Introduced in 2019, Massive X is the successor to the famous synth Massive.
It features a modernized look and more advanced capabilities. But how does it fare compared to behemoths like Serum or Vital?
This is what we are going to find out! In this guide, we are going to cover:
- Massive X’s general interface and workflow
- How to generate and process sounds
- Massive X’s modulation options
- 3 tips to get the most out of this synth
And hopefully by the end of this guide, you’ll know if Massive X is for you 😉
So strap in, and let’s dive into the world of Massive X.
Inject analog grit & haze into your music ⚡️
Our Analog Sample Pack is packed with 700+ weird and wonderful samples from synths like the: Roland Juno-6, Roland Jupiter 8, Teenage Engineering Pocket Operators, Korg Microkorg + more!
Table of contents
A Bit of Background on Massive X
If you’ve spent any time on electronic music production, you’ll know about Massive.
Introduced in 2007, Massive quickly became a cornerstone of music production. In particular, bass music emerged from Massive’s insane capabilities:
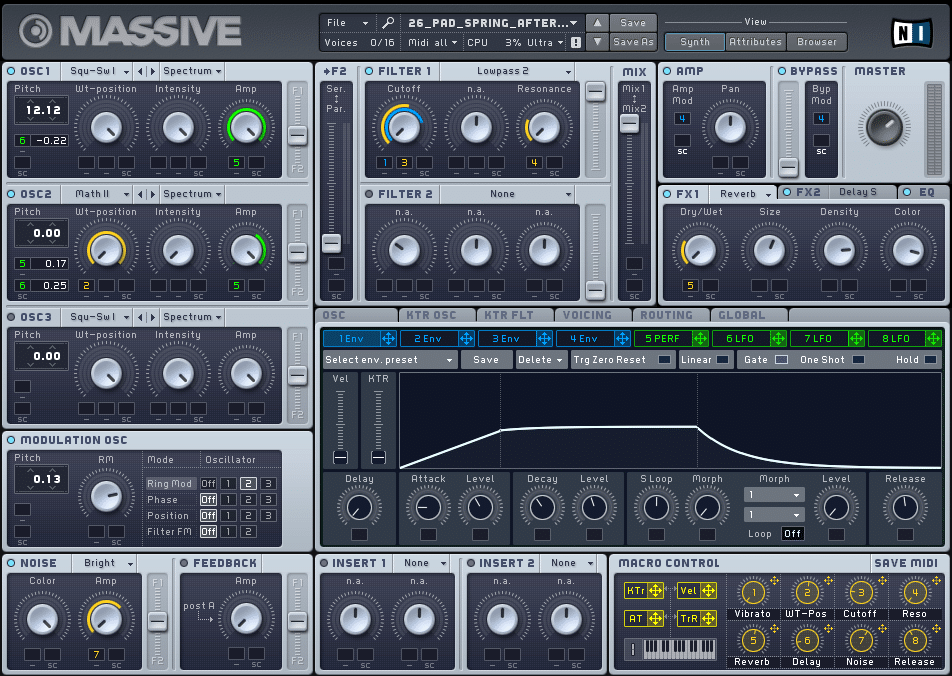
At the time, Massive distinguished itself with its amazing amount of features. You had crazy oscillators, smooth filters and clever modulation options. Furthermore, the synth was packed in a user-friendly interface.
However, competitors slowly appeared, rivaling it for the top soft synth on the market.
In particular, Serum and Vital have established themselves as serious contenders.
So Native Instruments got to work, and introduced Massive X in 2019. Massive X is described as the next-generation polyphonic wavetable synth. But was it worth the wait? Let’s find out 👇
Massive X Interface Overview
Right, let’s get into it. First things first, let’s look at Massive X’s layout:
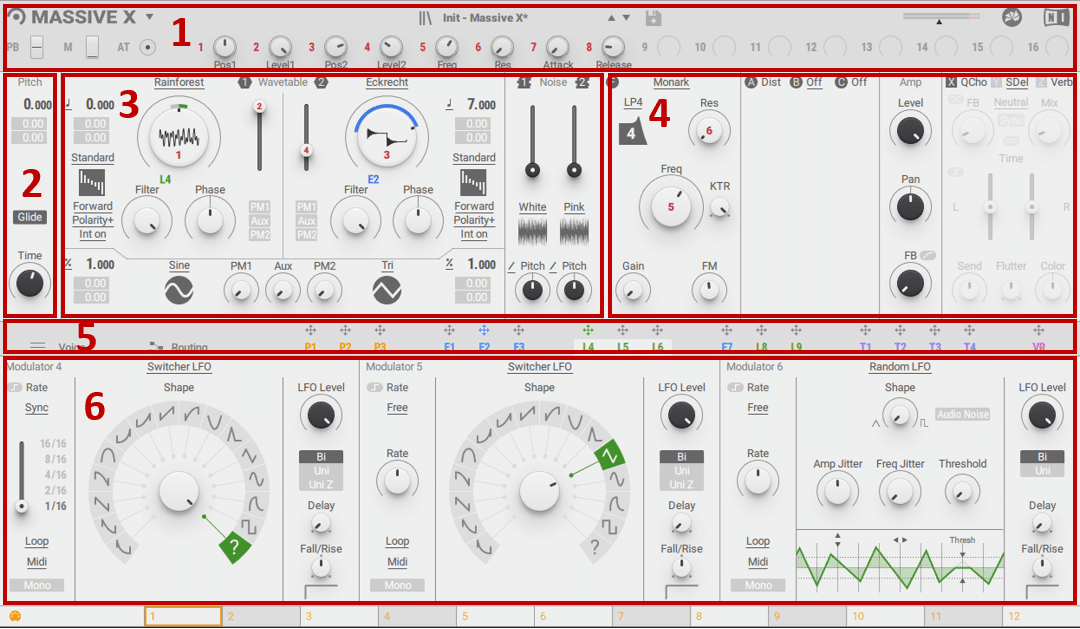
Massive X’s interface will be familiar to those having used Massive. In fact, if you’ve used any synth based on wavetable synthesis, you’ll quickly get the hang of Massive X.
Interface Breakdown
Let’s quickly cover each section, before diving into more detail. In order, we have:
- Header section. This is where you save and load presets. You also have 16 assignable macros, as well as MIDI controls such as Pitch Bend.
- Tuning section. This includes your overall pitch and glide controls.
- Oscillator section. This is where your sound is generated. At the heart of Massive X are 2 wavetable oscillators; more on those later 😉. You also have 2 Noise layers and 2 PM (Phase Modulation) oscillators for FM synthesis.
- Processing section. Once your sound is generated, it’s time to process it. In order, you have a filtering section, an FX section, an Amplification section, and a Stereo Effects section here. These effects include the classic Dimension Expander, Quad Chorus, and Stereo Expander.
- Navigation bar. Here, you decide what the Modulation Editor is going to display. It’s also from here that you will drag your modulation to any parameter you want. This is also where you access Voicing and advanced Routing options.
- Modulation Editor. Want to create some movement in your sound? This is where the magic happens. We’ll go over every option more in detail later. But in summary, you have access to
- 3 Custom Performer envelopes for pattern modulation
- 9 envelopes that can be switched between Modulation Envelope, Exciter Envelope, Switcher LFO, and Random LFO
- 4 Trackers for keyboard tracking modulation
If any of this sounds confusing to you, make sure to check out our guides on Wavetable Synthesis, ADSR envelopes, and LFO modulation 😉
Massive X Header Section
Let’s start off from the top. Massive X’s header section features 3 main parts.
On the left are the Pitch Bend, Modulation and Aftertouch controls:
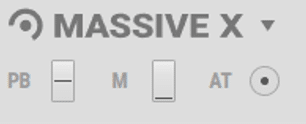
These can be linked to your MIDI keyboard (if it features a Pitch Bend wheel for example)
This is also where you access Massive X’s main menu. To the right, you then have 16 assignable Macros.
If you’re new to sound design, Macros are a common way to control several parameters at once.
Here’s a quick example. I’ve assigned Macro 1 to:
- The wavetable position of OSC 1 and OSC 2
- The cutoff frequency of a high-pass filter
- The amount of reverb

This means I can now control these 4 parameters with just one knob:
To assign a parameter to a macro, simply click the macro number, then the parameter.
Much like the original Massive, Massive X works with small boxes to assign modulation. However, you can also click directly on the parameter to assign a single parameter:

Massive X Oscillator Section
Right, let’s dive into the core of Massive X: the oscillators 😎
With Massive, you had 3 oscillators to play with. Surprisingly, Massive X has reduced the number to just 2 wavetable oscillators:
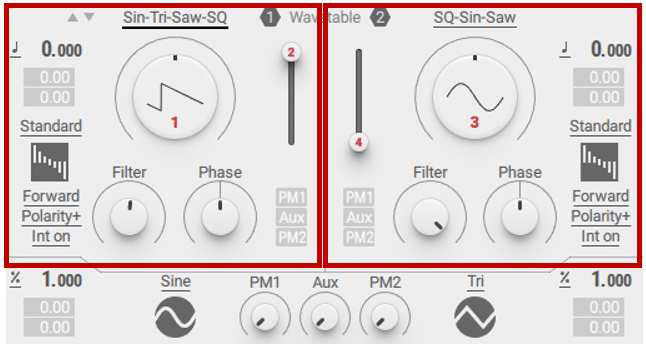
However, many will argue this is where Massive X’s strength lies. Some of these wavetables give out truly unique vibes.
After choosing a wavetable, you can easily morph between frames by turning the main knob.
You can adjust the level of each oscillator with the vertical slider.
A unique feature of Massive X is the Wavetable Mode. This determines how the wavetable is “read”:
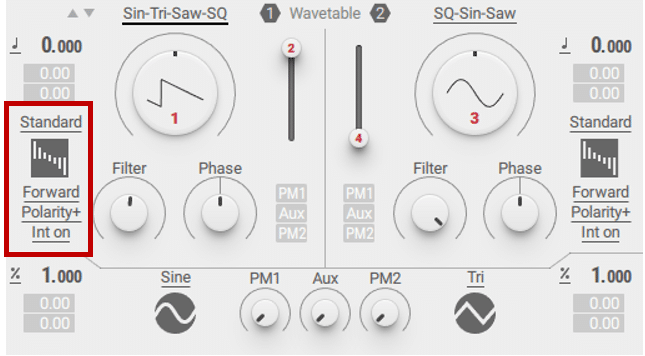
Switching between modes has a significant impact on the sound. Each mode also comes with 2 custom knobs that allow further manipulation. By default, the wavetable mode is set to “Standard” and comes with Filter and Phase controls.
However, selecting the “Gorilla” mode offers the knobs “Over” and “Bend”:
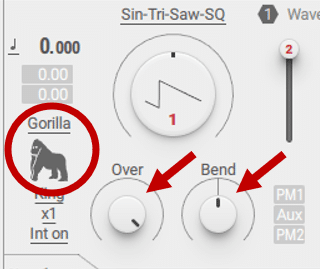
Let’s see how changing wavetable mode impacts the sound:
Each wavetable mode also has a set of custom settings underneath the icon.
Inject analog grit & haze into your music ⚡️
Our Analog Sample Pack is packed with 700+ weird and wonderful samples from synths like the: Roland Juno-6, Roland Jupiter 8, Teenage Engineering Pocket Operators, Korg Microkorg + more!
FM Synthesis in Massive X
Below the oscillators, you get 2 Phase Modulation oscillators (PM1 and PM2):

These allow you to access FM synthesis capabilities. If you’re new to the world of FM, check out our guide here 😉
There are 6 waveforms to choose from, and each PM oscillator can modulate either or both sound oscillators. To do so, simply select the PM and increase the amount:
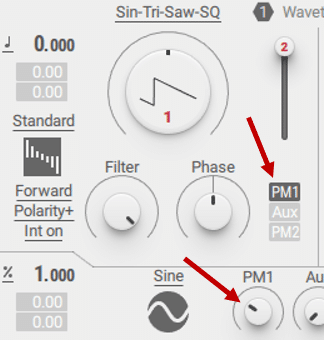
The “Aux” option lets you modulate from any other sound source within Massive X. You can explore this option more in detail in their manual.
Finally, there are 2 Noise layers that you can add. Each one comes with a huge amount of presets. You can add your own noise recordings here:
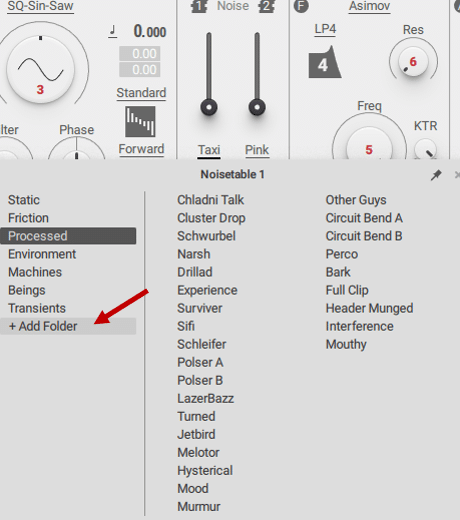
Noise layers are a great way to add a bit of grit and dirt to your sounds. I find they work especially well on pads:
Massive X Filter Section
Next, we move on to the filtering section.
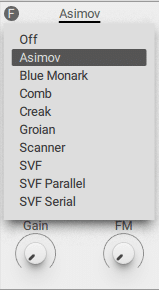
Massive X offers 9 different types of filters:
Each filter comes with a custom set of parameters:
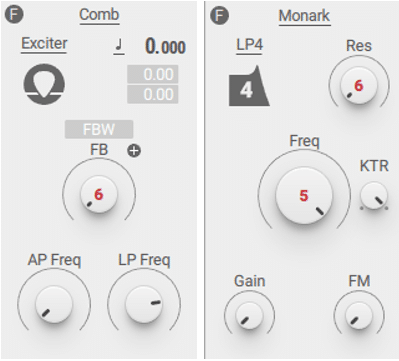
A common control here is the “KTR”, or key-tracking. Increasing the amount will make the filter follow the MIDI pitch. This enables each note to have roughly the same velocity, despite being in different octaves.
Without going into too much detail, here are the main characteristics of each filter:
- Asimov: a classic low-pass filter inspired by the 80s
- Blue Monark: multi-mode filter inspired by NI’s Monark synth
- Comb: creates a sort of flanging effect
- Creak: an experimental filter suitable for distorted sounds
- Groain: a multi-mode hybrid filter/flanger
- Scanner: a multi-mode filter inspired by classic analog synths
- SVF, SVF Parallel, and SVF Serial: these filters have the “cleanest” sound, making them suitable for precise sound shaping. You can set them up in parallel or in series.
As always, the best is to experiment and find what you like!
Massive X Effects Section
Massive X features two distinct types of effects: Insert and Stereo effects.
Insert effects are part of the voice structure itself. Think of them as an integral part of the sound.
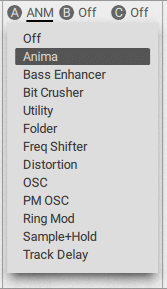
These effects cover things such as distortion, ring and phase modulation, and frequency shifting:
On the other hand, Stereo Effects are applied to the entire mix. These affect the sound at the end of the chain.
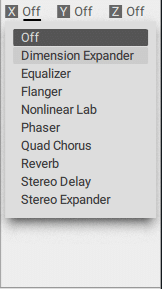
Stereo effects include classic effects such as EQ, Flanging, Reverb, Chorus, and more:
Massive X features 3 slots for Insert Effects (named A, B, and C) and 3 slots for Stereo Effects (X, Y, and Z). Let’s dive into all of this more in detail 👇
Insert Effects
By default, the first Insert Effect (labeled “A”) is located before any filtering:
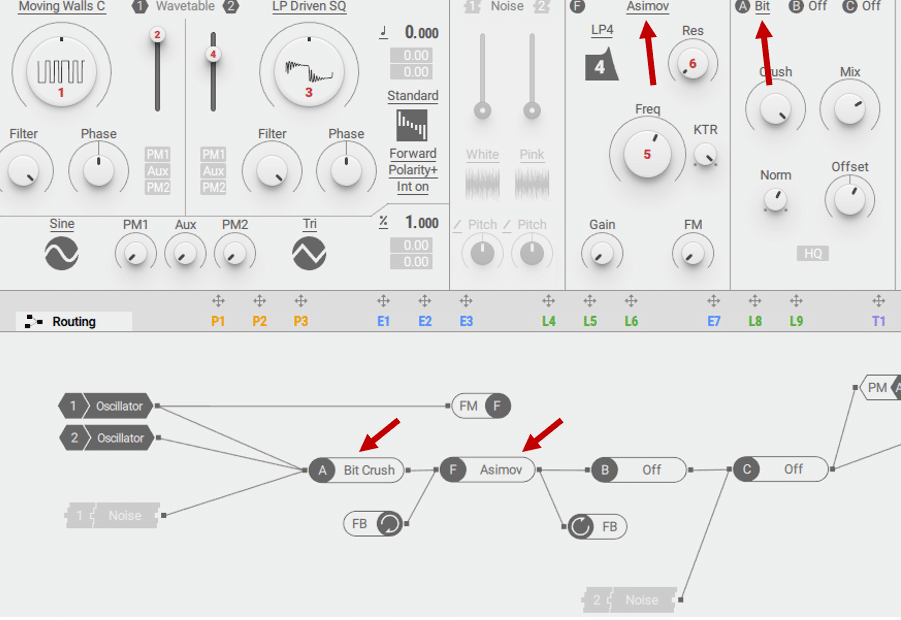
In this example, you can see that the Bit Crusher effect is applied before the Asimov filter.
Insert Effects B and C are applied post-filtering. Note that routing can be customized to suit your needs. Simply double-click on a line to erase it. You can then draw new connections.
Insert Effects cover a range of harmonic enhancement and distortion effects. Here are some of my favorites:
- Anima: creates some really cool harmonic resonances.
- Bit Crusher: a great tool to get that LoFi sound
- Frequency Shifter: perfect to create inharmonic risers and tension
- Sample + Hold: creates some weird, metallic distortion. Try setting the mode to “Fix” and playing with the note number.
Stereo Effects
As we touched on earlier, stereo effects are applied at the end of the chain.
By default, the 3 Stereo Effects are named X, Y, and Z. They are routed in series, one flowing into the next:

You can experiment with 2 other routing options. This will change how the effects interact with each other.
Some of the stereo effects include the following:
- Dimension Expander: a classic feature of the original Massive synth. Combines chorus and stereo enhancement.
- Nonlinear Lab: offers some interesting distortion results, especially when playing multiple notes
- Stereo delay: offers control of the delay time of the left and right channels.
One trick you can try is to load 3 different effects. Then, switch the routing to see how it affects the sound:
Inject analog grit & haze into your music ⚡️
Our Analog Sample Pack is packed with 700+ weird and wonderful samples from synths like the: Roland Juno-6, Roland Jupiter 8, Teenage Engineering Pocket Operators, Korg Microkorg + more!
Massive X Modulation Envelopes
Finally, let’s look at the Modulation section of Massive X:

Massive X can display 3 modulation envelopes at a time. In order, we have:
- 3 Performers (P1, P2 and P3). These are customizable sequencers that can create rhythmical movements.
- 9 Modulators (grouped by groups of 3). E1 is set by default to the Amp-Envelope (i.e. the ADSR of the master volume). Every other modulator can be re-assigned to any of 4 different modulators:
- Modulation Envelope
- Exciter Envelope
- Switcher LFO
- Random LFO
- 4 Trackers. These are modulations that will track the keyboard. For example, a filter could open up gradually the higher the note.
Let’s dive into all of these modulations more in detail.
Performers
Massive X features 3 different performer envelopes.
Essentially, these let you create complex patterns for your modulations:
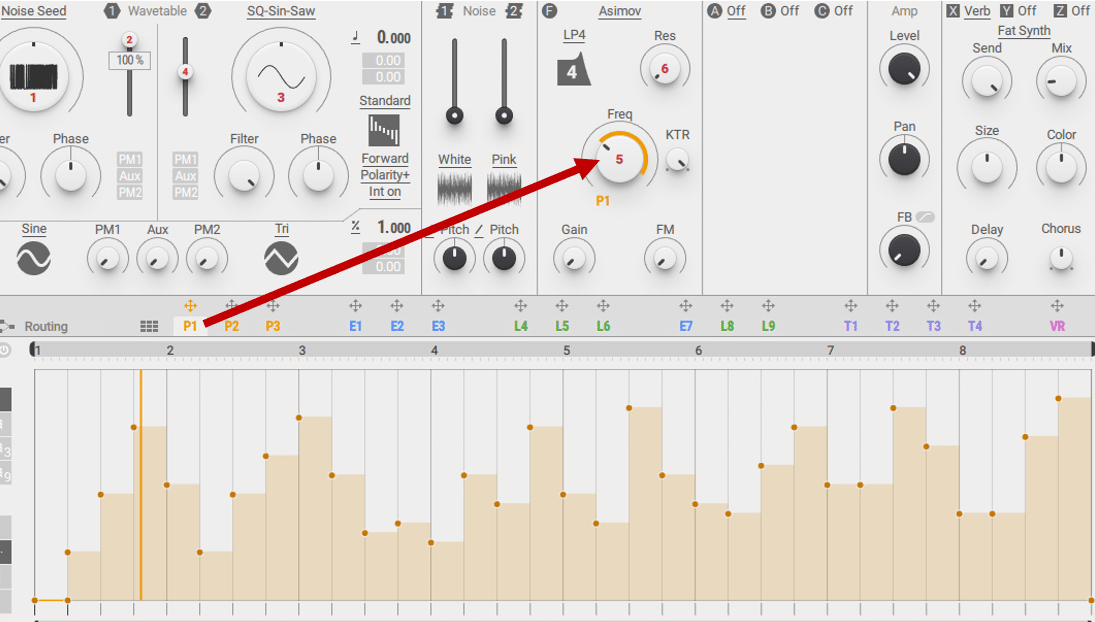
Here’s how it sounds:
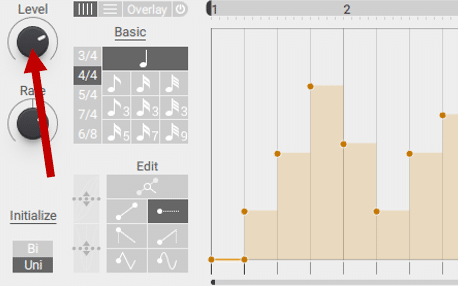
One handy trick here is to use the “Level” knob to control the amount.
This creates a smoother effect:
To create your own patterns, you have two main tools:
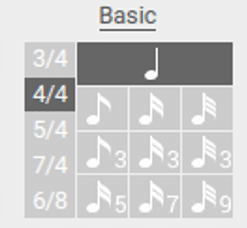
- Grid division. This is where you decide the rhythmic division of your grid:
- Painting tools. Here, you can choose from a number of shapes to draw on your grid:
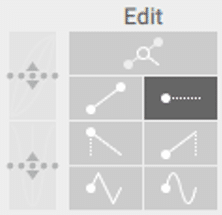
You can also decide to loop certain sections of your pattern. For this, use the horizontal slider:

Finally, changing the “Rate” will affect how fast the performer applies.
Pro-tip: LFOs in Massive X are not easily customizable. So you might find it easier to work with Performers instead 😉
Modulators
Modulators are the main way to modulate sound in Massive X. By default, Modulator 1 is set to the Amp Envelope. This means it controls the ADSR of your sound:

However, this doesn’t mean it cannot be applied to other parameters too!
Then, you have 8 more modulators that can be used. Each one can be assigned to one of the 4 following types: Modulation Envelope, Exciter Envelope, Switcher LFO, and Random LFO.
Modulation Envelope
A modulation envelope features the standard Attack, Decay, Sustain, and Release settings. However, Massive X offers a few more bells and whistles.
For example, you get 2 “Hold” knobs. These let you extend the time between the Attack / Decay and the Sustain / Release:
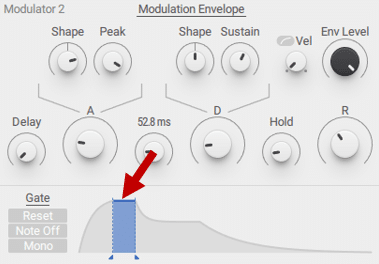
If any of this is confusing to you, make sure to check out our guide on ADSR Envelopes 😉
You also get an Envelope Level knob. This defines the overall level of the envelope.
Exciter Envelope
The Exciter Envelope is a very fast ADSR Envelope. It is particularly suited to create percussive sound:
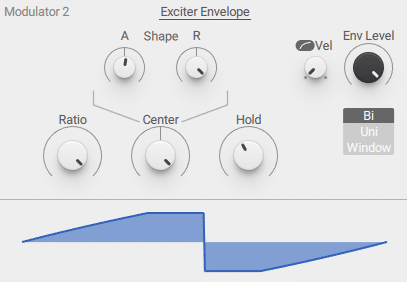
The best here is to experiment on different parameters and see what you get.
Switcher LFO
Surprisingly, Massive X doesn’t feature customizable LFOs. Instead, you get a choice of 16 different LFO shapes:
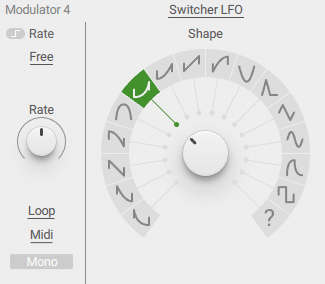
If you’re not sure what an LFO is, check out our full guide over here 👈
You can choose to sync the LFO rate to your project or set it in ms. Pro-tip: try increasing the rate to create some tension! You can do this with automation, or with another modulation:
Random LFO
Finally, the Random LFO lets you inject randomness into your modulations:
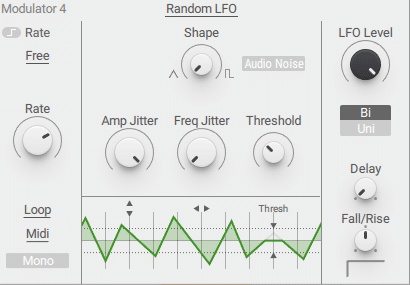
Increase the Amp Jitter knob to create sudden jumps in values. If you want to learn more, check out the Massive X manual.
3 Tips to Get the Most Out of Massive X
Finally, let’s wrap up this guide with 3 useful tips for Massive X.
Use Routing to Sculpt Your Sounds
I haven’t touched on Routing too much in this guide yet. However, this is where a lot of Massive X’s power comes from:

Here, you can decide precisely how each component interacts with each other. Ultimately, this is how you gain control over your sounds.
For example, you can use the routing tab to apply a specific filter over a noise layer:
In this example, the Asimov filter (F) applies to the 2 oscillators. The Noise 1 layer however bypasses the filter and is routed directly the the first Stereo Effect (X), an EQ. This EQ only applies to the noise layer. This is because my main sound feeds directly into the second Stereo effect (Y):

Routing can also be used to apply different effects to different oscillators.
Expand Massive X to 5 Oscillators
As mentioned, Massive X only features 2 main oscillators.
However, each Insert Effect can be used as an additional oscillator:

Practically, this means you can extend Massive X to 5 oscillators. This can come in handy if you want to layer in a sub under your main sound for example.
Harmonize with Advanced Unison
Another aspect of Massive X we haven’t talked about is its Unison features:
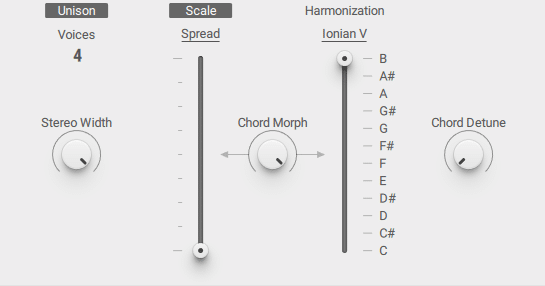
Unison lets you add voices to create a chorus-like effect. Slightly detuning the voices with the “Spread” slider is how you achieve the classic Reese bass.
However, Massive X goes one step further and provides a “Scale” mode. This lets you add voices that create chords over your main note.
There are some really wacky scales to choose from, so go nuts!
Inject analog grit & haze into your music ⚡️
Our Analog Sample Pack is packed with 700+ weird and wonderful samples from synths like the: Roland Juno-6, Roland Jupiter 8, Teenage Engineering Pocket Operators, Korg Microkorg + more!
So… Is It Worth the Upgrade? 🤔
That’s a wrap for this comprehensive guide on Massive X! I know I haven’t covered every single knob and feature of this synth. But hopefully, this has given you a good overview of how Massive X operates.
I would recommend downloading the free trial version of Massive X, and finding out if it works for you.
If you have used its predecessor Massive in the past, then you’ll master Massive X quickly.
Personally, I have found some interface choices a bit perplexing. For example, the lack of any visual representation is a bit annoying. Especially when playing with LFOs, it’s handy to actually see the parameters moving. But in Massive X, everything is more or less static.
Its architecture is also quite inflexible. For example, there is no way to quickly switch the order of effects without going to the Routing tab.
Nevertheless, Massive X remains an extremely powerful synth. Whether it is the synth for you will depend on personal taste 😉
Did I miss out on anything important? Any questions? Let me know over at [email protected]

