


Bass sounds are one the most important pillars of electronic music.
In fact, entire genres have been defined by certain bass sounds.
And the number of sounds out there is literally infinite. But there are a few ones that have stood the test of time.
In this article, I’ve gathered some of the most popular bass sounds in modern electronic music. And together, we are going to learn how to make them!
I will be using Vital for all the sounds – so make sure to download it so you can follow along (it’s free!).
So let’s dive in and drop some bass! 👇
Table of contents
A few things before we start
Before we dive into some sound designing, I’d like to highlight a few things:
- Get as much done in the synth as possible. Minimizing the post-processing will lighten up your CPU load and simplify your workflow. Also, make sure to download the Glorkglunk and Tam LeTeet wavetable packs from the Vital website (it’s free!).
- Don’t stick to just one genre when sound designing. For example, try a deep house bass in a drum and bass track. Or a dubstep bass in a techno track. That’s how you will stand out and create your own sound.
- Always set Phase Randomization to zero. This will ensure each bass note is exactly the same (which is usually the goal with bass sounds):
- When working with bass, keep in mind mono-compatibility. If you need a refresher on all things mono and phasing issues, check out our latest blog post. In short, make sure to always mono anything below 120 Hz.
- Think outside the box! If your bass sound suddenly works well as a lead, go for it. Don’t limit yourself.
- Bass compression is key to getting a full, consistent sound in your mix. We cover this topic in detail in this guide here 🔥
Now, let’s get into the first sound!
1. The Plucky House Bass
Let’s start with the almighty Pluck Bass sound. Made popular by the Korg M1, it’s the sound you hear in the timeless tune Show Me Love:
It comes in at 0:13 – and it doesn’t get much funkier than that.
The great thing about this sound is that it acts as a bass and a lead at the same time.
Let’s dive into Vital and see how to re-create it.
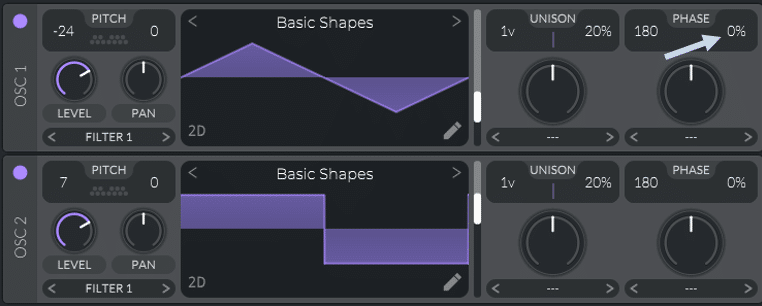
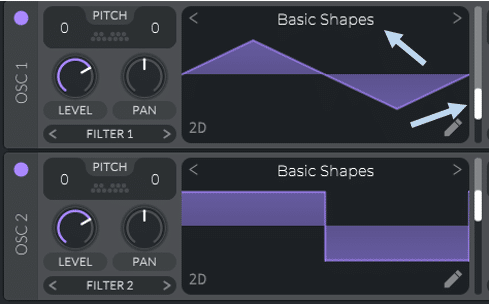
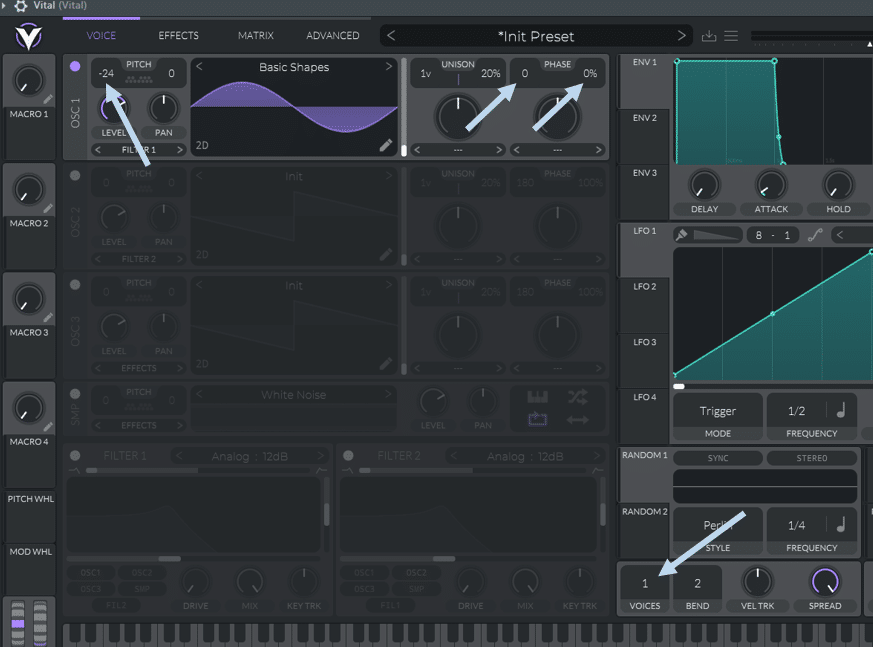
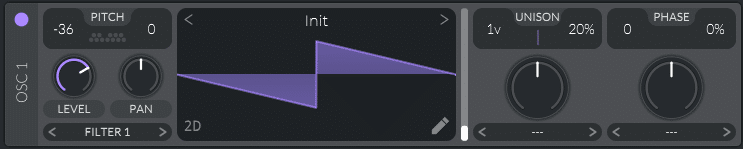
Let’s open up 2 oscillators, set the first to a triangle wave and the second to a square wave. To do this, simply select Basic shapes, and scroll through the waveforms with the slider:
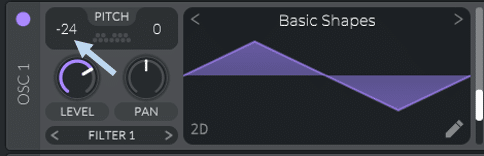
Next, we’re going to pitch down OSC 1 down 2 octaves. You can do this easily by holding Shift and scrolling down:
For OSC 2, we are going to pitch it up to 7 semitones. This will give us a perfect fifth in relation to OSC 1, creating that nice bass-lead relationship.
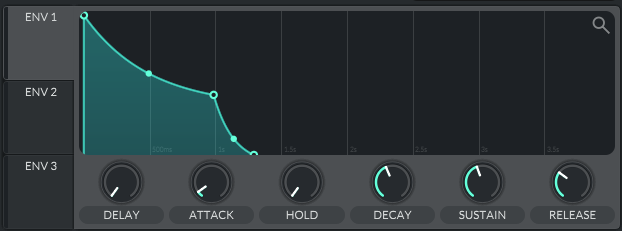
Next, let’s start shaping our sound with some ADSR. If you need a refresher on that and basic sound design, we have you covered.
ENV 1 is assigned by default to the amplitude of all oscillators. Let’s draw in something something “plucky”:
So far this is what we’ve got:
Make sure that “Voices” is set to 1 and on the bottom right-hand side of Vital. This will avoid any notes overlapping each other.
Filtering
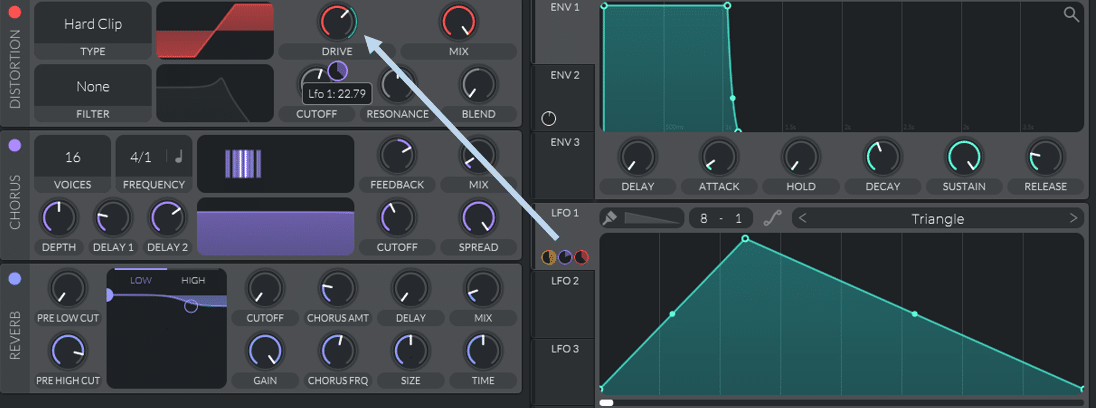
Next, let’s apply some filtering. We are going to assign ENV 1 to the cutoff of FILTER 1. To do this simply drag ENV 1 over to the cutoff slider of FILTER 1:
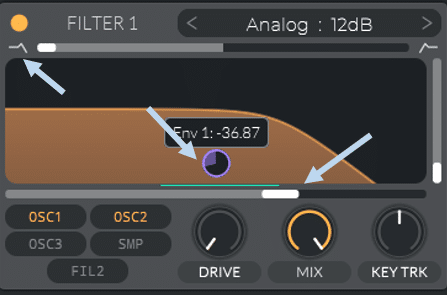
Set your filter to a low-pass, and adjust the cutoff point and amount of filtering to taste.
Finally, let’s add a layer of noise to add some character to the sound. Enable the sampler (SMP) and select a noise. Then, control the volume through a short envelope. You could also send the SMP to FILTER 2 for more control:

Some delay and reverb, and it’s done! Let’s have a listen:
Not bad for something done 100% inside a free synth right?
2. The Reese Bass
The Reese bass is a deep, rolling sound mostly popularized in drum and bass. However, it can also be used in other genres such as synth-wave and modern pop.
Believe it or not, we are going to achieve this sound with just one oscillator!
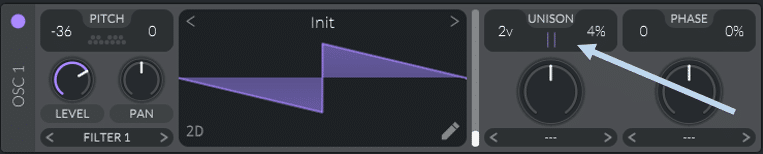
Load up Vital and choose a sawtooth wave from Basic Shapes. The key of the Reese bass lies in the Unison Voices:
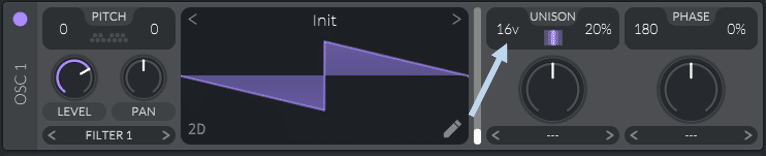
In Vital, you can have up to 16 voices per oscillator. Let’s listen to the difference between 1 voice and 16 voices:
Adding detuned voices is what gives the sound its width and thickness. You can control how much the voices are detuned through the Unison percentage knob.
For this example, I am choosing 8 voices, with 22% detuning.
Next, let’s crank up the distortion. Everything will be low-passed in the end so go crazy:
Finally, let’s apply a low-pass filter through the EQ:
Let’s see what we have:
Not bad!
I know I said we would only use one oscillator. But if you want more harmonic content, experiment with adding a second layer:

Finally, let’s split the sub and the rest of the bass. This way I can merge the sub to mono to avoid phase cancellation.
To do this, you can either duplicate your sound into 2 mixer channels. Or you can use custom plugins such as FL Studio’s Frequency Splitter:
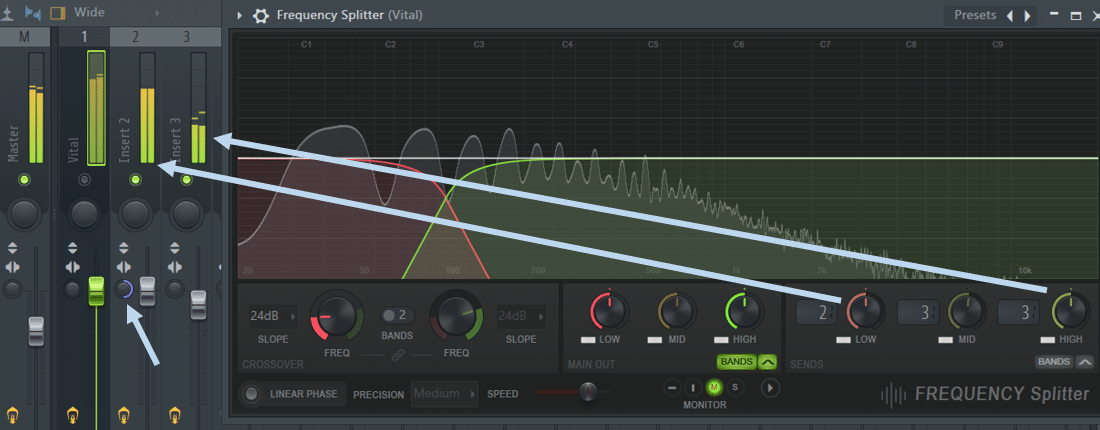
Here I’ve split the sub from the rest. I then sent the sub to Insert 2, and the rest to Insert 3. Finally, I merged the entire sub to mono.
This won’t change your sound per se, but it will make it translate better over multiple sound systems. So it’s a good habit to get into!
3. The FM Dubstep Bass
This is possibly one of the most recognizable bass sounds of the last decade. Made popular by producers such as Skrillex and Zomboy, the growl-FM-dubstep bass sound defined an entire era of EDM.
This is quite a complex one, so hang on!
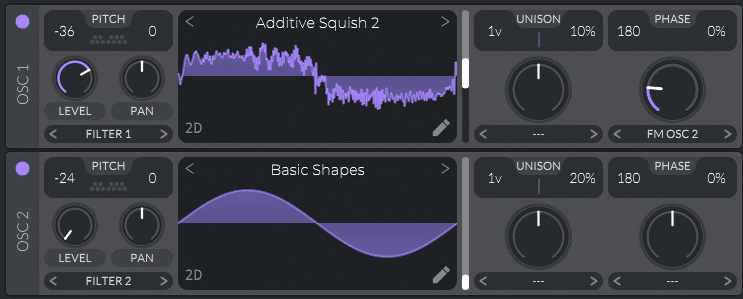
First, load up an Addictive Squish 2 wavetable into OSC 1 and a Sin into OSC 2. Drop OSC 1 by 3 octaves and OSC 2 by 2 octaves. Set Phase Randomization to 0% for both oscillators. Set OSC 2 to frequency modulate OSC 1, and cut the volume of OSC 2:
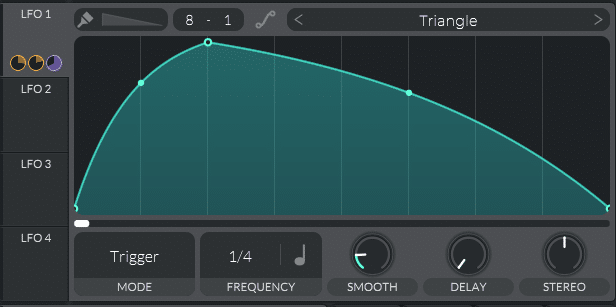
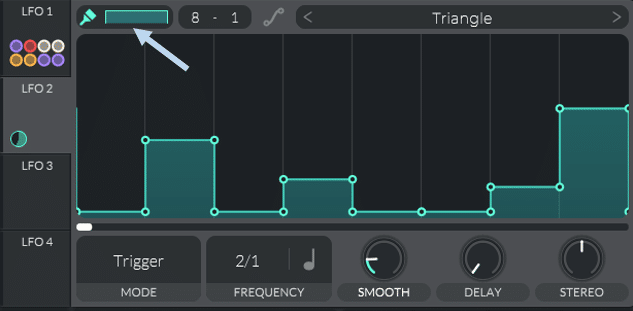
Next, draw in the following shape in LFO 1, set to 1/4 note:
Set a high-pass filter on FILTER 1, and send LFO 1 to the cutoff and the resonance. Here are the settings I used:
- Cutoff at -25 semitones, LFO amount at 35
- Resonance at 55%, LFO amount at 0.2
- Drive at 5.6 dB
Send LFO 1 to also automate the volume of OSC 1. At this stage you should have this sound:
Next, enable OSC 3 and set it to a square wave. Drop it by 3 octaves, send LFO 1 to the level, and route it to FILTER 2 with the following settings:
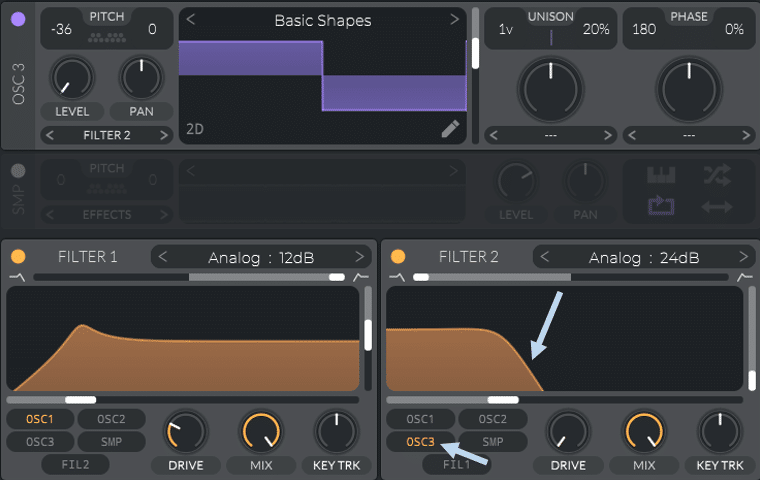
Don’t automate the filter here because we want a clean sub. Finally, send LFO 1 to modulate the amount of frequency modulation:
Still with me? Awesome!
Adding Some FX
Next, let’s move on to the FX section. This section is really up to taste, but the goal is to make the sound as aggressive as possible. Chorus, Distortion, and Compression are good places to start.
Here is a snapshot of the FX chain I used:
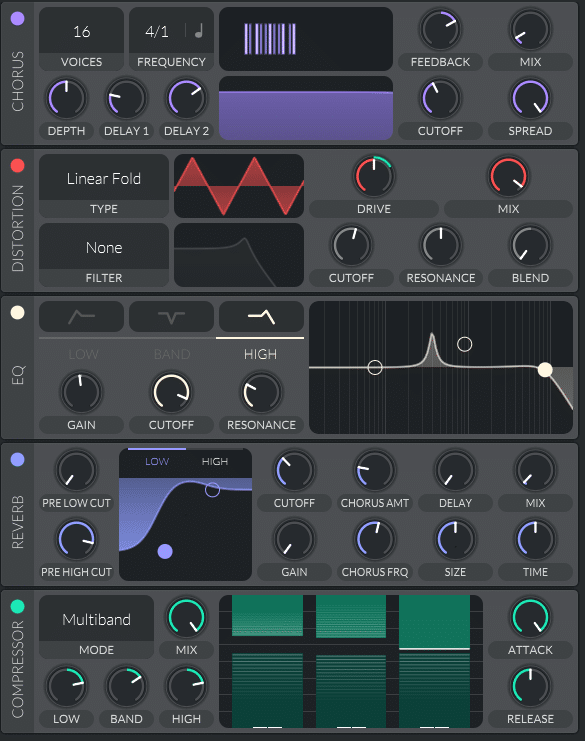
And this is the sound:
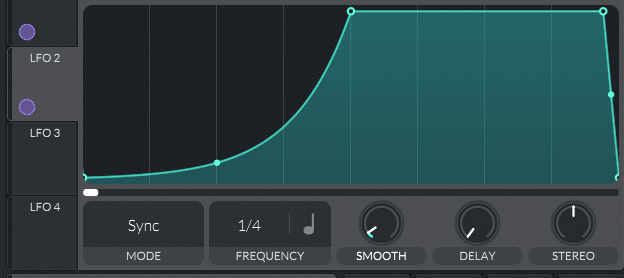
Then set LFO 2 to 2/1 notes, and draw in a step pattern (select the brush, and enable “Step”). This is the pattern I drew:
And this is how it sounds in context with a basic drum pattern:
And there you have it! I’ll stop here for now because this isn’t a dubstep tutorial (we actually just did one). Let’s move on to the next bass sound!
4. The 808 Trap Bass
808s are one of the most popular bass sounds today. Most hip hop and trap songs today will have that trademark sound:
An 808 is characterized by its thumpy attack and slow, pitched-down decay. Let’s see how to make one!
First, set your “Voices” to 1 and select a sine wave for OSC 1. Drop it down 2 octaves by holding SHIFT and dragging down. Then set your phase to zero:
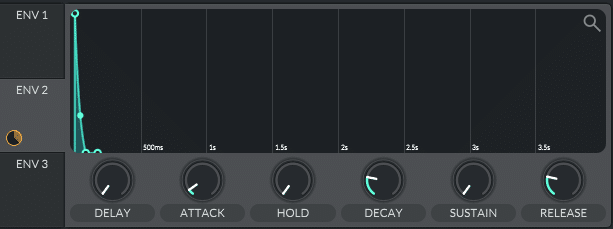
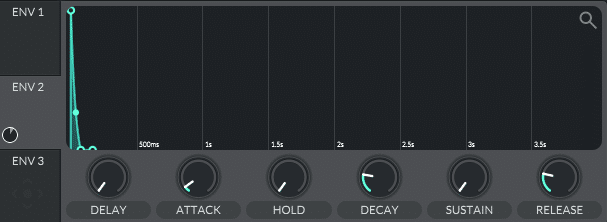
Next, let’s shape our 808. Let’s start with ENV 1 which controls the level of all oscillators. I’m going to draw in the following shape:
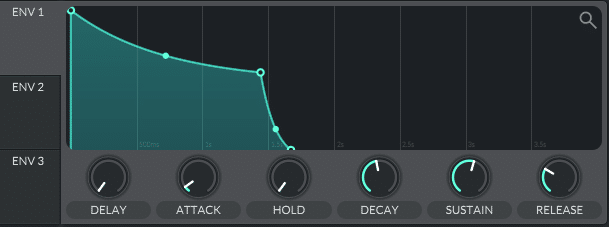
This will give me a nice sustained bass. Next, draw the following shape in ENV 2:
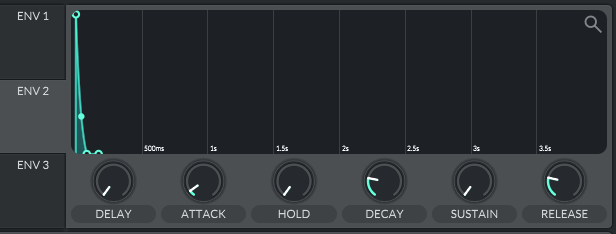
We are going to use this envelope to automate the pitch of our oscillator. This will give it a nice punchy attack.
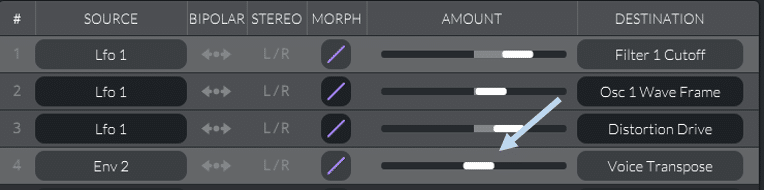
In the Matrix tab, left-click under Source and select ENV 2. Under Destination, select Global, and then Voice Transpose:
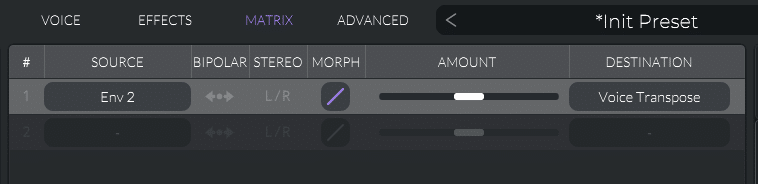
We can now control the amount of “thumpiness” (sorry I really don’t have a better word for it). I’ll set the amount to around 19.00, and this is what it sounds like:
Nice! You can now go back to ENV 1 and shape the sound to your liking. You can choose a short sustain if you want something closer to a kick. Or you can keep a lot of sustain for a more modern-sounding 808.
Additional Tweaking
Additionally, a common feature of 808s is the ability to glide between notes. To do this, enable “Legato”, and choose the amount of glide you want:
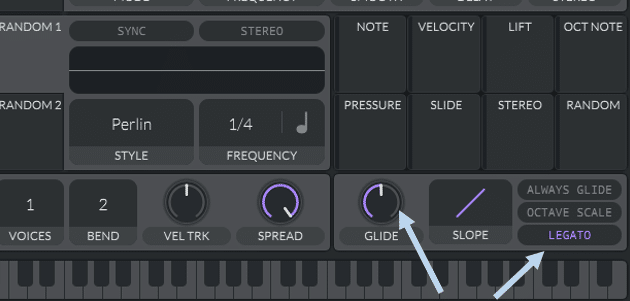
By overlapping notes, you can choose when the glide occurs.
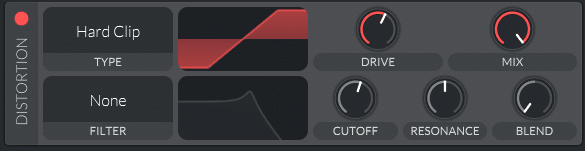
Last step: some distortion! You can do this within Vital or with any stock or third-party plugin.
This section is really up to taste and depends on the style you’re going for.
I’ve selected the Soft Clip distortion in Vital and set the Drive to about 17dB. Here is what it sounds like in context:
And that’s it! You could also use parallel processing to dial in the precise amount of distortion you want.
Want to dive deeper into 808s? Check out our full guide here!
5. The Techno Rumble Bass
The techno rumble bass is one of the most well-known techno bass sounds. Popular with producers such as Charlotte de Witte and Amelie Lens, it’s an almost atonal sound. But it makes for some of the hardest drops.
For reference, check the drop at 3:34 here:
Doesn’t get much heavier than that, does it? Let’s see how to make a rumble bass!
This section will be a bit different in that it isn’t strictly about sound design.
Essentially, a rumble bass is a kick that has been reverbed out like crazy. You low-pass it and sidechain to your main kick, and you’ve got yourself a rumble!
Let’s give it a try. Here is my basic kick pattern:
I will duplicate this pattern and send it to two separate mixer tracks. One will be my dry kick, one will be my rumble. Right now both channels will sound identical.
Let’s start processing our parallel kick to get a rumble. I am using Fabfilter Pro-R with the following settings:
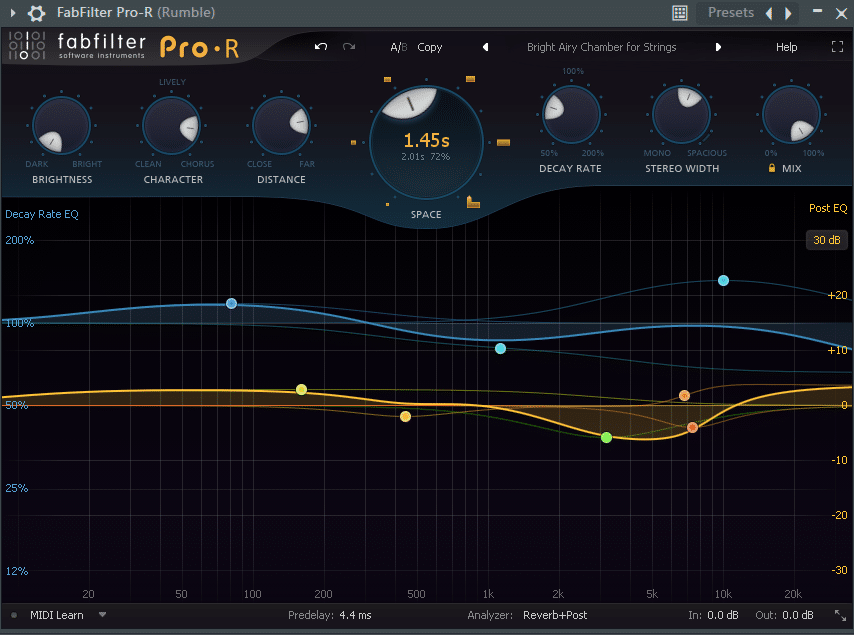
And this is the sound it gives me. Notice that my Mix setting is turned up to 100%:
Now let’s merge it to mono and apply a low-pass filter. Finally, sidechain it to your main kick to get a pumping effect. You can do this by drawing in some volume automation or using a plugin such as LFO Tool.
In this case, I decided to do it manually:
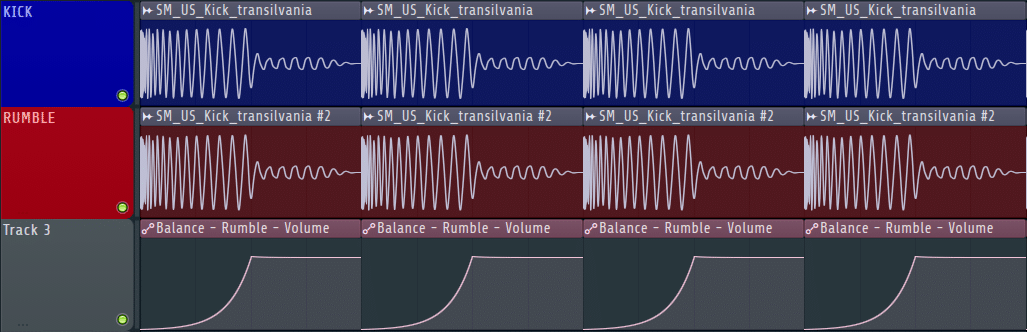
And this is what it sounds like:
Pretty easy right?
You could also add compression, saturation, and other levels of reverb to thicken the rumble.
6. The Acid Bass
Next, let’s dive into the world of acid basslines. This is a sound that I absolutely love because you can use into in so many different genres.
For this example, I’m going to use the rumble bass that we just designed as a foundation.
Open up Vital, and select a sawtooth wave:
I’ve set my Phase to zero, but you could adjust it slightly to introduce some variation.
Note: there are a ton of free wavetables that you can download from the Internet. It’s worth spending a bit of time researching to find the ones that fit your genre!
Next, let’s sidechain our signal to make it pump along with the kick. If you need a refresher on all things sidechaining, make sure to check out our latest guide!
In this example, I’ve used a ghost kick to trigger the sidechaining:

This is the bassline I’ve written with just our sawtooth wave:
Next, let’s make the magic happen with some filtering!
Filtering
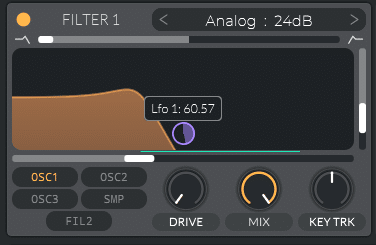
In ENV 2, draw in a low-sustain curve like such:
Next, enable Filter 1, and assign ENV 2 to the cutoff of the filter. Choose the 24dB low-pass filter.
You want to make sure that the filter is opening upward (i.e. toward the higher frequencies). Add some resonance and some drive:

This is what it sounds like:
Not bad for a simple sawtooth and some filtering!
One thing that is quite common is to automate the cutoff over time. The idea is that your acid bassline slowly opens up as the track progresses.
This is what it would sound like:
Finally, let’s add some Distortion, Reverb, and Delay. I am doing everything within Vital with the following settings:
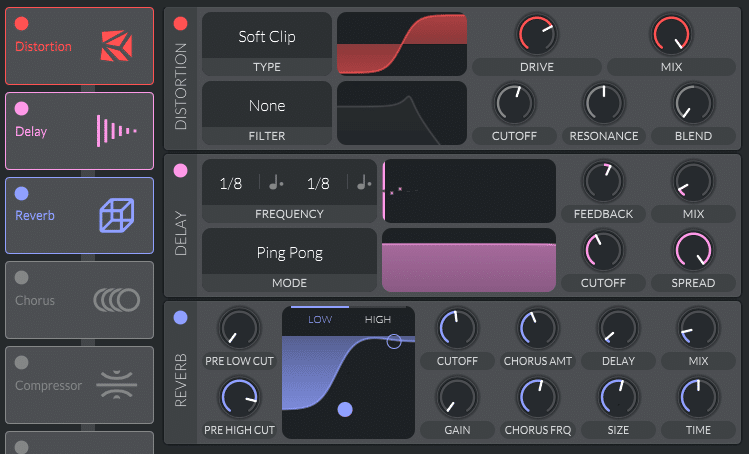
Final result:
Within styles such as progressive house and techno, try to automate settings over time. This will allow you to keep your track interesting even though the melody doesn’t change much.
For example, you could increase:
- the cutoff of your filter
- the amount of reverb.
- the drive of your distortion
- the resonance of your filter
7. The Jump Up Bass
Jump Up has exploded in popularity in the 2010s through artists like Macky Gee. The style is instantly recognizable through one of its trademark sounds:
Impossible to not bounce when the drop comes in right?! Let’s re-create that sound.
The selection of the wavetable is key here. If you have the free version of Vital, the number of wavetables available is quite limited. So it’s worth spending some time online downloading some free ones.
For OSC 1, I’ve chosen “Bad Moment” from the Tam LeTeet pack (available here). For OSC 2, I’ve gone with “Additive Squish 2” from the Glorkglunk pack (also available here).
The key here lies in the fifth. Basically, our synth will be playing 2 different notes at an interval of a perfect fifth (7 semitones). First set OSC 2 up by two octaves:
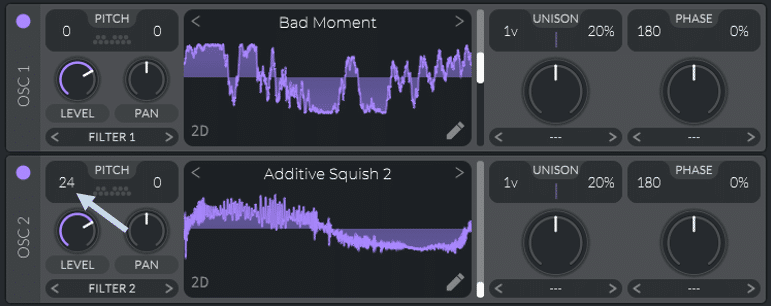
Next, pitch it up another 7 semitones. OSC 2 should now be 31 semitones above OSC 1.
Next, let’s go to LFO 1, set it to Envelope mode, 1/4 note, and draw the following shape:
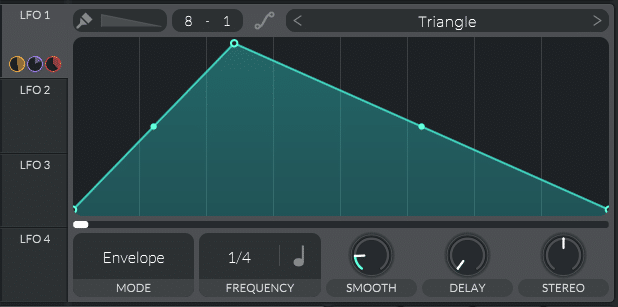
Drag LFO 1 to the cutoff of filter 1 in low-pass mode. Make sure your filter opens up over a large range of frequencies:
Make sure that only OSC 1 is being sent to Filter 1.
You can also apply LFO 1 to the wavetable position of OSC 1. This will give some extra movement in your bass.
So far this is what you should have:
Next, let’s move to the FX section.
Adding Some FX
Apply some generous distortion. I’ve gone with the Hard Clip type set at 9dB. Then, drag LFO 1 to the drive of your distortion. This will make your bass distort even more on each note:
You can also add some light Chorus and Reverb to add some width and depth. Just don’t overdo them or your bass will sound muddy.
At this stage we are getting pretty close to the final result:
I like to also add some Voice Transpose to give the sound a bit more attack.
To do this, go into Matrix, and select Env 2 under Source and Global > Voice Transpose under Destination.
Then draw in a short envelope in ENV 2:
Now adjust the amount to taste. For this sound I find that being between 5% and 10% is enough:
And you’ve got yourself a Jump Up bass sound!
If you want even more grit, add some noise to the sampler. For the best result, make sure to route the sampler to Filter 1. Drag also LFO 1 to the level:
Here’s my final result:
Nice!
8. The Huge Neuro Bass
Neurofunk has some of the darkest bass sounds you’ll find in electronic music. Neuro basses are especially dark and gritty – let’s see how to make one!
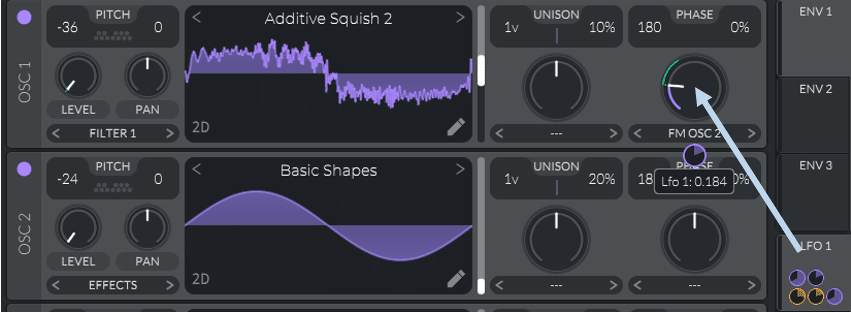
First load up a sine wave in OSC 1 and a sawtooth in OSC 2. However, we are simply going to use OSC 2 to modulate OSC 1. So turn the level to zero, and select FM OSC 2 under OSC 1’s Distortion type:
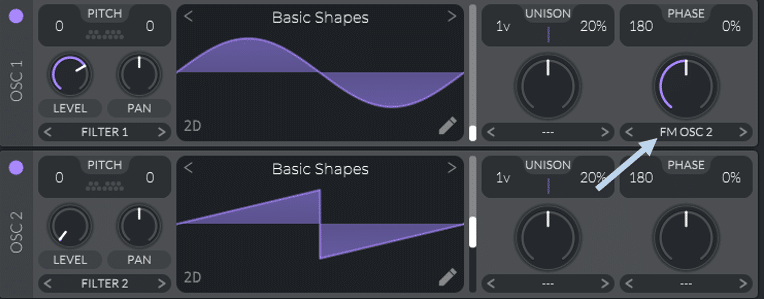
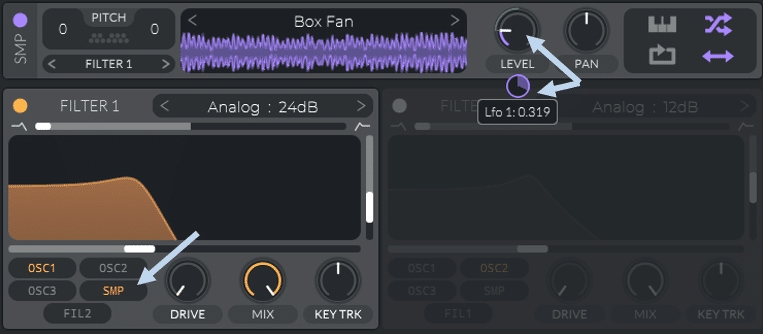
For OSC 3, select a sine wave. This will be our sub frequency. Finally, enable the sampler, but turn the level all the way down. We are going to automate it later.
Now for some filtering!
Under Filter 1, select Dirty 24dB. Then, draw the following shape in LFO 1, with the following tempo settings:
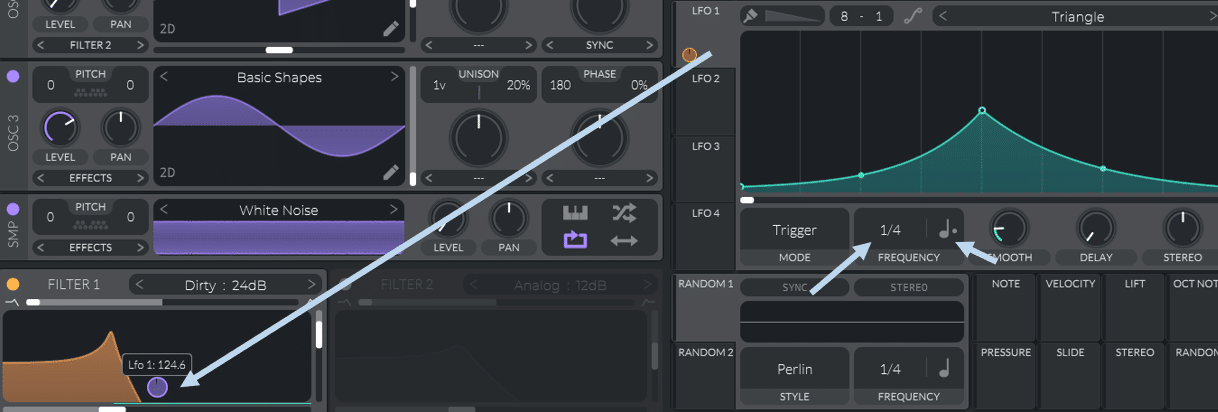
So far this is what you should have:
Not there yet, so let’s add some effects. First up, some distortion. I’ve set mine to Soft Clip with 15dB of drive.
The sound might get a bit muddy, so turn down the level of OSC 1 and assign LFO 1 to it. Next, do the same with the level of the white noise. This is what you should have now:
We are getting there! You can adjust the amount of LFO and the filter cutoff point for different results.
Next, add some Chorus with the following settings:
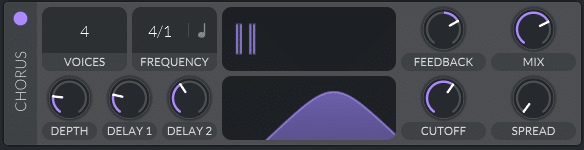
Experiment with the depth and cutoff points to find something you like.
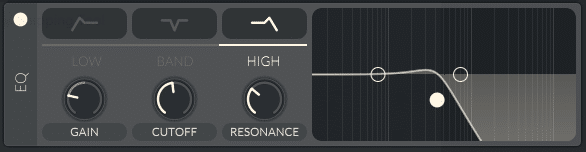
Finally, add some Compression and EQ:

And this is what we have:
And to top it off, add some OTT and a bit of reverb. Now you can automate the Sync of OSC 2 in step sequence to create some cool variations:
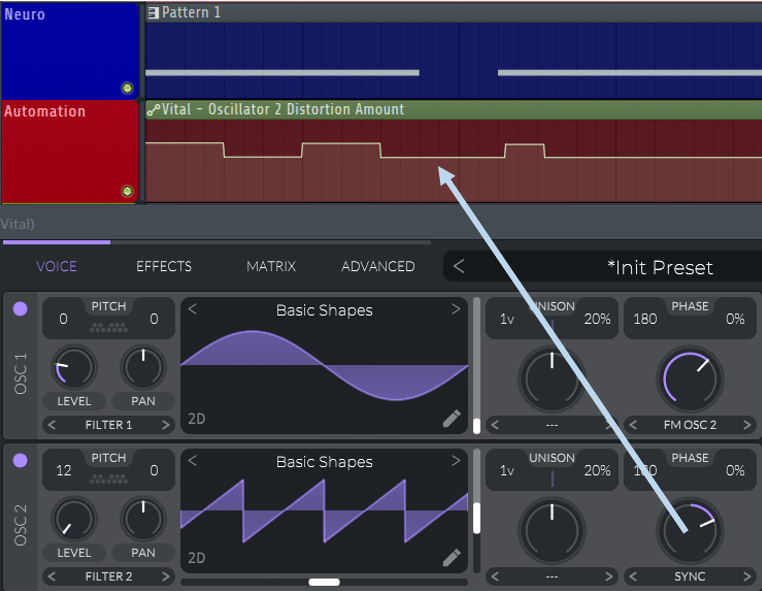
With this simple automation and just playing one note, this is the result:
Pretty nasty!
9. The Stabby Synthwave Bass
Finally, for our last bass sound let’s explore the world of synthwave.
If you’re new to synthwave, you’re in for a treat:
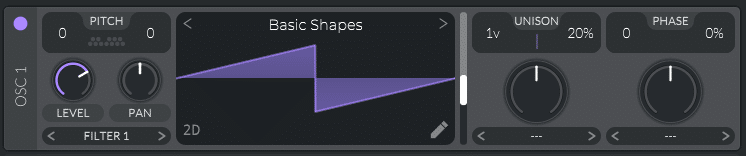
First, load up Vital and leave OSC 1 to its default wavetable. Drop it down 3 octaves and set the phase to 0:
Next, draw a “plucky” shape for ENV 2 and assign it to the cutoff of filter 1:
This is what you should have:
Next, set LFO 1 to a sine wave. Set the frequency to “Keytrack” and drop it 2 octaves. Turn down “Smooth” to zero, then drag LFO 1 to the phase position of OSC 1. This will give our bass sound a metallic feeling:
For some extra width, let’s add one voice to OSC 1 and detune it ever so slightly:
Finally, for the full synth-wave experience, let’s add some sidechaining.
We can actually also do this is Vital. In LFO 2, set Mode to Sync and Tempo to 1/4 Note. Then draw in a shape such as this one:
Then set the Level of OSC 1 to zero, then assign LFO 2 to it and turn it to 100%. This should be the result:
Adjust the curve based on the length of your kick and snare. And that’s it! If you want to learn how to make synthwave in 7 easy steps, check out our full guide over here 🔥
Last Words
I hope you found this guide useful! Remember to always experiment with different settings to get interesting results. And don’t be scared to apply principles from other genres to your own!
Got any questions? Feel free to reach out to me at [email protected].
