


Distortion can be a game-changer for producers.
It’s an effect that can range from the subtle warmth on your mix to the extreme crunch on your leads and basses.
Yet most producers get lost when it comes to the different types of distortion, when they should use them and how much to dial in.
In fact, too many producers wreck their mixes by using it in the wrong way.
So in this guide, we’ll give you the rundown on all things saturation and distortion. We’ll get into:
- Where distortion originated and why it’s important
- The different types of common (and uncommon) distortion
- How you can practically use it when producing
Let’s go! 👇
Table of contents
Distortion: What Is It? 🤔
This term ‘distortion’ tends to get thrown around easily, without people actually knowing what it means.
Essentially, distortion is a form of audio processing that alters the waveform by increasing the gain into a device, like an amp, circuit or software algorithm.

Historically, it was used on instruments like electric guitars, but in modern times it can be used on anything to achieve a certain effect.
Normally it sounds loud, crunchy, obscure, bright and full of character. But it can be much more than this narrow definition.
Distortion or Saturation?
These two terms are used interchangeably, but they usually have different contexts.
Distortion refers to creatively altering a sound in drastic ways
On the other hand, saturation implies subtle enhancement of a sound for warmth and thickness.
Throughout this guide, I’ll use the terms in the above manner.
Why Distortion?
Now you probably want to already jump in and start figuring out how to use distortion.
But before we look at how we need to look at why.
Why does distortion sound so damn good?
To answer this, let’s take a trip back to the 50s. Back then, distinctive effect started getting used in music on electric guitars.

The pedals and effects back then were rudimentary and were caused by driving hardware components to the point of ‘breaking’ (namely a preamp).
Artists continued to experiment until it sounded good enough to use in most recordings. Thus, ‘fuzz’ distortion was born.
Since then, many artists and bands like Pink Floyd, Jimi Hendrix and The Beatles adopted this technique into their own guitar sounds.
Overdrive. Clipping. Valve/tube distortion. Heavy metal bands started to push the limits to the extreme, which led to the sound we all know today.

But as distortion became a common effect in a creative sense, mix engineers had been pushing the hardware consoles they used to achieve a certain punch and character to sounds.
They could push drums up loud so they would sound like they knock hard. They would drive the bass so clipping would tickle it just a little.
Electronic music producers and other musicians started applying it to synths and other non-guitar sounds.
Taking both the creative and the technical use of distortion, and the advent of digital technology, we have a plethora of devices to use in our productions – both for creative usage and mixing usage.
The Many Faces of Distortion 🙂😎😉
Distortion isn’t a one-dimensional effect. Let’s take a look at some of the main distortion types and terms you’ll come across:
Tube
Tube distortion gets its name from driving a guitar into vacuum tubes, in say an amp. This gives a very pleasing, ‘even’ distortion that makes any sound magically more full.
It is probably the most common form of distortion for it’s full tone and popular sound.
It is what most people think of when they think of distortion in the creative sense.
Most distortion plugins try to emulate a tube sound:

Tape
Distortion on tape occurs from a sort of clipping or rounding off by driving a signal too loud into a tape machine. The result is an ‘odd’ sounding distortion, which sounds very analog.
Tape machines are usually found in high-end recording studios. But there are many plugins available that can recreate the effects of them, whether old or new.
This type of distortion works well on groups or on the final mix, but can work well in many areas and is usually used subtly:

Clipping or ’Distortion’
Clipping is caused by running a signal into a amplifier (usually in a mixing console) past the ‘analog maximum’. The result is a ‘rounding off’ of the wave form, causing distortion.
In the digital domain, the waveform reacts more drastically and ‘squares off’, creating a very intense ‘hard clip’ sound, as opposed to an analogue ‘soft clip’.
Here, we’re talking about the harder form of clipping that produces a brighter form of distortion, usually due to both the circuit/software and the amount of gain used to boost the signal.
Once again, the original effect comes from physical amplifers and guitar pedals, but the effect is now possible with a digital DAW environment:

Fuzz
Also known as a ‘stompbox’, fuzz distortion has a very noisy and characteristic sound. It sounds ‘broken’, as the early fuzz distortion devices were discovered by using broken and less-than-ideal hardware parts.
The sound is traditionally achieved by clipping transistors hard in a way that makes them sound broken.
Transistors typically give a ‘lofi’ sound, so this makes sense.
Fuzz works nicely on leads or elements that need to take up a lot of space in the mix:

Overdrive
Overdrive is a type of analog soft clipping that adds a warm yet transparent form of distortion. You can dial it in on a sound and expect it to add a bit of character, but not to drastically alter the sound.
Overdrive attempts to mimic the sound of a tube amp but without using an actual tube, thus some people use the terms tube and overdrive interchangeably.
Overdrive can be used to add that little bit of extra warmth to a sound, but it can nicely ‘heat up’ a sound without overdoing it, even when the drive is cranked up.
It’s not best for intense distortion, as it lacks clarity in the high end a lot of the time.

Downsampling or Decimation
Straying into digital distortion, downsampling is achieved by reducing the sample rate of audio by blocking out audio samples at certain intervals.
This creates a very digital and harsh sound, and is very characteristic of a ‘lofi’ sound.
In fact, it’s the very effect dubbed the ‘Lofi’ effect on a Roland SP-404.

Bitcrushing
Similar to downsampling, bitcrushing is achieved by lowering the bit depth of the audio.
In extreme cases, the effect makes the audio extremely loud due to the reduction in dynamic range. So you may need to compensate with volume or some other technique.
Bitcrushing also has a very digital feel to it, and characterises the sound of old school samples (like the Akai MPC, which recorded in 12 bits instead of the standard 24 we use today).

Wanna learn more about downsampling and bitcrushing? We have you covered 🔥
Compression/Limiting
I know what you’re thinking.
Compression, in a distortion article? Why?
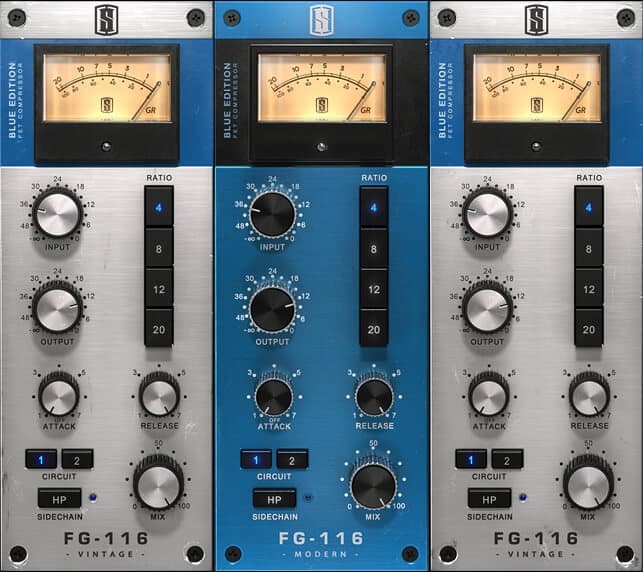
It’s true that compression and limiting are considered to be in their own league of audio effects. But it’s worth discussing that both these effects can be pushed to their limits in order to produce a type of distortion.
This sound is achieved usually by, once again, slamming the input gain, then into a fast compressor with high ratio and low threshold:
Recommended: Compression: The Definitive Guide for Producers
Waveshaping
At the end of the day, distortion can be summed up in this one principle – waveshaping.
Waveshaping is simply a relationship of input volume to output volume, and different curves and shapes give us the different types of distortion we all know and love.
So, we can use waveshaping to achieve many different types of known and unknown distortion types, which gives us a lot of control.
The only downside to waveshaping is the static nature of the algorithm.
Waveshaping on its own is a digital effect mimicking and analog principle, so you’re not usually going to get the full sound of say a tube amp. But doesn’t mean you can’t get good results with the process.

Wavefolding
A unique type of waveshaping, wavefolding ‘folds’ the waveform back under the clipping level instead of just ‘chopping it off’.
This process adds very interesting harmonics, giving sounds a very unique timbre.
Wavefolding can sound either very analog in small amounts, or very digital in large amounts, so make sure that’s the sound you’re going for when reaching for it:

Multiband Distortion
As the name suggests, this effect applies distortion to different bands across the frequency spectrum in different ways.
No particular type of distortion is out of bounds here – you could use a tube on the lows and a bitcrusher on the highs, if you wanted.
As you might have guessed, you can use this to achieve subtle enhancements on your master channel, or extreme results on a sick sounding lead – the choice is yours.
If you’re interested, we’ve written an extensive guide on a similar topic: multiband compression.
When and How To Use Distortion🧐
So you’ve got an impressive array of tools at your disposal, but no clue how to use them.
To give you some sort of idea, here are a few examples of how you could use distortion in different circumstances.
General Distortion
Distortion isn’t the only thing that makes a sound work well and sound great.
You need to have a good sound to work with.
Another note is that if you’re planning on adding a lot of harmonics and high-end noise with distortion, try to work with something that doesn’t already have a lot of harmonics to begin with.
Otherwise, you’ll end up with an overly-distorted mess and a lack of clarity in the tops.
Bass Distortion
Bass loves distortion, especially because typically you are dealing with only very low frequencies with very little tone or character.
Dialling in overdrive, saturation or any form of distortion really can add a great deal of interest to an otherwise flat sounding bass.

A caveat here is that you often lose the fundamental frequencies’ amplitude by adding distortion (especially to the extreme), so you may want to use distortion in parallel or be prepared to layer a pure sine wave underneath
This is especially true if you are making EDM where the sub bass needs to cut through.
Synths/Leads Distortion
Leads can also benefit from some nice distortion, but as a focal element of the track, you have to be careful how it’s applied, otherwise you can end up with a bit of a mess.
Leads tend to have a lot of top end already, so distortion is usually used to fill out the rest of the spectrum and bring a sound even more forward:

Think about the type of distortion used and what kind of character it will give the sound. Tube distortion or overdrive will add a nice full sound to your leads, whereas fuzz distortion might obscure the sound in large amounts.
Maybe you want to add a crunch to your sounds, in which case clipping or even some bitcrushing/downsampling might help with.
Pads/FX
Pads and effects are typically neglected when it comes to distortion, and it kind of makes sense. These elements tend to be mellow and sit in the background, and distortion is normally used to add character and bring elements forward.
But you can do some creative tricks to get interesting tones out of pads/FX while not neglecting their purpose.
For example, using extreme fuzz distortion on a pad could give it an extremely noisy texture, but with some reverb and volume reduction it could create a nice ‘bed’ for all the other instruments to sit on.
When applying distortion with time based effects (reverb and delay are usually applied on pads and FX), it’s important to consider the signal flow.
Drums
Soft clipping, tape and tube distortion (any form of analog saturation) sound incredible on drums. They can bring life out of them and help them to cut through the mix with attitude.

Usually you want to distort the mids and highs of the drums more than the lows, but a subtle amount of low end distortion can help the kick drum and snare thump a bit more and give them a sense of ‘weight’.
Distortion like fuzz and excessive amounts of bright tube distortion can be overpowering on drums and destroy the low end integrity, so not all types of distortion work here.
Looking for the best free drum breaks out there? Right this way 👈
Mix Buss/Mastering
When it comes to adding saturation on your master buss, you want to be subtle, otherwise you’ll ruin your track.
It’s also worth considering that if you’re adding input gain to drive up the signal, you might wave to decrease the output to compensate for the volume.
This helps you also to hear the effect and not just the extra loudness.
Soft clipping is also common on the master as the final processor, or as the precursor to a limiter. This helps add an edge to the track and can actually help to achieve extra loudness before the limiter squashes all the transients.
Another helpful tool is multiband distortion or excitation.
This allows you to add distortion to different areas of the spectrum in different ways. This way, you can keep your lows and mids fairly clean, while adding a nice bit of density and crunch to your top end.
Recommended: Mixing for Producers
Recommended Distortion Plugins 👌
Well, it wouldn’t be a comprehensive guide without a few plugin recommendations, right?
Of course, these devices can help you get the distortion sound your after, but honestly, don’t buy or download any of these before you’ve checked out the ones in your DAW.
Most of the time, they’re more than capable of getting a sound you want.
Soundtoys Decapitator
A personal favourite of mine – Decapitator is great for analog-modelled distortion.
It’s incredibly versatile, as you can use it to warm up your master or add crazy amounts of colour and grit to any sound. It also comes with five different distortion models, so you can test them all to see which gives the right character to your sound.

I particularly like to put this on drums to get them both punchy and crunchy, as well as the master buss to give an overall warmth to the full track (with the tiniest amount of drive).
Types of distortion included: Tube, Clipping, Tape, Overdrive
iZotope Trash 2
If crazy distortion is your thing, then Trash 2 is the plugin for you:

Arguably the most creative and advanced distortion unit available, this thing has so many distortion algorithms that you’ll be busy for days.
Most of these are created through complex waveshaping, which you can dive into and start to tweak yourself.
Beyond having comprehensive multiband distortion, it also has reverb, EQ, filtering and dynamics control to help shape your overall sound to get the most out of the distortion’s tone.
Types of distortion included: All.
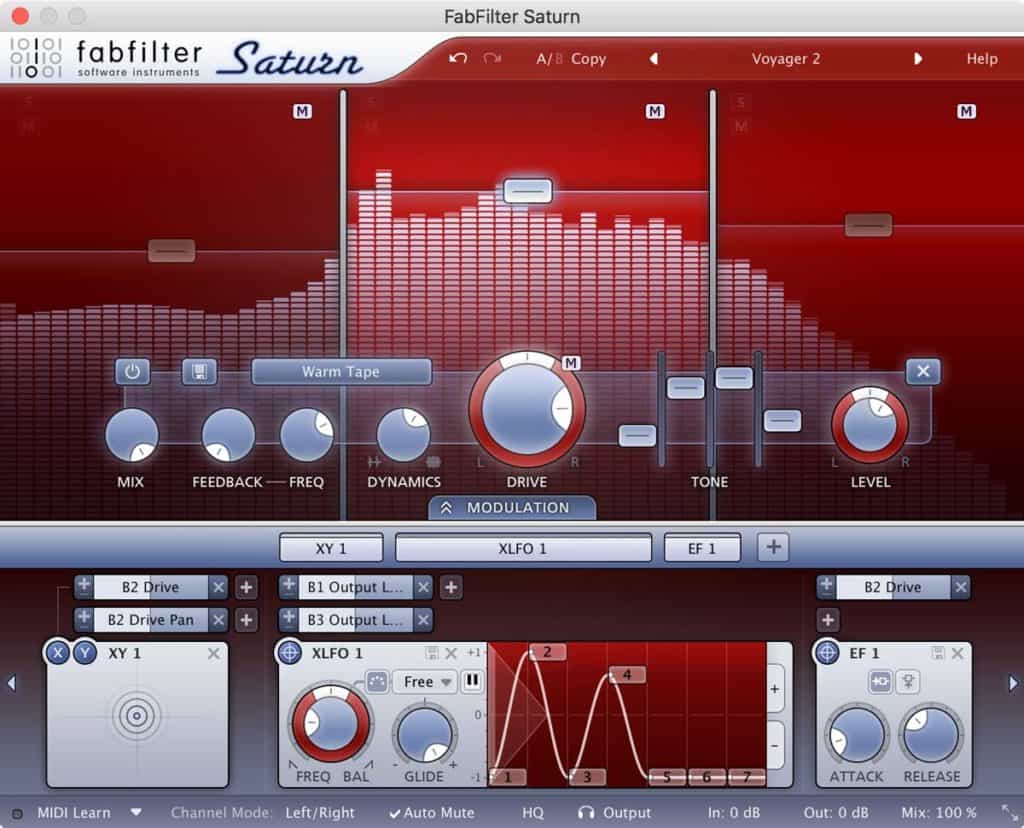
FabFilter Saturn
In the vein of Trash 2, FabFilter Saturn is one of those plugins that is capable of so much distortion, yet it can also be great for subtle and nuanced applications:

Primarily a multiband distortion unit, you can treat the highs of a sound very different to the lows, allowing you to achieve well-rounded distortion for every area of the frequency spectrum.
Types of distortion included: All.
Check it out here
Ohm Force Ohmicide
A bit of an older option, Ohmicide was like the Trash 2 of its day. But that doesn’t mean it’s completely irrelevant – it still has some insane distortion options:

Skrillex used it a lot at one point, so it must be good, right?
Types of distortion included: All.
Check it out here
Native Instruments Guitar Rig
Pedals and guitar effects helped shape distortion as we know it, so having a virtual option for these devices makes sense:

You’ll get more than just typical distortion pedals in here – you can get virtual rackmount gear, phasers/flanger/chorus, delays and reverbs, amp simulators and so much more.
Honestly, just load up some of the presets and see how they impact your sound – lots of fun.
Types of distortion included: All.
Check it our here
Common Distortion Controls 🎛️
It goes without saying that each distortion unit is going to have it’s own set of unique controls and workflows.
But there are some fairly universal parameters when it comes to these devices, so look out for the following:
- Drive/Gain
- Base
- Bias
- Type
- EQ/Filter Section
- Output Gain
- Dry/Wet
- Drive/Gain
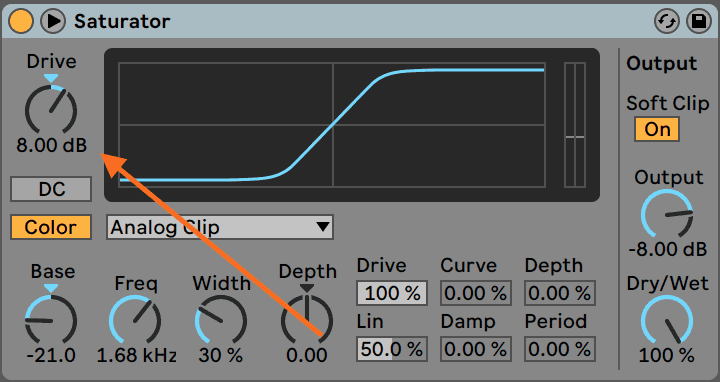
Drive
Arguably the most important of all the controls, “drive” ultimately determines how distorted the sound will be.
This is because distortion functions by turning things up. Drive is just gain into a specific unit that alters the colour of the output:
Base
Many distortion devices will have this control, and for a good reason too.
The base control allows you to choose whether the distortion is biased towards the lows and the highs.
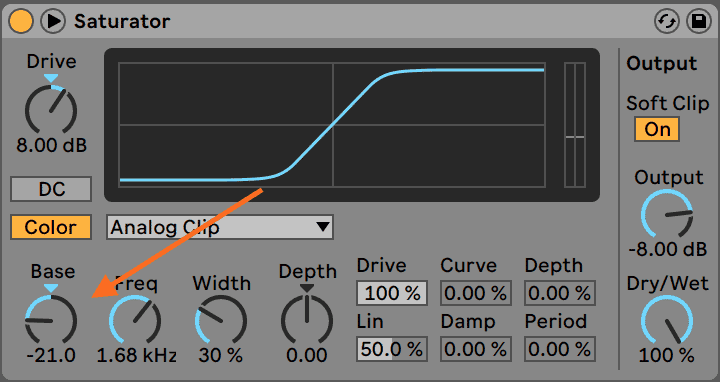
This is great, because sometimes you want to preserve your low frequencies while crunching the highs. And sometimes you want your lows to be obliterated to get that extreme sound.
Bias
This is another common control that varies specifically between devices, but ulimately changes the character of a distortion unit, usually by altering the input-output relationship.
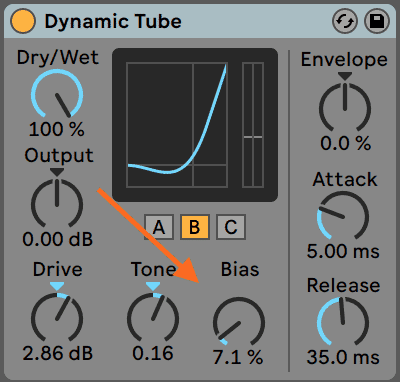
It gets pretty complicated, so here’s a Wikipedia article if you’re interested in the nitty-gritty.
Type
Different algorithms, curves and methods of distortion can be added to the same device.
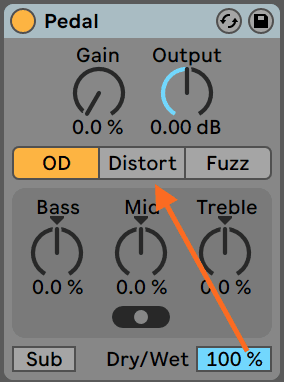
This allows you to test out different distortion variants (usually it’ll be one of the above).
EQ/Filter Section
Sometimes called tone, sometimes called color, this section allows you to shape the frequencies in a sound either before or after the distortion is applied.

Applying an EQ boost or resonance before distortion can drastically alter the character of the sound, as you have less control over how the resulting sound distorts.
Using EQ after can help tame the distortion and any particular peaks or loud/quiet frequency areas.
Recommended: EQ: The Ultimate ‘How To’ Guide
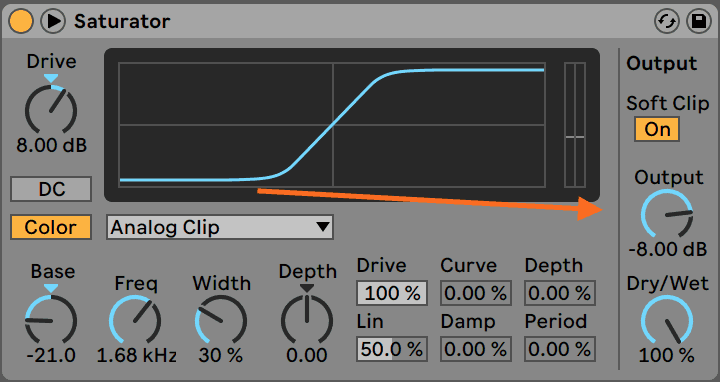
Output Gain
Distortion adds volume. Output gain compensates for said volume increase.
Otherwise, we fall into the trap of thinking louder = better.
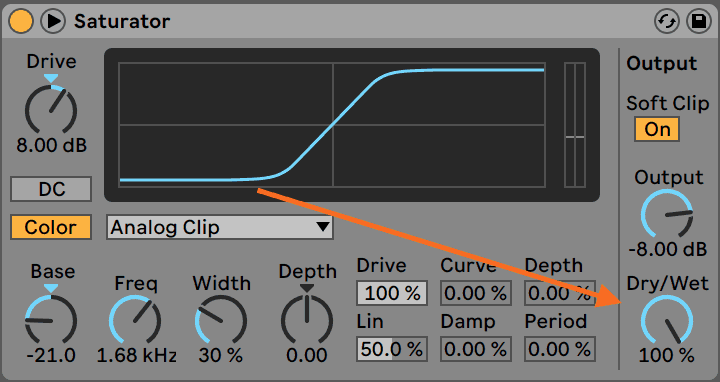
Dry/Wet
At the end of the day, distortion doesn’t always work on it’s own.
In many cases, you need to balance it with the original signal. The Dry/Wet knob allows you to do exactly that:
Distortion Workflow: Don’t Ruin Your Music 😱
As I’ve reiterated many times in this guide, don’t be tempted to whack on some distortion preset and hope for a magical sense of ‘warmth’.
I’ve been guilty of this, and now I look back at my tracks and shudder.
You need a process of applying distortion, so you can know what the right amount is.
I’m not a fan of long, drawn-out or complicated processes, so here’s a simple one you can follow next time you’re in your DAW.
Step 1: Is Distortion Actually Needed?
This might sound basic, but don’t change something that’s already serving its purpose.
If you’re adding distortion to a sound or instrument arbitrarily, it’s likely not going to work.

Ask yourself each time you go to grab distortion whether it will be helpful or not.
If you’re unsure, you can experiment for a bit, but remember to be ready to backtrack.
Committing to ideas because you spent time on them is pretty dumb 😅
Step 2: Choose A Suitable Distortion Type
So you’ve decided to go ahead and use distortion, but what type is best?
If you’re not familiar with the different types of distortion, make sure to have a play with your options and get to know them.
Generally, for a cleaner master buss saturation, you’ll want to go for some soft clipping or some pleasant, even harmonic distortion, like a tube. The key here is subtle.
For more extreme results, you might pick a classic overdrive, which has a very thick yet not bright sound, or a fuzz distortion that takes up that high end.
You can still use something like a tube distortion here with more drive and get solid results:

Step 3: Go Extreme and Dial It Back
The key here is that you want to hear how the distortion is improving your track, so dial it all the way up (to the point you can bear it). Then ease back to a comfortable point. That point will obviously be different for different sounds, so be wise here.
Dialling it back also might not refer to gain, it could be parallel processing (dry/wet) and/or changing EQ/bias/other settings to ‘shape’ the distortion to your desired result.
Step 4: Do an A/B Test
This is as simple as turning the plugin or chain off and on, and seeing if you like the result. Make sure you’ve compensated for added gain by turning down the output of the distortion device, otherwise you’ll be biased towards the louder option:

This can help you to identify whether the distortion works or not. And no matter how long you spent tweaking it, if it doesn’t work, remove it. Simpler = better.
Removing Unwanted Distortion 🧹
We’ve spent the bulk of this guide covering how to add distortion, but I thought it would be appropriate to discuss how to remove it.
But I thought distortion was supposed to sound good?
Not always. In fact, there are many other types of unwanted distortion caused by all sorts of recording and engineering processes, like sample rate conversion and the like.
Crap In, Crap Out
Before we dive into removing distortion, it’s worth noting that if you’re working with samples/audio with distortion already in the file, it’s already too late (unless you can repair it with something like iZotope RX7).
You want to start with the cleanest audio sources possible so you don’t run into problems later down the track.
This is especially true when adding processing – it’s only going to amplify the blemishes in the sound.
Finding good samples is a start, and if you’re recording, make sure you aren’t running your input gain/preamp too hot.
We dive deeper into the topic of sample selection in this video here:
Ironically, you want to prevent unwanted distortion so you can preserve the characteristics of your desired distortion, so don’t skip over this section.
Here’s how to take care of what is called your gain staging – which basically means keeping things at a good volume.
The Instrument Level
The first place distortion can occur in your DAW is at the synth level.
If Serum’s output is clipping, you’re gonna be clipping the whole way. So make sure to turn down that master output:

Most instrument plugins have some sort of output meter, as pictured here.
The Processing Level
Every plugin you use in your chain is an opportunity to clip, so make sure to check the output level between devices.
Many DAWs have some way of checking this, like below in Ableton Live:

The main idea is to manage your gain staging, meaning you’re keeping headroom for the mixing and mastering stage and not adding unnecessary loudness to sounds, unless specifically desired.
Of course, some effects (like distortion, ironically) often add some loudness to the signal with no way to turn it down.
That’s fine, you can compensate with some sort of utility device or gain plugin by turning it down immediately after in the signal chain.
The Fader Level
Once you’ve applied all of your processing, the fader controls the output volume of the instrument.
This means that you can see whether the instrument is now too loud or too quiet, and whether you should compensate for volume at an earlier stage or not.

Ideally, your instruments should all be hitting the same dB level on the meter with the fader at 0dBFS.
This allows you to control the balance of sounds objectively, without being influenced by the individual loudness of instruments.
Of course, this isn’t always practical depending on your workflow (I know I hardly adhere to this) so the main thing is that if your sounds are too loud, mix with the faders lower, so that you have some headroom on the master channel.
The Group & Master Levels
This is the last (and most common) place that clipping occurs – the master channel.
This is where all of your tracks sum to, so it’s already going to be the loudest track in your session. If you’re managing your gain staging at the other levels, your life would be easier here:

A standard amount of headroom on the master channel before mastering is normally -6dbFS. This doesn’t have to be strict, but it’s a useful guideline.
If you’re peaking above 0dB here, you’ll want to go back and turn the mix down, either by chucking a Utility on or by adjusting the faders.
Sample Rate/Bit Rate Conversions & Encoding
There’s a few different kinds of nasty distortion, like ISP (intersample peak) artefacts and other types of aliasing. This can occur when playing through speakers or when converting to another file format like MP3.
To avoid this, there are a few things you can do:
- Oversampling
- Oversampling ‘listens’ to the audio above the audible frequency spectrum so that it can avoid creating distortion down in the audible spectrum
- If oversampling is turned on and ISP artefacts are introduced, you can get all sorts of pops and unpleasant sounds.
- Oversampling ‘listens’ to the audio above the audible frequency spectrum so that it can avoid creating distortion down in the audible spectrum
- Dithering
- If using audio with multiple different types of bit rates, you can end up with quantization noise, which sounds pretty horrible, albeit quiet. To avoid that, you add in low level noise to mask the quantization noise after the mastering stage.
- If using audio with multiple different types of bit rates, you can end up with quantization noise, which sounds pretty horrible, albeit quiet. To avoid that, you add in low level noise to mask the quantization noise after the mastering stage.
- Headroom
- When exporting a WAV file that may later get converted to MP3 or another file type, leaving about 0.3-0.5dB of headroom can help to avoid ISP artefacts being brought out, as this type of encoding can remove frequencies which are masking other frequencies, causing them to jump out and cause distortion.
- Most limiters have the option to add a reduction in output volume.
- When exporting a WAV file that may later get converted to MP3 or another file type, leaving about 0.3-0.5dB of headroom can help to avoid ISP artefacts being brought out, as this type of encoding can remove frequencies which are masking other frequencies, causing them to jump out and cause distortion.
- Encode from Lossless
- If you encode an already encoded file (e.g. MP3 320 > MP3 128), then you’re going to get more quality loss and possible artefacts.
- Only use a full WAV or AIFF file for encoding, in other words, whatever was exported from your DAW
- Make sure to use a trusted encoding program like iTunes or similar
- If you encode an already encoded file (e.g. MP3 320 > MP3 128), then you’re going to get more quality loss and possible artefacts.
- Use the Industry Standard Sample Rate/Bit Depth
- No matter what you’re producer buddies tell you about the benefits of 32-bit floating point bit depth, stick to the industry standards.
- Bit Depth = 24bit
- Sample Rate = 44100kHz
That’s a Wrap! 🙏
That’s it for this guide! Hopefully you know have a better understanding of distortion, saturation and when to use them.
Any questions about distortion or anything in this article? Drop me a line at [email protected]
