There’s a reason that Xfer Serum is so popular and used by producers such as KSHMR, Marshmello and Jauz.
It’s capable of the most insane sounds, from intricate pads:
to growling basses:
and to crazy leads:
But the interface is so confusing. If you’re a beginner, it might even look like you need an engineering degree to understand it.
Fear not – we are here to help. This Serum tutorial will cover:
- The basic sections of Serum and what they do
- What sets this synth apart from the rest
- Why Serum sounds so damn good
- How to approach sound design if Serum is your first synth
- Some tips & tricks to speed up your workflow
Lastly, I highly recommend opening Serum and following along with this tutorial. This will help you get the most out of your time, and make you a better producer.
Let’s get into it! 👇
Want some great presets that just work? Then grab our free EDM Essentials for Xfer Serum preset pack below!
Want Serum presets that work out of the box?
Download our FREE EDM Essentials for Serum preset pack with 60+ high-quality sounds – from soaring leads to smooth pads. Suitable for any genre, style, or sound.
Where To Get Serum
Before we get into the tutorial, if you’ve already bought or got a trial of Serum you can skip this section.
However, if you’re yet to download Serum, you can get through two main avenues.
Direct from Xfer
The first way is to get either the paid or demo version direct from Xfer themselves.
The full-featured version of Serum is available on the Xfer Records website for $189 USD.
There is also a demo available, but use time is limited to 15 minutes, so that’ll quickly get frustrating after using it for a bit.
Splice Rent-to-Own
Xfer was the first company to team up with Splice for their rent-to-own scheme, allowing musicians and producers to get plugins without having to pay for them in full upfront.
For $9.99 USD a month you get full access to Serum, and once you’ve paid off the full price, the payments stop and you own it for life.
How good?
Get Xfer Serum on Splice Rent-to-Own (Not sponsored, just a genuinely good deal.)
The Interface
I find one of the most off-putting things about learning something new is just how complex something looks.
So in this tutorial, I want to give you a brief rundown of Serum’s layout first, mostly so you don’t stress out – everything is quite simple once you understand this.
When you load up Serum for the first time, you’ll be confronted with this interface.
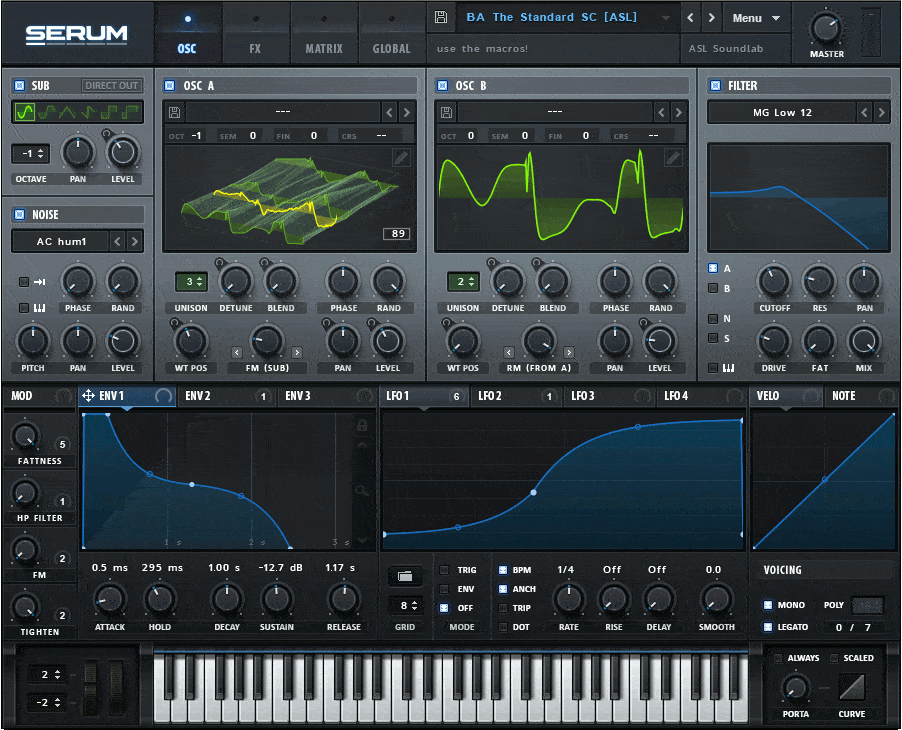
Very well-designed, but a tad confusing and complex. Don’t worry – we’ll cover what you need to know.
To start off, you should know the general features – the menu bar and preset selector are along the top.
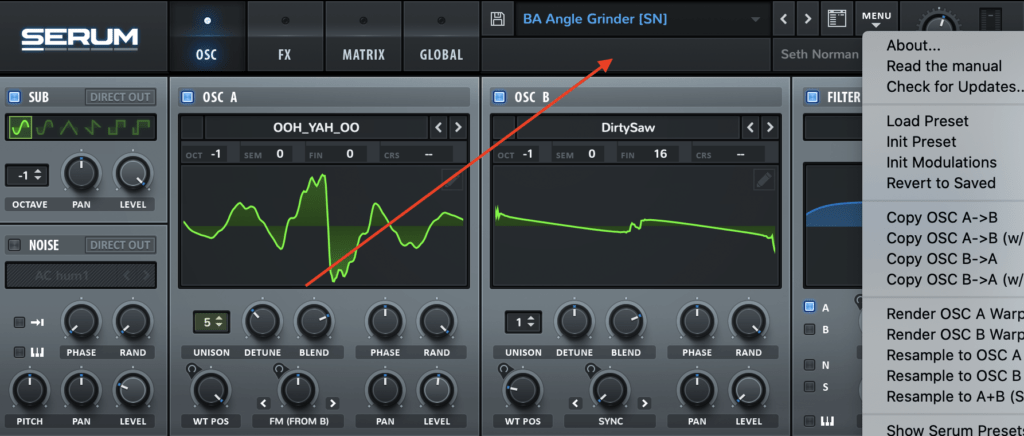
This section allows you to switch between sounds, and the menu gives you a variety of options for loading presets, switching sounds and other useful tools, like the Resampling function.
We won’t delve into each of these, as they are either too advanced or not necessary to use at a beginner’s level – just know that’s where they are.
You’ve also got the master volume knob up in the top right. This simply changes the volume of the whole patch. Obvious, but helpful.
The Four Tabs
Apart from the menu, the most important thing to know about Serum is that there are 4 ‘views’ or ‘tabs’ across the top:
- OSC
- FX
- MATRIX
- GLOBAL
By default, you’ll see that we’re on the OSC section of Serum. This is where we can generate and manipulate the bulk of a sound.

You’ll have the following on the page:
- Oscillators A and B
- Noise Oscillator
- Sub Oscillator
- Filter
- Envelopes
- LFOs
- Macros
- Voicing
- Keyboard
On the FX section, you can furthermore process your sound by dialling in any of the following effects.
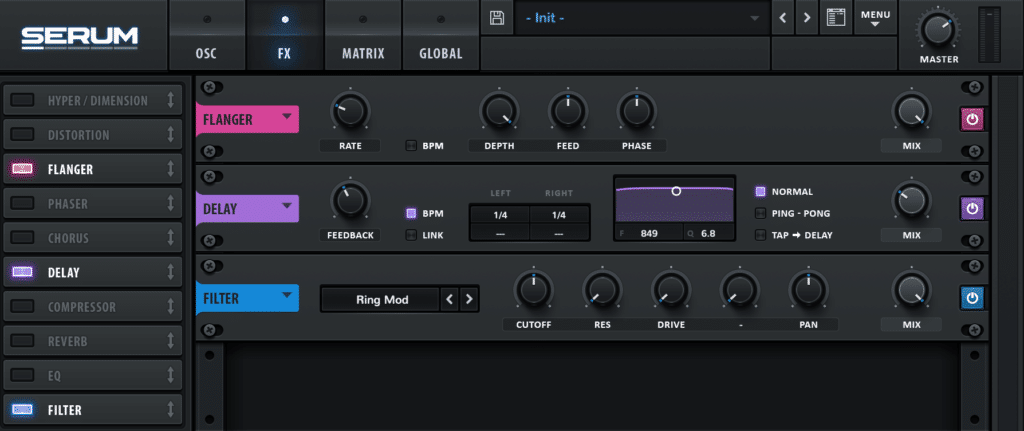
- Hyper/Dimension
- Distortion
- Flanger
- Phaser
- Chorus
- Compressor
- Delay
- Reverb
- Filter (another one)
- EQ
We’ll cover how to use this section later on.
You’ve also got the MATRIX section, which shows you all of your modulation sources and destinations. Modulations are used to add nice movement to your sounds, keeping them from being static and boring.
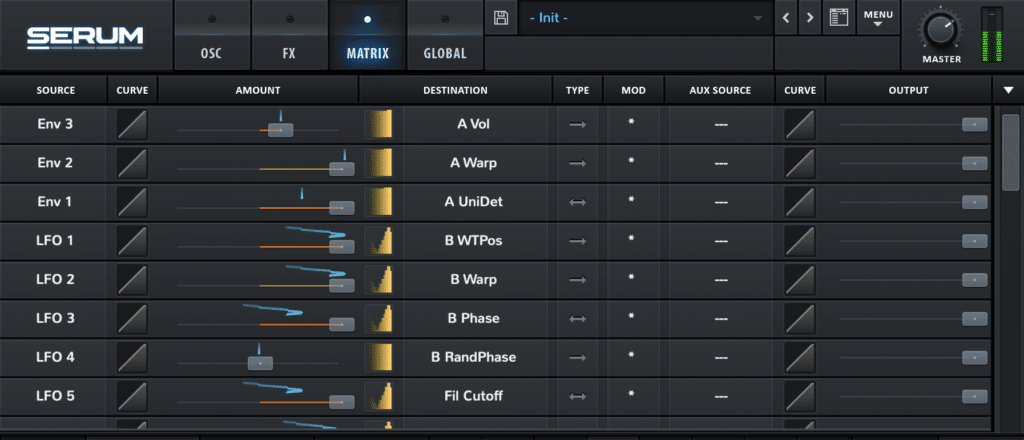
You don’t actually have to use this page to add modulations, but it shows them all and gives you the option to add more of them and tweak existing ones.
Once again, we’ll cover this later on as well – so don’t worry too much for now.
Lastly, you have the GLOBAL section, which has a bunch of optional features you can enable, as well as oscillator quality settings, chaos oscillators, and more.
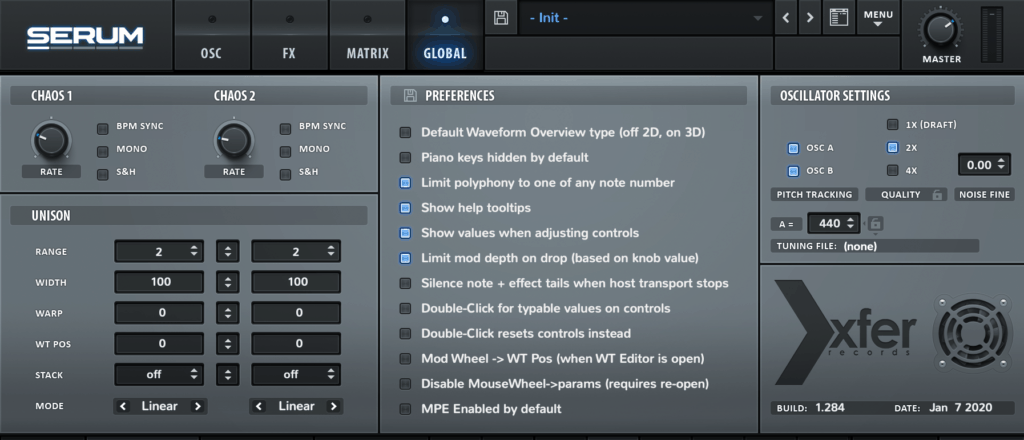
We won’t dive in too deep here, as a lot of this is advanced stuff that you can learn much later if you want.
That’s really all there is to the interface. So now that you have a big picture perspective, let’s start diving into the details, starting with the most important feature – the oscillators.
Recommended: Serum vs Massive X: Which Is The Best Synth Plugin?
Serum’s Oscillators
Make sure you head back to the OSC section for this one. As you may have figured, Serum is a wavetable synthesizer, which uses morphing oscillators to generate sound.
In the dead centre, you’ll find two oscillators: OSC A and OSC B.
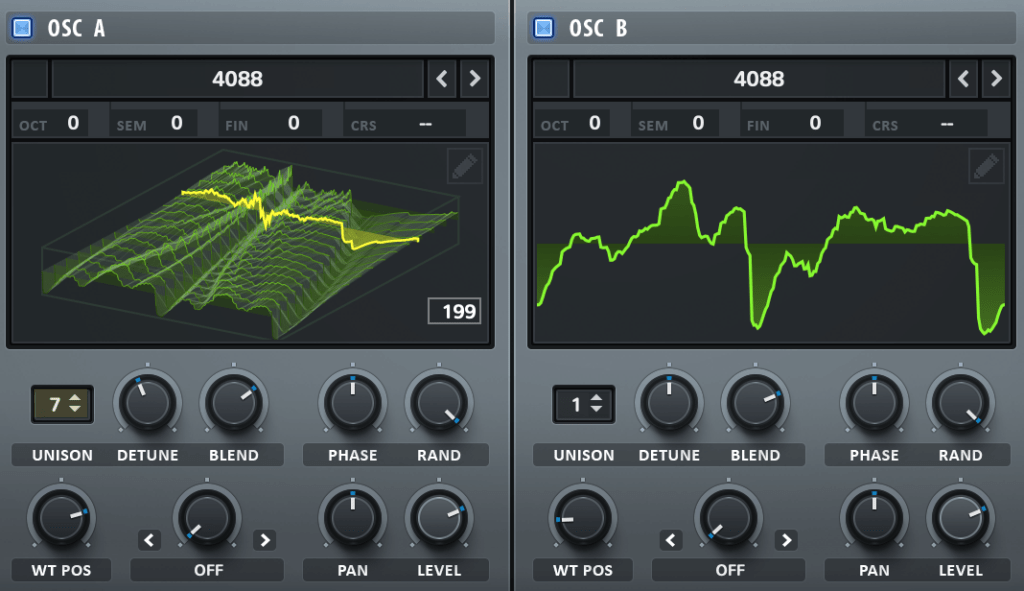
If you’re on the initial patch, then you’ll notice OSC B is greyed out and turned off. OSC A will be in its ‘init’ position, with a saw wave loaded up.
These two oscillators are the main sound generators for Serum, and arguably are it’s most powerful feature that sets it apart from the rest.
For starters, you’ve got the wavetable itself – the dope green waveform you can see in the visualizer. Clicking on it will enable 3D mode, so you can see how the wave changes over time.
You can select a wavetable from the dropdown menu where the name is displayed. Serum comes with an amazing array of wavetable options, but you can also load in third-party ones later down the track if you desire.
But these waveforms aren’t static – the WT POS control allows you to move the position on the wavetable, creating a sense of motion in the sound.
Take Action: Try switching between some of the wavetables to get a feel for the different options. Move the WT POS to see how the sound is affected for different wavetables.
Warping
If cranking the wavetable position isn’t enough, the warp options will give you heaps to play around with.
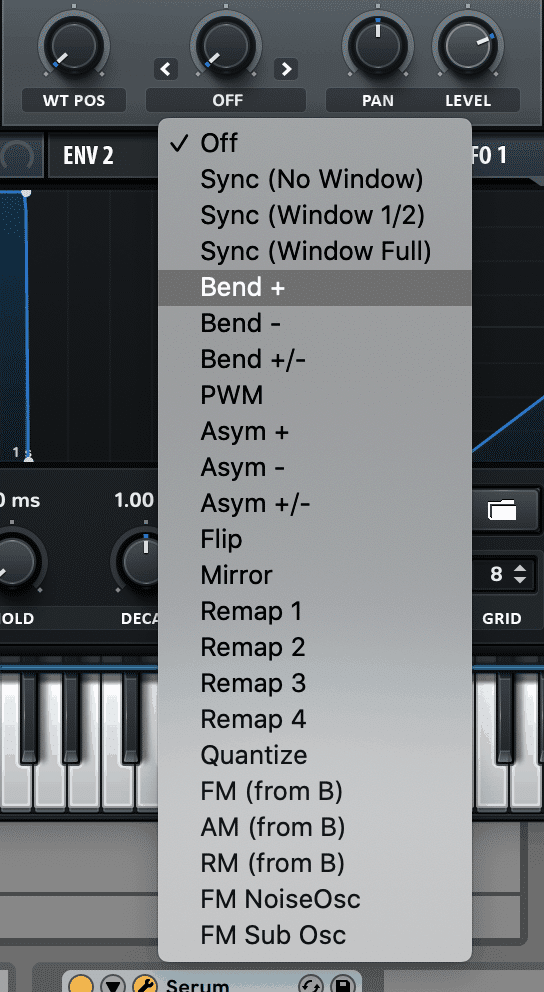
There are a number of warping options available. Most of these effect the waveform by tweaking it, duplicating it or manipulating it in some unique way.
The ‘Remap’ options allow you to do some custom tweaking, and you’ve also got the FM, AM and RM options for modulation capabiltiies.
Make sure you’ve got the respective sound source active in order to use the FM modes.
Personally, I love to use the FM from B a lot to add growly sounds to my patches. I’ll make sure OSC B is on but not outputting any sound, so I can use it as a dedicated modulation source.
Take Action: Load up a wavetable and tweak the warp modes, to see how each one sounds and how you can use them.
Phase/Random Knobs
This micro-section isn’t necessary for making amazing sounds with Serum, so if you’re bored, skip to the sub oscilaltor section.
These two knobs allow you to change how the oscillators relate to each other in time.
Firstly, the RAND knob indicates how random the starting position of the oscillator is across the cycle.
IMAGE
This feature gives the synth a more ‘analog’ response, because it’s not starting at the same place every time.
On the other hand, the PHASE knob determines the central starting point for each oscillator. If RAND is set to full, the PHASE knob has essentially no effect on the sound, because the phase is always random.
But if you dial down the RAND knob, the phase will start to center around the starting point. If the RAND knob is at 0, the phase will always start at the specified point.
Why would you want this? If you’re dealing with low end frequencies, having sub bass clashing can be undesirable and result in phase cancellation. So you might want to line up the phase of your waveforms for maximum impact.
For further reading, check out this resource on phase cancellation.
Words confusing you? Check out our EDM Glossary of terms.
Sub Oscillator
So you’ve got both OSC A and OSC B – so what is the SUB oscillator?
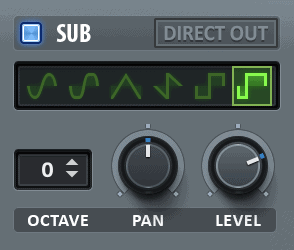
The sub oscillator is a simplified oscillator designed to output only a number of basic shapes.
Primarily, the SUB oscillator is used to layer a more simple sound underneath to form a more consistent sub-bass. You can choose between:
- Sine
- Rounded Rectangle
- Triangle
- Saw
- Square
- Pulse
The best way to use it is to pick the simplest waveform for the task, which is why I normally choose a sine, triangle or rounded rectangle for layering under sounds, especially when making basses.
This is also the reason it has a ‘Direct Out’ switch, allowing you to bypass any processing or filtering for maximum impact in the low end.
Apart from that, you’ve got your standard options – ‘Octave’ for getting the bass range right, ‘Level’ to dial it in according to the other oscillators and a pan knob, if you’re wanting to move your bass left or right for some reason.
Take Action: Try layering a sub under your existing sound, and blend it to taste.
Noise Oscillator
One of my other favourite features of Serum is the Noise oscillator.
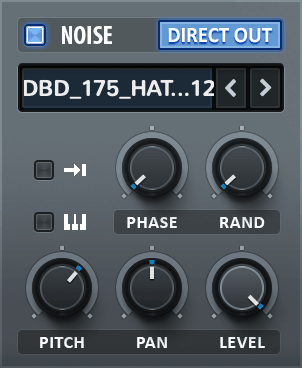
Why? Because it’s far from your standard white/pink noise generator. In fact, it uses noise samples to create noise.
How is this better? Because you have endless possibilities for sound design – even beyond noise.
Foley. Synth samples. Percussion.
It’s not uncommon to see producers load vocal samples into the noise oscillator, and process them to make them into basses or leads.
The main menu allows you to choose from the preset noise options, grouped into different folders – you’ve got attacks for layering into plucks, noises sampled from hardware, and other weird and wonderful samples.
But you can also drag in any audio file onto the noise oscillator and it will load (given it’s an accepted file type).
Beyond that, you’ve got a few controls that mirror the standard oscillators: PHASE, RAND, PAN and LEVEL.
You’ve got a PITCH knob, which controls the pitch of the sample in semitones. If you want to control the fine pitch, you’ll have to navigate to the GLOBAL section.
You’ve also got two switches. The first is a ‘One Shot Mode’, which allows you to stop the noise from looping.
Looping is great if you have a noise that you want to repeat over and over, but not for a one-off attack sound.
You’ve also got a keyboard tracking switch, which allows the Noise’s pitch to change with the MIDI note being played. This is great for tonal noises or for any sort of melodic sample you may be using.
Take Action: Try layering a noise or pluck noise under your existing sound, and blend it to taste. Try the FM Noise OSC warping option to see how that effects your other oscillators.
Note that in this Serum tutorial I’m not going to cover the Wavetable Editor, as it’s too advanced for beginners. If you want to learn, let me know at [email protected] and I’ll consider writing a guide.
Filters
Serum has two filters, but it might not appear so at first.
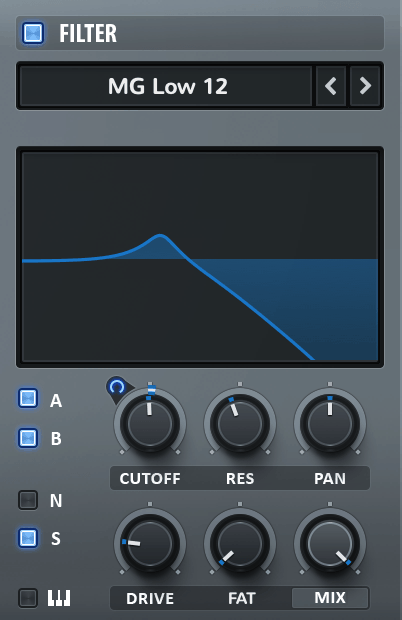
The first (main) filter is located on the right-hand section of the OSC page next to the oscillators.
This filter is quite visual and is the main one you should use.
The second filter is included in the FX page as an effect insert.
This one is not visual and lacks some of the features of the main filter, including the visual feedback.
Both can be used in combination to create awesome sounds.
Filter Controls
The main controls of the filter are the same across both:
- Cutoff
- Resonance
- Pan
- Drive
- FAT
- Mix/Level
If you’re aware of how filters work, then filter cutoff, resonance and drive are all self-explanatory.
The pan knob adjusts the cutoff differently between the left and right channels, creating stereo width.
The FAT control is a variable knob depending on the filter you’ve chosen, but on some it may act as a second filter (for multi types), or adjust some other feature. The easiest way is to play with it for yourself.
The MIX knob acts as a dry/wet for the filter. This can be changed into a LEVEL knob by left-clicking on the name, which is helpful for compensating for an increase of drive. Note you can only change this knob behaviour on the main filter.
Beyond that, the first filter also has a keytracking button, which allows the cutoff to move depending on the MIDI note incoming. This is great for getting a more consistent sound on leads, basses and other monophonic sounds.
Filter Types
One of my personal favourite features in Serum are the filter types. You can have a variety of standard curves with different slopes – low pass, high pass, band pass, notch and peak. These come under the ‘Normal’ category.
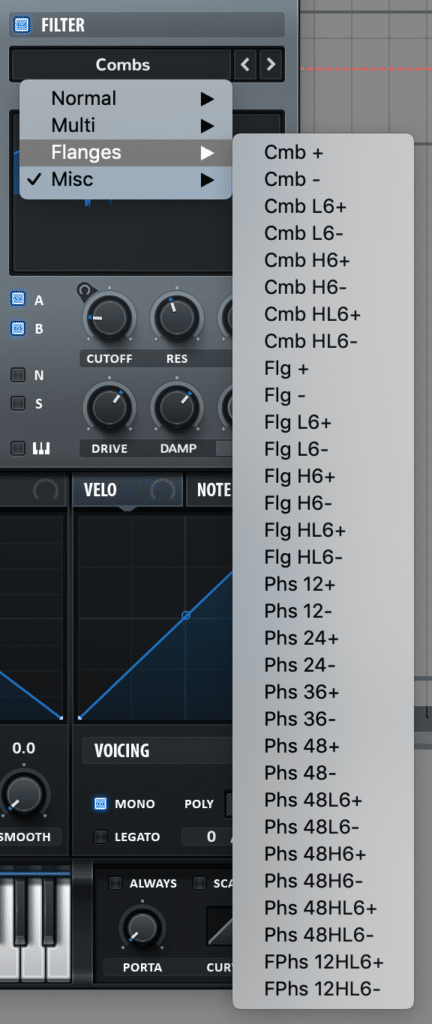
But you also have the ‘Multi’ types, which can combine two or three of these filters into one overall filter. This is great for coloring the sound in unique ways.
Note that this is where the ‘FAT’ knob becomes a second cutoff knob.
You’ve also got a great selection of Combs, Phasers and Flangers in the ‘Flanges’ section. These are less of a traditional filter but are more, as the name suggests, flanger-type effects.
Never the less, they are great for getting a unique sound. Play around with the cutoff and resonance to get some cool results.
The last section (and my favourite) is the ‘Misc’ section. You’ll find all sorts of crazy types in here, including everyone’s favourites: the Reverb and Comb filters. These are great for adding extra colour and interest to your sounds, so go nuts.
Take Action: Process your sound with filtering, seeing how the different types sound. Focus on moving the cutoff and resonance to shape your sound. Take note of any of your favourite options.
Want Serum presets that work out of the box?
Download our FREE EDM Essentials for Serum preset pack with 60+ high-quality sounds – from soaring leads to smooth pads. Suitable for any genre, style, or sound.
Modulation: Envelopes, LFOs & Macros
At the heart of Serum is the crazy routing and modulation capabilities.
This is what gives you motion to your sound.

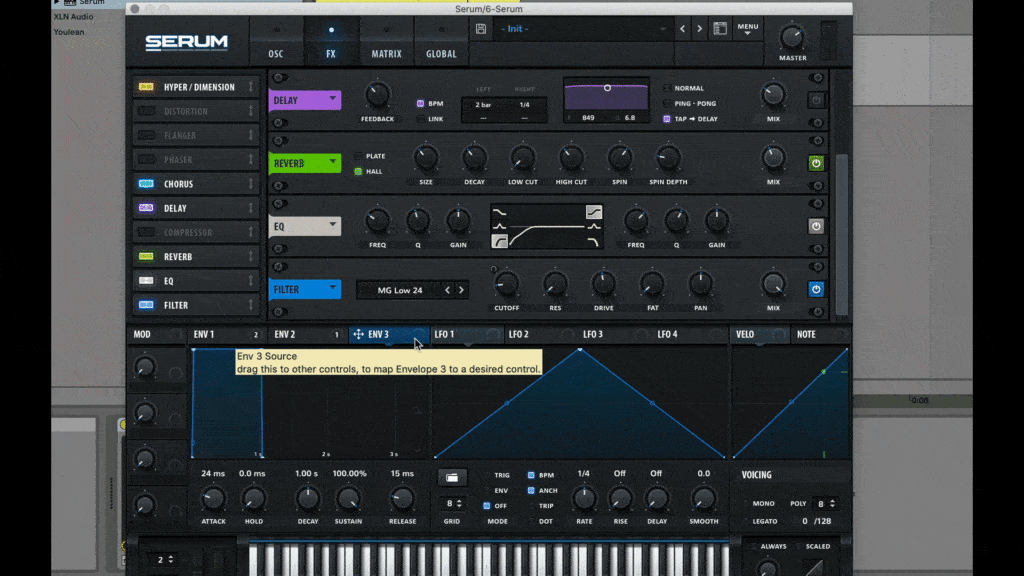
You get 3 envelopes at up to 8 LFOs (only 4 show up but if you use all of them, more show up).
Simply click and drag from one of the modulation sources onto and control to add modualtion to it. You can drag the blue ring to control the amount of modulation.
Envelopes
Envelopes use ADSR to sculpt the sound exactly as you would have it. Each envelope is triggered any time a new note comes in.
This can either be controlled by the knobs along the bottom, or by the points on the envelope graphic itself.
Beyond the standard ADSR controls, you’ve also got an additional ‘Hold’ feature, which allows the signal to stay at the maximum amplitude after the ‘Attack’ stage for a period of time, before decaying back down to whichever level is set. Neat.
Envelope 1 specifically is hard-set to the overall volume of your patch, so if you want to shape the volume, make sure to use that one.
You can also map Env 1 to other sources, but make sure to try out Env 2 and 3 to shape other aspects of your sound in different/unique ways.
Each of the curves on the interface can be customised to sculpt your envelope exactly how you want it. You can make it more ‘snappy’ or ‘drawn out’.
LFOs
Serum really delivers here once again, as you don’t have just a standard LFO in this section.
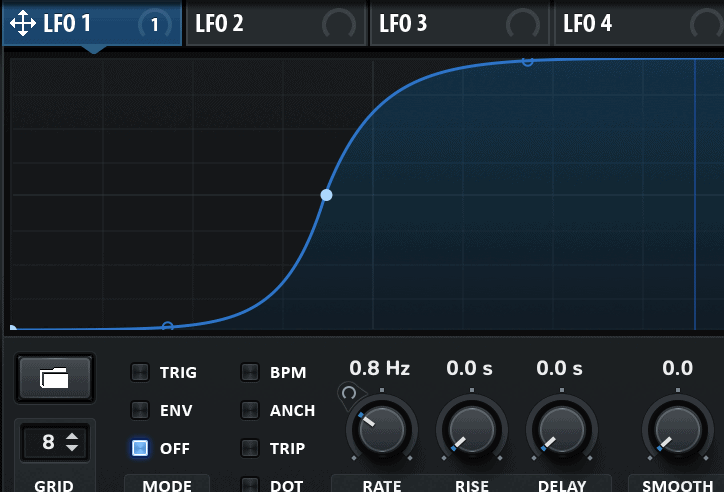
You can draw or load up any curve to use as a modulation source, which gives you crazy control over your sound, and can help you create patches that cut through the mix exactly like you want them to.
Simply click the folder icon to choose from any of the presets. If you’re making modern genres like future bass, a lot of the ‘Sidechain’ presets are great for getting that pumping effect.
If you’re feeling creative, you can also draw your own in.
Beyond that, you’ve got fairly standard LFO controls – ‘Rate’ controls how fast the LFO is, the ‘BPM’ and ‘Anch’ switches keep things in time with your DAW tempo.
You’ve also got three modes: Env, Trig and Off. Off with keep the LFO free-running as long as the DAW is playing, Trig will only trigger the LFO when a note comes in, and Env will do the same but it will only cycle through once, allowing you to treat it like a custom-shaped envelope.
Take Action: Try drawing in a custom LFO for yourself.
Macros
Macros are underutilized in my opinion, and are great for adding a human, organic feel to any sound.

The reason they are so powerful is that you can modulate so many parameters with one knob, and add automation to that outside of Serum, drawing in whatever curves and shapes you like!
They are located down in the bottom left-hand side of Serum’s interface, and can be assigned to any contorl by dragging and dropping. You then simply use the knob to control all the modulations at once.
Take Action: Assign some destinations to a Macro and automate it within your DAW.
Modulation Matrix
Once you’ve dragged on automation to any parameter, it will show up on the modulation matrix, under the MOD tab up the top.

As you can see, there is a list of both sources and there respective destinations. This is great for understanding how much you’ve got going on in one patch, and also for making additional tweaks to the sound.
The ‘Amount’ is the same as the blue ring you dragged when applying the modualtion, but you get a greater visual on how it relates to others easily.
You can scale it back or increase it, as well as adjusting the response curve.
Remember Maths class? Don’t worry it’s not that complicated, but just know that adjusting the curve can either make the modulation sweep up towards the end more, or come up quickly at the start.
Think of it the same as if you were adding automation curves to a track in your DAW.
You can also adjust the polarity or ‘Type’ of modulation – one arrow is unipolar, two arrows is bipolar.
You can invert the modulation direction as well, to see how it would sound in reverse, and also add an auxiliary modulation source.
Aux Source
Say you’ve added a sick LFO to your filter, and it sounding nice. But you don’t always want the LFO to be one – you want to fade it in and out over time.
You can assign an auxiliary source to a Macro and use that to control the amount of LFO modulation to the filter cutoff. Super simple and really useful.
Take Action: Assign a Macro as the Aux Source for an LFO that is modulating a filter cutoff.
FX
Serum’s FX are so powerful compared to other synths, that it’s possible to make great sounds just using Serum and no post-processing.
They’ve even included the Serum FX as a separate plugin, so you can process sounds outside of Serum with the same units.
So why is it so good? Because you’ve got 11 FX units that you can use in any order you like – as if you were adding plugins inside your DAW.
They can also be enabled and disabled as you like, so they don’t take up space if you’re not using them.
If there’s one thing I want you to take away from this Serum tutorial, it’s the power of FX. Let’s take a look at them all.
Hyper/Dimension
This first effect is broken up into two parts: Hyper and Dimension.

The Hyper effect is a sort of additional detune effect, that takes the sound and duplicates it at different pitches. The detune control changes the amount of pitch difference, and the rate determines how fast these pitches change.
This gives is a wide, phat sound and is great for adding width and thickness.
Dimension acts as a sort of short delay/reverb, giving sounds an immediate yet controlled echo. This is great for plucks and leads that need space without clogging up the mix.
Distortion
The distortion section is very powerful, and is ideal for dirtying up Serum’s ultra clean oscillators with ease.

The many distortion types give you a variety of options for adding grit to the sound, and they range from subtle warmth like the tube, soft clip and tape saturation algorithms, to the insane sine shaper and diode algorithms.
You also have the option to filter a sound pre or post the distortion. I like to tame my sounds with some pre-distortion low pass filtering, otherwise the distortion can be a bit much. Post-distortion is also great for taming any resulting distortion.
Flanger
This one is fairly self-explnatory, and is great for adding metallic-like textures to sounds.

One cool thing with Serum’s flanger in particular is that if you turn the rate to 0Hz, you can control the LFO manually with the ‘Depth’ knob.
Phaser
With similar controls to the flanger, the phaser is great for adding some thin movement to sounds.

A personal tip would be to chuck this before some intense distortion to get some phat movement to bass and lead sounds.
You can also do the same ‘Rate’ trick as the Flanger.
Chorus
Once again, fairly similar to a standard chorus. You can achieve a similar sound to the Hyper effect but with a more metallic-y and delayed effect.

Use the LPF/HPF control (switchable) on the end to tame the wet signal and blend to taste. I like to abuse the chorus’ effect and create some really wacky textures and FX.
Delay
Acts like a standard delay.

You can set the ‘Feedback’ of the delay tail, choose to sync to the ‘BPM’ or not, set a left and right delay time and whether they are linked or not.
You also have the ‘Normal’ mono delay option, a ‘Ping Pong’ stereo delay and also the unique ‘Tap -> Delay’ option, which sets the left delay to a ‘pre-delay’ and the right delay to the actual delay time, allowing a gap before the delay starts. Pretty cool.
All of this can be controlled by a nice filter, allowing your delay tail to sit exactly where you would like in the mix.
Compressor
Probably one of Serum’s most essential FX, especially for bass design.

The reason for this is the special ‘Multiband’ mode which enables an OTT-like compression preset that adds that special character to any sound.
Beyond this, you’ve got your standard compression controls – threshold, ratio, attack, release and gain.
Great for controlling your wild sounds once you’ve added a bunch of processing, so I’ll normally leave this somewhere at the end of my FX chain.
Reverb
While the built-in reverb might not be the most ‘authentic’ and ‘rich’ sounding reverb you’ve ever heard, it’s super useful for sound design.

The plate mode is great for a more 2D-sounding reverb, and many producers use this on leads and basses to add a sense of space. It also has a more ‘metallic-like’ texture, which is great for those sorts of sounds.
Use the pre-delay knob to add some space between the dry and wet signal, use the damp control to soften the high end and the width knob to add more stereo information to your sounds. The plate can easily sound very sharp so the damp knob is often used to tame it.
The hall algorithm is more 3D-sounding and is great for adding space to pads and plucks. If you want a more natural-sounding verb, this is the one to go for.
The decay knob determines the length of the verb, and the spin and spin depth add a chorus-like effect to the tail, adding a richness and thickness to the sound.
Size, high cut and low cut are controlled by both reverbs, and can be used to control the feel of the reverb, as well as how it fits in the mix.
EQ
A simple two-band EQ for either controlling the sound, or using as a third filter.

You can switch between a shelf, cut or bell for each end of the spectrum, and control both gain and bandwidth.
Filter
We already covered the filter section, but here you will find the second filter that you can use.

It has all the same filter types, without the same graphical interface.
Take Action: Use 3 of the FX unit to process an existing sound.
Recommended: The 3 Rs of Sound Design
Some Workflow Tips & Tricks
Now we’ve made our way around Serum, let’s look at a few tips and tricks to help you speed things up.
Reverb and Combs Filters
If you want an instant way to add crazy textures to your sounds, check out both of the Reverb and Combs filters in the ‘Misc’ section.
Some people aruge they are overused, but they are popular for a reason.
Modulating the cutoff slightly with an LFO is a great way to add movement as well. It’s all about finding the right spot.
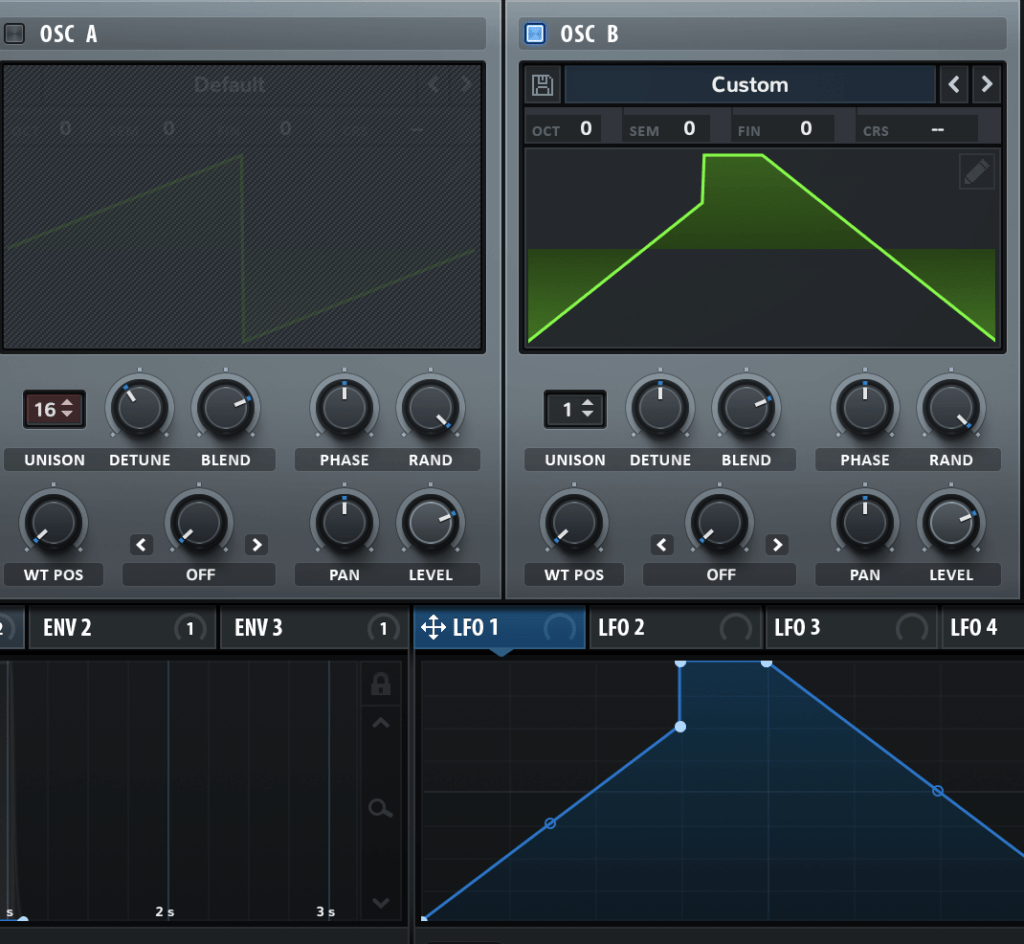
Use LFOs as Oscillators
If you’ve drawn a cool shape and want to see how it sounds as an oscillator, simply hold Option/Alt + drag the LFO into the oscillator visualizer.
LFO Steppers and Performers
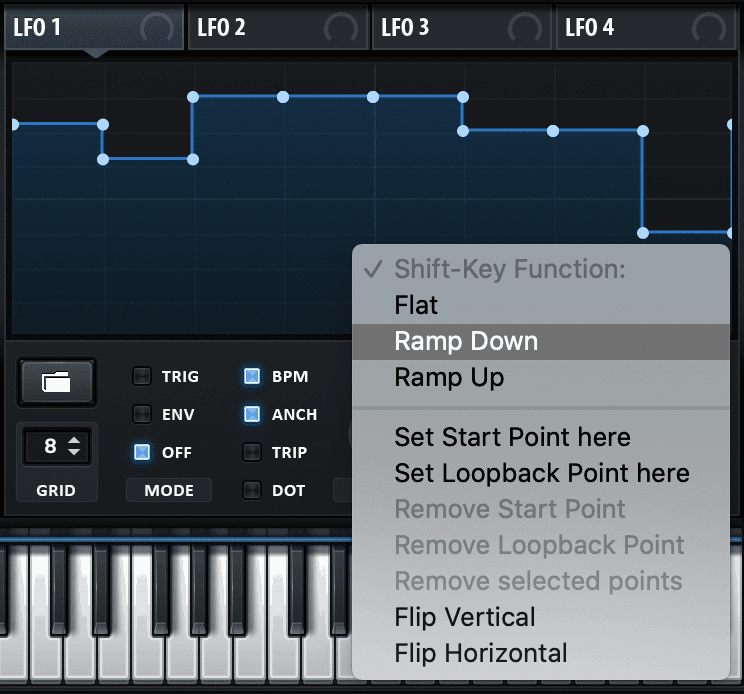
If you’re an ex-Massive user like myself, you’ll miss the Stepper/Performer function a lot.
But not to fear – you can use the LFO’s as such. Simply use:
- Shift + Click and Drag to add steps that snap to the grid
- Right-click to switch this to a ramp up or ramp down
Unison Modes
Did you know you can change the way voices spread out in the Global section of Serum?
In the bottom left of the said page, you have a selector for the Unison Mode. By default it is set to ‘Linear’, but you can select from:
- Super
- Exponential
- Inverse
- Random
Each of these has a unique sonic imprint on the thickness of the sound when using multiple voices, so give it a go.
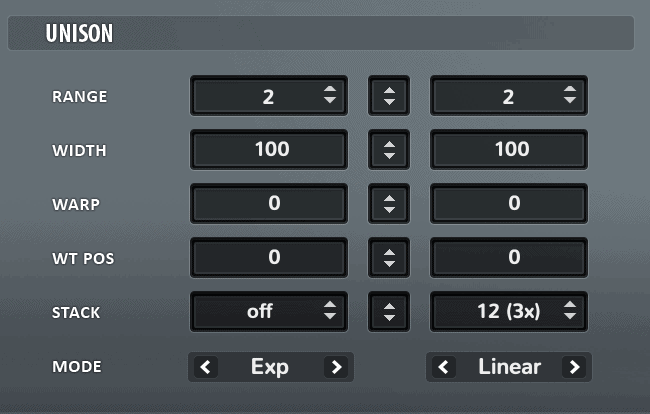
You can also control the way voices layer up with the ‘Stack’ control, to add extra bulk to your supersaws or basses.
Make Synthetic Choirs
You can use the 3 formant filter options to make any manner of choir sound effects.
For added ‘realness’, modulate the cutoff and resonance with a very slow LFO to add subtle movement to the sound. You can also do this with the pitch, chorus and any number of other FX.
Bass Design Tips
If you want further tips, and you make bass music (dubstep, DnB etc.), check out my YouTube video on 11 other fundamental tips:
And there we have it for this Serum tutorial!
Recommended: 100 Sound Design Tips
Need Sounds?
So you’re keen to make some more sounds with Serum, but you’re feeling a bit dry on inspiration?
Grab our Serum EDM Essentials packs to get some quality sounds to use, tweak and learn from.
Want Serum presets that work out of the box?
Download our FREE EDM Essentials for Serum preset pack with 60+ high-quality sounds – from soaring leads to smooth pads. Suitable for any genre, style, or sound.
Any thing I missed? Email me at [email protected].

