


Some have called Vital synth the successor to Xfer Serum. Released in November 2020, it is one of the most intuitive synth plugins on the market.
And it’s free.
You read that right. So what makes Vital so special?
In this guide, we will go through everything you need to know to create the most amazing sounds. From ethereal pads to soaring leads, to growly basses, Vital covers it all.
Together we will look at:
- The basic sections of Vital and what they do
- What sets it apart from Xfer Serum
- How to start designing your first sounds
- 5 more tips & shortcuts to speed up your workflow
As mentioned, Vital is a free VST synth. Plus it works in all major DAWs (FL Studio, Ableton Live, Logic Pro X etc.)
So there’s absolutely no excuse to not download it straight away and follow along with this guide. Let’s get into it!
Table of contents
Note: as you can see, this is an extremely comprehensive guide. So feel free to bookmark this page for later. Or jump directly to any section that interests you 👍
Vital Synth Pricing Options
I know I said that Vital is free, and that is true.
However, there are also 2 paid tiers plus a subscription-based tier available. Let’s quickly run through the options:
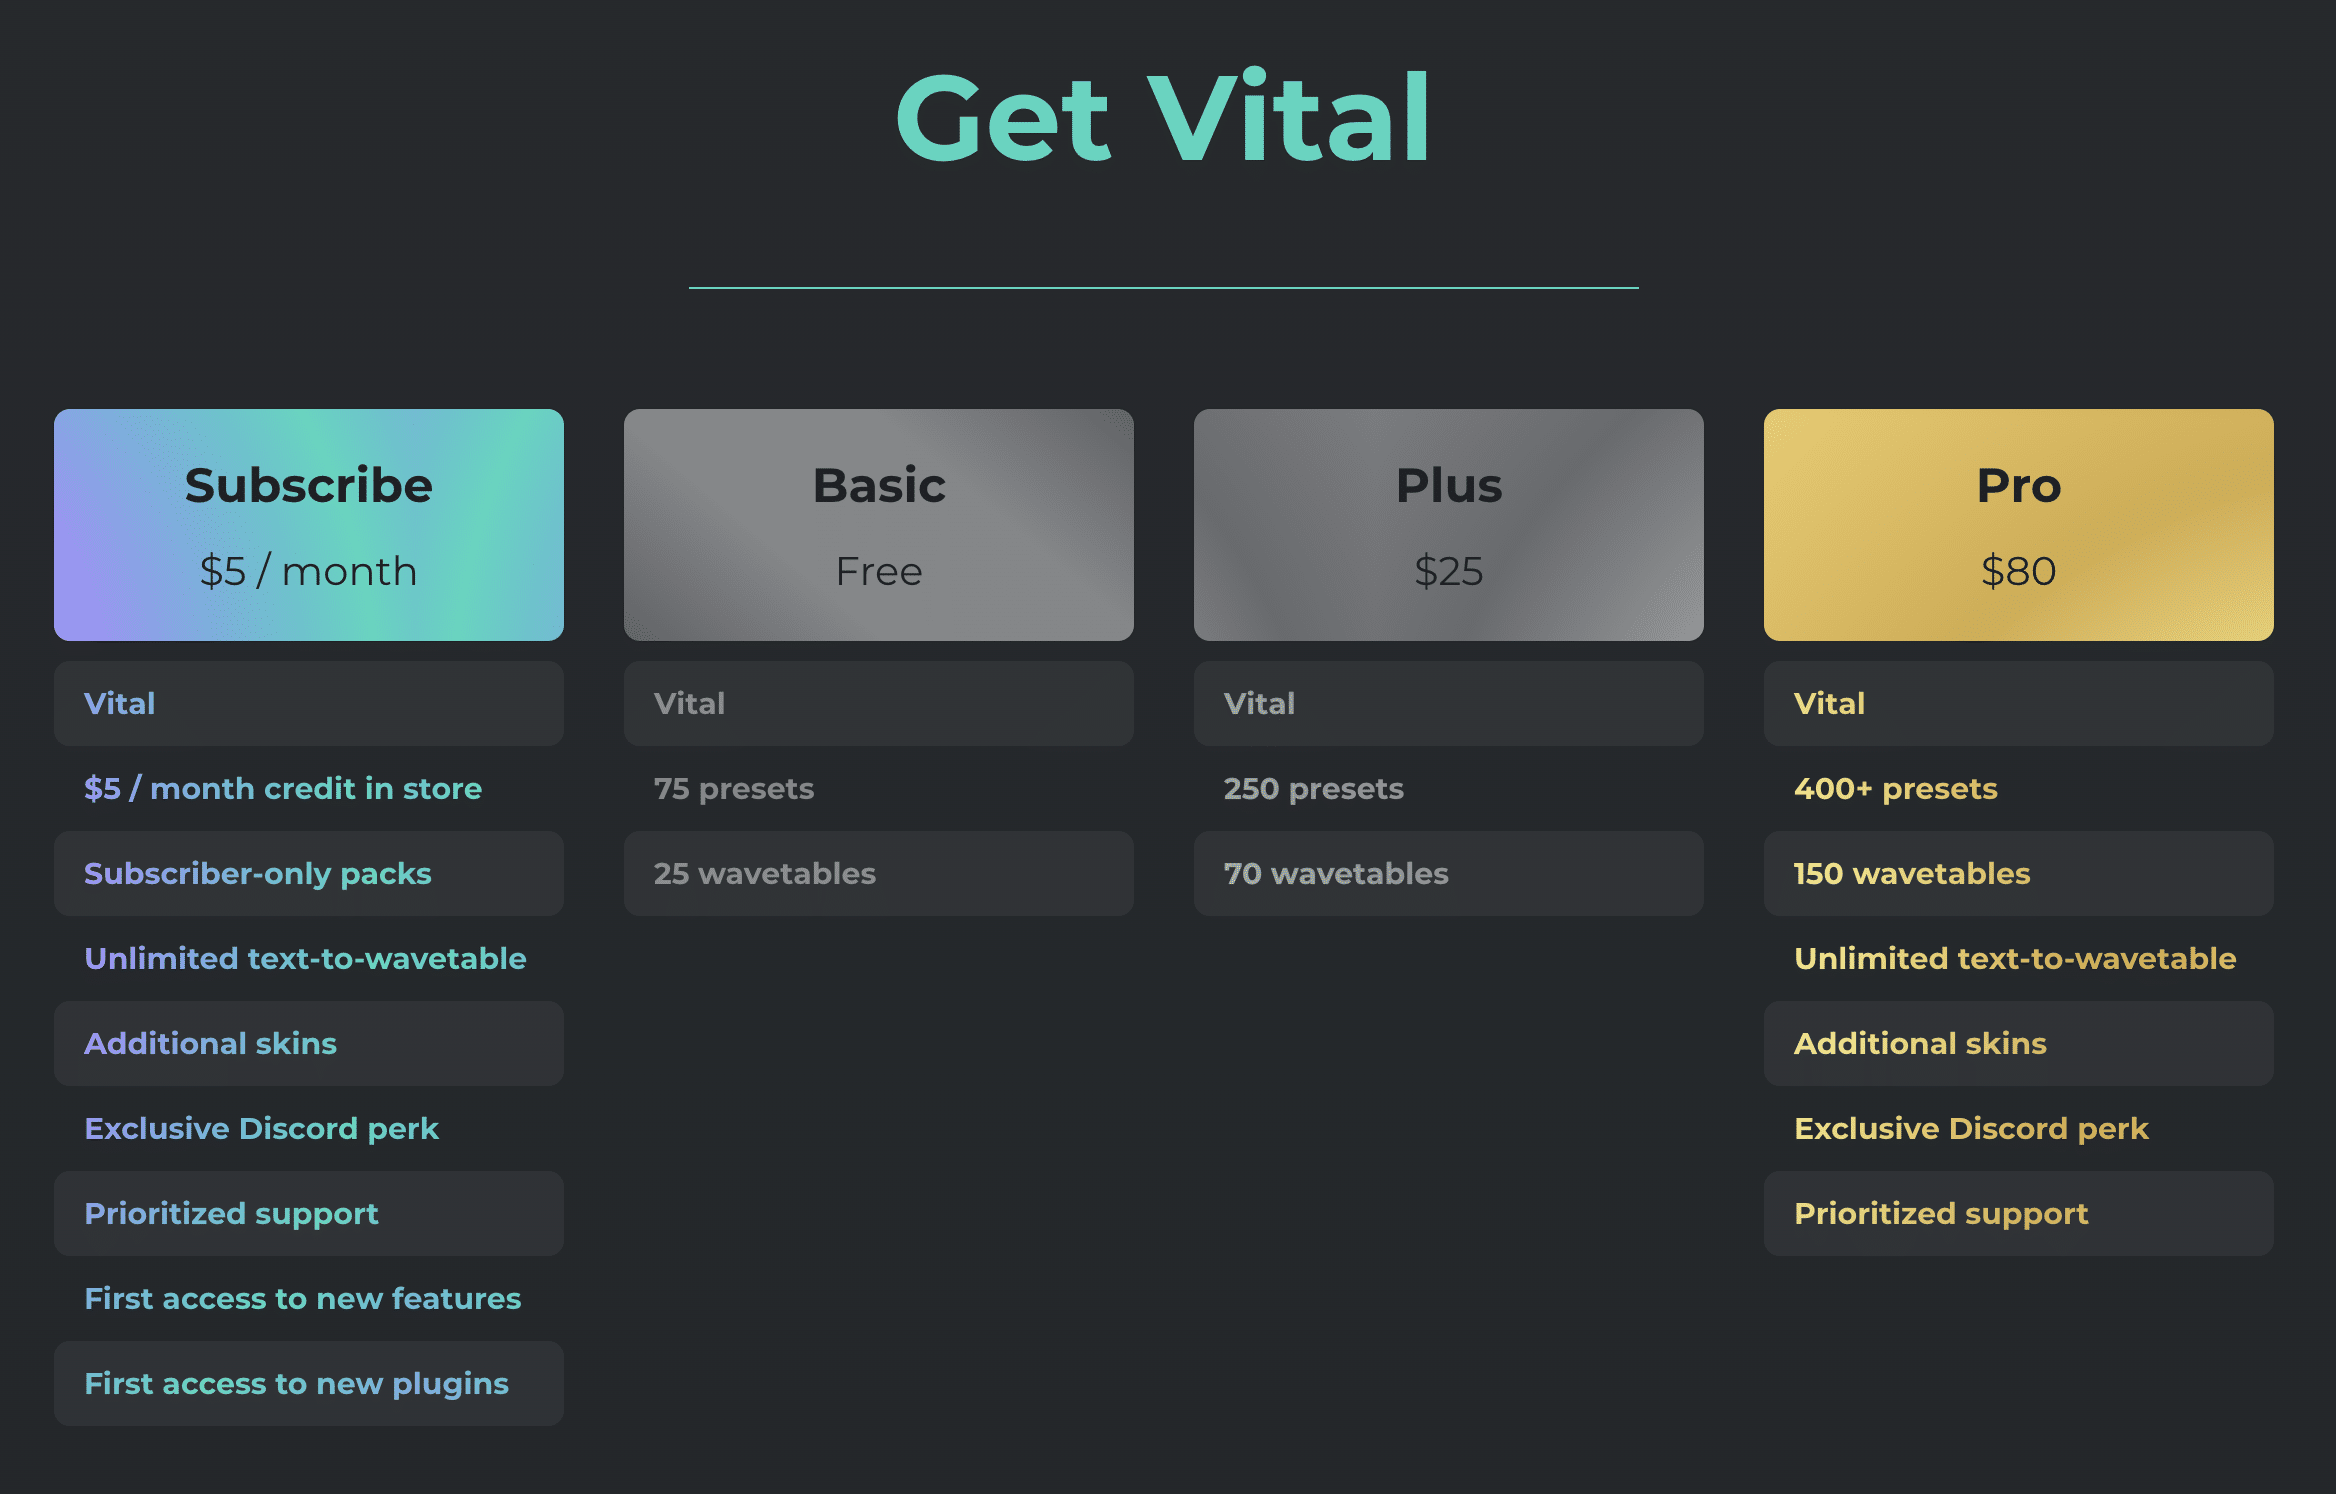
Basic
The free version of the Vital synth comes with 25 wavetables and 75 preset sounds.
It’s important to note that the free version includes all the features possible in Vital. No restricted or time-limited features: you get the full deal (with the exception of the text-to-wavetable feature, limited to 5 per day). So there’s no risk of missing out on anything by getting the free version.
As with most software synths, presets can be saved and shared with other people. With a bit of Googling you will find a wealth of presets (free and paid) available online.
Plus
For US$25, you get 250 presets and 70 wavetables. Plus, you get to support an awesome project.
Pro
For US$80, you will get even more presets and wavetables to choose from, additional skins to change the look of Vital, Discord perks, and more.
The presets are what makes Vital shine, so it’s definitely worth it.
Subscribe
For US$5/month, you get all the advantages of the Pro tier, as well as first access to new features and new plugins.
Now, let’s dive into the meat of the topic.
Vital Synth Interface
Before we go into all of the Vital synth functionalities, let’s get familiar with the interface. For me, this is where the major strength of Vital lies.
Unlike a lot of other software synths, Vital’s layout is clear, colorful, and intuitive.
As you open Vital for the first time, this is the interface you will see:

By the way, this is my own custom skin – you can download for free here 😉 👇
Straight away, you can see that a whole section is greyed-out. That is because those functionalities are disabled at the moment.
As you enable and disable parameters, you will see them disappearing and re-appearing. This will give you a clear picture of what is happening with your sound.
Let’s break down the different components of this layout. We’ll dive into each of them separately later on in this guide, but this is just to get you familiar with the Vital synth GUI.

Vital Synth’s Components
#1 – The Views
Much like Serum, Vital has 4 views you can switch between. The view you pick will then be displayed in the main view (number 5). Without going into too much detail yet, here are those 4 views:
- Voice gives you access to Vital’s 3 oscillators, the sampler and 2 voice filters
- Effects allows to activate and adjust 9 different effects such as delay, compression and reverb
- Matrix lets you quickly visualize all the modulations currently active
- Advanced gives you control over some advanced (duh) features such as voicing and oversampling
#2 – Preset Section
The Preset section allows you to quickly browse through your saved presets, save and re-initialize the current patch and more. Much of the options here are self-explanatory, so we won’t be diving into them any further.
#3 – Master Volume
The Master volume setting. Self-explanatory 😅
#4 – Analyzer
The section allows to switch between an Oscilloscope and a Frequency Spectrum Analyzer. Simply click on the analyzer to toggle between the two.
#5 – Main View
The Main view displays the selected view as explained in point 1.
#6 – Envelope section
The Envelope section allows you to draw custom envelopes and apply them to specific parameters. By default, envelope 1 is assigned to the oscillators and the sampler volumes. It therefore acts as your basic ADSR envelope.
#7 – LFO section
Similarly, the LFO section lets you draw custom LFO curves and apply them to specific parameters.
#8 – Additional Controls
This sections allows you to add some Random Modulation. You can also control the number of voices and glide settings.
#9 – Keyboard
The Keyboard is a handy feature if you don’t have a MIDI controller and need to play specific notes.
#10 – Pitch and Modulation Wheel
The Pitch Wheel and Modulation Wheel let you pitch bend the notes. They can also be assigned to any parameters within vital to modulate them dynamically.
#11 – Macros
Finally, the Macros section allows you to control many parameters with just one knob.
As this is a comprehensive guide for Vital, we won’t go over common terms such as ADSR and LFOs. If you need a refresher on any technical term, consult our comprehensive glossary!
If you want a beginners guide to Vital in video format, check out our latest video on our Youtube channel👇
As mentioned above, the four views at your disposal are Voice, Effects, Matrix, and Advanced. Let’s explore each of these in detail.
Vital Synth Voice View
The Voice view of the Vital synth is the equivalent to Serum’s OSC tab. This is where you select the source of your sound. For this, you can play with 3 different oscillators, a sampler, and 2 filters:

Let’s explore all of these functionalities.
Vital Synth’s 3 Oscillators
Unlike Serum’s 2 oscillators, the Vital synth provides 3 fully customizable oscillators.
When you initialize Vital, only OSC1 will be turned on. Simply click the round activation button to activate any of the other oscillators:

Oscillators are the main source of your sound. Make sure you spend enough selecting the right wavetables!
To do this, click on the wavetable name (in this case “Init”). This will open up all the available wavetables at your disposal:

For this example, I will load the Classic Blend wavetable. I can toggle between different frames of the wavetable with the vertical slider.
If you feel like you need a refresher on wavetable synthesis, make sure to check out our Complete Wavetable Synthesis Guide!
Let’s see how switching between frames affects our sound:

Simply toggling between frames (or automating it) can bring great results.
On the left-hand side of the view, Level and Pan control the volume and panning of the oscillator. Pitch allows to transpose the sound by a specific number of semitones (left), cents (right), or both:

Vital Synth’s Routing
Below Level and Pan, you can decide how to route your oscillator. For example, you could decide to bypass any effect by selecting Direct Out. Or you could select Filter 1 to send the oscillator only to Filter 1 and not Filter 2:

Note that the signal will always flow into the Effects chain after the selected Filters unless Direct Out is selected.
On the right-hand side of the wavetable visualizer, Unison lets you add up to 16 voices. The percentage determines how detuned these voices are:

Let’s hear how this impacts our sound:
You can hear how adding voices and detuning can add a lot of depth and width to your sound. A common application of this technique is to create the famous Reese Bass popular in Jungle and Drum and Bass, or the supersaw in Trance and Future Bass.
Phase
Phase determines at what point of the waveform the sound will start playing.
0 is the start of the waveform, 180 the middle, and 360 the end.
A useful tip to create movement is to start at random points in the waveform. This means that every time a note is played, the starting point on the waveform will change. To do this, simply increase the phase percentage.
Let’s listen to how this can add movement:
You can hear how the first version is quite stale and static. When you increase phase randomization, you get more movement in your sequence.
However, in some instances (like a sub-bass), you might want the phase randomization set to 0% to get the same impact on each note!
Finally, the Vital synth provides you with two Morphing modulators for each oscillator. This allows you to twist and shape your sound for crazy results:

We won’t go into the details of each morphing algorithm in this guide. The best way is to experiment and see what sounds you can come up with!
Vital Synth’s Sampler
Vital’s Sampler allows you to layer any sound of your choice on top of your oscillators. In Xfer Serum, the equivalent would be the Noise Oscillator.
Let’s dive back into the Vital synth to see how to use the Sampler. Here’s an arp sequence with the Sampler de-activated:
First, let’s add some noise to make our sound more interesting and textured:

In this example, I’ve selected a Waves noise and routed it to Filter 2 so I can high-pass it.
Let’s check the result:
This is a great way to add foley and an organic feel to your sounds.
You can also load any sample of your choice into the sampler. Let’s try this out. I’ve loaded a rain sample, routed it to filter 2, and high-passed it. I’ve also applied an envelope to the Level of the sampler:

This way, the rain fades out after each note is played. Let’s hear it:
You can get really creative here to add life to your sounds!
Pro-tip: if you have a long noise sample, activate the sample random phase. This way, the sample will start at different points every time a note is played, adding more variation:

The 2 Voice Filters
We’ve touched on Vital synth’s filters a bit already in this guide. They act as your basic EQ filters, so if you need a refresher on Audio Filters, check out our comprehensive guide here!
Let’s start with the layout. Top, bottom, and right are your three main sliders. They control respectively the filter type, the cutoff frequency, and the resonance.

At the bottom left are your routing settings. In this example, we can see that Oscillator 3 and the Sampler are both routed to Filter 1.
Pro-tip: if you want Filter 1 and Filter 2 to act in succession, enable FIL2 in the Filter 1 routing options.
There are a bunch of crazy filters you can use to create amazing sounds. One of my favorites is the Formant filter:
As always, experimenting is the key to interesting results!
Vital Synth Modulations: Envelopes, LFOs and Macros
If you’ve spent any time at all with a synth, you will be familiar with modulations. They let you fine-tune how parameters of your sound come into effect over time.
For example, you might want a low-pass filter to be applied as soon as you hit your keyboard. Or you may want that filter to gradually enter over time.
In short, modulations are a way to add movement and variation to your sounds.
Envelopes
Envelopes use the ADSR model to sculpt any parameter that affects your sound. Every time you play a note, the envelope you have designed will be applied to your sound.
If you’ve never played with envelopes before, this might sound a bit alien. But it really isn’t. Let’s explore how all of this works in Vital synth.

Envelopes in Vital synth are located in the top right-hand corner of the synth. Three envelopes are at your disposal to start with, with a potential 6 envelopes in total to use.
You get your standard Attack-Decay-Sustain-Release settings, as well as Delay and Hold. Delay lets you set up to 4 seconds before the envelope is triggered. Whereas Hold will set the amount of time the sound remains at maximum volume while the note is still being played.
Now let’s look at some common applications.
Creating Envelopes
Envelope 1 is automatically assigned to the level of the oscillators. Let’s change the Attack from 0 to 0.3 seconds:

Let’s draw a second envelope, and apply it to the cutoff of Filter 1:

To apply an envelope to a parameter, click on the wheel and drag it directly to the parameter you want to modulate:

Once you do this, a little wheel will appear, reminding you where your envelope is applied. It will also let you control the amount of modulation applied.
In our case, we are controlling how much Filter 1 is opening up every time we play a note:
Let’s listen to what this means:
If we wanted, we could set a much quicker attack time so that the filter opens up immediately. The possibilities are endless!
Pro-tip: when trying to design a specific sound, try to get as close as possible within your synth. Use envelopes and LFOs to avoid using too many effect plugins. This will simplify your workflow and lighten up your CPU load.
LFOs
LFO stands for Low-Frequency Oscillator and has become a cornerstone of music production. Much like envelopes, they allow you to modulate parameters over time. However, LFOs play in a repeating pattern, modulating your sound endlessly.
Vital synth provides you with a total of 8 LFOs to play with. Let’s explore the 2 main features you will need: Mode and Frequency:

Mode sets how your LFO will start and end. Setting to Trigger for example will start the LFO from the point set by the horizontal slider.
Frequency determines how fast the modulation repeats itself according to the curve you drew. Usually, you will want your frequency set to Tempo so that the LFO is applied in time with your project’s BPM.
Pro-tip: re-using the same LFO for several parameters can help achieve cohesion in your sound!
As always, actions speak louder than words, so let’s hear some examples!
In this example, I have assigned the LFO to the cutoff of Filter 1. Setting the frequency to 1/4 notes ensures that the modulation stays in time with my project.
Let’s hear another example:

Pro-tip: in Vital synth, both for Envelopes and LFOs, drawing directly into the visualizer can be a quicker way to achieve results!
Random Modulation
Vital’s Random Modulation Generator is a great way to introduce interesting and unexpected twists to your sounds:

This is a great option if:
- you want to modulate a parameter but don’t know in which way;
- you want some sort of evolving pattern that never repeats.
This can be useful for arp sequences and long atmospheres for example.
You can choose from different styles of randomness. Sample and Hold will jump in step from one random value to another. Sine Interpolate will introduce randomness around a sine curve.
Macros
Macros allow you to control multiple parameters at once.
In Vital synth, 4 macros are available, and any number of parameters can be assigned to a single macro.
Let’s look at an example:
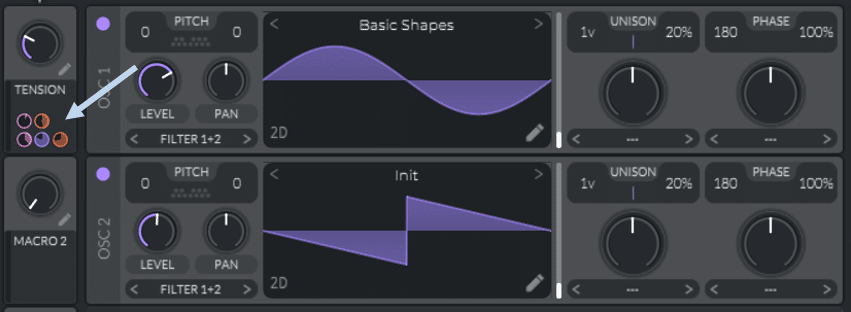
I have assigned 5 different parameters to Macro 1 – and renamed it “Tension” for easy reference. Hover over any of the 5 circles to see which parameter is being controlled:

To assign a parameter to a macro, simply slide the macro tile to the parameter you want to control.
For this example, I wanted to be able to create tension with a single knob. I’ve assigned things like Reverb level, Delay level, and Distortion to the macro. This way, I can increase them all by just turning up one knob!
Let’s take a listen:
Pretty cool right?
Vital Synth Effects View
Much like Serum, Vital synth offers so many effects and parameters to adjust that you probably won’t need to use additional effect plugins.

Activated effects will light up with a specific color, while de-activated effects are greyed out. You can easily re-arrange the order of effects by simply dragging the tiles up or down.
For me, this is the section that truly makes Vital stand out.
Each effect has its own visualizer, making it dead easy to understand how the effect is affecting your sound. Let’s dive into each of the effects and how they can transform your sound.
Pro-tip: keep in mind that each effect flows as an input into the next effect – so choose your order wisely!
Chorus
Chorus duplicates your sound into several voices, delaying and detuning them slightly. This will create the impression of multiple instruments playing together:

You can choose 4, 8, 12, or 16 voices. Playing with the Depth, Delay 1, and Delay 2 will accentuate the sound of the chorus. You can tone down the sound of the chorus by decreasing the Mix amount.
Finally, a nice Filter lets you cut out low/high frequencies from the chorus output. This won’t effect any of the dry signal.
Compressor
Vital synth’s compressor comes with several modes: from single one-band compression to 3-band compression.

Again, you’ve got a nice OTT-like visualizer that lets you see exactly what’s happening. You can use a mix of upward and downward compression to make your sounds thick and dense.
Need a refresher on all things compression? Check out our Ultimate Compression Guide!
Unfortunately, you cannot adjust the frequency cutoffs for each band (which is also the case in the OTT plugin it’s modeled after).
But again, Vital synth is free – so who am I to complain.
Delay
Vital synth’s delay has one of the most aesthetically pleasing layouts in my opinion:

Everything from the frequency to the feedback level and the dry/wet mix is represented on the visualizer.
You have your standard delay modes to choose from such as Mono, Stereo, and Ping-pong.
Just like with the chorus, a filter lets you high-pass, low-pass, or band-pass the delay output.
Pro-tip: automating the Feedback and Mix amounts during a build-up can be a great way to build up anticipation!
Want to deep dive into delay? Check out our dedicated guide here.
Distortion
Distortion is where you can get really crazy and completely transform your sounds:

From light saturation to intense bit-crushing, you’ve got a wealth of distortion types to choose from.
Personally, I love to automate the Drive and Mix amounts with an LFO to create variation and to build tension. Let’s listen to an example:
Here I am using the Down Sample type, and automating the Drive amount with a sin wave LFO. Notice how having the delay placed after the distortion adds dimension and a cosmic feel.
In this next example, I am using the Bit Crush type, and slowly increasing the Drive to create tension:
Distortion can bring out some harsh frequencies, so use a filter or an EQ if anything pokes out.
EQ
An efficient 3-point EQ with no bells or whistles:

The low and high cutoff points can be set to either shelf or low/high-cut mode. This is another case where drawing directly into the visualizer is handy.
Filter
The Filter in the Effects rack is a carbon copy of the 2 filters available in the Voice view, so we won’t go over them again:

Flanger
The Flanger is quite self-explanatory. Essentially, a flanger is a form of low-time delay combined with filtering:

When used too much, it can sound quite cheesy. Like with many other effects, I like to simply automate the amount over time to create some nice movement:
Phaser
Fairly similar to a standard phaser, this is another effect that can add movement to your sounds:

Pro-tip: try automating the Center amount to create a cool retro feel!
Reverb
Finally, a standard Reverb unit is at your disposal:

This is one that I prefer to use to simply experiment. For example, I might chuck it in the effects chain when designing new sounds to see if anything interesting happens.
But if I need a lush and spacious reverb, I will tend to reach for an external plugin.
I would say this is one area where Vital lacks compared to Serum. A few different reverb modes or presets would be nice; but hey again, Vital is free.
Recommended: Reverb – The Ultimate Guide For Music Producers
Vital Synth Matrix View
The Matrix is a great way to instantly visualize the different modulations (i.e. envelopes, LFOs, etc.) in your current patch:

In this example, we can see that LFO 1 is modulating the tuning of Osc 1, LFO 2 is modulating the level of the sampler, etc.
The Matrix lets you quickly bypass any modulation by simply clicking on the number in the first column. You can also quickly change the amount of modulation with the horizontal slider.
When loading a preset sound, I find the Matrix is a great place to start to understand what is happening. I can then tweak individual modulations one by one to get closer to the sound I have in mind.
You can also easily re-route any modulation source to any parameter within Vital, all within the Matrix. All you need to do is click on the name of the modulation source or the parameter being modulated:

Finally, for the more adventurous among you, the Modulation Remap Curve lets you set how quickly a modulation takes place:

We won’t go into more details here, but simply drawing new curves will make it obvious how the sound is affected.
Vital Synth Advanced View
I’ll admit that I don’t use the Advanced settings that much, although there are a few handy features.
To light up an Oscillator Options section, simply activate said oscillator. Only the oscillators with more than 1 voice will have the Oscillator Unison section enabled:

Stack lets you decide how the different voices relate to each other in terms of pitch.
Detune range sets the maximum amount by which your voices will be detuned.
Finally, the Analysis view gives you a visual representation of your sound. First is an Oscilloscope, and the second is a Spectrum Analyzer:

Typically, you’ll adjust these settings once or twice to make Vital work for you. And then you’ll probably never look at it again 😉
Vital Synth: Free Custom Skins
Just like with Serum, you can load custom skins in Vital. I’ve always found that a visually-appealing synth is super important. It helps you stay inspired, and makes you come back to the synth.
A vital skin is a simple file with the “.vitalskin” extension.
You don’t have to save them anywhere specific. Although it probably helps to stay organized and keep your skins in the same place.
To load a new skin, go to the advanced tab. Under “Display”, select “Theme”, then “Load custom theme”.
Here’s a list of some great free custom skins for the Vital synth:
- Echo Sound Works. Here you’ll find exact copies of the Serum and Phaseplant skins. Plus, you also have a crazy “Diabloic” skin!

- Better Beats. Another great list of free Vital skins. It features a great range of different skins, from eye-popping colors to duo-chromatic themes. My favorite is probably the Promethium theme:

- Vital Skin Sharing Thread. The Vital official forum also has a great list of skins for free. Check out the Gumroad Vital skin for a synthwave aesthetic:

Want to Make Your Own Vital Synth skin? 🎨
If you’re feeling adventurous, you can even custom design your own skins!
To open the Vital Theme Editor, hold ALT and click on the Vital menu icon:

Select “Edit Theme Colors” to open up the Editor. The layout is a bit confusing here, so let’s go over it together.
The easiest way to edit the theme is to click on any section of Vital. This will bring up the relevant parameters you can edit in the Editor:

For each section of Vital, there are several sub-menus. For example, in the Oscillator section, we have the “line_renderer” menu. If we click on it, we have a choice parameters we can adjust:
- LineColor
- LineFillColor
- LineDisabledColor
- etc.
To change the color of a parameter, simply drag a color onto it. Each color is saved on the left-hand-side and can be further edited later:

I would recommend using something like Coolors to create your color palette. Once you have all your colors in the Vital Theme Editor, you can assign them individually.
If you like a more soothing ambiance for your sound design, check out my own “Soothing Pastel” theme:

You can download it for free right here 👇
10 Tips To Get The Most Out Of Vital Synth
Before I let you go, let’s go over some quick tips and hidden secrets in Vital.
Pressing CTRL to fine tune
When adjusting any parameter, hold down CTRL to fine-tune the amount. You can also press ALT and click on the parameter to enter a value directly.
Octave shifts
If you want to quickly switch the octave of an oscillator, simply hold SHIFT when adjusting the pitch. This will transpose the pitch by increments of 12 semitones.
Using LFOs as Macros
If you run out of macros, you can use an empty LFO as a macro. Simply set the LFO Frequency to Freeze, and use the LFO Phase (the horizontal slider) as the macro knob.
Create Custom Reverb Tones with Chorus
You can actually create custom reverb tones with just the chorus effect. Give this a listen:
To achieve this, set the chorus frequency to Freeze, and assign a different Random modulation to Depth, Delay 1, and Delay 2. By modulating the 3 parameters by very small amounts, you get a beautiful reverb tone!
Create Randomized Sequences that Stay in Key
You can combine the Random modulation and the Transpose Snap function to create amazing melodies. Let’s have a look.
First, set each oscillator’s pitch to transpose into the key of your project:
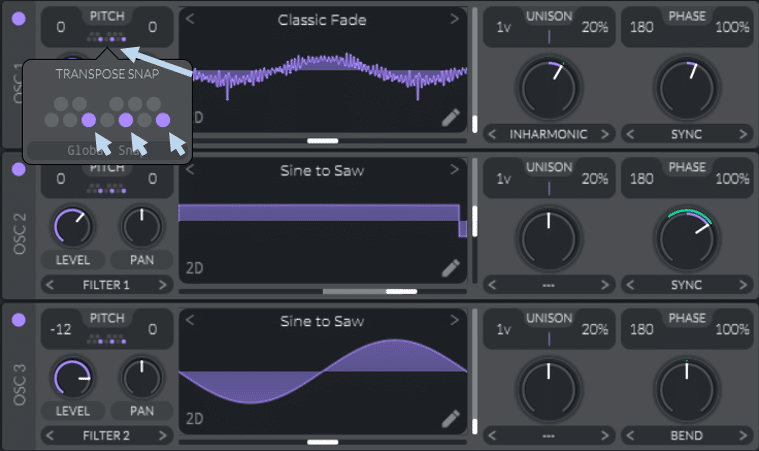
Next, set a random modulation to Sample and Hold, and drag the modulation onto the Transpose parameter of each oscillator:
Now, all you need to do is draw one long C note into your piano roll, and this is the result:
How cool is that? You can play with the modulation amount of each oscillator, as well as the frequency of the modulation to get amazing results.
This is perfect for re-sampling into an 8 bar-loop for example.
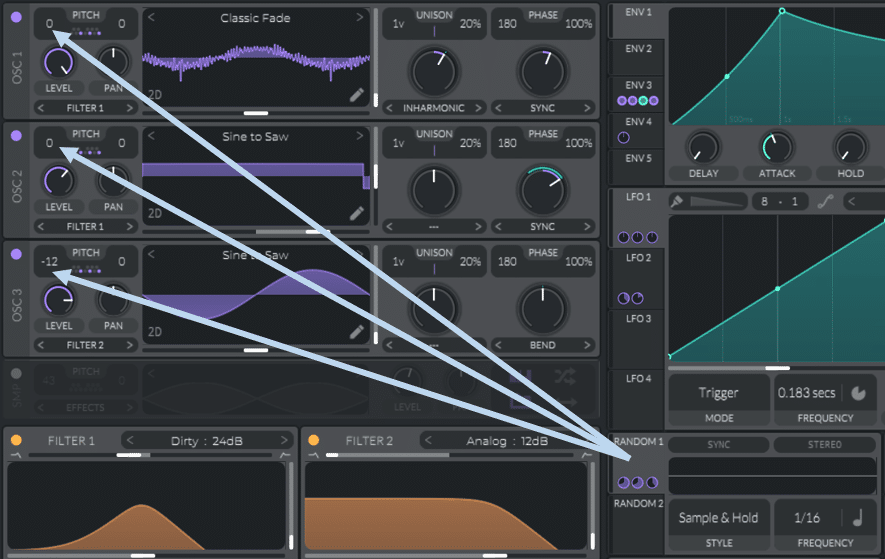
Key-tracking modulation
Key-tracking is an amazing feature that allows you to modulate any parameter based on the notes you play.
Practically, there are 2 different trackers that I find super useful within Vital: Note and Velocity.

Let’s examine both.
Note tracking lets you modulate a parameter based on the frequency of the note.
For example, you could set it to the amount of reverb. This means that the higher the note, the more reverb it will have. To do this, simply drag the Note modulation over to the mix amount of the reverb:

In this example, I’ve also added note mapping to the delay amount. Listen to what it sounds like:
You can clearly hear the difference between the low notes and high notes. While the low notes are distinct, the higher we go, the more it sounds like a pad because of the amount of reverb and delay.
Velocity tracking is very similar, but responds to how hard you play a note.
Here, the harder you play a note, the more modulation will happen. A classic example is with a filter: the harder you play a note, the more the filter will open up. To achieve this, drag the Velocity modulator to the cutoff frequency of your filter:

I’ve drawn the following pattern with the piano roll, taking care to adjust each note velocity individually:

This is what it sounds like:
Pretty cool, right? 😎 This is a great tool to add that little bit of variation to your melodies.
Glide and slop shape
Enabling Glide and adjusting the slope shape is a great away to add character to your note transition.
First off, enable Glide by turning up the knob:

Next, play with the Slope to create cool effects. Here are two examples with the following slopes:


Wavetable editor
If you really want to get into the nitty-gritty of sound design, check out Vital synth’s wavetable editor.
To access it, simply click on the “Draw” tool:

This will open up the editor window. From there, you can go into an extreme level of detail to draw your very own wavetables.
If you want to learn more about Vital synth’s wavetable editing, check out this great video.
Oversampling
Vital is (unfortunately) notorious for using quite a lot of CPU. If you have a low-performing laptop and CPU is an issue for you, make sure to check out our full guide here on optimizing your DAW performance!
If you find Vital glitching your DAW, try turning down oversampling to 1x:

This menu is available in the Advanced View.
Without getting too in the weeds, oversampling is the process of sampling a signal at a sufficiently high frequency. Practically speaking, 2x oversampling is plenty for most sounds. However, for sounds with very rich high-end harmonics, higher oversampling might be required.
In any case, if your laptop is struggling to manage Vital, turning down oversampling to 1x will help. Additionally, you can also reduce the number of voices in your synth. This will also greatly help with CPU load.
Last Words on Vital Synth
Hopefully, this will inspire you to start designing your own crazy sounds!
Did I miss out on anything? Feel free to get in touch with me at [email protected]
