


Pitch shifting and time stretching are two of the most commonly used sound design techniques.
Typically pitch shifting is used to change the pitch of an audio sample while keeping the duration of the sample unchanged.
Time stretching on the other hand is used to change the duration of the sample without changing its pitch.
In this guide, we will explore together some creative techniques beyond BPM and key matching, such as:
- How to time stretch and pitch shift samples in FL Studio and Ableton Live
- Interesting ways to create unique atmospheres through extreme time stretching
- The power of harmonizing your melodies by hacking pitch stretching algorithms
- And a lot more
Let’s dive in! If you need some samples to get started with, make sure to check out our Foley Sample Pack – full of sounds that are ready to stretch and process! 👇
Table of contents
- Tip #1 : Pitch Shifting in FL Studio and Ableton Live
- Tip #2: Time Stretching in FL Studio and Ableton Live
- Tip #3: Warp Markers in Ableton Live
- Tip #4: Harmonizing with NewTone (FL Studio)
- Tip #5: Creating the Stutter Effect in Ableton Live
- Tip #6: Haunting Textures Through Extreme Time Stretching
- Tip #7: Incorporate Other Genres
- Tip #8: Transforming Sounds Into New Instruments
- Tip #9: Transform Your Vocals With Little Alterboy
- Final words
What Do We Mean by Pitch Shifting and Time Stretching
Before diving into practical tips, a little refresher. If you’ve ever had a physics 101 class, this will probably bring back some (potentially painful) memories.
Frequency is measured in hertz (Hz), which is just a fancy way of defining the number of cycles per second of a given waveform. One hertz equals one cycle per second, so a higher number of hertz means more cycles per second, which the human ear will translate into a higher pitch.
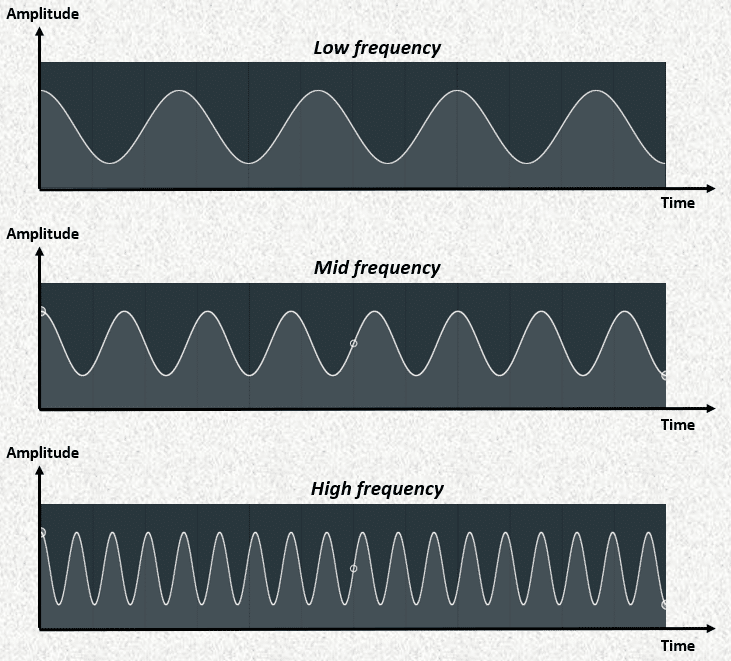
Visually, a higher frequency will therefore translate into a more “squeezed” waveform, while a lower frequency will look more spaced out.
Intuitively, you can see that if you stretch out (i.e slow down) a waveform, you will lower its pitch. If you speed up an audio sample, you will raise the pitch. This is why pitch shifting and time stretching are two sides of the same coin.
Through technological innovations, we can now time-stretch without changing the pitch, or change the pitch without changing the duration of the audio. This is what is commonly referred to when talking about pitch shifting and time stretching, and it opens up a world of possibilities.
A quick disclaimer that pitch shifting is different from frequency shifting. While pitch shifting will keep the harmonics in step, a frequency shift will move the fundamental and every harmonic by a certain number of Hertz, meaning the harmonics are no longer multiples of the fundamental, and hence lose their musical properties.
Tip #1 : Pitch Shifting in FL Studio and Ableton Live
First let’s look at how to use pitch shifting in two of the most popular DAWs: FL Studio and Ableton Live. We will be using only stock plugins in these examples, so you can easily follow along.
Pitch Shifting in FL Studio
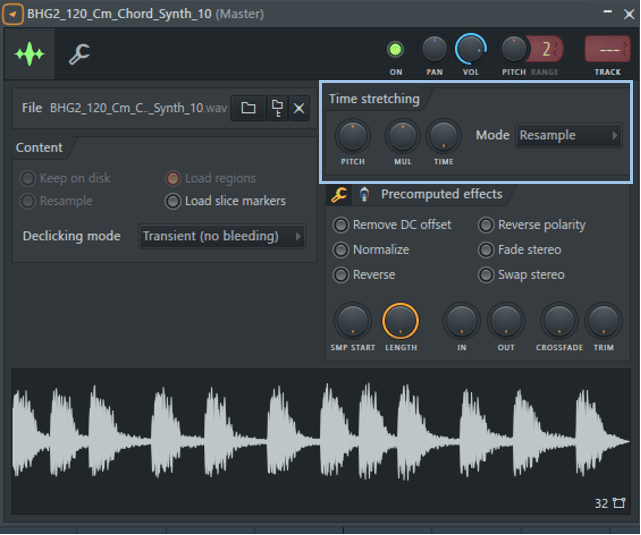
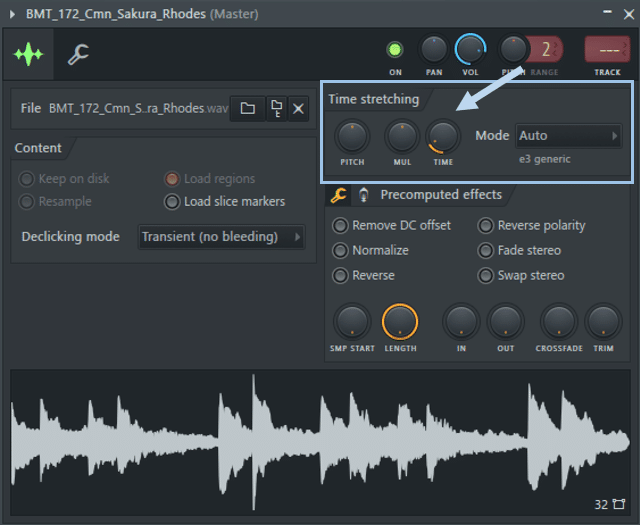
There are a few ways to pitch shift audio in FL Studio, but one of the easiest ways is to go directly into the Audio Wrapper of your sample by double-clicking on it.
In the top-right, you will see the Time stretching section.
Select Auto mode. This will by default select the best audio preservation algorithm based on your sample. You can then adjust the Pitch knob to the desired pitch. Each 100 cents increment corresponds to one semitone, so if your sample is in F#m and you would like to pitch it up to Am, then turn the Pitch knob up by +300 cents.
Feel free to experiment with different modes, as some might work better on samples with high transients (such as drums). The e3 mono mode is especially suited for vocals and other monophonic input signals.
Pitch Shifting in Ableton Live
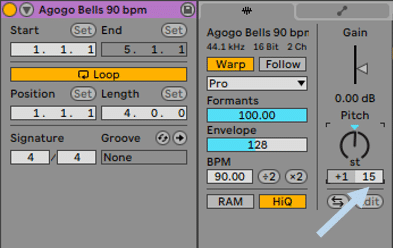
In Ableton Live, pitch shifting is achieved through its famous Warp mode. In the Sample tab of your audio clip, select Warp. Similar to FL Studio, Ableton Live offers different time-stretching modes. For the best audio preservation, select Complex Pro, then adjust by the desired amount of semi-tones.
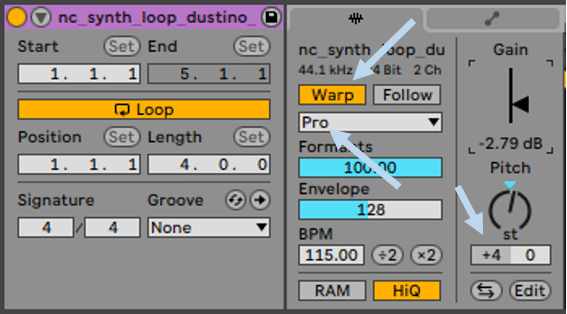
You can also adjust the Cents knob if you wish to pitch by an interval smaller than a semi-tone.
Different time-stretching modes will work better with different audio sources. Select Beats if the rhythm is predominant in your sample, or Tones for monophonic samples.
Recommended: How To Use Ableton Live – The Producer’s Guide
Tip #2: Time Stretching in FL Studio and Ableton Live
As mentioned above, pitch shifting and time stretching are two sides of the same coin. Much of the controls described below will therefore be similar to what we’ve already covered about pitch shifting.
Time Stretching in FL Studio
Open up the Audio Wrapper by double-clicking on your audio sample. Select Auto mode, and adjust the Time knob to make your sample fit the desired tempo.
In practice, there will be a set BPM you will want to match your sample to. An easy way to do this is to select Bar in the Snap to grid options.
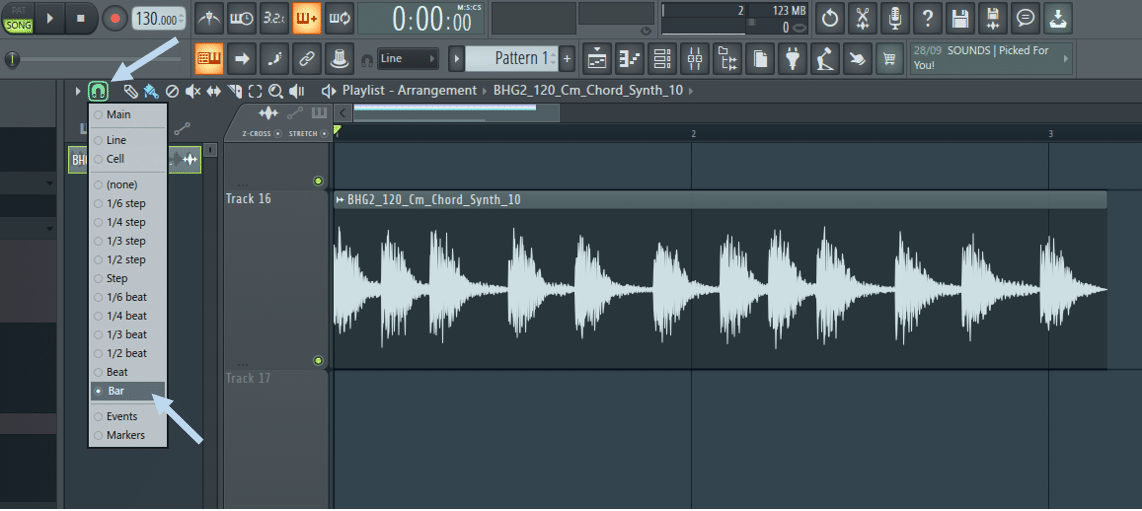
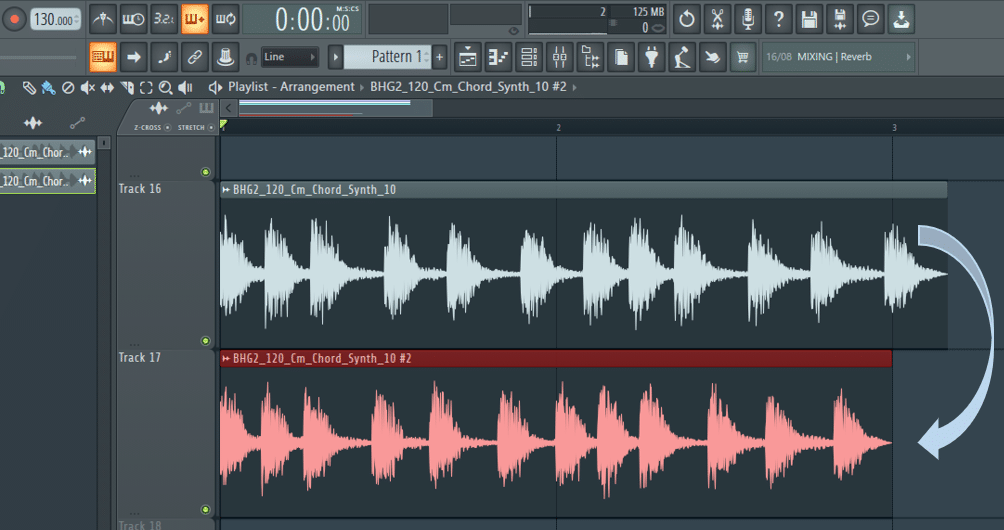
In the above example, our sample is at 120BPM, but our project is set at 130PM. To make the sample fit the grid, simply double-click on your audio sample, select Auto mode and adjust the Time knob until it snaps to the grid.
If you don’t know the tempo of your sample, you can use FL Studio’s built-in Tempo detection to find it for you. Click on the waveform icon in the top-left corner of your audio sample and select Detect tempo.
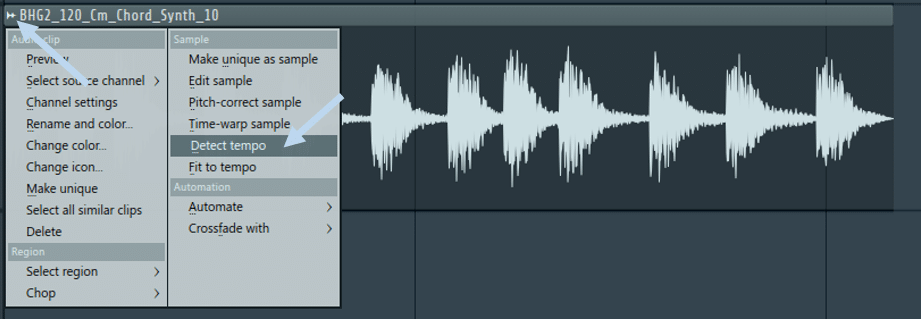
Enter the most probable tempo range your sample is set in (100 to 200 BPM is usually a good guess). Once the tempo has been detected, go back to your sample, click on the waveform once again, but this time select Fit to tempo. Click Type in (BPM), type in the tempo of your sample (not the tempo of your project!), and your sample should now be in time.
Time Stretching in Ableton Live
Compared to FL Studio, Ableton makes it a lot quicker to time stretch samples in time with your project’s BPM. Simply activate Warp in the Sample tab of your audio clip, then select the algorithm most suited to your sample as explained previously.
The sample will now play in time with your project, even if you decide to change the project’s BPM.
However, a key feature of Ableton Live’s Warp function is the ability to set Warp markers, as we will explore in the next section.
Tip #3: Warp Markers in Ableton Live
A key feature of Ableton Live’s Warp function is the ability to set Warp markers. Let’s look at these in detail.
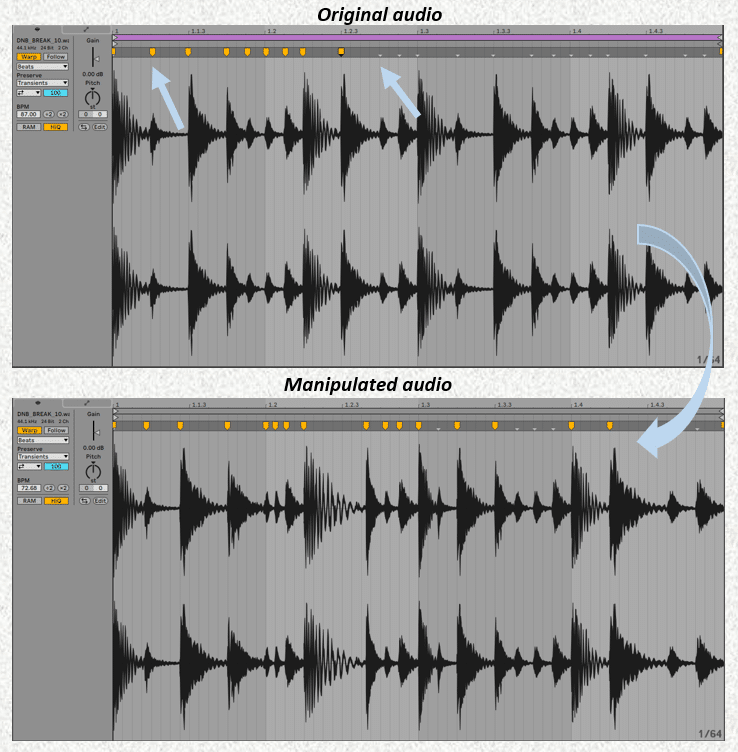
By zooming into the Clip View, you will see grey triangles called transients markers. As their name suggests, these markers indicate the transients of your sample.
By double-clicking on one of these markers, they become a warp marker, allowing you to time stretch or condense specific regions of your sample.
Let’s give it a listen:
This can either be used for corrective purposes (such as for a vocal take) or to create entirely new patterns.
Tip #4: Harmonizing with NewTone (FL Studio)
Harmonies are an essential building block of contemporary music. Often hidden in the background or barely noticeable at first listen, harmonies provide richness to your melodies and will help enhance your arrangements without the need for new elements.
Although NewTone is mostly used for pitch correction, it can also be applied to shift the entire pitch of a vocal sample, thereby creating brand new melodies. Let’s have a look at how to easily harmonize vocals.
First let’s have a listen at the original vocal sample:
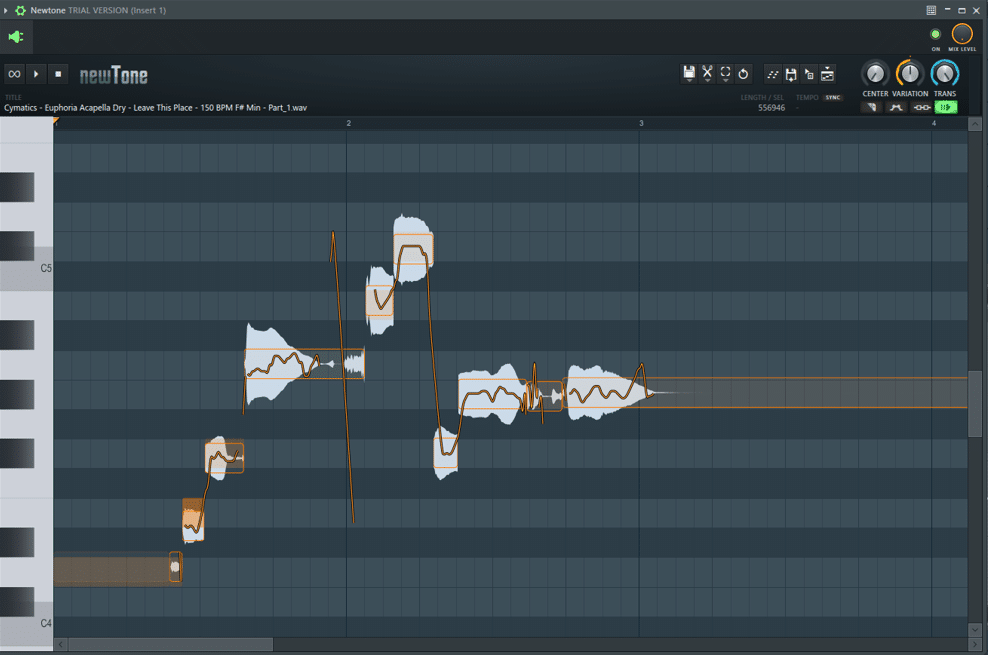
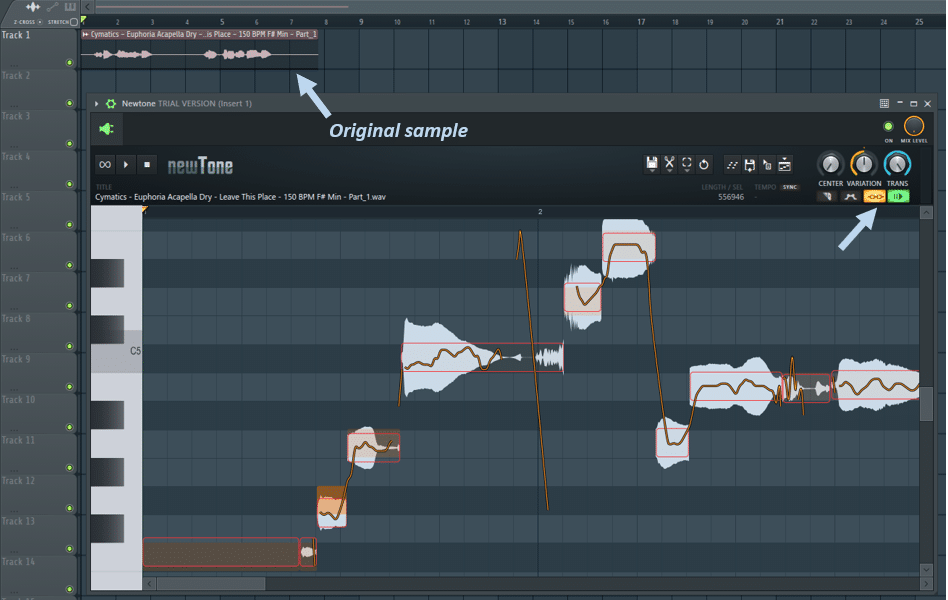
Firstly, simply drag your sample into NewTone. It will automatically cut your sample up into different syllables and their respective notes:
Before we start creating harmonies, make sure you have Slave playback to host enabled. This will allow you to monitor in real-time how your harmonies sound on top of the original sound playing in the playlist
There are many ways to write harmonies. You can go by ear, or you can use a little bit of music theory. Without diving too deep into scales and intervals, let’s look at how we can build harmonies with some basic theory.
One very common way to harmonize is to use perfect fifths. To do this, select all the notes by pressing Ctrl+A, and pitch shifting them up 7 semi-tones.
Let’s hear the result:
Pretty cool right? And you can get even more creative by pitching individual notes and creating entirely new melodies. Check this other example out:
NewTone is an extremely powerful tool and allows so much more than pitch shifting, such as rectifying tempo, formant control, and vibrato enhancement.
If you are curious about how to manipulate vocals further, check out our latest tutorial on vocal chops.
Tip #5: Creating the Stutter Effect in Ableton Live
One of the best ways to create interesting results is to misuse settings in ways they were not intended for. One such example is achieved by messing with the algorithms of Ableton Live’s Warp function.
As discussed in Tip #1 and #2, Ableton Live offers different Warp modes suited to different styles of samples. Let’s see how we can use this creatively.
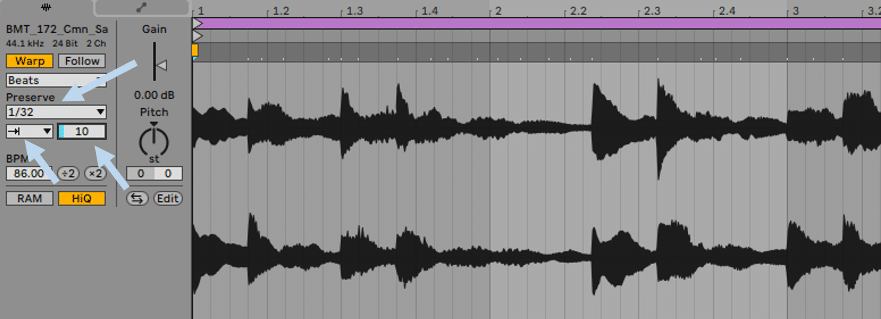
Select a melodic sample, such as a background pad or a simple chord progression. Enable Warp, select Beats mode, set Preserve to 1/16 or 1/32, set Loop mode to off, and reduce the time envelope to anywhere between 0 and 50.
Check out the results you can get:
Tip #6: Haunting Textures Through Extreme Time Stretching
Building on Tip #5’s advice of misusing settings for creative purposes, pushing time stretching to its limits can yield fascinating results. You’ve probably already come across some of these videos of popular tracks slowed down to the extreme:
Extreme time stretching is a way to create absolutely haunting and twisted soundscapes, all from relatively normal source material. Although there are ways to achieve the same result within your DAW, my go-to software to do this is Paul’s Extreme Sound Stretch.
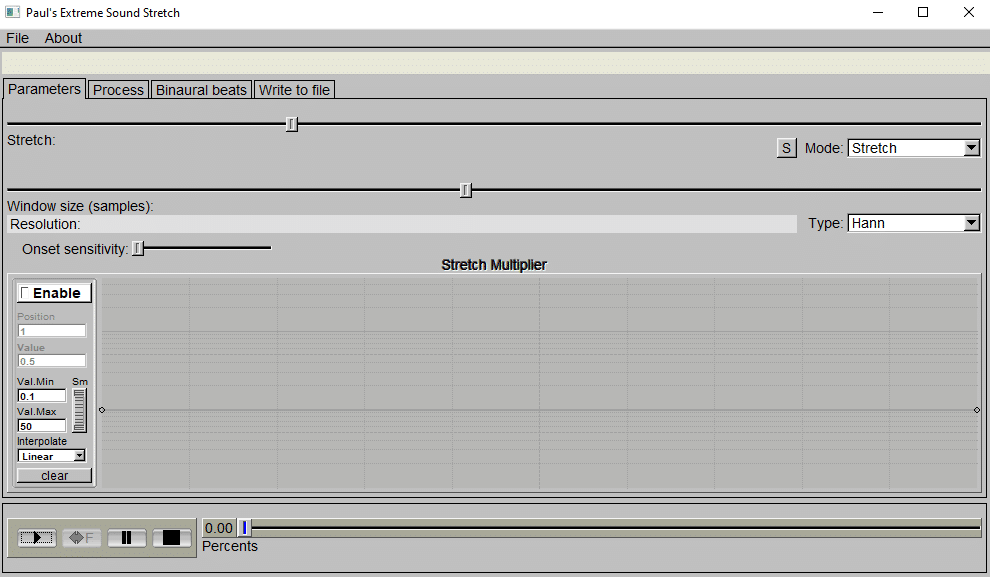
Yes, it looks like it’s straight out of 1996, but bear with me as I show you what it’s capable of.
As you might recognize, I am using a quite recent famous pop song as my starting point. Don’t worry about copyright issues, the audio we will end up with will be unrecognizable.
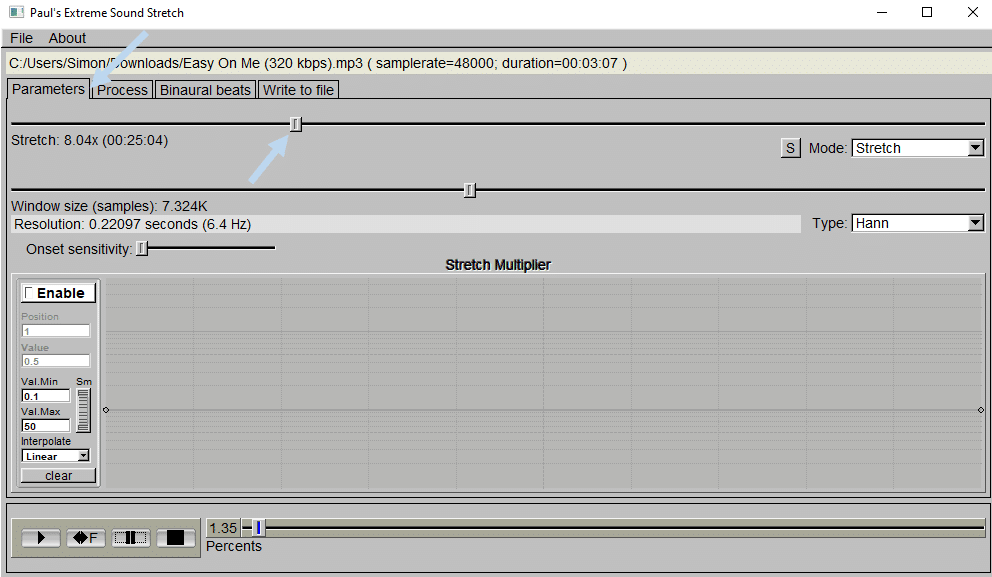
To time-stretch, navigate to Parameters and slide the Stretch button.
Unfortunately, the software’s built-in rendering options aren’t the most user-friendly and don’t allow you to render out specific portions of the audio. Two options are possible here:
- Route the audio to your DAW or to a recording software such as Audacity, and record dynamically from there. In this case, you can use the freeze function to isolate sections you want to keep.
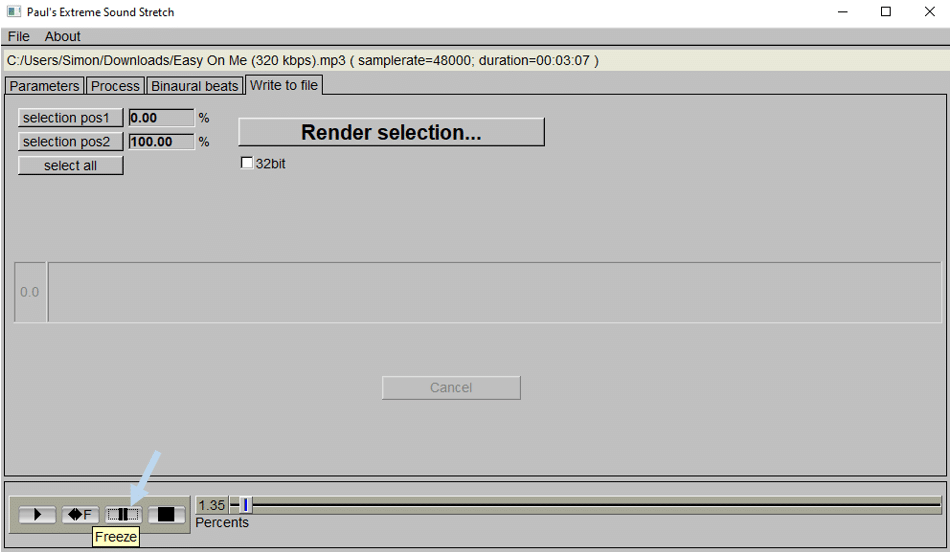
- Alternatively, I like to keep my options open, so I render the entire audio file at different speeds, and then work within my DAW to select interesting sections. Exporting at 8x and 20x usually yields a good range of results to work with.
Keep in mind that because you are stretching out an audio file, using audio clips any longer than 2min will create quite large files.
Let’s hear some of the clips I selected from these 2 rendering speeds:
And this is without any processing! With some basic filtering, reverb, and delay, you can create truly mesmerizing atmospheres. These also work particularly well for risers and transitions between sections, or when you just want to incorporate the atmosphere of a song without sampling it directly.
Tip #7: Incorporate Other Genres
One recurring challenge most producers will face at some point in their creative journey is how to come up with original ideas.
This is especially true when using sample packs that were made for the genre you are writing in: you end up using the same sounds as your peers in the scene. Have you ever used a sample in one of your tracks, only to realize it had already been used in multiple other tracks?
I know I have, and it’s not a great feeling.
One way to counter this is to explore obscure genres you are less familiar with and make those sounds fit into the tempo you are working with.
Let’s explore this. Here is the drop we will be working with. The tempo is 174 and the key is in Fm:

I’ve browsed Splice in some genres I am not used to checking, and here are some cool samples I found:
In the Middle Eastern Music category:
In the Trip-Hop category:
Let’s see how they sound over our original drop:
Pretty cool right? I used the first half of the Middle Eastern loop, and then transitioned into the Trip Hop loop to bring the track into a completely new world.
Despite both samples not being in the same key or the same tempo as my track, time stretching and pitch shifting allowed me to incorporate other genres into my music.
Tip #8: Transforming Sounds Into New Instruments
Pitch shifting can also be used to transpose instruments into registers they cannot naturally play in.
For example, I do not own a bass guitar, but one option would be to record my electric guitar and pitch it down to emulate the sound of a bass guitar.
Let’s explore this.
I’ve recorded a little melody that I feel could work well as a bass-line on my electric guitar, without any processing:
Let’s pitch the guitar down one octave, and add some processing to it:
Not too far from a real bass guitar, right? Obviously, this is not a perfect substitute, but as a guitar player, I find it sometimes more natural to write bass lines on a guitar and pitch them down after the fact, rather than having to write them on a MIDI controller.
Despite not owning a bass guitar, this is a great way to inject the natural tone and grain of a real instrument into your arrangement.
Tip #9: Transform Your Vocals With Little Alterboy
A guide about pitch shifting would not be complete without a mention of Soundtoys’ famous Little Alterboy plugin.

Little Alterboy is Soundtoy’s monophonic voice manipulation plugin, and although the interface is relatively simple, the amount of control and enhancement you can bring to your vocals is astounding.
Without going into a detailed run-through of all the controls, let’s have a listen at some of the results you can achieve:
Activating robot mode will pitch the vocal to a single note. When Pitch is set to 0.0, that note will be a C:
One of the brilliant features of Little Alterboy is the ability to mix in the processed signal with the original signal through the Mix control. Let’s have a listen at the preset Rich 5ths blended with the original signal:
From subtle backing harmonies to totally manipulated robotic voices, the possibilities are endless.
Recommended: Music Production Software – The Definitive Guide
Final words
Hopefully, you will now have a better understanding of the many creative ways in which you can use pitch shifting and time stretching to enhance, manipulate and transform your sounds.
If you want to explore sound manipulation further, make sure to check out our 7 Ways to Resample Audio!
