


How to make Phonk has been one of the most common requests from our students.
And I can understand why. It’s the most popular genre at the minute on TikTok and Instagram.
But where does Phonk music come from? And more importantly, how do you make it? That’s what we’ll cover in this guide on how to make Phonk!
Together, we’ll look at:
- The Origins of Phonk
- How to write a typical Phonk melody
- Creating a Phonk beat
- Adding HUGE 808s
- Adding FX, the arrangement, and more!
So without further ado, let’s get stuck in 👇
Table of contents
- What is Phonk? And Where Does It Come From? 🤔
- How to Make Phonk – Step 1: Lead Melody 🎶
- How to Make Phonk – Step 2: Add a Mean Beat 🥁
- How to Make Phonk – Step 3: PHAT 808s 🥴
- How to Make Phonk – Step 4: Hip Hop Vocal Sample 🎙️
- How to Make Phonk – Step 5: FX and Background Ambiance 🌫️
- How to Make Phonk – Step 6: Arrangement 🎼
- How to Make Phonk – Step 7: Mixdown and Final Touches 🎛️
- That’s It For This Guide on How to Make Phonk! 🙏
What is Phonk? And Where Does It Come From? 🤔
Phonk actually traces its roots back to the 1990s. More specifically, it draws heavy inspiration from the Memphis rap scene of that time.
Wanna jump straight into it? Check out our full genre breakdown over on our YouTube channel:
Check out this track from 1996. You’ll hear a lot of the aesthetics of today’s Phonk scene:
Note: a lot of the Memphis rap scene from that era has a… controversial history. We are not condoning any of that, but simply tracing back the roots of today’s Phonk music.
What stands out immediately is the low quality of the recording. This is reminiscent of the Soundcloud rap scene of the 2010s.
Other notable characteristics include repetitive vocal hooks and simple melodies.
Check out this other track from 1994 by Skinny Pimp. At the 1:20 mark, you’ll hear the basis of today’s Phonk music:
Phonk takes direct inspiration from Memphis rap while adding a darker layer. This is often achieved with heavy distortion, pitched-down vocals, and eerie atmospheres.
The sub-genre of Phonk you’re probably familiar with is called “Drift Phonk”.
This sub-genre became massively popular on TikTok, often accompanying drift or fighting videos. Funnily enough, a lot of these videos were coming from Russia. From Memphis to Moscow… Who would have thought? 😅
In this tutorial, this is what we are going to re-create. I am going to use this track from Kordhell as a template for our own track:
Almost half a billion streams… I think it’s a safe bet to imitate this track 😇
So without further ado, let’s get started 👇
How to Make Phonk – Step 1: Lead Melody 🎶
First things first, let’s set a BPM.
Phonk is quite a versatile genre in terms of tempo: anything from 120 all the way to 150 will work.
You can also go up to 170 or 180 BPM, but you would then be in half-time (i.e. the kick is not on every beat, like for drum and bass).
For our project, I’ve set the tempo to 130:

But before writing our melody, let’s find our sound.
Finding the right lead sound
The most famous sound in Phonk melodies is the pitched cowbell. It sounds something like this:
There are a million different variations of this sound on Splice and Loopcloud. So pick one that you like – you can always swap it out later.
I’ve written the following melody with it:

And here is what it sounds like:
A very common scale in Phonk is the Phrygian dominant scale.
Don’t worry, I won’t bore you with complex music theory 😅. If you want to learn more about this scale and others, I’ve made a full guide over here.
In a nutshell, the Phrygian scale starts with the natural minor scale. If we are in A, this would be
A – B – C – D – E – F – G
All you have to do next is flat the second note:
A – Bb – C – D – E – F – G
And there’s your Phrygian dominant scale! Another example with E would be:
E – F# –> F – G – A – B – C – D
The notes that sound the best for Phonk within this scale are usually the 1st, 2nd, 5th, and 6th. In the case of the A Phrygian scale, this would be A, Bb, E, and F.
Of course, you can always write without any music theory. But it helps to know which notes sound good together 😉
What about designing my own lead sound?
But maybe you’re more interested in designing your own lead?
If that’s the case, let’s have a look at how to do it 🔥
I will be using the free synth Vital, which you should definitely grab:

By the way, if you want to grab this custom Vital skin, head over to our Free Downloads page 😉
First, I am going to load up 2 different wavetables:
- Crappy Toilet
- Annoying OP
Both are available in the preset bank when you download Vital.
Next, pitch down OSC 2 by 7 semitones:

You will need to manually scan through the wavetable to find a sound that fits. I settled roughly in these positions:

Now, we want to draw our ADSR envelope to create a plucky sound. I’ve set the following times:
- Attack: 0 sec
- Decay: 0.54 sec
- Sustain: 0%
- Release: 0.321 sec
This is what it should sound like at the moment:
Next, add a Noise layer to introduce some grit. I’ve gone with the Grinder preset. But you can load up any noise sample you like:

Adding Some FX
Now, it’s time to process our sound! The goal here is to make it huge, dirty, and distorted.
I’ve gone with the following effects chain: Chorus –> Compressor –> Distortion –> Reverb.
Here are the settings I used. Feel free to copy them and use them as a template:

Your lead should now sound something like this:
Finally, let’s add some more movement with envelopes and LFOs.
Firstly, I added this very short envelope to the pitch of OSC 1, OSC 2, and the SMP. You want to keep the amount small so that you don’t turn your lead into a laser:

I also added an LFO to:
- the cutoff of FILTER 1
- The Distortion Drive control
This adds some more movement to each note.
In the end, you should have something like this:
What’s even better, you can now layer this in with a cowbell from Splice:
Still with me? Awesome 😇 Let’s move on to some drums now 👇
How to Make Phonk – Step 2: Add a Mean Beat 🥁
Drums in Phonk can vary widely. I’ve heard Phonk tracks with a classic Trap beat or UK Drill beats. I’ve even heard Phonk tracks with a 4-on-the-floor House beat.
In the track “Murder in My Mind” from Kordhell, you actually get a pretty basic House beat:
There is however one common denominator: HEAVY distortion!
So let’s build our beat up. For our tune, I wanted to go with more of a Drill type beat.
First, let’s lay down a Kick and Snare pattern:
Next, I am going to layer up the snare with another snare and a clap. I’ve also added one hit of a “reverb clap” to add some space:
If you want to add some extra width, add another clap. Add a high-pass filter to it, then add some stereo widening.
Processing Your Drums
While I lay the drums down, I am also doing some processing.
When layering sounds, it’s especially important to process sounds in a single bus. Here on my Snare/Clap bus, I’ve added some EQ and Saturation:

Remember, you can’t go overboard with Phonk. So crank up that distortion!
Next, let’s fill up the beat with some hats. I downloaded different loops from Splice, then cut and pasted sections I liked.
Next, I routed all the hats to a single bus. There, I added some EQ, OTT, and (again) heavy saturation.
This is what my beat sounds like now:
What you can also do is add something like LFO Tool (or STFU, a free alternative) to your hats bus. This will add some extra movement:

While we’re at it, let’s add some sidechain compression to our lead melody. I am going to duck manually the volume of the lead on each Kick and Snare hit:

This is going to let the kick and snare cut through the mix.
How to Make Phonk – Step 3: PHAT 808s 🥴
Right, time to add some PHAT 808s!
We’ve done a complete guide on 808s over here, so feel free to check it out.
For this tutorial, I am going to grab a sample directly from Splice:

Here are a few guidelines for writing an 808 bassline for Phonk:
- Add an 808 on every kick
- Stick (mostly) to the root note
- Cut out the 808 on every snare/clap (optional)
- Add some glides between octaves (optional)
- DISTORT IT 😍
Here’s what it sounds like:
Nasty 😈
How to Make Phonk – Step 4: Hip Hop Vocal Sample 🎙️
Let’s move on the one of the most crucial aspects of Phonk: the vocal.
For this, I wanted to pay homage to the roots and looked up some Memphis rap acapella.
Now, let’s process it a bit to make it sound… Phonk 😍
I’ve created several layers using Soundtoys Little Alterboy. Here’s what they sound like:
And yes, they sound “Low Quality” on purpose. Mixing them all together, this is what we get:
Phonk vocals are often buried in the mix and unintelligible.
If you’re sampling old records, here are a few guidelines to follow:
- Make sure to mono your sample (you can use a free tool like A1StereoControl for this)

- Pitch your vocals up or down, or use formant shifting
- Remove most of the low and high frequencies to create a radio-style EQ
- Degrade the audio with distortion and bitcrushing
- Don’t be afraid to sidechain your vocal directly to your kick and snare
Nice! Now, let’s fill out our loop a bit more 👇
How to Make Phonk – Step 5: FX and Background Ambiance 🌫️
This part now is totally up to taste. But the goal is to insert some effects, transitions, gang shouts, and noises to fill out the arrangement.
Here are a few samples I selected:

You can also fill out your drum loop with some white noise, reverse claps, percussion, and more.
But for now, let’s move on to the arrangement. Once our whole track is laid out, it will be much easier to fill in the gaps with more FX and transitions.
How to Make Phonk – Step 6: Arrangement 🎼
The arrangement is a crucial part of any song. This is how you keep your listener engaged for the whole duration of the track. By the way, if you haven’t yet, check out our Free Arrangement Checklist 😉
We are going to use “Murder in My Mind” as a template here. You can take any song you want, but this is an excellent trick for “getting out of the loop”.
I am going to mark down every time the track changes section:

In this 2:25 track, we have in order:
- a 2-beat “Pre-Intro”
- an 8-bar Intro
- an 8-bar Drop
- an 8-bar Drop with vocals
- an 8-bar Chorus (or Switch)
- an 8-bar Drop
- an 8-bar Drop with vocals
- a 16-bar Chorus (or Switch)
- a 4-bar Outro
And that’s it! So let’s replicate this with our own track. First, let’s lay down some markers:

If you’re in Ableton Live, you can use Dummy Clips instead (I talk about this more in detail in this guide). As you can see, I’ve already filled in the arrangement with our drop.
Adding an Intro
After a bit of work, this is what my intro sounds like:
Here are some ideas I used that I encourage you to steal.
Firstly, I used the free Izotope Vinyl plugin to create that LoFi effect. I also added some different risers to introduce every new 4-bar section.
For the main build-up before the drop, you want to create as much tension as possible. Here, I played on the classic kick build-up:

I also removed every single element besides the vocal right before the drop hits. This creates an additional impact when all the elements return.
You could also slowly high-pass the drums as the drop approaches.
My best tip for you here is to listen to your favorite tracks. What sort of effects do they use? How do they arrange every bar of their sections? By observing the pros, you’ll pick up tricks you can use in your own productions.
The Switch
Let’s move on to the rest of the track. After our intro, we have our main drop with no vocals. Then, our vocals enter.
What you can do here is pitch your melody up or down an octave. This will introduce some variation, for a minimal amount of effort 😅

This is what it sounds like:
Now, we need a proper switch. This section basically acts like a sort of chorus or breakdown.
The main elements you want to change here are:
- The lead melody
- The vocal

For the purpose of this tutorial, I’m going to keep things simple. I’ve changed the lead melody to make it more discreet and layered different vocals and pads. I am intentionally changing the mood of the track to create that “switch” effect.
This is what it sounds like:
However, you don’t want to remove every single element. Your track needs to keep some continuity, so you should at least keep:
- Main beat or groove
- Lead sound (but change the melody)
- 808s
- Some vocal chops
Great! Now you have every single section of your track! Now let’s move on to the last stage of this “How to make Phonk” tutorial 🤩
How to Make Phonk – Step 7: Mixdown and Final Touches 🎛️
A big part of what makes a Phonk track “Phonk” is the audio aesthetics.
Just like with LoFi Hip Hop, Phonk aims for low-quality audio on purpose.
So when mixing down your track, keep 2 things in mind:
- Have I added enough distortion? (probably not 😅)
- Am I using enough sidechain compression to make room for the elements?
Let’s tackle distortion first.
My favorite plugin to “dirty up” a sound is Decapitator by Soundtoys:

If you want a “free” alternative, check out CamelPhat3 (we’ve done an extensive guide on it here by the way).
My recommendation is to apply a healthy dose of distortion on every bus track. Some examples of bus tracks where you can apply distortion are:
Processing a bus track as a whole will give more cohesion to your elements. You can also use a good amount of compression (think OTT-style) to glue all the elements of your bus.
Sidechain Compression to Create Space
Next up is sidechain compression.
This is crucial to ensure your track doesn’t become one big soup. I know we are going for “degraded” quality, but we still want to make out the different elements 😅
If you’re in FL Studio, you can use a stock plugin like Fruity Limiter:

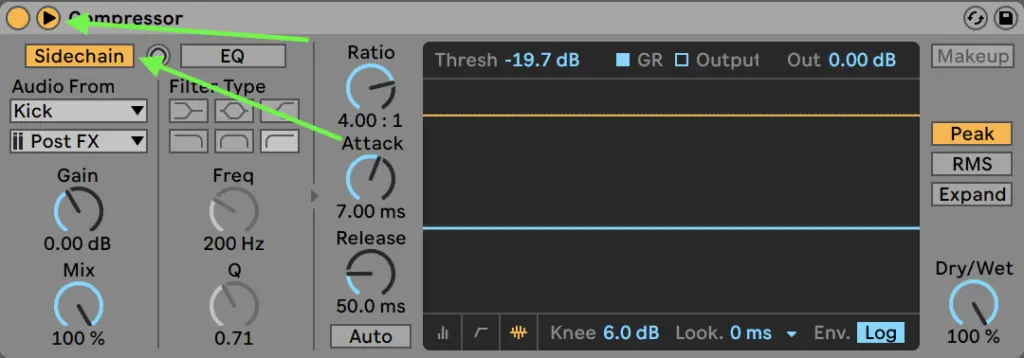
In Ableton Live, load up the stock Compressor and set it to “Sidechain” mode:
If you want to learn more about sidechain compression, check out our extensive guide over here 🔥
The main elements you want to cut through are the Kick and Snare. So most of your elements should be ducking when those two hit.
At this stage, you also want to add the final 5% that will make your track sound professional.
This includes:
- Polishing every 4-bar or 8-bar transition (check out this guide for some inspiration)
- Layering, especially for your lead sounds
- EQ’ing every sound and bus track
- Volume automation
- Clipping and Brickwall limiting
The last stage is crucial if you are mastering and uploading yourself.
This will ensure your track has the proper loudness and will compete with others. Don’t be scared to go overboard here! Phonk is all about pushing things beyond a reasonable limit 😅
Finally, make sure you are using a reference track. This is how you’ll know you’ve gone too far, or not far enough!
That’s It For This Guide on How to Make Phonk! 🙏
This wraps up our guide on how to make Phonk! I hope I was able to give you some pointers and ideas to start your own tracks 😊
Did I miss out on anything? Any questions? Feel free to reach out to me at [email protected]
