


Hi hats are synonymous with groove in EDM.
Actually, this might be one of the reasons your music sounds robotic 👀
It’s easy to overlook hi hats, and focus instead on kicks and snares. But human-sounding hi hats will give your track a professional shine. That’s what we’ll explore in this guide!
Together we will look at:
- Why hi hats matter
- How to design hi hats
- How to automate certain parameters to create variation
- How to “choke” your open hi hats 👀
Ready? Let’s get started! 👇
Table of contents
- Hi Hats: Why They Matter ⚠️
- Trick #1: Design Them Yourself 👩💻
- Trick #2: Start With A Good Sample 🧪
- Trick #3: Vary the Sound of Your Hi Hats 🎶
- Trick #4: Move Those Hi Hats Off-Grid! 🎹
- Trick #5: Switch Up Your Patterns 🎨
- Trick #6: Play with the ADSR Envelope ✉️
- Trick #7: Choke Your Open Hi Hats 🥁
- That’s It For This Guide! 🙏
Hi Hats: Why They Matter ⚠️
Hi hats are often overlooked by producers. We tend to focus on the big elements: kick, snare and claps. When we need hats, we often take the first loop we find and drop it in.
But hi hats and shakers are what give groove to our tracks.
And if you’re not careful, your music will quickly sound robotic. Listen to these 2 examples:
I think you’ll agree one sounds better than the other 😅
Hi hats are the most repetitive elements of your track. In fact, it might be the sound that gets played the most during the whole track!

Here’s a quick calculation. For a 3min-long track at 125BPM, you’ll get an average of 1500 hi hat hits.
This is why it’s crucial to spend time on them.
There are a million ways to achieve human-sounding drums. We cover the topic of drum programming more in detail in this guide here.
But for now, let’s focus on hi hats. Here are 9 of my favorite tricks to make them sound better 🔥
Trick #1: Design Them Yourself 👩💻
Designing your own hi hats is the best way to make them sound human. This is because you can then automate any parameter in your synth (more on that later 👀).
Let’s look at how to design your first hi hats in Vital.
Pro-tip: If you haven’t yet, make sure to grab Vital. It’s as good as Serum, free, and we have a full guide on it here🔥
All we need to start is a noise layer. In Vital, de-activate all oscillators, and enable the Sampler:

Here, I’ve selected “White Noise”. But you can try any type of noise, and even drag in your own recordings.
Next, draw in the following LFO shape. Drag it to the volume control of the sampler:

This basically automates the level of our white noise. This is what you should have now:
Finally, draw in a similar shape in LFO 2. Drag it to the high band of the EQ:

This will add some presence in the high-end:
And that’s your basic hi hat! You can now process it with compression, reverb, saturation, and more.
You can also easily switch out the sample layer to your liking:
The advantage of this technique is that you can fine-tune every detail. You can also automate parameters, as we’ll explore later on.
Want to create some instant variation?
Hit the “Sample Random Phase” button. This will trigger the sample at different spots on every hit:

Looking for more tricks to get better-sounding drums? Check out this video from Luca:
Trick #2: Start With A Good Sample 🧪
Of course, you don’t HAVE TO design your own hi hats. If you want, you can use a sample as a starting point.
But here’s my tip: start with a good sample.
If your sample is weak, no amount of processing will improve it.

Secondly, try to find a sample with as little reverb as possible. This is because we’ll want to apply our own reverb to it later.
Pro-tip: you can also use a transient shaper to remove reverb from a loop.
Finally, and most importantly, make the sample your own.
This is the most important part. Don’t just drag in a 16-bar hi hats loop into your project.
Instead, try something like this:
- Step 1: find a loop you like
- Step 2: isolate a single hit

- Step 3: Sculpt the envelope to your liking

Nice! We’ve gone from a full loop to our very own hit hat 😎
Of course, this is not to say you can’t use full loops. We even dedicated a full guide to the best classic drum breaks. However, try to use loops as textures to fill in the spectrum.
And when it comes to the main elements, make them yours 👍
Trick #3: Vary the Sound of Your Hi Hats 🎶
One key aspect of realistic hi hats is their sound. If every hit is exactly the same, it will sound robotic.
Think of it this way when a drummer plays. Does he hit the cymbals identically every time?

Of course not. There will be slight variations in the way he hits every hi hat. The force, the placement on the cymbal, etc. All of these will give the hi hats varying sounds.
This is what we want to re-create in our productions.
Here are a few tricks you can try out.
Automating the Pitch
Slightly changing the pitch is a great way to add subtle variation.
In FL Studio, you can randomize pitch directly in the Piano Roll:

Select your hits, and press ALT + R. This will bring up the Randomizer tool. Gently increase the “Pitch” knob to create random pitch variation:
Usually, I stay below 10% here. Otherwise, the hits become too different from one another.
Looking for more cool Piano Roll tips? We have you covered here 🔥
In Ableton Live, enable the LFO and set it to “Sample and Hold”:
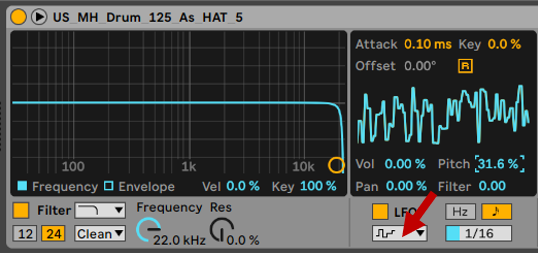
Set the tempo in line with the rhythm of your hi hats. Then adjust the “Pitch” percentage to your liking!
Automating a Filter
This technique also works well with filters.
In this example, I’ve set a radio-style EQ on my hats. I am then automating randomly the amount of EQ:

If you’re new to LFOs, we’ve done an extensive guide on them over here.
Basically, they allow you to modulate other parameters.
In this case, I am using Fruity Peak Controller’s LFO section. Setting it to “Random” and in time with the hi hats modulates the EQ of every hit:
If you want to learn more, everything is in our LFO guide 🔥 Best of all, this works with any parameters you want!
For hi hats, here are some other suggestions for modulations:
- automating the volume of your hi hats
- automating the amount of saturation
- automating the amount of reverb
- automating the amount of bitcrushing
- automating the panning with a free plugin like Pancake
Looking for a full guide on drum programming? We have you covered 👇
Trick #4: Move Those Hi Hats Off-Grid! 🎹
Let’s face it. As producers, we love to copy-paste 😅
Especially in the piano roll, DAWs make it super easy to drag out a pattern. But this can kill your groove.
Having every hit on the grid is the best way to sound like a robot. Think about it: which drummer is always perfectly in time? Nobody 😁

To move your hi hats off-grid, you’ve got several options. Let’s look at a few of them.
The first option is to do it manually.
Not the most fun, but probably the most effective. Basically, you move each hit slightly off-grid.
My preferred method is to use “Grooves” in Ableton Live:

In the Grooves folder, pick any groove you like. Then adjust the “Timing” and “Random” controls to accentuate the effect:

Here’s what it sounds like:
Trick #5: Switch Up Your Patterns 🎨
Switching up your hi hats pattern is a great way to make them feel human.
The idea is to avoid hitting every 16th note during the entire track.
Your pattern variations could look something like this:

And sound something like this:
You don’t want to go too crazy here. But just enough to keep the listener engaged 😉
If you want to bring this trick to the next level, introduce some open hi hats.
Trick #6: Play with the ADSR Envelope ✉️
This trick takes a bit more time to set up. The idea is based on the concept of arpeggiators (which we’ve explored in this guide).
Basically, you create 4 or 5 different versions of your hi hat. You then “arpeggiate” randomly between them:

Then, set your Arpeggiator to “Random”, and set the Rate to 1/16. This will ensure every hit is triggering a random sample.
Finally, draw in all 4 notes in the piano roll:

In my Drum Rack, I’ve created several copies of the same hi hat. Here, you can change any parameter you want (like velocity, pitch, etc). However, I like to play with the ADSR of each hit.
In particular, changing the decay of each hit is a great way to add variation.

The downside of this technique is that you can’t combine it with different patterns.
The arpeggiator will always play a note every 16th note. So you’ll have to create another MIDI clip if you want to vary your pattern.
Trick #7: Choke Your Open Hi Hats 🥁
Last but not least, let’s talk about choking. Don’t worry, it will all make sense 😅
On a real drum kit, your hats can have two positions: open or closed. It can’t be both at the same time.

We need to take this into account when programming our drums. This means that:
- every time we play a closed hi hat, the previous one needs to “stop”
- when we play an open HH followed by a closed HH, the closed HH needs to close, or “choke”
Listen to this example:
You can hear how the open hi hats are spilling over onto the closed hi hats. This is not what we want.
Rather, we want to “choke” the open hi hat when the closed hi hat plays:
How do you achieve this?
Manually
If you’re working with samples, you can do it manually:

Drum Samplers
But the best way is to work with a drum sampler. In Ableton Live’s Drum Rack, click “Show Chain List”, then click on “Show Input/Output Section”:

This will bring up the Choke Groups for each pad.
In this example, my open HH is on Pad 2. Therefore, I want every other pad to “choke” pad 2:

Let’s give it a listen:
Nice 😎
Depending on which drum VST you use, the procedure will be different.
For example, with FL Studio’s FPC, you get “Cut” and “Cut By”:

In this case, the CUT number sets the cut group the selected Pad is in. The CUT BY then sets which group will cut the current Pad.
A final useful trick is to cut a sample by itself!
For example, you might use a ride cymbal with a very long tail. In this case, cutting the sample by itself ensures the ride doesn’t overlap with itself.
That’s It For This Guide! 🙏
That’s a wrap! Hopefully, I could give you some ideas to spice up your hi hats.
Did I miss out on anything? What’s your favorite hi hats technique? Let me know over at [email protected]
