


Want to nail the last 10% of your song? Check out our comprehensive course, Mastering For Producers 🚀
LUFS is the modern standard for measuring loudness in music.
Everyone wants a clean, loud, and polished master – especially if you’re making EDM. And to get that results, you need a reliable way to measure that. This is where LUFS comes in.
In this article, we cover:
- What LUFS means
- How you can make better tunes with it
- The loudness wars and what it means for music
- What you should be aiming at for different services
- Some free and paid metering plugins
Let’s go! 👇
What is LUFS?
LUFS simply stands for ‘Loudness Units Full Scale’.

The measurement for LUFS is ‘Loudness Units’, and the ‘full scale’ refers to the comparison to 0dB being the loudest point along that spectrum before clipping.
In some circumstances, it is referred to LKFS, which just means that the LUFS measurement is K-weighted – but they are essentially the same measurement.
In basic terms, it measures your track’s average loudness over time, adjusted for human hearing differences.
This is because humans don’t hear frequencies evenly across the spectrum – some we hear louder than others, and some a lot quieter than others (like bass).
Looking to master your first track, but feeling confused? Check out our YouTube channel:
LUFS vs. RMS
For a very long time, RMS was the standard in music for measuring average loudness. RMS stands for ‘Root Mean Square’.

Peak Volume, and the light green
is RMS
It simply analyzed a signal over time and gave the average dB reading for it.
But the reason it quickly became outdated was because it’s not adjusted for human hearing – it wouldn’t place weighting on certain frequencies which we can’t hear as well.
Many loudness metering plugins still use RMS, and many DAWs still use it as a metering tool. But LUFS will allow you to get much more accurate data, and can help you understand why your mix sounds the way it does.
Why is this? LUFS takes into account ‘loudness perception’, and this is based on what is known as the Fletcher-Munson Curve.
You can read into it more, but basically, mids are heard more prominently than bass and highs, so a mix that has high RMS might have lower LUFS due to the level of the bass, for example. Then you might need to crank out that EQ, or adjust some levels.
Short-term vs. Integrated LUFS
Short-term LUFS looks at a shorter window of time and is great for identifying the loudness of a particular section.
The window of time that different plugins use for the short-term varies.
In comparison, Integrated LUFS continues taking new loudness information into account over time and updates the average value.

So if you play your track from start to finish while metering, the LUFS value at the end will be the average volume of your whole track.
Integrated LUFS is most commonly used when comparing tracks. You might hear that Skrillex masters at -4 LUFS, so you might try to aim for your tracks to be -4 across the entirety of your music.
The integrated value is also what the streaming services use as their target value for loudness matching.
LUFS and The Loudness Wars
For a very long time, engineers, musicians and producers have been pushing the maximum LUFS they can get to without ruining the quality of music.
This has gotten higher and higher over time, as limiting and maximizing has gotten more sophisticated with the algorithms, allowing music to become extremely loud without any obvious repercussions.
Besides the lack of dynamic range, which has created a years-long debate amongst the music and audio communities.
The main reason for the increase in loudness is that to humans, louder is better.
Compared to the last record, if yours is louder, it will likely be perceived as more ‘professional’.
But that’s all changing with music streaming services.
Recommended: How To Get Full Mixdowns by ‘Thinking Like A Compressor’
LUFS Targets on Music Services
Since services like Spotify and Apple Music have become the gatekeepers of most music, they each come with their own way of standardizing the listener’s experience.
One main way they do this is by targeting the same LUFS level for all music and adjusting the gain as a result.
For example, if you’re making a tune at -6 LUFS, Spotify will turn it down to -14 LUFS if their target is so.
The problem is, Spotify just turns the volume down. But to get to -6 LUFS, you sacrifice a lot of dynamic range.
LUFS and Dynamic Range
The dynamic range is the dB difference between the highest and lowest ‘true peak values’. These true peak values are estimations of the analog representations of audio waveforms, rather than just the digital peak.
This means they’re more accurate for real-world applications.
But back to dynamic range. Often when achieving a loud master, we can sacrifice dynamics range for LUFS. It’s almost impossible to get high LUFS without reducing the dynamic range of the material.
The problem is, loudness normalization on streaming services doesn’t adjust dynamic range. It will turn down the LUFS, but you still have a compressed waveform.

The result? A quiet mix with no dynamics.
So once you’ve gone loud, you can’t get those dynamics back. That’s why a lot of engineers are purposely mastering quietly these days.
Platform Targets
Here are the LUFS loudness targets for each platform.
| Service | Loudness Target |
| Spotify | -14 LUFS |
| Soundcloud | No loudness normalization |
| Apple Music | -16 LUFS |
| YouTube | -14 LUFS |
| Amazon | -11 LUFS |
| Beatport/DJ Stores | Recommended -6 to -9 LUFS |
Why You Still Might Want To Go Louder
Bearing all this in mind, depending on the purpose of the music you’re making, you might still want to go above the recommended average of -14 LUFS.
If you’re making music for clubs or festivals, then it needs to be loud and consistent, not just so it’s easy for DJs to mix, but also because that level of loudness brings a certain energy to the music.

That’s why I included a recommended -6 to -9 LUFS for DJ stores – just so your tunes hold up in a club.
Personally, I don’t mind sacrificing dynamic range because I make genres like drum & bass, which are designed to be played in a club. Even on Spotify, they don’t sound all that bad personally.
But if you’re making chill, pop or hip-hop – you don’t necessarily want to go as loud.
Recommended: Ian Shepherd on The Loudness War
LUFS Metering Plugins and Software
I’m going to offer a variety of free and paid options for LUFS metering. I’ll give my recommendations, but make sure to try them out and use what works for you!
But before I do, make sure you use these plugins right.
They should go last on your master buss, after any limiters or effects.
This way, you get the accurate data of your final master.
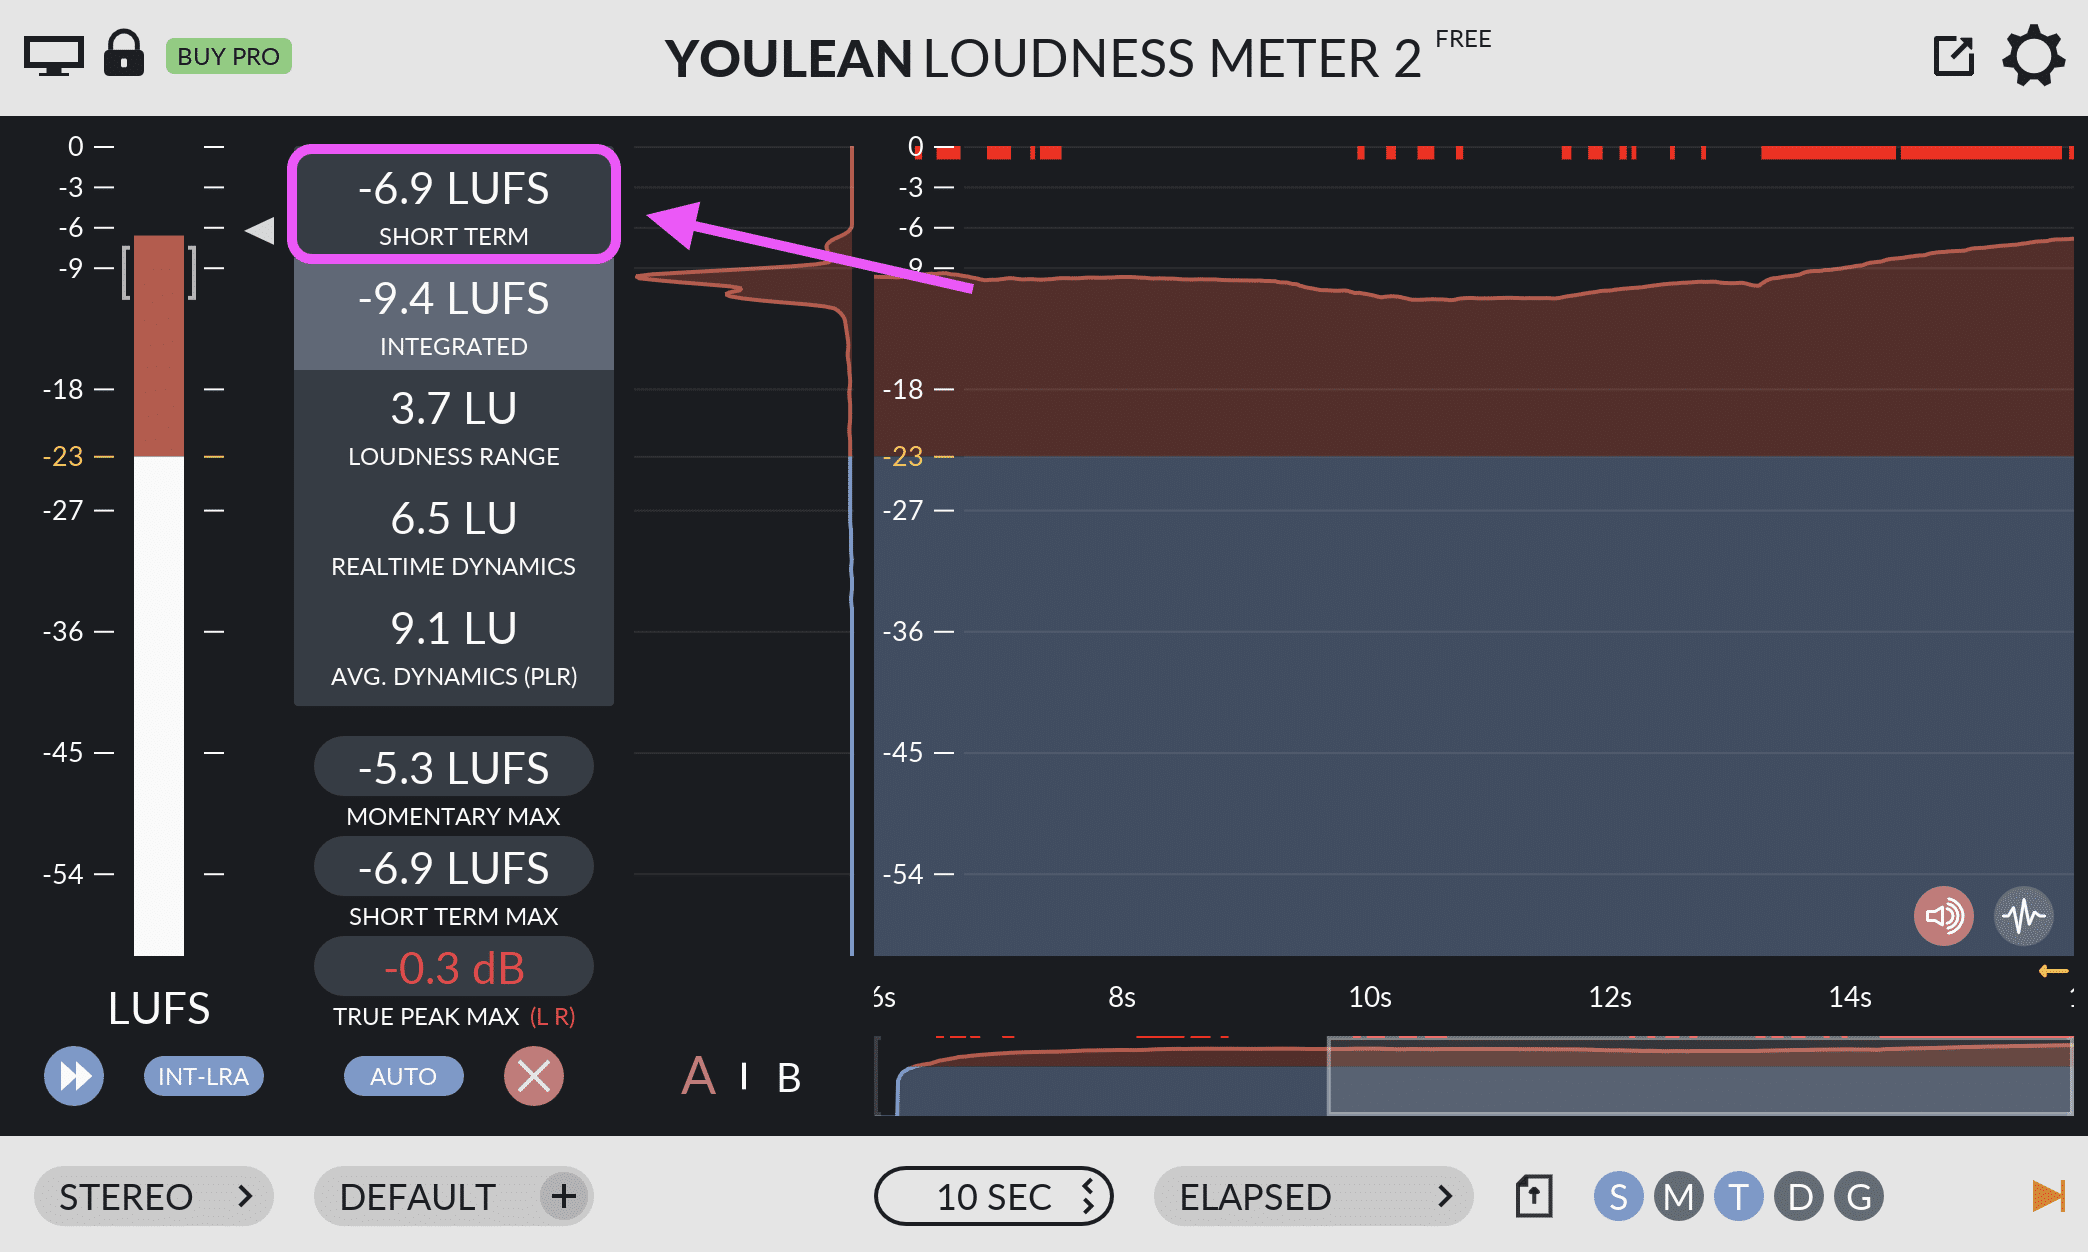
Youlean Loudness Meter 2 (Free and Pro)
This is my personal favourite, mainly because they offer both a free option for producers and engineers who are just getting used to everything, as well as a paid pro option if you need extra detail and want to dive in.
You have both short term and integrated LUFS measurements, true peaks, dynamics and loudness range, as well as a bunch of other useful tools.
Mastering The Mix LEVELS (Paid)
If you love simple yet fancy GUI’s – this is the one for you.

I love how they’ve kept everything in a simple interface without sacrificing usability.
You’v got LUFS, LRA (loudness range), stereo field, peak, dynamic range and even a ‘bass space’ meter for checking your bass loudness.
iZotope Insight 2 (Paid)
Insight 2 is another great option that I’ve played around with and gives you all the features you need.

It has the standard integrated and momentary (short-term) LUFS readings, as well as true peak, a 3D spectrum analyzer and sound field.
There’s also a cool intelligibility section, if you’re doing dialogue-related stuff.
Waves WLM Plus Loudness Meter (Paid)
Waves’ plugins are popular for a reason. They’re relaible and they’ve been doing it for a long time.

WLM Plus is fully up-to-scratch and compliant not only with music-related metering requirements, but also for film and broadcast (if you’re into that).
Check out our roundup of the best Waves plugin here.
Applying This Knowledge
So you have a grasp of LUFS, have gotten a plugin and are ready to get your tracks up to scratch.
But maybe you’re not just struggling with loudness. If you’re a producer, mixing is even more key to getting a clean and loud mix.
You need to know all sorts of things: EQ, compression, volume, reverb, and more.
But personally, I believe that a good mix can be achieved with just volume, EQ and compression.
But those things are still hard to get right. That’s why I created a free EQ cheat sheet for you to understand how to apply it in your mixes.
