ReFX Nexus has been a staple in the industry for decades. Its collection of unique presets made it a go-to for many aspiring producers.
However, with the advent of modern soft synths, how does the latest version of ReFX Nexus fare?
That’s what we’ll explore in this guide! Together, we will look at:
- What makes ReFX Nexus unique
- Some major improvements compared to older versions
- What you can and can’t do in Nexus
- My own personal thoughts on whether it is worth your time and money
Ready? Let’s dive in 👇
Note: This guide references version 4.5 of Nexus with the upgraded Routing page.
Get the headstart you need in music production with our EDM Starter Kit 🎛️
Get our collection of high-quality presets, samples and PDF guides – suitable for all genres of electronic music 👇
Table of contents
So What Is Nexus 4? 🧐
At its core, Nexus is a ROMpler.
ROMpler stands for Read-Only Memory sampler or sample-based synthesizer.
This means the approach is totally different from a synth like Serum or Vital. Whereas those two synths (and many others) take the approach of “synthesizing” sounds, ROMplers make use of a huge library of samples:

This means ROMplers work pretty much straight “out-of-the-box”. All you have to do is search the preset you need, maybe tweak it slightly, and you’re good.
Are you the kind of person who likes to create sounds from scratch? Then Nexus (and ROMplers in general) are probably not for you. Customization is usually quite limited, and you’re stuck with a limited number of presets (although you can always buy more).
However, in its version 4.5, ReFX Nexus has brought things one step further. In their own words, they have now mixed classic analog and wavetable synthesis with the world of ROMplers.
Think of it as “Kontakt meets Serum” (sort of). You get a lot more customization than in previous versions. But in many ways, you’re still stuck in a rigid architecture. More on all of that later 😉
ReFX Nexus’s Interface
So let’s break down the interface of Nexus 4:

In order, we have:
- Search Bar and Global Controls. This is where you can search and load presets. You’ve also got information on your CPU load and an output volume control.
- Filter Modifier. This section provides a filter and dedicated envelope for each layer.
- Delay Module. The main interface features quick access to the delay unit. Controls include delay mode, feedback, mix, and filtering.
- Main Filter. This is a simple global filter that applies to all layers. Filter modes include low-pass, high-pass, band-pass, and notch.
- Macros. Macros are an easy way to automate multiple parameters at the same time. The Mod-Matrix is where you set up your Macros.
- Tab Selector. This is where you select what the main Visualization window will display. Options include Librarian (the preset selector), Routing, Modulation, and Arpeggiator.
- Main Visualization Window. This window displays your tab selection.
- Amp Modifier. This is where you access the global output controls such as volume envelope, panning, and drive.
- Reverb Module. The main interface also features quick access to the reverb unit. Here you can quickly set the reverb type, mix, pre-delay, and filters.
Great! We now have a basic understanding of Nexus and its interface. It’s time to dive a bit deeper 👇
Exploring ReFX Nexus’s Tabs 📑
As mentioned in the intro, ReFX Nexus offers 4 main tabs to navigate its functionalities:

These are:
- Preset Librarian. This is Nexus’s preset library and explorer.
- Routing. This section represents the signal flow within Nexus 4, from oscillators all the way to output.
- Modulation. This tab gives you access to modulation controls such as Envelopes and LFOs.
- Arpeggiator. Here you can access ReFX Nexus’s arpeggiator controls.
Let’s explore each of these sections more in detail.
Preset Librarian
The Preset Librarian is how you explore and find presets:

The Librarian is divided into 3 sections: Folder, Categories, and Presets.
“Folders” refers to all the stock and expansion packs you’ve purchased. If you want to explore a specific pack, simply select it in this section.
Next is a “Category” filter.
ReFX Nexus features dozens of categories to help you find the sound you need. These include things like “bass”, “atmosphere”, “lead”, “guitar” or even “screech”.
Finally, based on your “Folder” and “Category” selection, a number of presets will be available.
Each preset has a number of color-coded “character” attributes. These describe the sound with terms such as “dark”, “bright” or “dirty”:

There are a few really cool features worth nothing here. Firstly, the librarian has a “memory”. This means you can easily return to a previous sound you liked.
You can also click on any preset to preview it. This avoids needing to load the preset to actually hear it.
Finally, you can tag your own presets with character filters.
Get the headstart you need in music production with our EDM Starter Kit 🎛️
Get our collection of high-quality presets, samples and PDF guides – suitable for all genres of electronic music 👇
Routing in ReFX Nexus 4
The Routing is the biggest improvement in this version of Nexus:

Previously, you had separate pages for effects, layers, and trancegate. All 3 have now been combined into one overall Routing page.
Basically, the Routing page describes every step of the signal flow within Nexus.
The overall signal flow within Nexus is the following:
Generator –> Layer –> Effects Group –> Main Effects –> Output
Generator Blocks
Starting at the top, you’ve got your “generator blocks”. This is where the sound is generated. Nexus 4 has four different generator types:
- Virtual Analog Oscillator
- Sample-Based Generator
- Time-stretched Sample-Based Generator
- Wavetable Oscillator
Each generator block has the same basic layout with Volume, Panning, Mute, and Solo controls:

However, the bottom part of the Routing tab features the “Inspector”. This is where you can fine-tune specific properties:

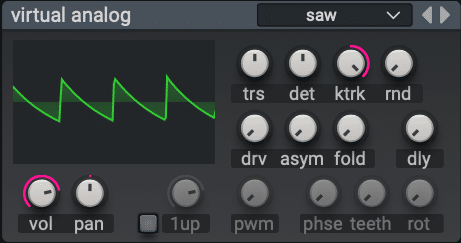
For example, the “Inspector” for the “Virtual Analog” generator block looks a bit like this:

Specific parameters for the Virtual Analog include things like:
- Waveform selector (10 different options)
- Detuning
- Key-tracking
- Fold
- Drive
Each generator type has its own custom settings. I won’t bore you with every parameter for every generator type, or we will be here all night 😅
There are however a few key things worth mentioning. Firstly, you cannot manually add or remove generator blocks. This means you are stuck tweaking a predefined list of presets. There are however a few “Init” presets that offer different templates.
However, the level of customization goes way beyond previous Nexus versions.
For example, the Wavetable generator features 500 different wavetables to choose from. It’s definitely not Serum, but it’s getting closer. On the other hand, the 2 sample-based generators do not let you switch out samples. You also can’t load any of your own samples.
Layers
Within ReFX Nexus, generator blocks can be grouped into layers. This means they can be processed as one entity later on:

All layer blocks display the same general controls: volume, panning, mute, solo, and arp mode.
If you go down to the inspector, you’ll get access to advanced controls. These include things like the note range, which oscillators are triggered, and more.
What’s more, each layer can be further shaped with the following options:
- 2 multi-modal filters with dedicated envelope controls
- Amp settings to shape the volume, panning, and ADSR of the layer
- Portamento controls
- Modulation matrix for that specific layer
- LFO Modulation
- Envelope Modulation
- Step Modulation
I know that’s a lot to take in, so let’s look at an example 😁

This is the Layer 1 Inspector. We can see that after the basic properties, we have a low-pass filter activated. The second filter is disabled. Next, the Amp settings are pretty standard. Portamento is disabled. Finally, in the Mod Matrix, we can see that Env 1 is modulating the cutoff of our first filter.
Note that this Layer Inspector is specific to each layer. So you can have different layers with completely different modulations and filters.
Also, this is probably a good time for a reminder. Nexus is meant to work straight “out-of-the box”. So there’s no need to dive this deep if you don’t want to 🙏
Get the headstart you need in music production with our EDM Starter Kit 🎛️
Get our collection of high-quality presets, samples and PDF guides – suitable for all genres of electronic music 👇
Effects Group (Layer)
Next, each layer flows through its own effects group. This is a group of effects that can be re-arranged at will in the inspector:

The list of effects here is quite comprehensive and includes the following:
- Analog Phaser
- Chorus
- Compressor
- Degrader
- Distortion
- Ensemble
- Flanger
- Fuzzer
- Gate
- Limiter
These should keep you busy for a while 😅
- Magnetic
- Noise
- Overdrive
- Phaser
- Razor
- Ring Mod
- Stereo Enhancer
- Talkbox
- Wide Mono
A few cool effects worth mentioning:
- “Degrader” mimics a bitcrushing effect by reducing the bit depth and sample rate
- “Fuzzer” is a cool type of distortion that works well on guitars
- “Magnetic” recreates the imperfections of old magnetic tape wear. Perfect for a LoFi vibe.
- “Razor” is a harsh Haas effect used for additional width.
- “Talk Box” uses a vowel filter to recreate a vocoder-type effect
Finally, all layers flow into one “Main” processing channel 👇
Main Effects
The main effects are the effects that apply to all layers of a sound:

So to recap what we’ve covered so far:
- Step 1: Generator blocks. This is where different source sounds are generated.
- Step 2: Layers. Different sounds are grouped together to form layers
- Step 3: Insert Effects. Each layer can be processed by a range of different effects
- Step 4: All layers flow into the same, final effects chain.
This final effects chain (the Main Effects) processes the signal in the following order:
2 Insert Effects –> Filter –> EQ –> Delay –> Reverb –> Impulse –> 2 Insert Effects –> Limiter
Note that you directly control the Main filter, reverb, and delay from the main interface:

Modulation in ReFX Nexus 4
Let’s now look at the third tab of Nexus 4: Modulation.
If you’re new to modulation, here’s the TLDR.
Modulation is simply a way to control any parameter within a synth. You could for example modulate the panning automatically so that it moves from left to right. This is typically done by assigning Envelopes and LFOs.
At the heart of ReFX Nexus’s modulation is the Mod-Matrix:

This is where you connect a modulation source (left) to a modulation destination (right). For example, we can see here that Macro 1 (renamed “m1:bell”) is used to control the volume of layer 6.
Depending on your MIDI controller, you will be able to assign your Mod Wheel or Pitch Bend.
You also have 2 User LFOs. One downside is that the LFOs are not customizable. You basically need to choose between sine, triangle, saw, ramp, square, one, or chaos.
ReFX Nexus also features the following modulation options:
- Vibrato: allows to quickly modulate the pitch of a sound
- Pitch Bend: allows you to pitch bend notes up or down a defined number of semitones
- Portamento: Make each note blend into the next
Once you apply a modulation to a parameter, an orange ring will appear. This indicates the range of modulation for that parameter.
Arpeggiator in ReFX Nexus 4
Finally, let’s close off this guide with another killer feature of ReFX Nexus: the Arpeggiator.

For those of you on FL Studio, you’ll see a clear similarity with the Piano Roll 😉
An arpeggiator is a way to automatically generate arpeggios. Arpeggios, or “arps”, are simply chords where notes are played consecutively.
By the way, we’ve got a full guide on how to create arps with your MIDI keyboard over here 🔥
ReFX mixes arp and sequencer together. This means you’re not limited to chords, but you can write any melody you want. Playing a single note will then trigger the entire sequence.
A key feature here is that each layer can have its own arpeggiator. This means you can trigger different sequences for different layers. You can also have an arpeggiator at the “Main” level:

Note that you cannot have both a layer AND a main arpeggiator at the same time.
Some standard arpeggiator modes include:
- Up: Notes are played from lowest to highest
- Down: Notes are played from highest to lowest
- Order: Notes are played in the same order they were triggered
- Seq: allows you to create your own sequences
A cool feature of the arpeggiator is the “Strum” function. This will play your chord as if it was “strummed” on a guitar.
So… Is ReFX Nexus 4 Worth It? ⁉️
So… What is my verdict on the latest version of ReFX Nexus…? Without wanting to sound like a politician, this will largely depend on your preferences.
If like me, you’ve gotten used to synths like Vital or Massive X, you’ll be frustrated. Many times, you’ll want to switch out an oscillator, or customize an LFO exactly how you want it.
In Nexus, a lot of that is a big “Nope”. Nexus is not meant to “create” sounds. True, there’s a lot more customization than previously. However, if you have a “sound designer” mindset, I don’t think ReFX will cut it. And I haven’t even mentioned the pricing plans (from US$249 for the entry price all the way up to US$ 4,000+):

However, if you want a huge amount of sounds that work immediately, you won’t get much better than Nexus. And there a hundreds of preset packs you can buy to continuously upgrade your collection.
Do you use Nexus? What are your thoughts? Did I miss out on anything? Let me know over at [email protected]
Get the headstart you need in music production with our EDM Starter Kit 🎛️
Get our collection of high-quality presets, samples and PDF guides – suitable for all genres of electronic music 👇

