


If you’re here, it’s because you want to learn how to use FL Studio, right? In which case, you’re probably a beginner to FL Studio, or to music production in general, right?
Maybe you’ve loaded up the FL Studio interface for the first time, and have thought to yourself: “How am I going to learn all this…?”
I know because I also started on FL Studio many years ago – and have felt the exact same way. But don’t worry, this is why we’ve put this guide together! Together, we are going to break down the main features of FL Studio to get you making music in the least time possible.
But first, if you’re a new producer, learning your DAW is only the first step. You need a comprehensive guide for learning electronic music.
That’s why we created our FREE eBook – How To Make Electronic Music. You can download it below.
Note: We will be using the FL Studio 21 Producer Edition for this guide.
Table of contents
- How to Use FL Studio: Introduction 👋
- How to Use FL Studio: Tool Bar Overview 🛠️
- How to Use FL Studio: The Browser 🔍
- How to Use FL Studio: The Channel Rack 🔊
- How to Use FL Studio: The Piano Roll 🎹
- How to Use FL Studio: The Playlist ⏯️
- How to Use FL Studio: The Mixer 🎚️🎚️🎚️
- How to Use FL Studio: Settings and Other Features ⚙️
- How About Actually Making Music? 🤗
How to Use FL Studio: Introduction 👋
For most of you, FL Studio will look something like this when you first load it up:

The first thing to know about FL Studio is that all the windows can be moved around.
That’s the beauty of this DAW – it’s infinitely customizable, especially in comparison to its arch-nemesis, Ableton Live. Nothing is fixed, besides the toolbar across the top of the screen.
When I explain the interface and how to use FL Studio for beginners, I like to break it down into 5 different sections:
- The Playlist
- The Piano Roll
- The Channel Rack
- The Mixer
- The Browser
These 5 different views can be accessed from the top of the window:

If you’re unsure what you’re about the click, check the Help window at the top left! Altogether, these 5 sections cover 99% of the functions you’ll use in FL Studio. Let’s quickly go over what each of them does before diving deeper.
Exploring FL Studio’s 5 Main Sections
The Playlist (or Arrangement view) is where you arrange your entire track. This is where you will drag your various musical and beat patterns, audio samples and automation:

The Piano Roll is where you write your melodies and chord progressions. Every time you load up a synth (like Serum or Vital), a dedicated Piano Roll will be available:

Next, the Channel Rack is where your different instruments and automation are held. This is where you create patterns (like an epic chord progression or a drum beat) before dragging them into the playlist:

The Mixer is where you process your sounds with effects like reverb, delay and saturation. You can link multiple instruments and sounds to the same mixer track if you wish:

Finally, the Browser is where you will search for samples and MIDI scores:

Great! We now know how to access the 5 most important sections of FL Studio. But before diving deeper into each of them, let’s quickly cover some basic controls included in the Tool Bar (the top section of FL Studio).
How to Use FL Studio: Tool Bar Overview 🛠️
The Tool Bar is top section of FL Studio. Although there is a bit of customization possible, this part of FL Studio is mostly fixed:

I won’t cover every single button here, but let’s go over the ones you’ll use the most often.
Transport Controls
In the centre, you’ll find your transport section: play, stop, record and tempo. Those should be pretty self-explanatory:

In this section, you’ll see two options: Pat and Song. This allows you to switch between playing what’s in the Channel Rack and what’s in the Playlist. Switching between them allows you to move between sketching out ideas to making a full track.
Right-clicking the Record button lets you switch between recording modes.
The two most common recording modes you will use are :
- Notes: play your MIDI keyboard, and the notes will be recorded into the Piano Roll.
- Audio: anything you play (MIDI or an instrument you plug into your audio interface like a microphone) will be recorded as an audio clip.
Additional Global Controls
Next to the tempo are some more global controls. I’ve highlighted the ones you’ll use the most:

At the top right, you can enable or disable the metronome.
Next is the “typing keyboard to piano keyboard” mode. This lets you use your keyboard as a piano in case you don’t have any MIDI controller. Finally, the “Multilink to controllers” lets you link parameters to your MIDI keyboard and create automations easily.
Main Snap
Underneath, you have a universal snap control. This determines the snapping of the grids across the piano roll and playlist:

Snapping basically keeps everything quantized in time (to a specific interval) across your music. For example, if you want your audio clips to snap to the closest beat, select “Beat” in the Main Snap.
Visualizers
Finally, a bunch of different visualizers help you understand what is going on in your song:

Namely, we have:
- Song position. This tells you where you are in your song (can be set in seconds or bars).
- Spectogram. Gives you a rough indication of the frequency spectrum of what is playing.
- Peak Meter. Gives you an indication of the overall level (in dB) of your track.
- CPU load. A super useful tool if you don’t have a very powerful computer. The closer you reach 100%, the more the sound will start to glitch. Double-click on the window to see the plugins that are consuming the most resources.
How to Use FL Studio: The Browser 🔍
FL Studio’s Browser is where all your material comes from, whether its samples, presets or instruments:

Imagine you’re a craftsman: you have raw materials like leather, metal and wood to work with. You’ve also got your toolbox, all the tools you use to make things.
This is what the browser is for music producers in FL Studio. By default, there are quite a few different folders. Let’s not worry about all of them, let’s instead look at the main ones.
In FL Studio 21, the browser has been re-organized with a few tabs at the top. If you want to add a browser menu that you use a lot to the tabs, just right-click on it and select “Open in new tab”.
Current Project
Either by navigating to this folder, or clicking on the paper icon at the top, you’ll arrive at the Current Project folder:

This will show you all sounds, automation clips, actions, anything done in the current project.
This is useful for finding material you’ve got without having to sift through different windows.
Plugin Database
Similar to how Current Project works, you can open the Plugin Database window in the main view, or by clicking on the ‘plug’ icon at the top right of the Browser window.
This will show you all effect and generator (a fancy way of saying instrument) plugins. Any third-party VSTs or plugins you add will show up here too. However, most of the time you will be loading effects directly via the Mixer, and instruments directly in the Channel Rack. So you won’t be using this menu often.
Want to Add Your Own Sample Packs to the Browser?
Let’s be honest, most people are going to want to add their own samples to the browser.
So to do that, the best thing to do is to go to Options > File Settings > Browse Extra search folders.
There, select the folder where your samples are located:

Now your samples folder will appear in the ‘Browser’ window.
Searching for Samples
At the bottom of the browser is a super useful tool called the “search bar”:

This allows you to instantly scan your entire samples library for a specific term. FL Studio will then filter any sample or folder with that keyword in it.
How to Use FL Studio: The Channel Rack 🔊
If the Browser is your toolbox and materials, then the Channel Rack is your workbench. Here is where you can make patterns and bring ideas to life:

Arguably, this is the most important part of FL Studio, and it’s a large part of what sets it apart from other DAWs on the market.
Channel Rack Basics
By default, FL Studio’s Channel Rack loads up with 4 stock sounds: Kick, Clap, Hat and Snare. To create a beat, simply fill in the steps by clicking on them:

Awesome! You’ve just created your first beat! This is what it sounds like:
To add a step, left click on the box. You can also drag across to add multiple. To delete a step, right click on a box (also with the option of also dragging).
You can right-click on any channel to open up a context menu. Within this menu, the most useful options are:
- Rename. By default, a channel will take the name of the sample or plugin you load. Rename a channel to something that is clearer for you.
- Clone. Duplicate a channel if you want to create layers.
- Delete. Self-explanatory 😅
To replace a sample by another down, simply drag it over:

You can also drag a sample into a new slot underneath, which will automatically create a new channel. Or you can add a new channel by clicking the “+” icon at the bottom.
Step Sequencer vs. Piano Roll
The key part of the channel rack is the step sequencer, and this allows you to quickly sketch out ideas. This is what we covered in the previous section: filling out steps to create a beat.
However, how does the channel rack work for melodic ideas? This is where the Piano Roll comes in.
Let’s say you’ve loaded up FL Keys by pressing the “+” icon:

Right-click on the channel and select “Piano Roll”. This will open up the Piano Roll, where you can then write out your chords and melodies. Whatever you write will then show up in the channel rack:

Additional Channel Rack Controls
If you bring your attention to the left side, you’ll notice a few additional knobs and buttons:

In order, we have:
- Mute / solo button. The green LED determines whether the channel is on or not. Left-click to turn them on and off. Or right-click and select “Solo” to solo a channel.
- Panning and volume. Two knobs controls the panning and volume of each channel.
- Mixer Routing. Indicates to which mixer track the channel is sent (more on the mixer later).
The number at the top right determines the length of the pattern (in 1/16th notes), which is 16 by default. The knob next to that determines the swing amount, which is a sort of timing effect that alters the notes to sound more human and groovy-sounding.
How to Use FL Studio: The Piano Roll 🎹
We’ve touched on the Piano Roll briefly when talking about the Channel Rack. But let’s dive a bit deeper now.
In essence, the Piano Roll will help you write melodies, chords and more complex rhythms and patterns.
FL Studio is famed for its incredible piano roll, and the smooth functionality it has to offer. Seriously, just try putting in a couple of notes and you’ll be in love.
FL Studio Piano Roll Basics
The same way you draw steps on the step sequencer is the same in the piano roll, but you have the option of clicking and dragging up, down, left and right to change timing and pitch:

The basic controls you will need here are:
- Left-click: add a note. The note will automatically snap to the grid.
- Right-click: remove a note.
- Click-and-drag to move a note left-right or up-down.
- Click-and-drag the end of a note to change its duration.
- Hold CTRL + left-click to select multiple notes and adjust them.
Down the bottom, you have the velocity for each note. You can left-click and drag to adjust these values, as well as select an option from the Control dropdown menu to change what is being altered.
FL Studio Piano Roll Tools
Beyond that, the Piano Roll nearly has enough functionality to be its own program.
We won’t go into heaps of depth here, but we will unpack a few of the key features to get you

- Draw: draw in notes and move them around
- Paint: paint in notes and repeat them (by dragging)
- Paint (Sequencer): paint in steps and repeat them (by dragging)
- Delete: remove notes by clicking on them
- Mute: deactivate certain notes by clicking on them
- Slice: break notes into multiple parts by clicking and dragging a line
- Select: click and hold to select a group of notes
- Zoom: click to zoom in on all notes, click and drag to zoom into a specific area
- Playback: one of my favourite features, allows you to hear what notes are playing at a given time by clicking
There’s a lot more to the Piano Roll then this, but this should be enough to get you started. If you want to go one step further, you can explore our dedicated guide here.
For now, let’s move on the the Playlist
How to Use FL Studio: The Playlist ⏯️
So you’ve made some patterns in the Channel Rack and want to make them into a full track? The Playlist view is designed to do just that:

On the left in the Picker. This is where you can pick patterns, audio clips or automations and drag them into the Playlist.
You can place these in any track, which is the beauty of FL Studio. There isn’t a particular way you have to structure patterns.
You can also drag in audio samples directly into the Playlist and structure them however you want, without having to load them into a sampler and play them with notes first. Additionally, any automation clips you create will appear here, which is something we will get into in the last section.
Similar to the channel rack, there are a variety of tracks you can drag clips onto. The height of these tracks can be resized, and you can turn them on and off by left-clicking on them and soloing certain tracks by right-clicking. Each track can also be renamed and colored for clarity:

Playlist Tools
Much of the tools and controls from the Piano Roll are applicable here too (right-click to add, left-clicking to remove etc.).
Some additional tools which you might find handy:
- Slice: lets you cut up any pattern or audio clip.
- Slip: lets you move the content of each clip without affecting the start and end times (really useful for adding interesting rhythms and timing)
- Time Markers: press CTRL + T to add a time marker, helping you structure your track.
How to Use FL Studio: The Mixer 🎚️🎚️🎚️
Once you have your sounds arranged how you want, the mixer is where all the magic happens with processing:

Personally, the mixer is one of my favourite tools for creative sound design, because of the processing and routing capabilities. So, let’s start with the main features.
Each channel will be assigned to a mixer track from the Channel Rack, as per the number we discussed earlier. If not, you can select a number to route it to.
On the main interface, you can see all the mixer channels, and the master channel on the far left.
The meter on the far left indicates the level of your entire track, whereas the small meters along the track indicate the level of each track:
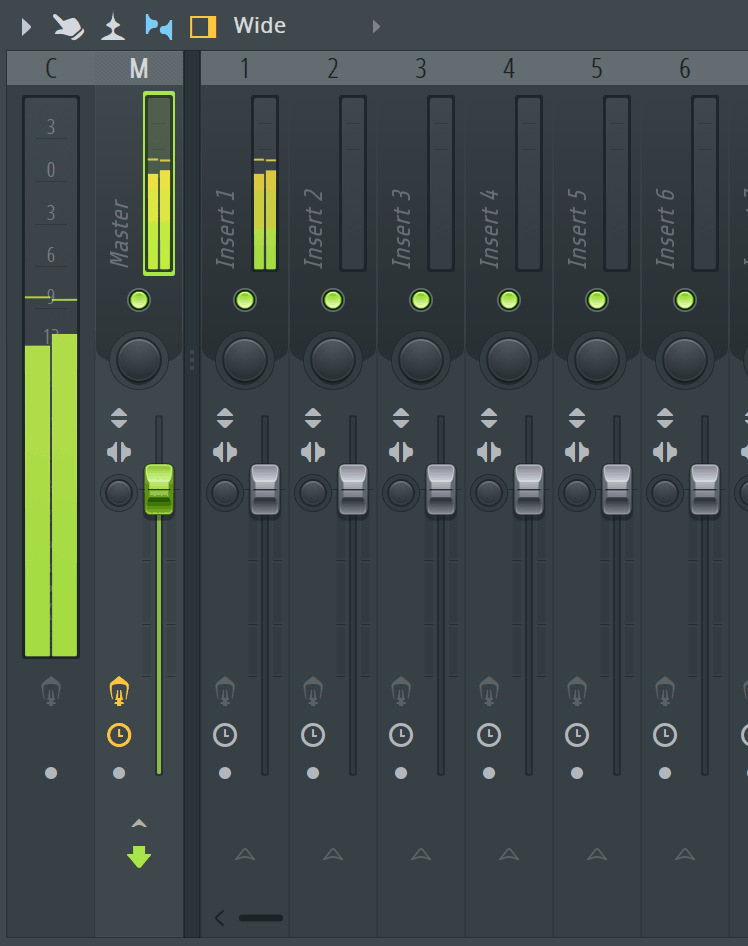
For each track, you have:
- a mute switch
- a volume fader
- pan controls (for moving a sound left or right)
- stereo imager (for making things sound more stereo or mono).
These are your 4 main tools for mixing. Most of the mix work will be on the volume faders, balancing the individual levels of sounds to make them blend nicely together.
Adding Effects
This is where the real fun begins 😍

The inserts on the right are where all your effects are added to process each mixer track. Down the bottom, you have a basic EQ to mess around with, but the slots above are where you can add some of FL’s built-in effect plugins, or third-party ones.
Simply left-click on the slot to open up a menu to select from the variety of plugins. There are many here to use, but some of the main and more practical ones are:
- Fruity Parametric EQ2 (EQ Effect)
- Fruity Limiter (Limiter/Compressor Effect)
- Fruity Reeverb 2 (Reverb Effect)
- Fruity Delay 3 (Delay Effect)
Each of these requires a lesson on how the various FX types works, so click the above links to see some great resources on those.
How to Use FL Studio: Settings and Other Features ⚙️
Now those are the 5 main sections of FL Studio, but there are some key features beyond this that will help you to start creating music.
Plugins
If you want to add plugins (and be wary of this if you are a new producer), then follow the next steps to begin adding them.
Firstly, you’ll want to head to the Options > File Settings again and click on Manage plugins. This will bring up a new window with a variety of options.
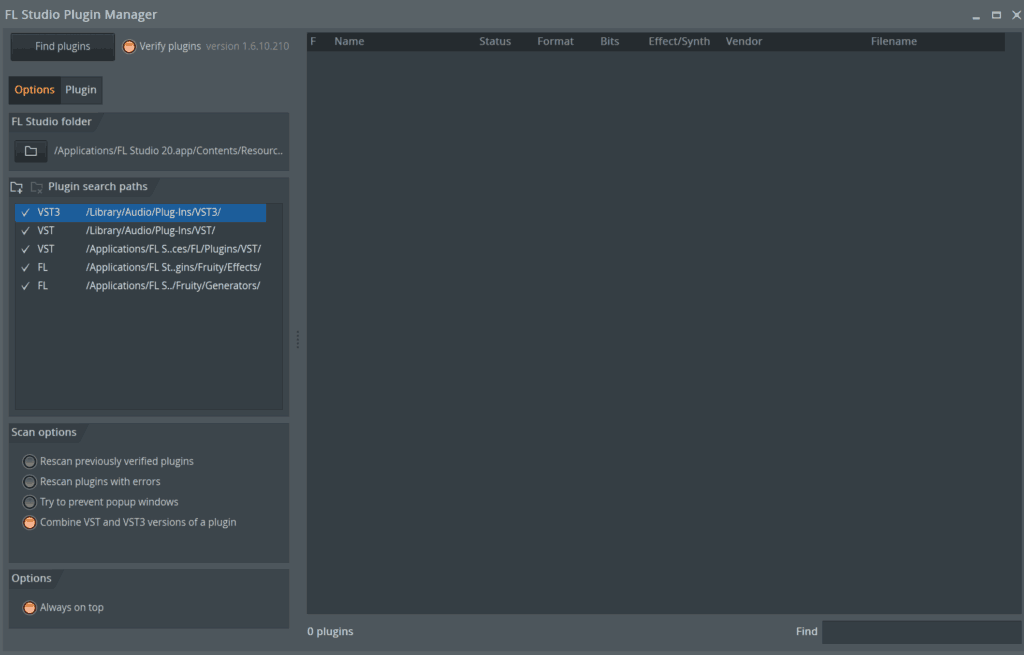
FL Studio knows how to find plugins pretty well, so click on the Find plugins button in the top left.
Wait a bit while it scans through your computer (you might want to make yourself a coffee if you have a lot of plugins). Once you’re done, it will list out all plugins you’ve got installed. If you’re super indie and need to add a custom folder to scan, click on the plus folder icon in the top right of the Plugin search paths area. Simply navigate and choose a folder.
Once you’re done, leave the Plugin Manager and go to the Browser > Plugin database and they will all be there. When you load it up, if you want it to appear alongside the list of FL Studio plugins, simply click on the menu in the top left and select Add to plugin database.
When you go to add effects in the mixer or generators in the Channel Rack, they’ll all be there!
Automation
One of the most powerful tools in the arsenal of the modern electronic music producer – automation.
An automation basically allows you to automate any parameter you want over time. For example, you could automate the volume of a Piano, or increase the reverb of a percussion. The only limitation is your imagination!
We’ve got a full guide on automation here, but here’s the TL;DR.
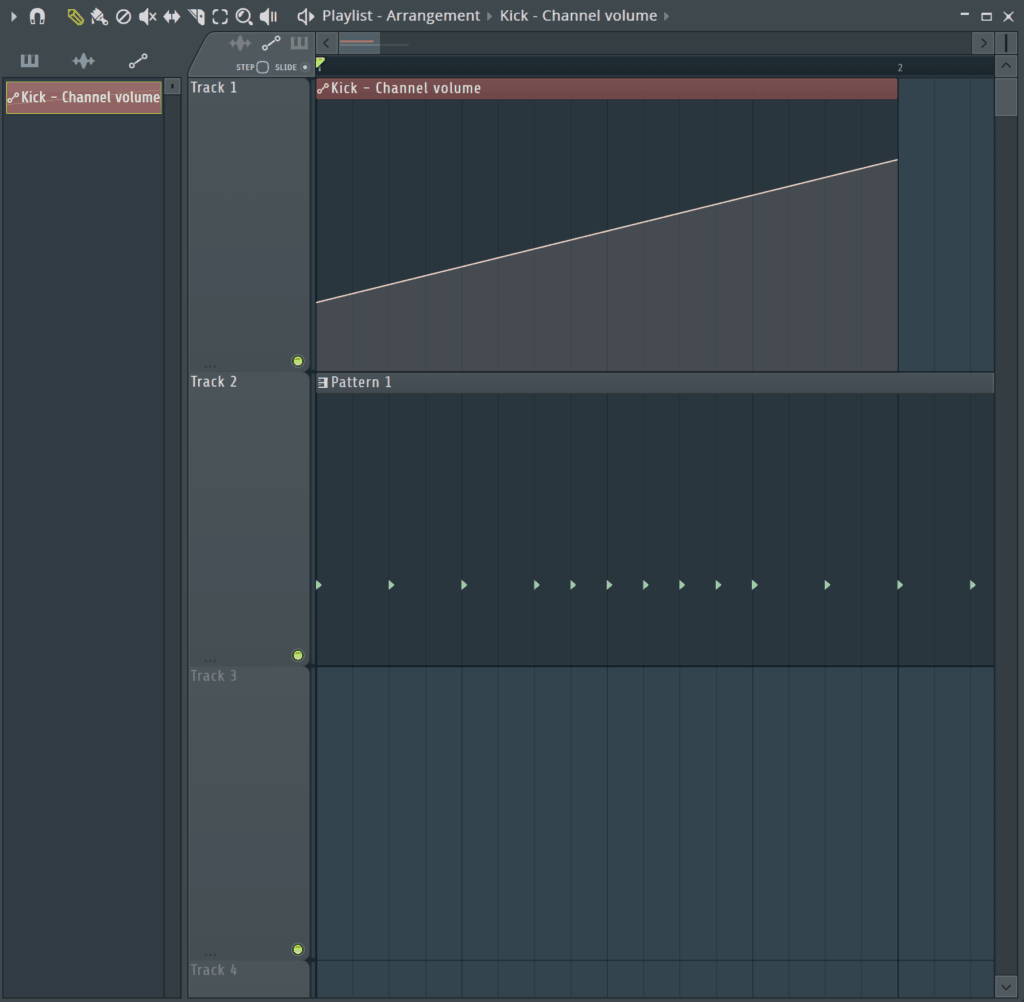
If you find yourself playing around with any control in FL Studio and/or any of the native plugins, simply right click on it and select ‘Create Automation Clip’. In the Playlist, a new clip will appear with a line, describing the control that you just automated.
Then, right-click on the line anywhere to add an automation point, and left click to move it around. Notice it will snap to the current grid, which is neat.
If you right-click on a specific automation point, you can change the curve type, which is super fun to play around with.
Edison
Now if you are used to using another DAW, then you might be asking where the bouncing and audio processing functionality is at.
If you’re not, that last sentence made you very confused. Either way, let’s take a look at Edison and what it does:
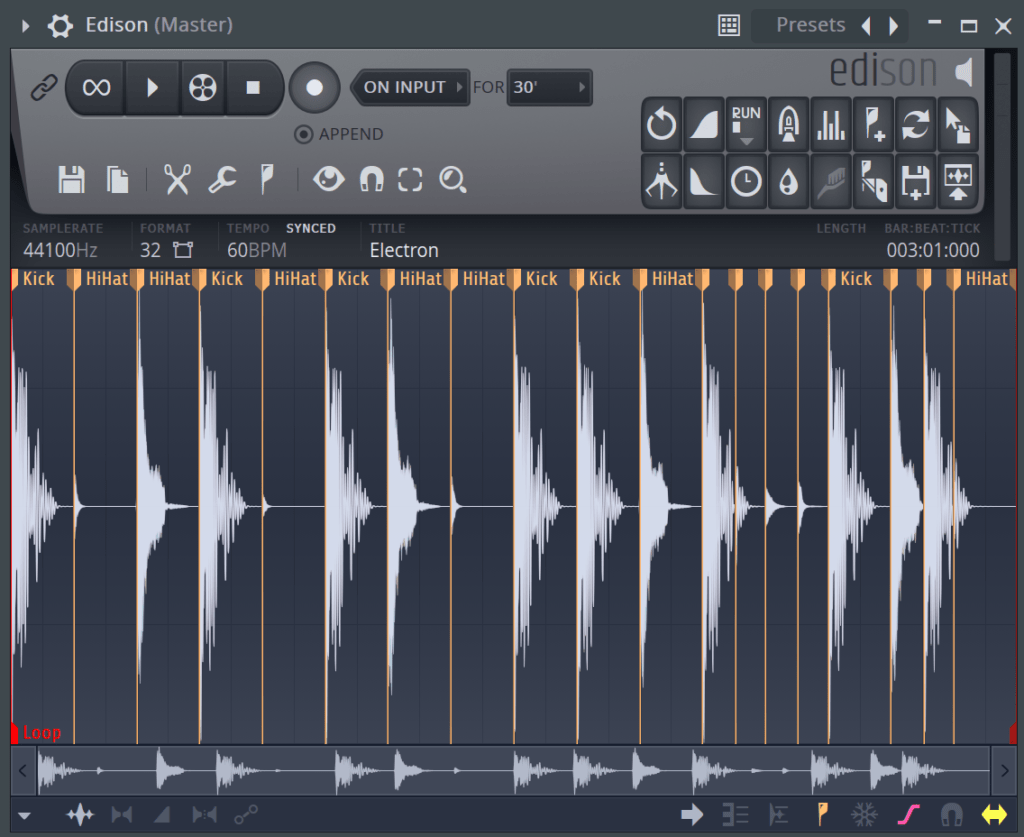
Edison is FL Studio’s audio recorder, processor, manipulator, whatever you want to call it. You can load it up on a slot in the insert FX area of the mixer.
Note: Normally it’s best to put it on the master channel so it doesn’t get lost, as by itself it’s not a typical ‘effect’ and functions more as a way to record audio for the purpose of resampling it back into your track. That being said, if you want to put it on an individual track, go ahead.
Try dragging in a sample from the browser into the large sample area at the bottom, or clicking record and recording something from the track.
There is a myriad of processing functions in Edison. We won’t get into them in this guide, and we probably will get around to doing a full Edison tutorial at one point, but just know it’s there and feel free to experiment.
Export
Now the last thing you’re probably wanting to know – how to actually export your track once you’re done. Because finishing music is the aim, right?
Well, let’s take a look. Navigate to the top toolbar and click the save icon with the wave underneath it, or simply press CTRL + R.
After choosing where to export, the following window will come up.
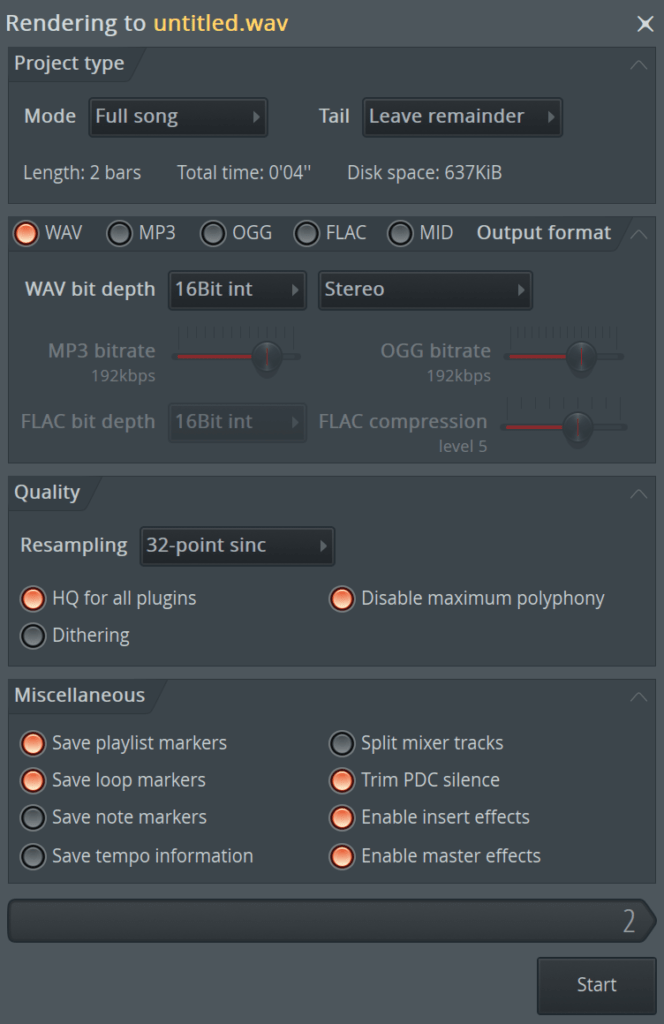
There’s a lot to take in here, but let’s talk over the key things to remember.
- Make sure Mode is set to Full song to export the entire arrangement
- Select the desired format in the second section. MP3 exporting will give you extra options like bitrate etc.
- Make sure all the other settings are set like above for a standard export
- Also, saving tempo information will write the BPM to the file tags
After that, hit start and watch your masterpiece export.
How About Actually Making Music? 🤗
You might be wondering how to use all these techniques to actually start making music.
In fact, when I started producing, I didn’t have the faintest idea of how to make good music, even as I learned how the tools worked.
In that case, you’re probably going to need someone to guide you through the process of making a song, maybe even multiple songs.
That’s where EDM Foundations comes in. Now even though we’ve had 2000+ students do this course in the past, we’ve never released an FL Studio version.
Until now. You’ll learn the fundamentals by creating 4 tracks in different styles, all inside FL Studio. Check it out.
That’s It for This Guide on How to Use FL Studio
So, that’s quite a lot of information. Hopefully we were able to help you get off that ground and start using FL Studio. Do you have any questions? Anything in this guide that was unclear? Feel free to reach out to use at [email protected]
