


If you’ve been using FL Studio for a minute, you’ll have noticed a massive list of FL Studio plugins.
This list shows you not only FL Studio plugins but all VST plugins you own.
If you’ve been producing for a while, this won’t be news. But if you’re just starting out, you might feel confused. Plugins? VSTs?
In any case, this article aims to answer your questions. Together we’ll cover:
- What plugins are
- The difference between VST, VST3, AUX, and more
- The most important FL Studio plugins (effects and instruments)
- The best free plugins out there 👀
So, let’s jump into it. 👇
Table of contents
What is an FL Studio Plugin? 🤔
Depending on your music production journey, you might know what plugins are already.
But if you don’t, they are extra pieces of software you can use with FL Studio (or any other DAW):
Hence the word “plug-in”: you simply plug them in and play.
I like to think of plugins as the tools in my toolkit.
Depending on the sound I’m aiming for, I might use one or the other plugin. So while FL Studio provides the framework and workflow, plugins let you create and modify sounds.
And in the world of plugins, we have two big categories: generators and effects.
FL Studio Plugins: Generators vs Effects
Plugins come in two varieties: generators and effects.


Generators are used to synthesize, sample, and produce sounds. They are sometimes also called “instruments”, “synths” or “soft synths”.
Sound is produced when you input notes through a MIDI device or on the piano roll.
To load a generator, simply click on the “+” in the channel rack:

You can also go to the “Add” menu and choose an instrument there:

On the other hand, “effects” help you to process & change the incoming sound.
These plugins are added in the FL Studio mixer inserts on the right of the mixer window:

Note that the order matters when it comes to loading up effect plugins!
For example, adding a delay after a reverb will apply that delay to the reverb.
When you download FL Studio, a bunch of plugins are already there. These are called “stock” plugins.
These FL Studio plugins were developed so you can get straight to producing:

However, the most popular plugins are not stock plugins. There are “3rd-party” plugins. These are companies that solely focus on developing new plugins.
These can be instrument plugins (such as Serum or Vital) or effects (such as EchoBoy, Decapitator, or Pro-Q3):
Plugins made by third parties are purchased or downloaded separately to FL Studio. Some popular manufacturers include Xfer, Soundtoys, Waves, and Izotope.
What’s a VST?
However, you might also have seen the word VST floating online. What does it mean?
VST is simply a type of plugin format. It is the most widespread format, so people use “VST” and “plugin” interchangeably.
But there are other formats too. Here’s a full list of the most popular ones:
- VST (Virtual Studio Technology) – compatible with most DAWs
- VST3 – a newer VST version compatible with some DAWs
- AU (Audio Units) – compatible with most DAWs on macOS only
- AAX (Avid Audio eXtension) – compatible with newer Pro Tools versions
- RTAS – compatible with older Pro Tools versions
- Native – technically not really a format. This is when a plugin is hard-wired to only work with the DAW it came with
What should you use? It mostly depends on your computer. When installing a plugin, you’ll have the option to choose. If you have a Windows PC, simply installing the VST3 version is enough.

Many instrument plugins also have standalone versions that you can use outside of FL Studio or a DAW environment. This is usually an option when you install a plugin on your computer.
FL Studio Plugins
As previously mentioned, FL Studio plugins are numerous. In fact, FL Studio’s stock plugins are one of the reasons people pick it over other DAWs.
When I first started using FL Studio, I only used FL Studio stock plugins. And to be honest, you can get very far with just those.
So let’s delve in and demystify the main ones for you. We won’t cover all of them, but we’ll get to the important ones.
FL Studio Plugins: Generators
3x Osc
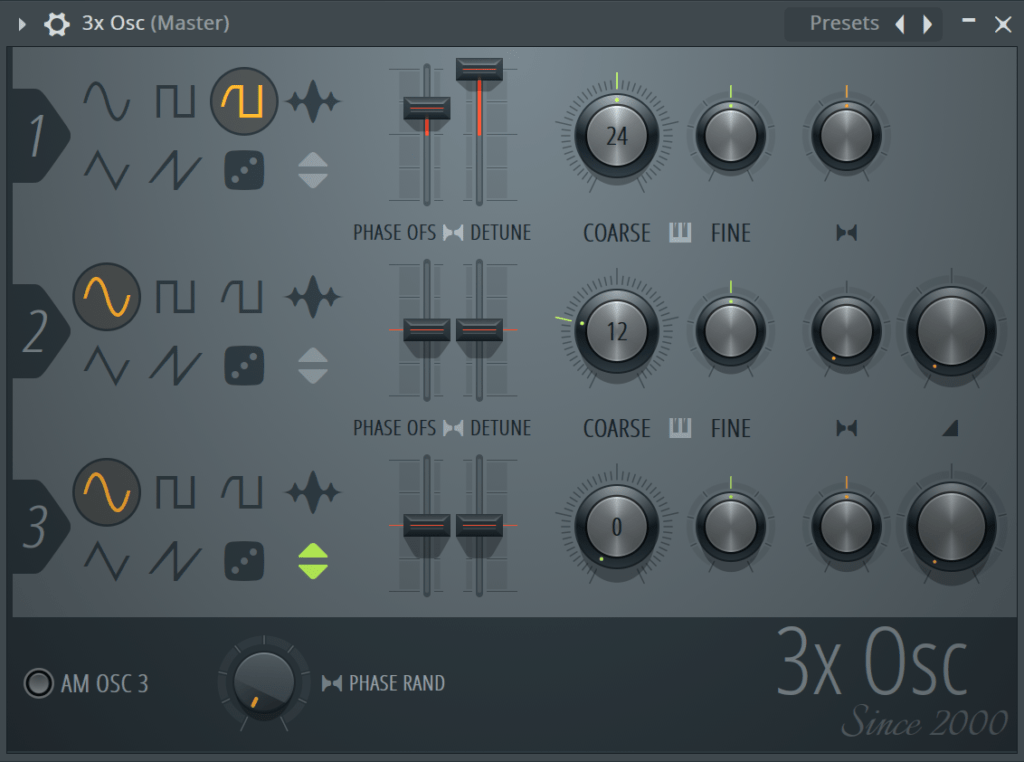
This is probably the most basic synthesizer plugin that’s included with FL Studio. But as they say, limitations can be powerful.
This FL Studio plugin is actually a great place to start understanding sound design.
The plugin itself is fairly self-explanatory:
- You get 3 oscillators (hence the name)
- Each one can feature one of 6 different waveforms (saw, sine, triangle, square, noise, and rounded square or sample)
In addition, you also get the standard level control, pan control, fine and coarse pitch tuning, detune, and phase offset.
Finally, oscillators 2 and 3 come with mix controls that blend their signal in with Oscillator 1’s signal:

Personally, I use 3x Osc in 2 specific cases:
- Creating white noise. Super handy if I want to create a riser quickly.
- Creating sub-bass. 3x Osc is surprisingly powerful and low CPU.
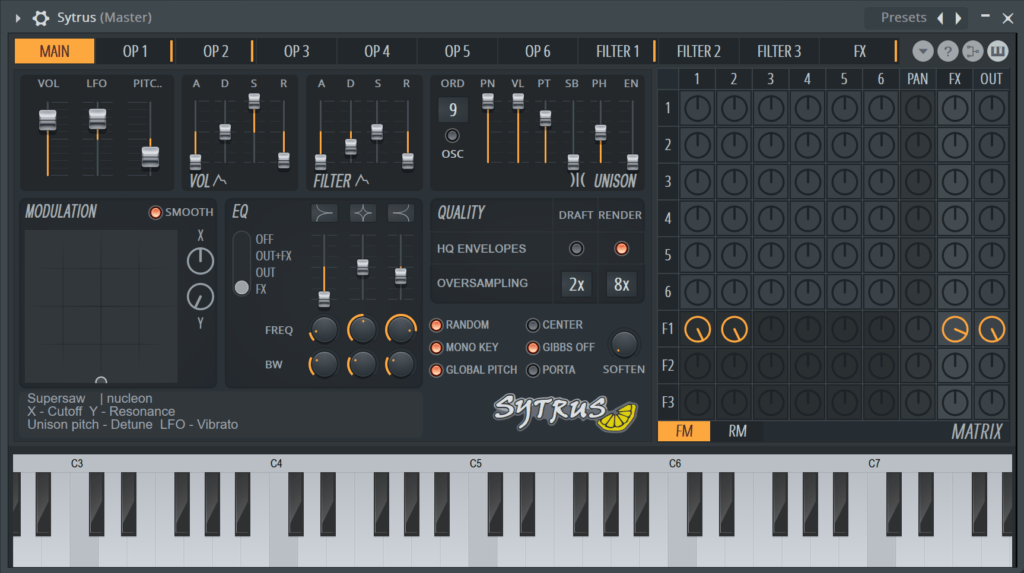
Sytrus
Now I’m not gonna lie… When I started using FL Studio, this was my go-to plugin:
However, I had no idea how it actually worked 😅 I was simply browsing the massive preset list:

Honestly, you can go a very long way with just the presets.
However, Sytrus is actually FL Studio’s FM synth. If you want to learn more about FM synthesis, we’ve done an extensive guide over here 😉
The interface is actually pretty daunting. Which is probably why I refrained from actually learning how it worked. In a nutshell, the interface includes:
- 6 operators (think of them as your noise generators)
- envelope shaping for each operator
- 3 filters
- 1 FX unit which includes chorus, delay, and reverb
- a modulation matrix
With FM synthesis, you can make an insane variety of sounds – from rip-roaring growly basses to beautiful tonal pads.
The modulation occurs through the matrix. This is where you decide how the operators affect each other:

Essentially, you modulate the different operators against each other to produce different tones and textures.
The matrix takes a bit of time to wrap your head around. In this example, operator 2 is modulating operator 1. Operator 1 is then sent through the FX unit. Finally, it is sent through Filter 1, and then outputted:

Here’s what it sounds like:
But Sytrus is capable of so much more. Check out these examples:
If you’re after a full course on Sytrus, check out this course from Sonic Academy.
Harmless
Harmless is an incredible subtractive-additive synthesis plugin.
Haven’t heard of subtractive synthesis? It’s basically when you shape a sound rich in harmonics with a filter. And yes, we also have a full guide on how it works here 😉
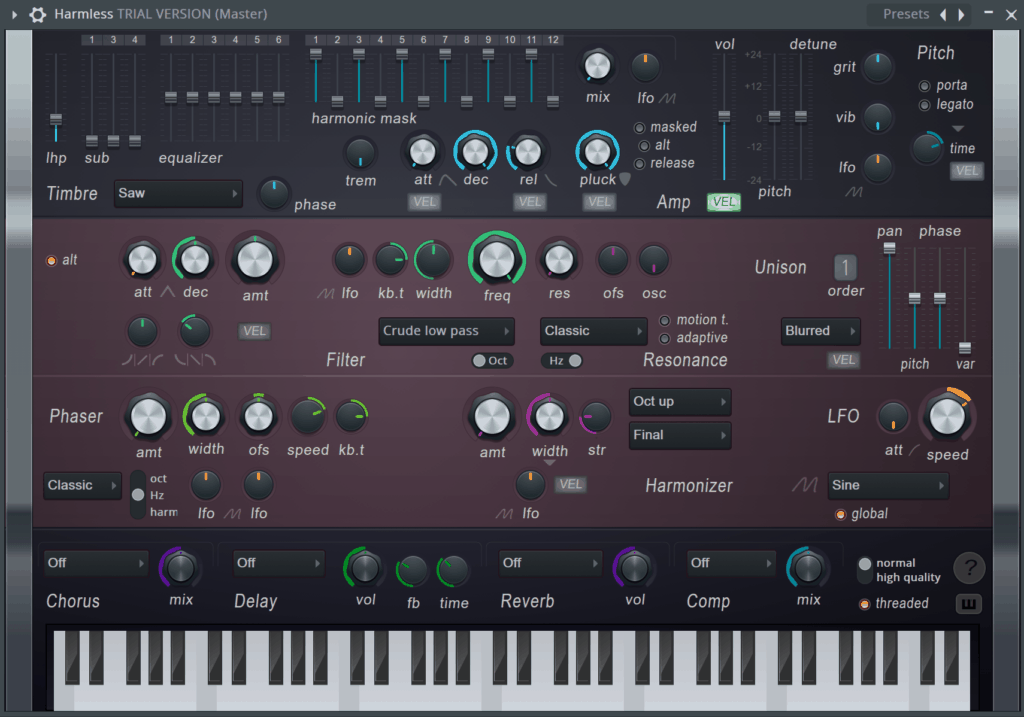
Harmless was designed to have 5 main sections:
- Timbre – The oscillator or sound generation controls.
- Filtering and Unison – Voice thickening &
stereoizing effect. - Phaser – Creates totally unique phasing and
partial-based effects, only possible with Harmless. - LFO – Modulation source for adding motion and evolution to sounds.
- Effects – Chorus, Delay, Reverb & Compression

Here are some examples of the sounds you can achieve:
Harmless has quite a steep learning curve. So if you’re new to sound design, you’ll probably want to follow a guide to learning a synth like this.
Note: Harmless only comes with the Signature Bundle and up
Harmor
The staple of many bass producers’ studios, Harmor is an extended version of Harmless including a resynthesis engine:
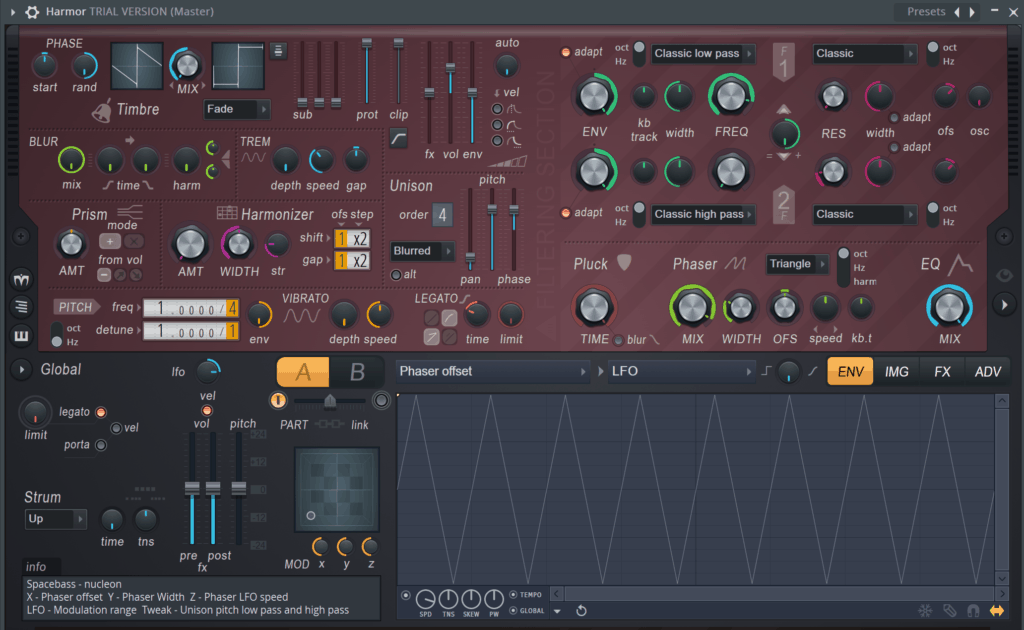
What’s that you ask? Well if you make a sound, you can take it, treat it as the new basis, and apply the synthesis and FX process all over again.
If you’re interested in making crazy bass sounds with this plugin, check out our guide over here 🔥
Other features include:
- Image Synthesis – drag in images to hear what they sound like
- FX – Click on the FX section in the bottom right to uncover a wide variety of distortions, choruses, delays, and reverbs
- Layering – See the A/B section down in the left-of-center? That means you can have two sounds going at the same time.
- Visuals – Harmor is great for visualizing what’s happening to your sounds. Click the arrow on the right to show the spectrogram.
Listen to some of the crazy sounds you can make with it:
Note: Harmor is only available in the All Plugins Bundle
Slicex
To this day, Slicex remains my go-to sampler.
If you’re new to samplers, they are basically tools that let you manipulate samples. For example, let’s take this classic drum break:
If you’re looking for classic drum breaks, we have the ultimate list over here 👈
Now let’s throw it into Slicex:

Slicex automatically cuts up the samples (called markers). Each note on our keyboard now triggers a different part:

Which sounds something like this:
If the interface doesn’t make it apparent, Slicex isn’t feature-shy.
You have a variety of modulation options such as volume, filter, speed, velocity, and way more.
This means you can control the ADSR envelope, volume, filtering, and more of each marker individually:

This works great with melodic loops to create more variation:
Of course, you can change the chops by adjusting the markers down the bottom, while naming them for the sake of definition.
Fruity Granulizer
Fruity Granulizer is the FL Studio for all things granular synthesis:

Granular synthesis is a sample-based sound-design technique.
Essentially, the synth chops your sample into “grains” and re-arranges them. This can produce cool, glitchy effects.
Give this example a listen:
I find that granular synthesis works best with vocal samples. But you can chuck any samples in there and experiment!
Within Fruity Granulizer, some of the controls include:
- Attack and release time of each grain
- Hold: length of time each grain is played
- Grain Spacing: controls how fast each grain is played
- Wave Spacing: how many grains are generated from the sample
Fruity Granulizer also features transient detection. This is useful when working with drum samples:

FL Studio Plugins: Some Honourable Mentions
Finally, here are some of the stock FL Studio plugins worth checking out:
- Fruity Slicer – A simpler alternative to Fruity Slicex
- BassDrum – A nice drum synthesizer for kicks
- Transistor Bass – Great 303 emulation with some extra bells and whistles
- SimSynth – A nice analog synth emulation. Think of it as a beefed-up version of 3x Osc
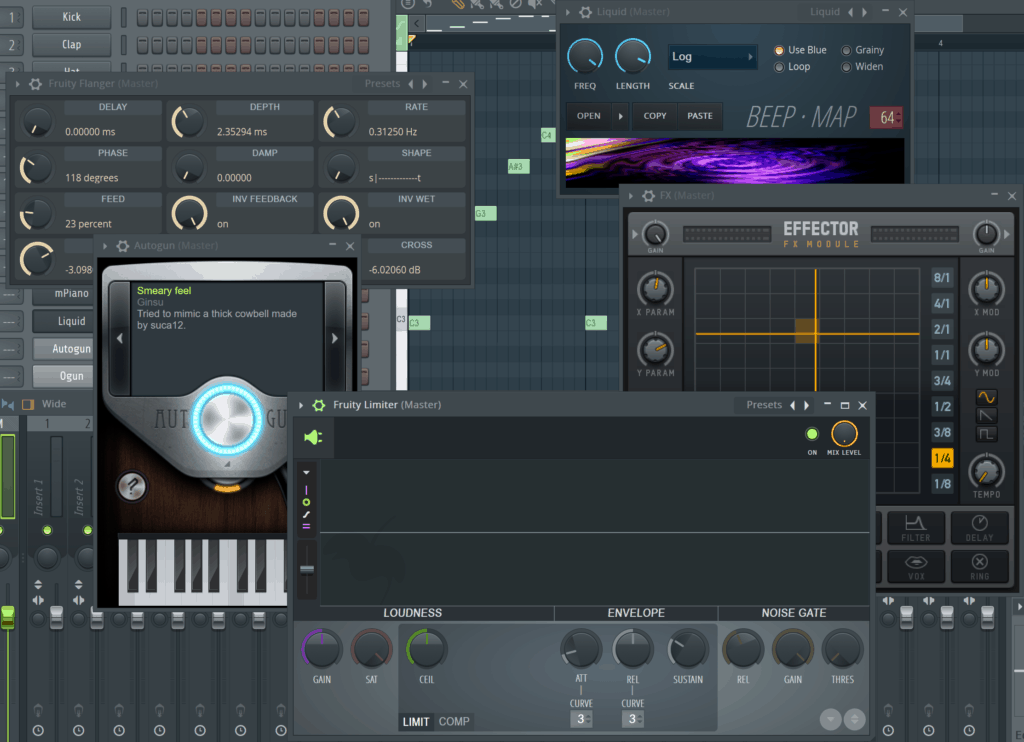
- Ogun/Autogun – Make some pretty wacky textures using physical modeling and some other technical magic
- Morphine – This is a really cool synth but with a bit of a learning curve. The violin preset is pretty awesome.
- Toxic Biohazard – One of the first synths I started using. The interface is a bit confusing and outdated though:

FL Studio Plugins: Effects
Now let’s move on to the effects plugins. With FL Studio plugins, most of these are recognizable with the “Fruity” prefix.
Fruity Parametric EQ 2
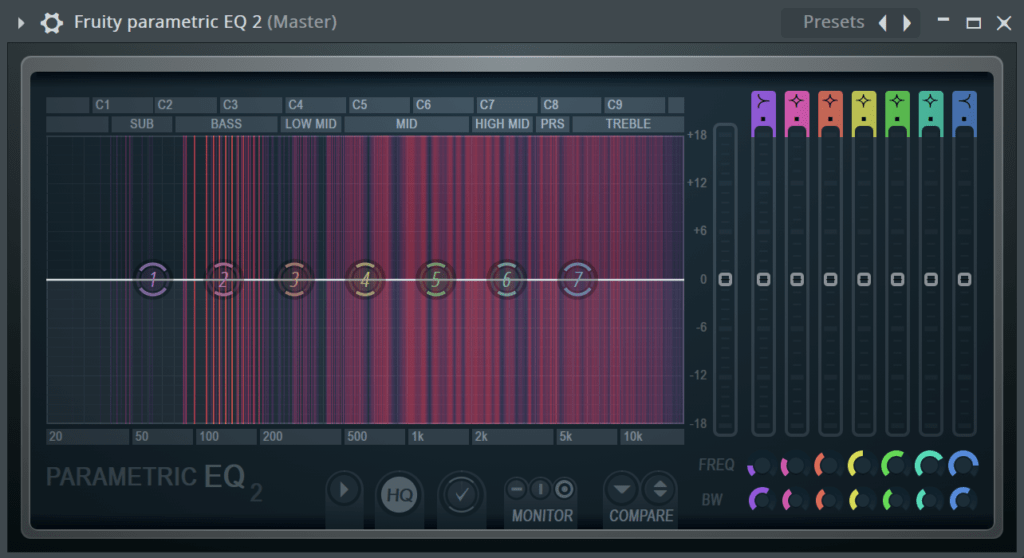
A powerful yet simple EQ plugin that helps balance the different frequencies in a sound.
One unique feature that helps EQ 2 to stand out is the intuitive frequency visualizer – brighter lines indicate louder frequencies. Great for both mixing and mastering.
You’ve got 7 different bands you can manipulate the frequency and bandwidth on, but also 7 different curve possibilities:
- Low-Pass – cuts all frequencies above a certain point
- High-Pass – cuts all frequencies below a certain point
- Band-Pass – cuts all frequencies above and below a certain point, allowing a narrow range of frequencies through
- Notch – cuts a specific range of frequencies completely out of the spectrum
- Low Shelf – attenuates a group of frequencies below a certain point
- Peak – attenuates a range of frequencies at a specific point
- High Shelf – attenuates a group of frequencies above a certain point
If you’re new to EQ’ing and filtering, we’ve got guides here and here 🙏
Fruity Limiter
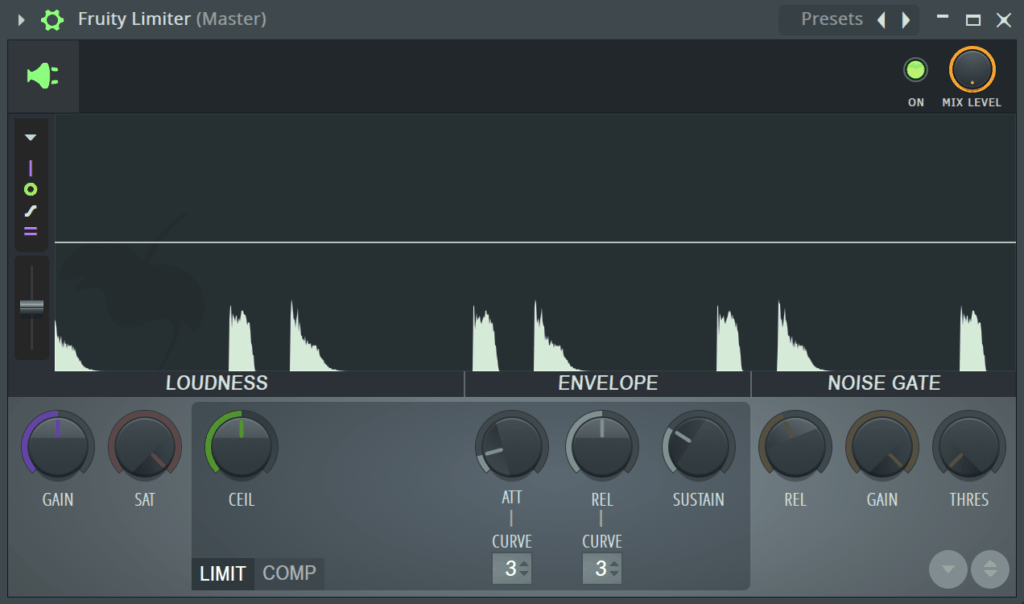
Ahh yes, that plugin that gets loaded on your master every time you open FL Studio.
But what does it do?
Well first and foremost, it’s a limiter. A limiter is a device that allows no audio to pass over 0dB by applying heavy compression. Yet most people don’t realize it also has a standard compressor function:

This makes it an ideal tool for sidechaining (kick and bass for example).
Fruity Delay 3
Fruity Delay 3 is your go-to FL Studio plugin for delay.
This FL Studio plugin is a revamped version of Fruity Delay 2. It adds new features such as distortion, diffusion, and modulation:
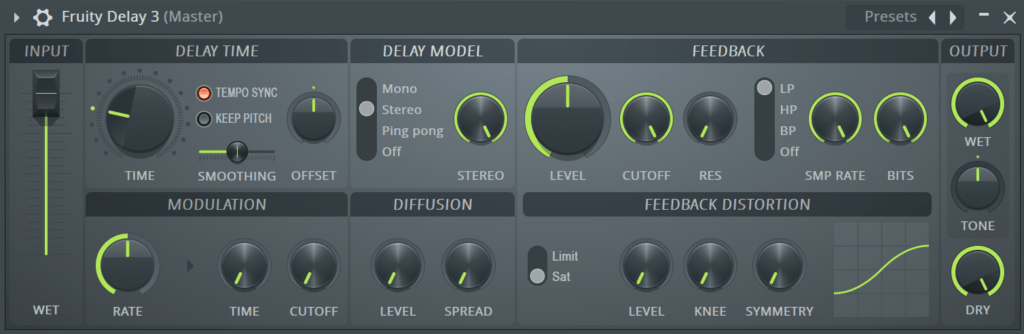
In addition, you get your standard features such as delay time, feedback, filter, delay model, and dry/wet control.
If you’re getting your feet wet (no pun intended) with delay, this is the perfect place to start.
Fruity Reeverb 2
Fruity Reeverb 2 might have a reputation for a cheesy sound. But if you’re getting started with reverb, this is a great little plugin:
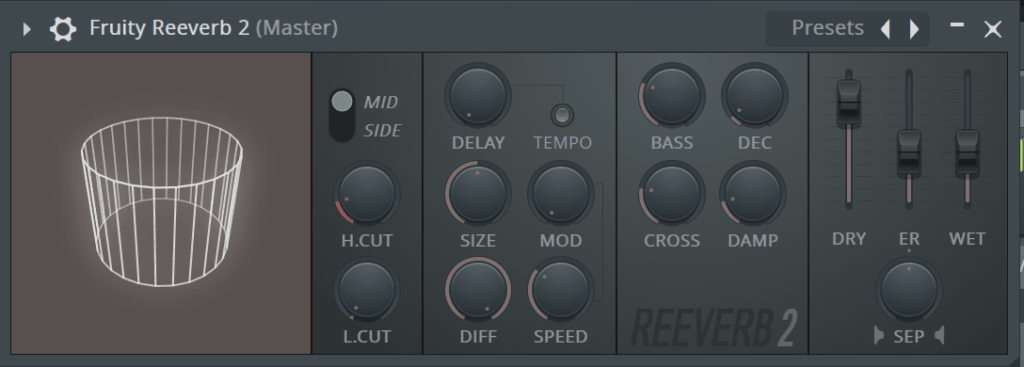
You’ve got quite a number of controls here, but the important ones are delay, size, decay, dry/wet, high/low cut, and ER level.
These control the bulk of the length, density, loudness, color, and shape of the reverb tail.
You can get many flavors of reverb with this, from close-up to cathedral-like:
Fruity Convolver
I’m quite surprised when FL Studio users say they haven’t tried out Fruity Convolver:
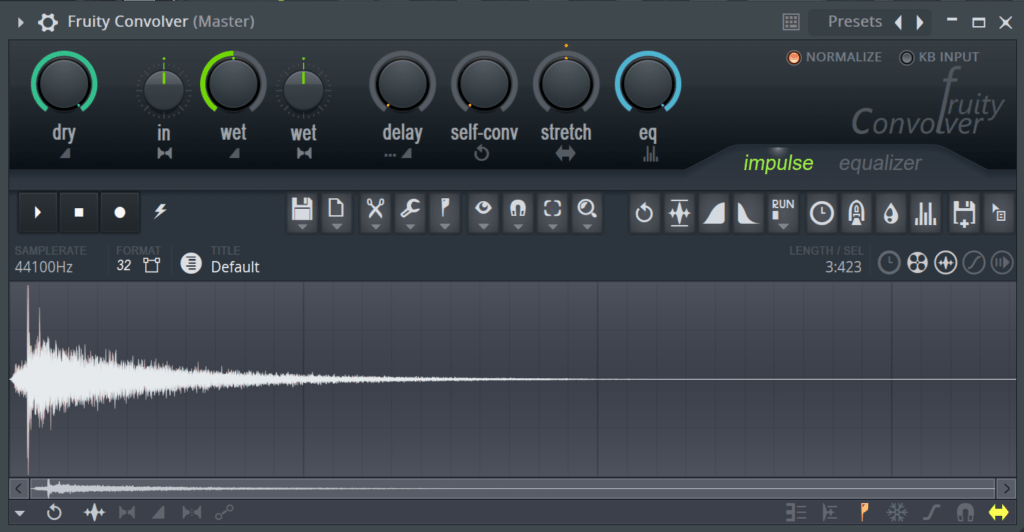
Fruity Convolver is a convolution reverb plugin. This sets it apart from standard algorithmic reverbs you’ll find (like Reeverb 2).
Convolution reverb uses pre-existing sounds called an Impulse Response (IR) to model the space. This means you can re-create the reverb of any place in the world!
It also explains the insane list of presets available with this FL Studio plugin:

Fruity Convolver features a great EQ tool that allows you to shape the reverb:

If you’re new to convolution reverb, we’ve made a full guide on its insane capabilities over here 🔥
Pro-tip: for some crazy sound design, try dragging in a sound that isn’t designed to be an IR, into the sampler at the bottom. Because breaking tools is the most fun, right?
Edison
Edison is FL Studio’s native audio processing tool:
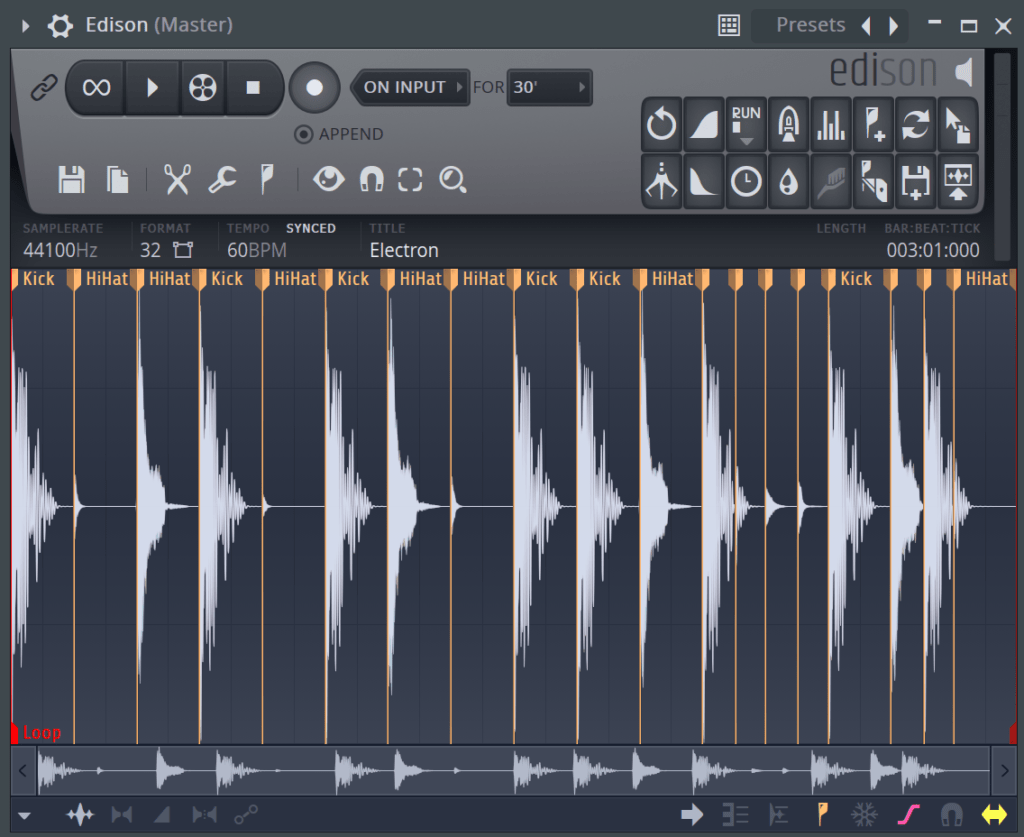
Edison features a myriad of tools including:
- fade-ins and outs
- normalization
- looping
- delay
- blur (a reverb-type effect)
- and so much more than I can write here, you’ll be playing with it for hours 😉
It’s an excellent tool if you want to quickly edit a sample. Simply right-click the sample, and select “Edit in Audio Editor”:

This will automatically open up Edison. One of my favorite shortcuts is CTRL + DEL. This allows you to delete everything except your selection:

Another killer feature of Edison is the “Blur” tool. This allows you instantly create stunning atmospheres and pads:
One thing to note about Edison is its native integration. This means it ‘overtakes’ the transport keyboard shortcuts (like play, pause, and record) when being used.
Gross Beat
The holy grail of FL Studio to be honest. Honestly, when I first used this plugin I didn’t get it. I mean, I thought it was alright, but nothing fantastic:
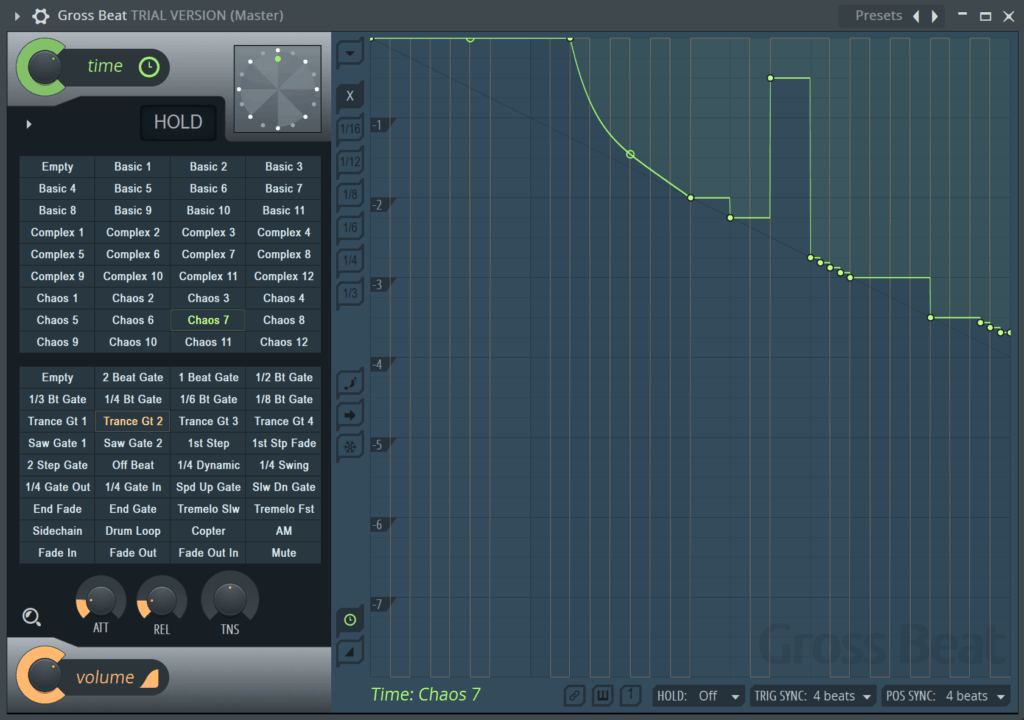
But I slowly saw how practical and creative it could be.
Sidechaining, pitch shifting, stuttering, volume fading, turntable emulation – you name it.
Yet this is all achieved by drawing an envelope for both the pitch and volume over a defined period of time (e.g. 1 bar).
Note: Gross Beat only comes with the Signature Bundle and up.
Effector
While it’s no replacement for a dedicated effect type, Effector is a fun way to get creative with your processing:
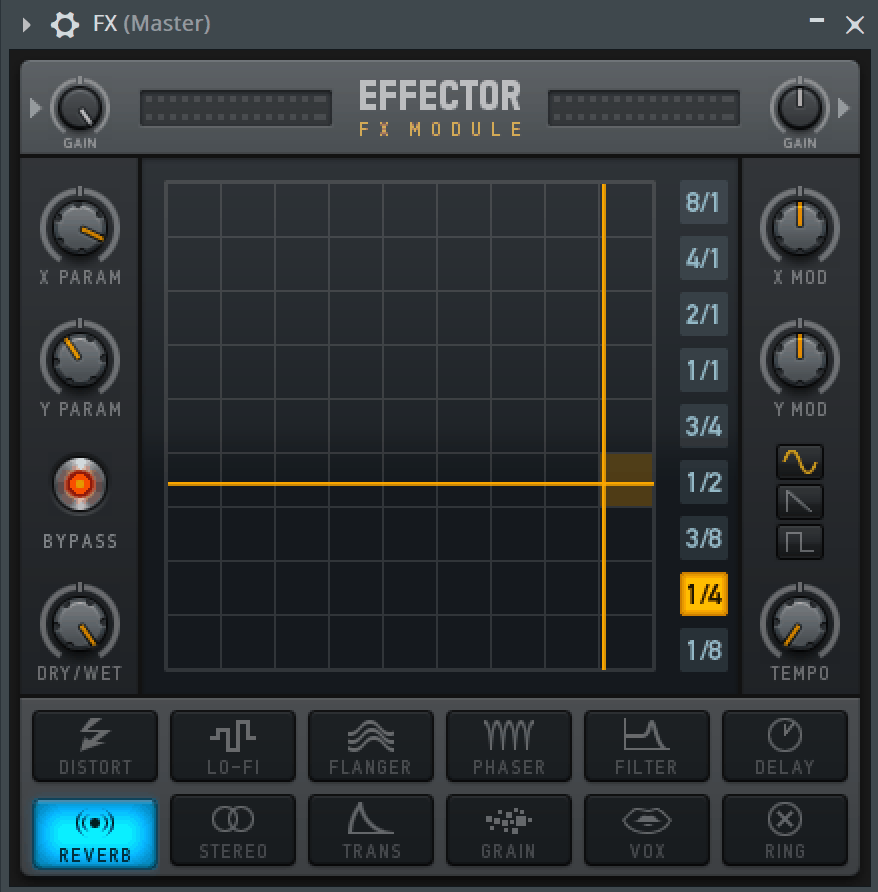
Combining phasers, reverbs, distortions, and pretty much every effect type into one plugin, it allows intuitive modulation of parameters on an X-Y pad, with a customizable mod rate.
Think of it like a discount Turnado, Effectrix, or Glitch 2. Good for some applications, but not so much for others, mostly because there’s not too much to the plugin.
Vocodex
Yoy-bass lovers and vowel-sound fanatics – this is your plugin:
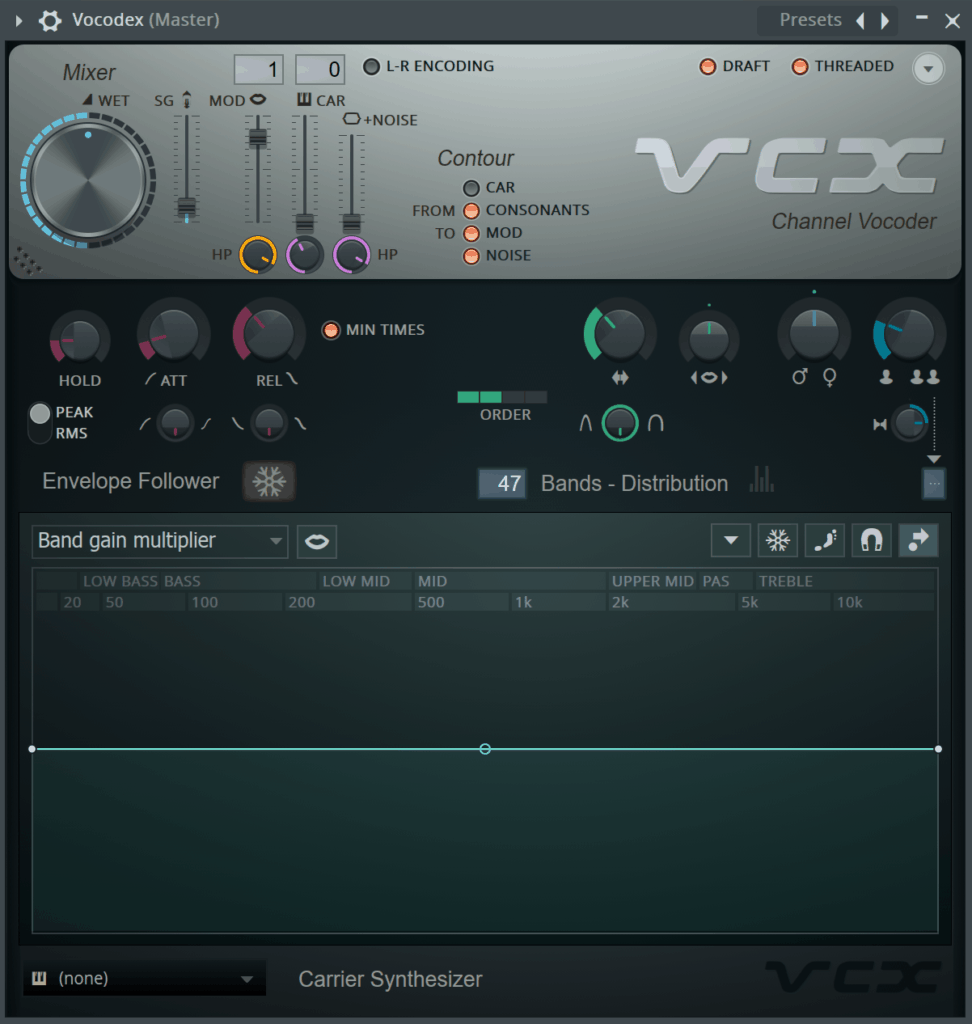
Vocodex is an advanced Vocoder plugin. Vocoding essentially uses a voice (modulator) to modulate a carrier, which can be a synth or any sound.
It’s how you get those robot-esque sounds in many of Daft Punk’s tracks.
Except Vocodex is like that on steroids. You can change vowel sounds, make it sound like multiple people and way more.
Here is a simple guide on Vocodex if you want to dive into it.
Maximus
Multiband compression and limiting to the next level. Maximus is (mostly) a mastering plugin that makes things sound super loud:
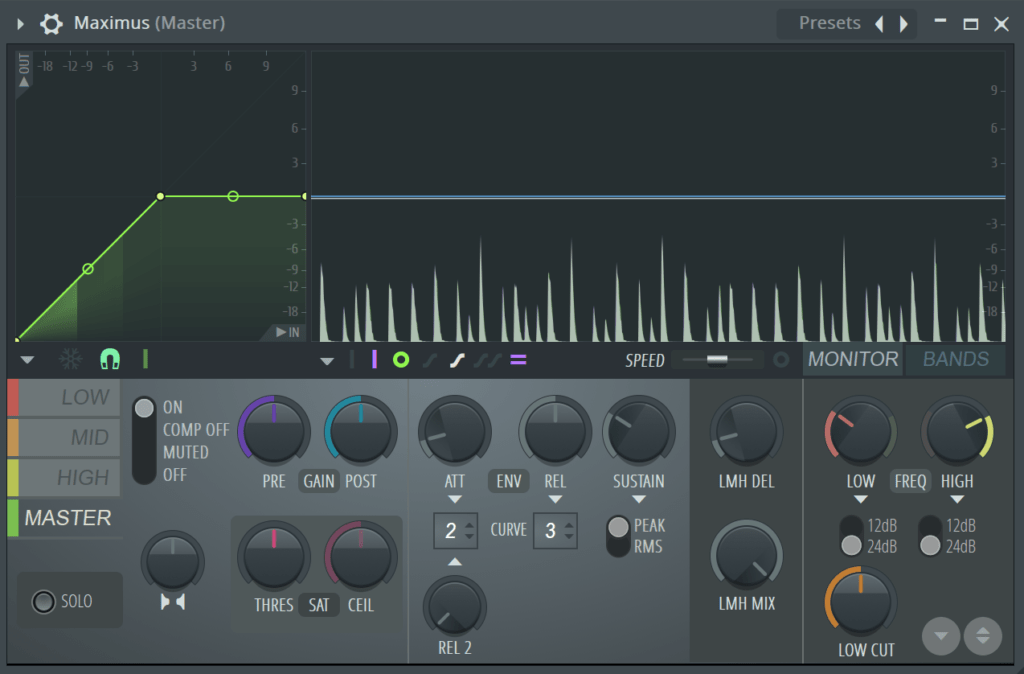
It has 3 bands, for low, mid, and high, and then a master processing that comes after all three.
Each band has its own visualizer and set of controls, like gain, attack, and release, and the graph on the left represents the ratio and threshold.
Maximus requires a decent set of prior knowledge before using it, like understanding an EQ, compressor, and limiter, so if you want to dive into it, check out another video from Seamless.
Fruity Love Philter
Fruity Love Philter is the FL Studio plugin for advanced filtering:

It consists of 8 filtering units that you can run in parallel or in series. You can create really cool delay and gating effects with it.
FL Studio Plugins: Some Honourable Mentions
- Soundgoodizer – Look, as much of a meme as it may be, it packages some Maximus presets quite nicely into an easy interface. It can actually, in fact, sound good.
- Hardcore – Guitar pedals inside a DAW? You got it.
- Fruity Chorus, Flanger, and Phaser – these are your standard chorus, flanging, and phasing plugins (don’t know the difference? We’ve got a guide right here).
- Fruity Waveshaper – a basic waveshaper for quick saturation.
- Fruity Soft Clipper – adds some nice soft distortion in a simple interface.
Third-Party Plugins
Beyond the many included plugins, there are an infinite number of free and paid options made by a variety of manufacturers.
It can even be overwhelming sometimes. That’s we’ve put together a comprehensive list of the best free plugins out there. This covers both instruments and effects plugins by the way 😉
If you don’t know how to add them to your library, check out our beginner’s guide to FL.
One recommendation here is to be careful – it’s easy to go overboard with plugins. You’ll quickly end up with a bunch that you’ll never use. And you could waste a lot of money and kill creativity. Think about each plugin before you add it to your studio.
Paradoxically, at the right moment, adding a new plugin to your toolbox can be a great way to spark inspiration. So let’s take a look at some options.
Free Plugins
OTT by Xfer
So you want your sounds to be super-squashed? Like over-the-top squashed? Then this is the compressor for you:
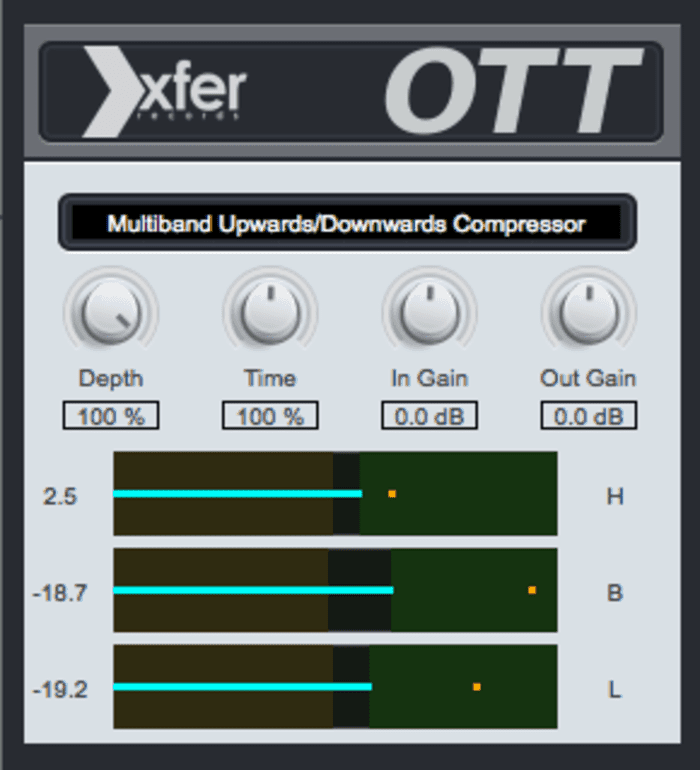
Modeled off the ‘OTT’ Multiband Dynamics preset in Ableton Live, this plugin brings a unique texture to any DAW, including FL Studio.
OTT includes gain control, 3-band threshold control, and time and depth controls. If you’re interested, we have a guide over on our YouTube channel here:
Span by Voxengo
It’s hard to come across a decent spectrum analyzer. Especially one that’s free.
Enter SPAN:
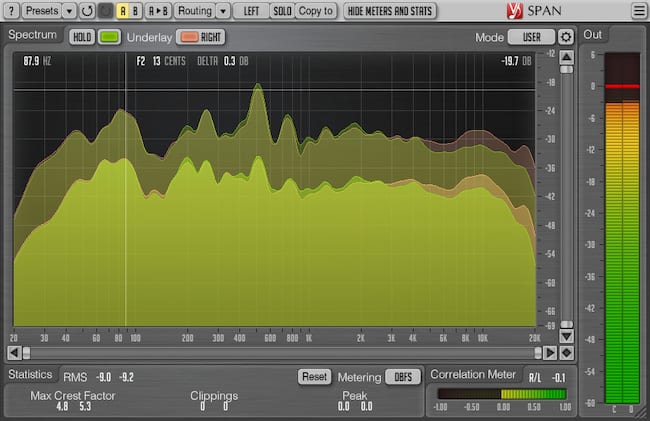
Span is incredible for the price (free) and has all sorts of functionality, including:
- FFT time customization
- pitch and frequency analysis
- multiple spectrums from different audio sources
- Correlation meter
This is a tool I always use. Namely, I use it to reference it to other tracks. This ensures my mix is balanced in all the right frequencies. I also use the correlation meter to make sure I don’t have any phasing issues

Unlike other analyzers, it balances the frequency spectrum to how we as humans hear sound. Super cool.
Tyrell N6 by u-he
I had to include a free instrument, and Tyrell is insanely great value as a free plugin.
In my opinion, its synthesis engine is of premium-level quality:
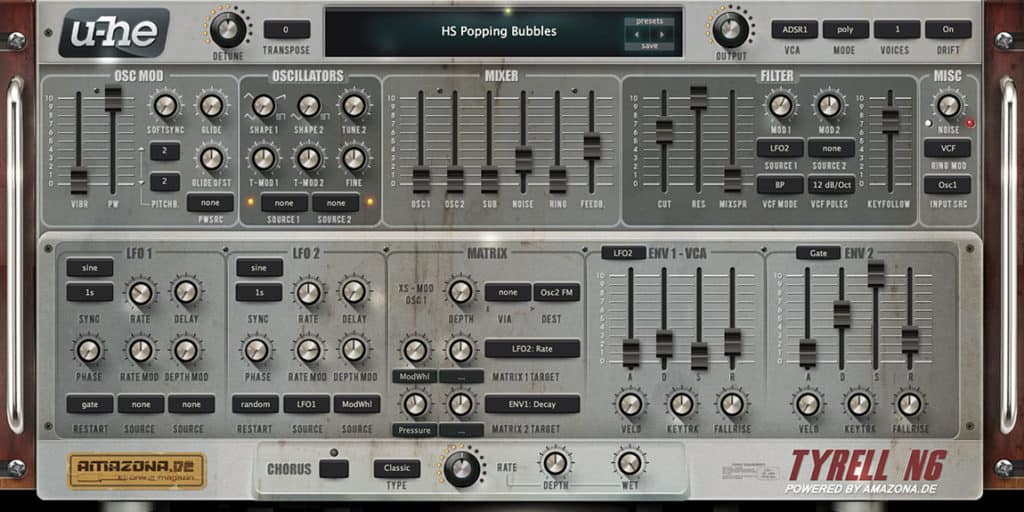
Yes, it’s simple and compact, but that’s all you might need. Check out some of the presets on this thing, they’re really solid:
The filter module on this thing is also adapted from Diva, u-he’s top-of-the-line analog emulation synth. So don’t sleep on this one.
Vital
Now, I wasn’t going to forget about this one. Some have called it the successor to Serum. And it’s free:

Vital is personally my synth of choice. Its killer added value is the visual aids you get. Filters, LFOs, envelopes, effects… Everything is so visual that you can instantly understand what’s happening.
We’ve dedicated an extensive guide to Vital here. And gathered some free sample packs for Vital here. If there’s one free plugin you should download TODAY, it’s this one.
Paid Plugins
Sure, there are numerous free plugins that are sufficient for making good music. But sometimes you need something that’s had the time and effort worked into it.
The problem with free plugins is that they’re hit-and-miss. If you buy something, you’re a lot more likely to get utility out of it.
Paid plugins also represent an investment on your part. This means they give you the kick up your producer ass you probably need 😅
Here are some popular and high-quality options on the market.
Serum by Xfer
It’s both number 1 on Splice and the go-to synth plugin in many electronic music producers’ studios for a reason. It’s damn sick, that’s why:
Serum is the brainchild of Steve Duda, a producer and software engineer who runs Xfer Records.
Basically, it’s an advanced wavetable synthesizer with subtractive, additive, and FM capabilities all built in. And that’s only scratching the surface.
What’s a wavetable synthesizer? Imagine you could tell your oven to make any food you wanted ever. That’s the culinary equivalent of Serum.
You can import any sound and turn it into a wavetable, by splitting the sound into a series of audio cycles that get repeated and scanned through. Kind of like making a stop-motion film and putting all the pictures together at the end.
You can either buy or rent-to-own Serum, which is a pretty sick deal. We also recommend it for EDM Foundations course.
Ozone 10 by Izotope
AKA mastering made easy all-in-one plugin. Ozone is a suite plugin, meaning it rolls a lot of the features from a group of standard plugins into one simple interface.

It comes in a few different versions, but at the heart of it, the result is the same – quality mastered audio.
Ozone has some crazy futuristic features that I should mention, like:
- Tonal Balance Control (which is basically automatic EQ)
- Spectral Shaping (removes frequencies surgically per band)
- Track Referencing per section. Makes some tedious mastering tasks too easy.
To sum it up, Ozone includes the following modules (they are standalone too in the Advanced version):
- Spectral Shaper
- EQ
- Dynamic EQ
- Post EQ
- Maximizer
- Imager
- Exciter
- Dynamics
- Vintage Limiter
- Vintage Tape
- Vintage EQ
- Vintage Compressor
This basically makes the go-to mastering plugin for 9 producers out of 10. Once again, Splice offers the option to either buy or rent-to-own Ozone.
Massive X
Massive X is the revised version of Massive. The old version of Massive was the center of many music producers’ studios for years and years, responsible for many synth sounds. And it still is for many people, remaining at #11 on Splice:

Massive X is described as the next-gen polyphonic wavetable synth. Its features include:
- Dual oscillators
- 2 noise modules for textures
- Advanced filtering section
- Effects include reverb, flanger, delay, and more
Recommended: Massive X vs Serum
VintageVerb by Valhall
One of my personal favorites reverbs, Valhalla VintageVerb is insanely good for thick, retro-style reverb:
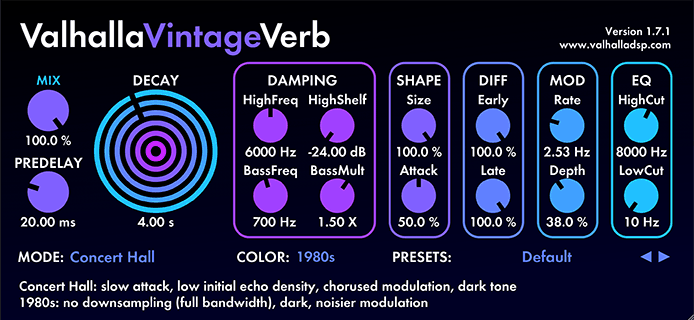
It can emulate a 1970s color, a 1980s color, or a NOW color, which texturizes the reverb in different ways.
It also has a bunch of different modes for different sounding spaces and a myriad of presets for different creative needs.
While you’re at it, you should just check out all of Valhalla’s reverbs. They are all $50 each.
Other Resources
If you didn’t know, there are literally thousands, if not millions of free and paid plugins out there for FL Studio, made by hobbyists and companies alike. Here are a few resources that curate them well. Be warned though, you’ll find both gems and garbage in these sorts of places.
- Music Production Software Guide – Our own list of curated software, including plugins. We cut out the junk in this one, but not all are free.
- VST4Free – So many free plugins here, so if you need something specific, give this a look.
- KVR Audio – More of a full-featured plugin forum, that features a variety of plugins with download options.
- LANDR Blog –A bit more on the curated side again, LANDR lists 200 free plugin options on their blog.
- Splice – Splice curates a lot of plugins and also ranks them depending on who uses them. Pretty cool.
Enough FL Studio Plugins?
Ok, there are quite a few options, so go check out some of these plugins, load them up into FL Studio, and be on your way. Also, check out our music production software guide if you need more.
Remember, plugins won’t solve all your issues either, and they won’t make you a better producer. The thing that makes you a better producer is getting down to the fundamentals.
That’s why you should grab our EDM Starter Kit – full of samples, presets, and resources to guide you on your music journey.
If we missed something important, then let me know at [email protected].
