


Ever listened to a song and thought:
How did they do that!?
Every producer’s dream is to make the quality of music that their idols do.
But we get caught up in things like:
- Finding out what plugins they use
- Watching breakdowns and walkthroughs
- Getting down that our music isn’t good enough
While these things can be helpful (well, not the last one), nothing compares to the benefit of analyzing and recreating music.
Here’s our guide to dissecting, understanding and applying techniques from your favourite music.
Note: To follow along best with this article, make sure to grab the PDF guide for music analysis below. We’ll be using it to demonstrate many techniques!
Why Analyze Music?
Apart from recreating music, analyzing music is an active task that helps you understand what makes a track work the way it does.
You are doing something musical, rather than just watching a video.
Also, it’s been something that artists have been doing for years, and it works.
Of course, recreating a track in your DAW is probably the most effective way to learn another artists’ production approach, but if you don’t know the practical side of things yet, understanding it from an analytical
What Do I Need?
To analyze music, you’re best off having the following.
Access to a High-Quality Audio File
There’s not much point analyzing a track if you’re listening to a 128kbps rip off YouTube. Yes, you can analyze the composition and arrangement, but mixing, mastering and production will be a tad trickier.
I’d recommend using a 320kbps MP3 at a minimum. If you have Spotify Premium, set it to max quality and this will be fine.
Try and find an uncompressed lossless file (i.e. WAV or AIFF) if possible. The difference is negligible, but it’s the closest thing to working in the studio you can get your hands on.
Quality Headphones or Speakers
I love my Apple EarPods. They’re great for listening, great for referencing mixes on and are super portable.
But they’re not great for analyzing the production, mixing or mastering of a song. Even the composition and arrangement can be difficult to hear, because of lacking bass response.
Instead of inducing a headache, get yourself something you enjoy listening on. No, you don’t have to splash out to get something decent. A pair of headphones like the Audio Technica ATH-M50x‘s are a solid option, for example.
Pen & Paper
People are gonna call me old for this one, but writing down the elements you’re hearing while listening is the most effective way to learn.
If you really don’t want to write, at least take notes on your phone or computer.
The main point here is to actively engage with what you’re listening to.
You can write on standard paper, but we also created our Music Analysis Guide that you can check out at the link above, which steps you through the entire process.
A DAW Template
Lastly, you need something you can listen to your track in that has all the tools and resources necessary to help dissect it.
This is especially important for the mixing and mastering phases of the analysis, where your ears, while still your best tool, can only go so far.
We will jump more into the details of this as we go through the process, but all you need is one track with a few devices on it, as well as the track for analysis loaded up.
The 5-Point Technique
Five years ago, we published an article called the Production Pyramid with our friend Nicholas Di Lorenzo of Panorama Mixing & Mastering. From it, we created this framework for thinking about music production.
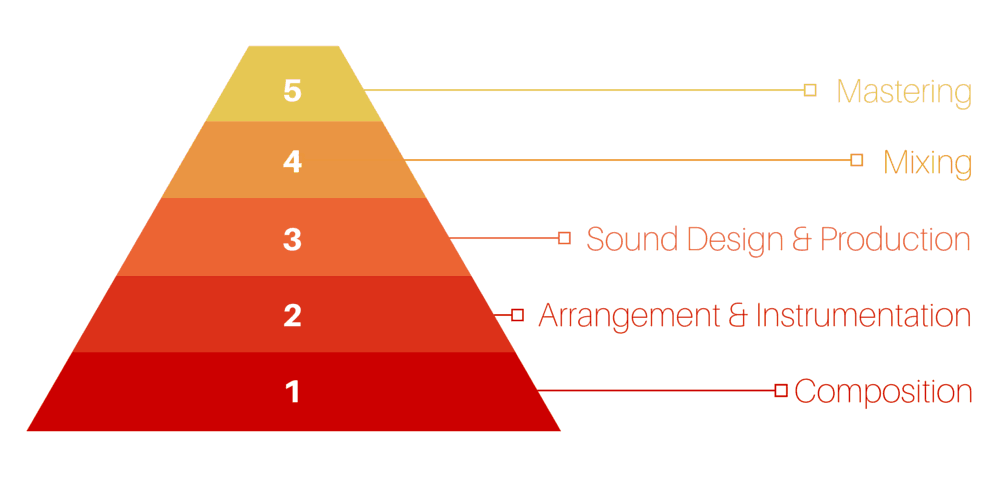
Based on the production pyramid, we designed the 5-Point Technique to help you analyze music on every level: Composition, Arrangement & Instrumentation, Sound Design & Production, Mixing and Mastering.

For each of these stages, I’d recommend 1-2 playbacks of the entire track while focusing on that particular level. In other words, don’t multitask.
Some stages, like composition, might not require you to listen to the entire track multiple times, so playing through once, or just repeating a small section twice, should be fine.
Let’s start with the composition.
Composition
The composition is the most crucial element of a track to analyze.
Without it, there is no music, no song.
That’s why I’ve put it first.
I’ll be honest though, this is more difficult if you haven’t brushed up on your music theory. So I’ll leave some links throughout to help you understand.
What you want to analyze here is the core idea of a song, in terms of melody, harmony and rhythm.
Recommended: Songwriting for Producers
Melody
AKA the thing that gets stuck in your head.
A melody consists of:
- Contour
- Range
- Intervals
- Structure
- Scale
The most effective way to start with a melody analysis is to draw what is called a ‘melody contour’. This is perfect if you don’t know much music theory, as all you are drawing is a line over time, representing changes in pitch.
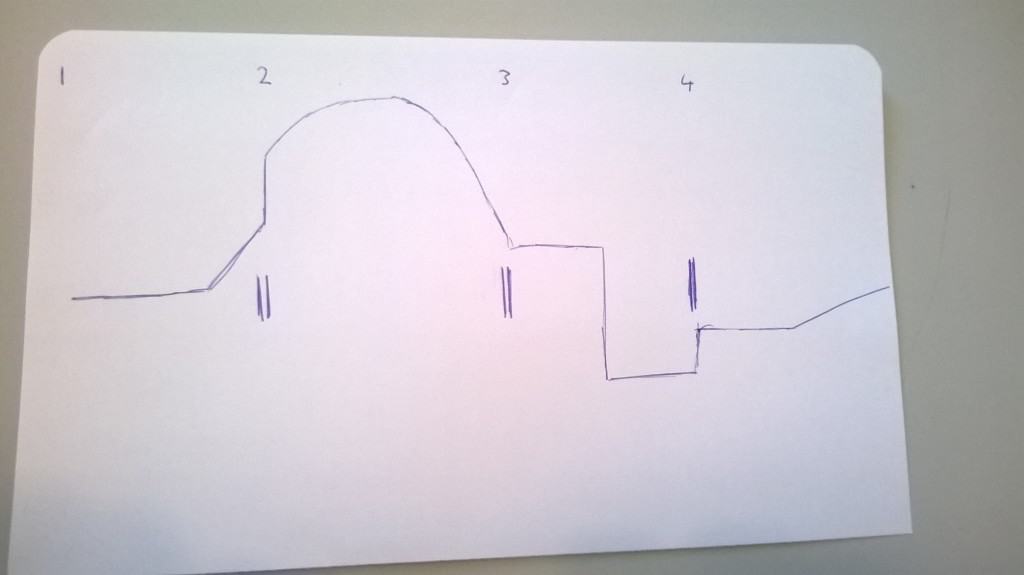
Once you understand the general contour and motion of a melody, you can begin to draw in exact notes.
From here, you can begin to analyze the scale, range and intervals used, to identify how motion is used to create the melody.
Recommended: The Ultimate Guide to Writing Better and More Memorable Melodies
Example
I’ll use the song Porter Robinson – Divinity to demonstrate how to analyze the composition.
After loading the track into my DAW, I want to give the track a general listen through, just to get myself familiar with it before I start diving into the details. You may want to do this more times if you feel comfortable doing so.

After this, you can identify where the core idea is present in the track. In this track, the core idea is there pretty much from the first beat, and it just develops over time.

After drawing a general contour for the feel of the melody, I whipped out the keyboard and began writing each of the notes next to the point in the contour.
Once the notes were identified, you can start to see different ranges (D to D) and different intervals (e.g. a fifth), as well as the overall key, which happens to be D major.
Harmony (Chords)
Now that you’ve analysed the melody, next in line is the harmony. In most cases, harmony is formed by a chord progression.
There are a couple of options here. If you’re a veteran in music theory, analyzing the chords and writing out the numerals or chord names shouldn’t be a problem.
But for those of you who don’t know music theory, this can get a bit trickier.
My recommendation would be to describe how the chord progression makes you feel. Is it euphoric? Sad? Happy? Tense?
This is a great exercise even for those who know music theory because then you begin to understand how different progressions evoke different emotions.
Recommended: Different Chord Types and How to Make Them
Example
In Divinity, the main chords don’t come in until the drop. They sound very euphoric yet simple, partially because of the arrangement and sound design, but also because of the way the chords are constructed.
By drawing in some notes, we can gather that it is a simple variation on the IV – I – iii chord progression (technically called IV7 – I7 – iii7, as they are seventh chords. The voicing of these chords changes a bit throughout, but this is the core chord progression throughout the entire track.

Rhythm
You’ll notice that you may have accidentally analyzed the rhythm when looking at either the melody or harmony.
That’s absolutely fine – it’s tough to separate them because it’s when melody, harmony and rhythm work together that a good idea comes to life.
In the previous two, you likely were only paying attention to the tonal elements and instruments in the track, but hear we may pay attention to atonal elements, like drums and FX, as well as the others.
This time, you can draw out a multitude of 4 beat bars (as most electronic music is in 4/4) and simply draw dots along them where you hear any sort of rhythmic accent or hit.
Recommended: Learning Music – Make Beats by Ableton
Example
The following is the melody rhythm for Divinity. This is the melody heard in the intro:

You can repeat this process for many of the other rhythmic elements in the track, such as kick and snare, and even the chord rhythms (there are plenty of grids inside the music analysis guide).
Arrangement & Instrumentation
An idea in itself doesn’t make a song or track – it needs development and structure. Otherwise, we’d be listening to an 8 bar loop for 5 minutes.
That’s where arrangement & instrumentation comes in. Arrangement refers to the way that the elements in a track are arranged in time and space. A chord progression may be shared by multiple instruments, and a drum pattern may change between the verse or drop.
Instrumentation (Vertical/Linear Arrangement)
We know the chords, melody and rhythm of our track, but how do we know which instruments and sounds comprise it? That why we look at the instrumentation of a track.
It helps to start from a bottom to top look at the sounds, starting with kick and bass all the way up to hi-hats and FX.
Example
On the provided analysis PDF, list the main elements you hear from low to high in terms of frequency content/note range. Try and go into as much depth as possible.

Structure (Horizontal Arrangement)
Once we’ve got the instrumentation down for one section, we can start to look at how it changes over time. It helps to draw a ‘map of your song’ to see what happens when (almost like in a DAW).
You may need to repeat the songwriting and instrumentation analysis process again to sections that are entirely different from the main section, but oftentimes there are always similarities with subtle changes.
Example
You can do this in your DAW or in the worksheet provided – it’s up to you.
In your DAW, you can use markers, start points or whatever your DAW calls them to mark out the structure

If you’re using the analysis PDF worksheet, replicate this structure on the paper. You don’t have to be as precise with the lengths of each section, but it can help to approximate it as closely as possible. Even write the number of bars if that helps.

Next, let’s move onto sound design!
Sound Design & Production
Obviously, an important part of electronic music is the sound design and general production work.
It’s often the part we love to appreciate the most – incredible sounding Serum patches, creative processing and well-executed ideas.
Yet, it’s important to analyze the composition and arrangement before this stage, as you can too easily get caught up in the way a supersaw was designed, and not the notes behind why it sounds amazing in the first place.
In production, there are two things to consider – the sources and the processing.
Sources
One mistake I made when learning music production is thinking that everything was synthesized from scratch every single time.
Yet, sampling has been an integral part of music production since the beginning, even though it has largely evolved since.
When listening to music, we should begin to analyze where the sounds came from. Were they recordings? Were they synthesized? Were they from a sample pack? Are they sampled from another track?
While it’s impossible to get this right every time (we don’t know the artist’s process necessarily), we can estimate it to help us understand how to get certain sounds. A stretched piano chord might sound like wavetable synthesis wizardry, but it might just be a pitched down sample from an old jazz record with lots of compression.
To simplify this process, list where each element was synthesized, sampled or some combination of both.
Processing
This leads me to the second part of the sound design and production equation – processing. It’s all well and good to start with a good sound, but a lot of unique production comes from the processing, resampling and general work done to the sound to get it to where it is.
Once again, getting every detail down may be an impossible task, but you get can the gist of it by analyzing the general sound. For example, maybe a resonant filter played a part in this sound, even though I can’t tell whether it’s actually a filter or a phaser. It helps to narrow down the options.
Try to list down the signal chain that may have been used, to the best of your knowledge.
Example
Using the PDF, here are my estimates of the sound design and production behind many of the elements in Divinity.

Mixing
Mixing starts to get into the more technical side of analysis, where it’s still important to primarily use your ears, but you might need to enlist the help of some audio tools for certain things.
A track’s mix can be viewed like the image below, courtesy of David Gibson in The Art of Mixing.

The height of the object determines how much of the mix it takes up, the closeness determines the loudness, the width determines the placement in the stereo field.
Recommended: Mixing EDM
Volume
A mix is 90% in the volume faders.
Thus, it’s important to really listen to the loudness of certain elements in order to understand what makes certain mixes sound amazing.
It’s easiest to start with the loudest sounds in a mix and work back. Primarily rely on your ears here, and give the track a couple of listens through. The human mind can only focus on ~3-4 elements at a time.
Frequencies
Beyond a sound’s loudness, you have to think about the space in the mix it occupies. A supersaw chord, for example, would take up a lot of space in a mix, whereas a sine lead would take up very little space.
If you want to get more technical, describe or illustrate any frequency changes over time. For example, a sound might start playing an octave higher, so make a second note of the higher version.
Dynamics
A sound or instrument isn’t always the same volume throughout the duration of a track – it changes.
Sometimes the changes can be small (micro-dynamics), like a snare drum starting loud and getting quiet, and they can be large (macro-dynamics), like a kick getting louder in a build.
Stereo Width
The last dimension is the stereo width. Music doesn’t come out of one speaker, it comes out of two. So it’s important to pay attention to what is coming from where and how that impacts the feel of the mix.
Example
We can analyze the volume, frequencies, dynamics and stereo width using the PDF provided.


The above example is easier to do with a printed version using pen, as you can draw lines and get more specific with frequency ranges. It can be hard to do it with just text and lines on a screen.


Note that some of the elements may have width due to the mastering process, which we will cover next.
Mastering
This is the final stage of a track that you should analyze.
To be honest, like mixing, it’s difficult to do this just with your ears (probably more so), so you’ll need a few tools to help you hear what you’re listening to.
Loudness and Dynamic Range
The contemporary practice of mastering, especially in the digital world and in electronic music, is loudness maximisation.
Although this is changing with services now introducing loudness matching, it’s still important to get your tracks sounding at the level of other releases.
In mastering, you want to measure the average loudness of a track. The current standard for this is LUFS, or ‘Loudness Units Full Scale’. This measures the average loudness across time, of a track, also taking into account how humans hear music.
Plugins like iZotope Insight measure this, alongside a bunch of other helpful indicators (like stereo width and frequency spectrum).
Frequency Spectrum
The frequency spectrum can tell us a lot about the track. Does it feel bass-heavy? Is it very bright or dull? Are there a lot of mids?
Sometimes it can be difficult to know what is actually going on with the frequencies in a track. This is why using a Spectrum Analyzer at this stage can help to identify what you are hearing.

Stereo Width/Phase
In the mixing phase, we looked at stereo width. But in the mastering phase, it’s all about the feel of the track. Does it sound wide or narrow in general? Is the bass below a certain point mono?
A useful tool for this stage is a Mid/Side checker (something like Ableton’s Utility can do this) to listen to what is in the centre and what is in the sides.
Additionally, you can use tools that are included with iZotope Insight like a Sound Field Vectorscope, or find a Correlation Meter (I use this Max for Live one).
A Correlation Meter will tell you how similar or different the left and right channels are, -1 being opposites, +1 being the same and 0 being different.
A Sound Field will tell you the overall width of a track in relation to the frequencies.
Example
Once again, using the sheet provided, we can write down key information about the final master that we hear.

Using a plugin like iZotope Insight, we can measure both the LUFS and dynamic range in Loudness Units.
We can also make observations about the frequency content of the overall content, based on what we hear and the frequency spectrum analyzer.

From this graph, we can see that the lows are mono (fairly standard), whereas the mids suddenly get wide, and then the highs are also wide.
After that, you’ve finished analyzing the whole track! Now you can repeat this process in other tracks to discover your favourite techniques and then apply them to your own music.
Need Further Help?
So now you understand how to analyze your favourite music. But what about putting it into practice in the studio?
Soon, we’ll publish an article on recreating tracks as a ‘Part 2’ of this article.
For now, make sure to grab the Music Analysis Guide to get started.
Any questions? Feel free to reach out to me at [email protected], I don’t bite (unless you ask me how to become Martin Garrix in 6 months).
