The ability to process samples uniquely is a foundation of modern EDM.
After all, pretty much every track you’ve heard of has samples in it.
But being able to transform a sample so you don’t recognize it is an art! After all, there’s nothing worse than building a track around one sample… Only to find out it’s already been used in another track.
That’s why I’ve put this guide together for you 🔥
Together we will look at my favorite sample processing techniques, including:
- Chopping and re-arranging
- Reversing
- Transforming samples into pads
- LFO and volume automation
And much more! By the end of this guide, you’ll be turning boring samples into otherworldly sounds 🤩
So without further ado, let’s dive in 👇
Inject analog grit & haze into your music ⚡️
Our Analog Sample Pack is packed with 700+ weird and wonderful samples from synths like the: Roland Juno-6, Roland Jupiter 8, Teenage Engineering Pocket Operators, Korg Microkorg + more!
Table of contents
- Trick #1 – The Cut-and-Pastor 👥
- Trick #2 – The Pad Transformer 🤖
- Trick #3 – The Formant Shifter ♒
- Trick #4 – The Reversor 🔁
- Trick #5 – The Sample Synthesizer 🎹
- Trick #6 – The Volume Automator 🔊
- Trick #7 – The Movement Generator 🎛️
- Trick #8 – The Randomizer 🎲
- Trick #9 – The FX Recorder 🎞️
- That’s It For This Guide!
Trick #1 – The Cut-and-Pastor 👥
Cutting and pasting sections of a sample is referred to as “chopping”.
This is a must-know technique to process samples.
Let’s look at how to do it in FL Studio and Ableton Live. We’ll start with this piano chord progression:
There are 2 main ways to go about slicing samples: manually and with a sampler.
The “manual” version means you cut and re-arrange parts of the sample yourself:

By re-arranging, shortening/lengthening different sections, we can create an entirely new progression:

This is what it sounds like:
However, you can also use dedicated plugins to create slices. These are called samplers.
In FL Studio, you can use Slicex:
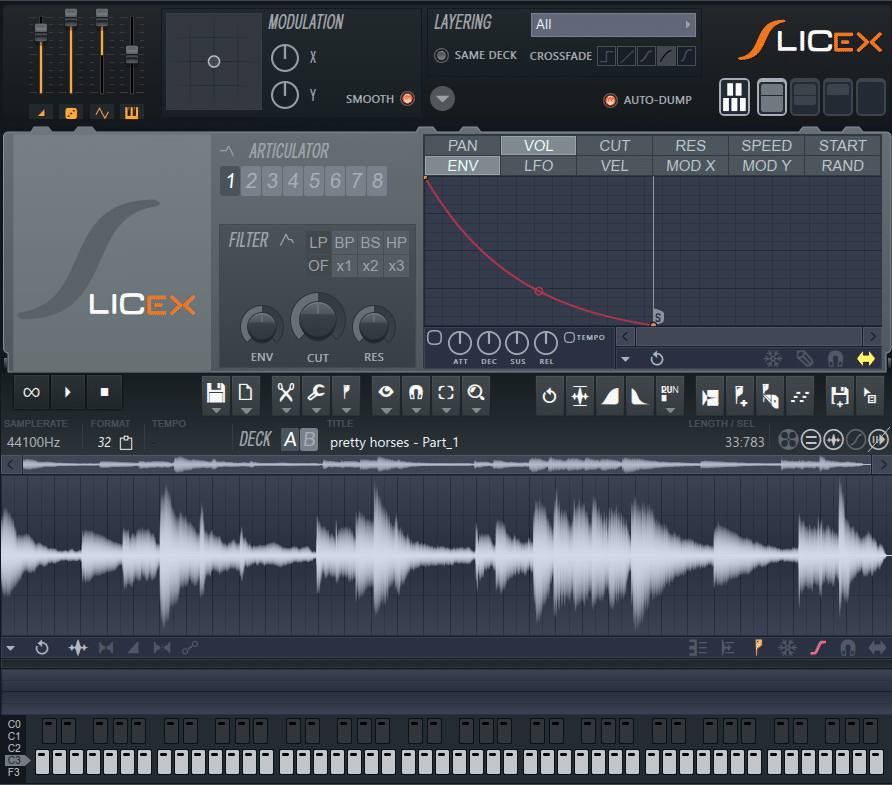
Click on Auto-slicing, and Slicex will create slices for you:
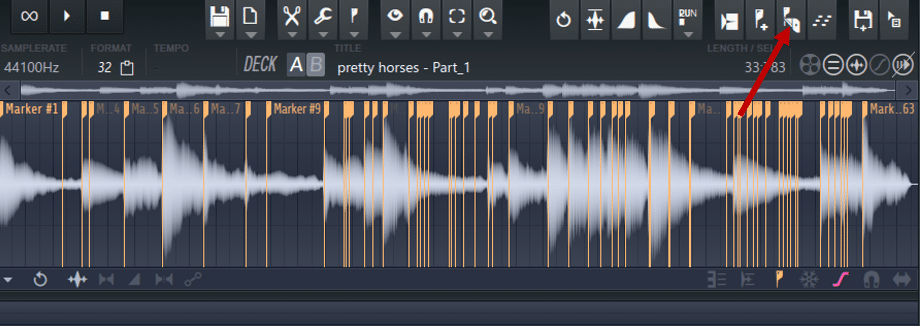
Each slice now has its own assigned MIDI note. This means you can play your keyboard to generate new ideas:
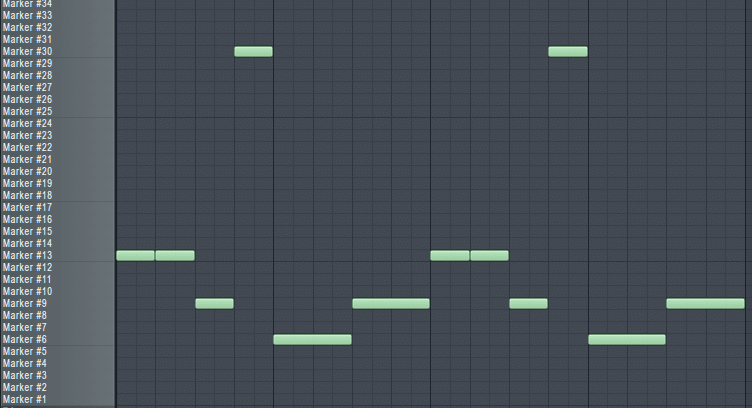
Here is what it sounds like:
To do this in Ableton Live, load up Simpler and drag a sample into it:

Next, click on Slice and decrease the Sensitivity to have more or fewer samples:

Now you can play your MIDI keyboard and come up with entirely new grooves!
If you’re looking for a beginner’s guide on how to sample, check out our latest guide here.
Trick #2 – The Pad Transformer 🤖
This is one of my favorite sampling techniques. It works especially well when you like the “feeling” of a sample. But it doesn’t quite fit your track as it is.
So we’ll transform the sample into a pad.
There are a few different methods to achieve this. Let’s first look at FL Studio:
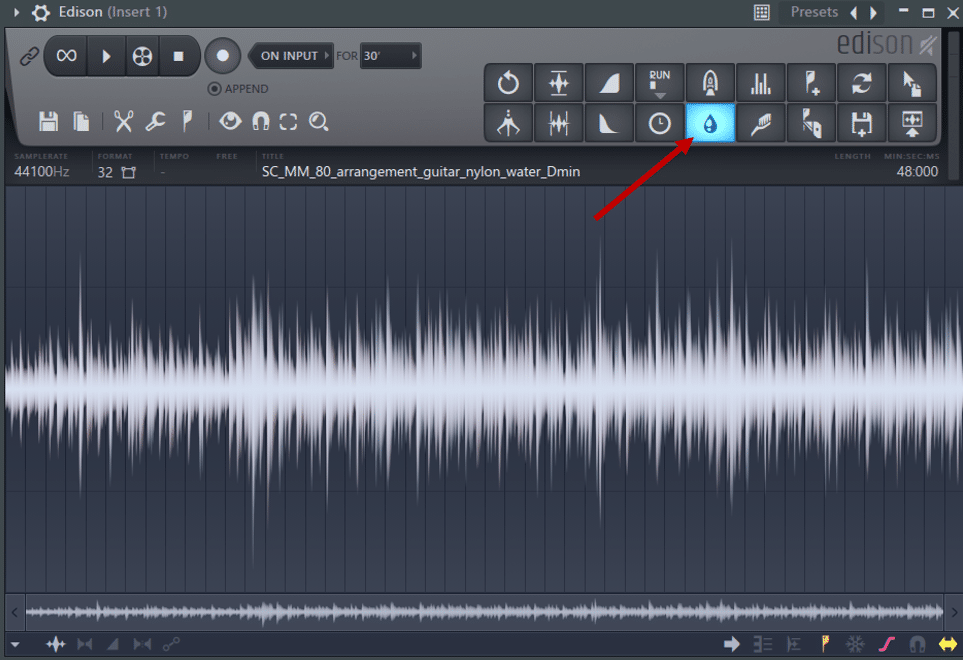
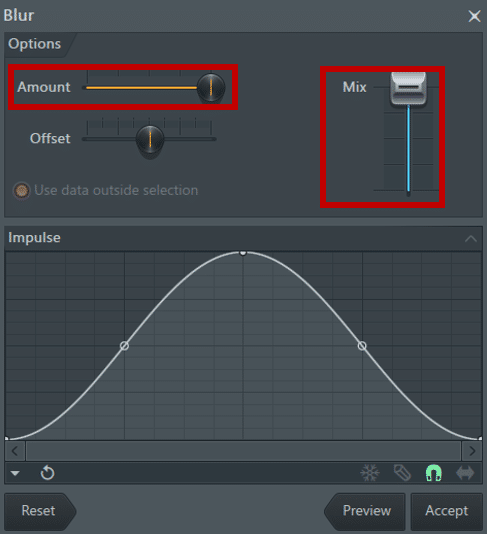
Edison’s Blur tool acts a bit like a convolution reverb.
Essentially, it multiplies the original waveform with a white noise impulse response.
This is what it sounds like:
If you want to retain the original sound, try decreasing the “Amount” and “Mix”:
Let’s listen to it in context. I have a short loop where I add the original sample. I think you’ll agree it doesn’t quite fit:
Now let’s hear it with the Blur technique:
Nice! I’ve added a touch of sidechain compression to make the pad “breathe” too.
Now let’s look at how to achieve this in Ableton Live.
In Ableton Live
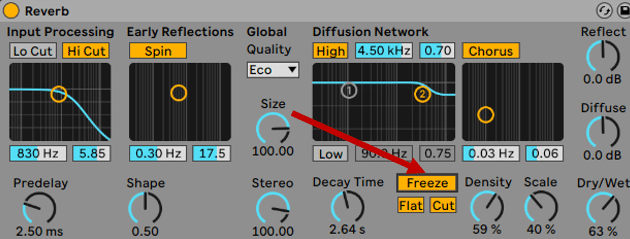
First, load up your sample and add some large reverb. You can also add other effects such as chorus and phasing to add some width:

Increase the Decay and Density to “wash out” your sound. Next, all you have to do is hit “Freeze”:
Now click on your sample and hit the number 0 to deactivate the sample:
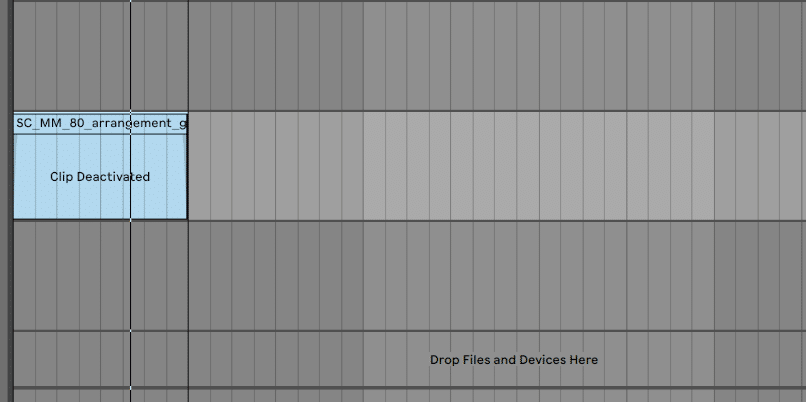
You now have a frozen reverb!
To record it, hit CTRL + T to create a new track. Then, select “Resampling” and arm the recording:

Looking for more handy Ableton Live shortcuts? We have you covered!
Hit the main Record button, and you’re done! You’ve now successfully gone from this:
To this:
Pro-tip: this technique is fantastic with an element already present in your track! For example, creating a pad out of the existing piano chords. This will give a sense of cohesion to your track.
Trick #3 – The Formant Shifter ♒
Formant shifting is one of the most common ways to process samples. Formants are peaks in the frequency spectrum of a sound. They are what gives that sound its “timbre”.
You can think of “formants” as filters.
Let’s listen to an example. Here’s a little soul loop I have going on:
The vocals are taken from a very popular track called “Never Miss The Water”.
Simply using the vocals like that is a bit obvious. So let’s mess with the formants!
To do this, you can use the free plugin MAutoPitch:
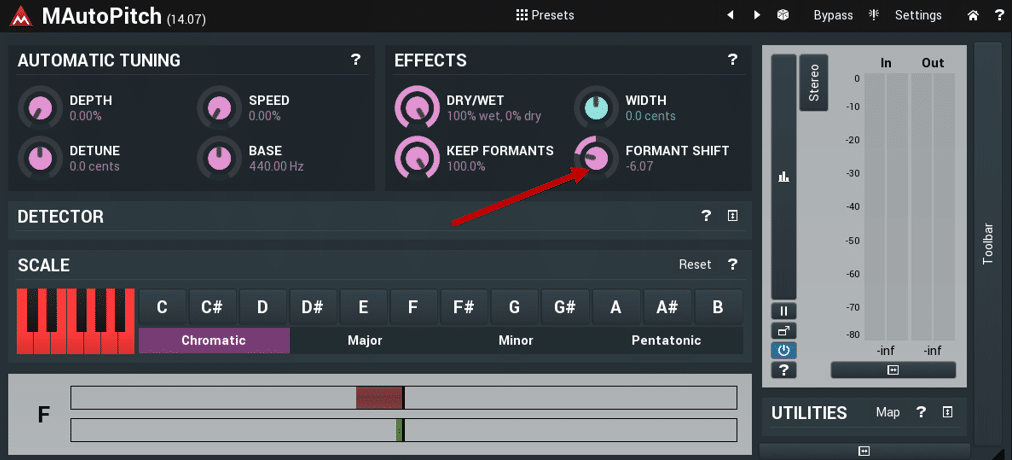
First, deactivate the automatic tuning. To do this, decrease the “Depth” knob to zero. Then, play with the formant shift until you find something you like.
This is what I came up with:
In this example, I shifted the formants by -6.5. I even automated the formant shift in the second phrase to create more variation.
I also added a radio-style EQ and some room reverb:
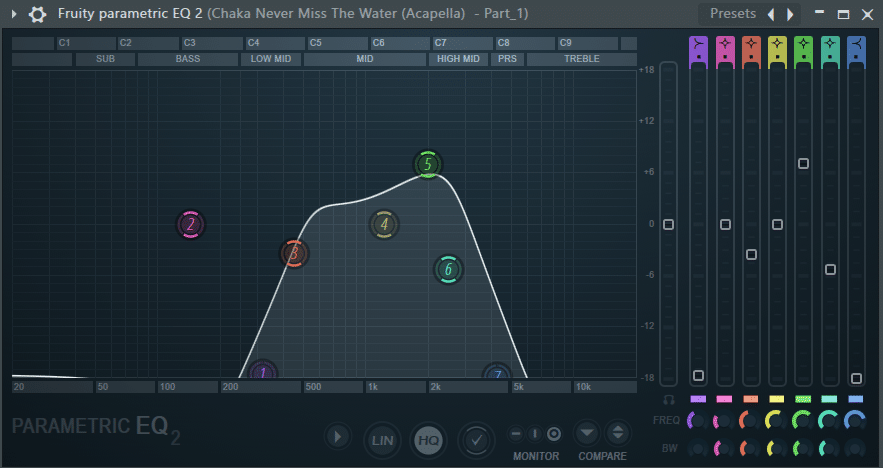
Another vocal processing technique that we’ve covered in the past is vocoding.
Here is what it sounds like layered in:
Vocoding has a pronounced character to it, so it might not fit your specific style. But you can always combine it with other techniques!
Btw, we have a lot more vocal processing tricks in this dedicated guide 😉
For example, you can create a vocoder layer, then transform it into a pad using trick #3:
Nice! 😍
Inject analog grit & haze into your music ⚡️
Our Analog Sample Pack is packed with 700+ weird and wonderful samples from synths like the: Roland Juno-6, Roland Jupiter 8, Teenage Engineering Pocket Operators, Korg Microkorg + more!
Trick #4 – The Reversor 🔁
When in doubt, just reverse it!
Reversing samples is such a powerful and underrated tool.
Let’s look at how to do it in FL Studio first. Load up your sample, and enable “Reverse”:
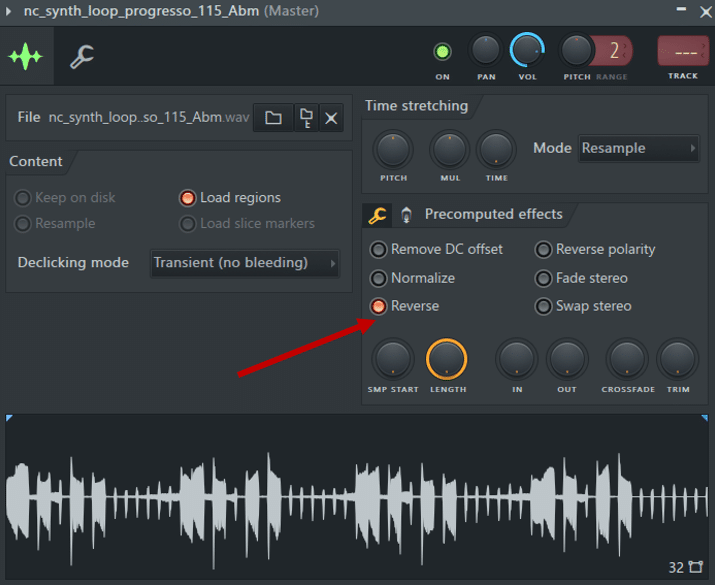
We’ve gone from this loop:
To this:
Pretty cool already if you ask me 😎
If you want to bring it to the next level, try reversing sections of your loop.
To do this, duplicate your entire sample. Then, make one of them “Unique”, and reverse it:
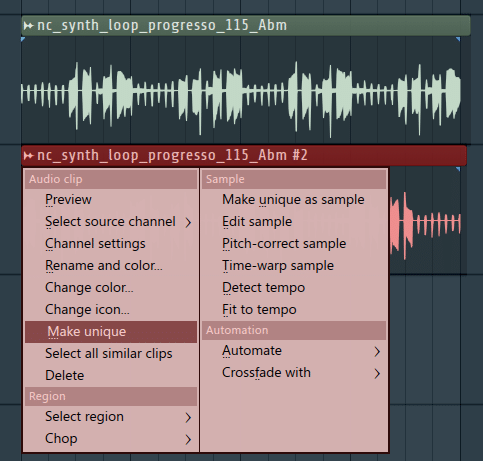
Now you can chop and combine parts of the original loop with reversed sections:
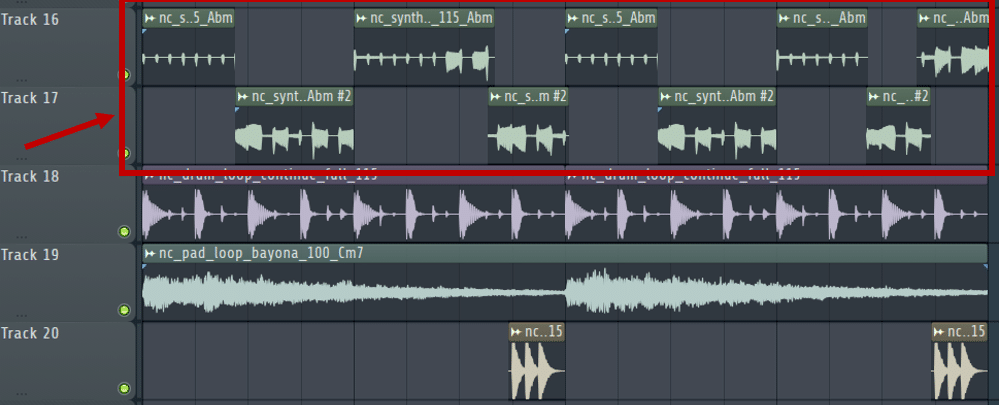
This is what it sounds like:
Awesome 😍 One last touch you can bring is reverb and/or delay. On the reversed sections, this will make the loop flow more smoothly:
Looking for some tips on how to choose your samples? Check out our latest video from Aden:
Trick #5 – The Sample Synthesizer 🎹
Another unique way to process samples is to turn them into… a synthesizer!
We’ve done a guide on how to do this with vocal chops. But you can do it with any kind of sample!
In FL Studio, first, isolate a section of a sample. Ideally, this should be a short section, with a clear pitch:
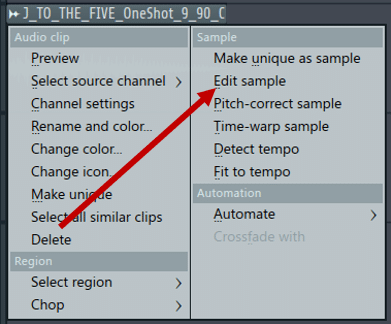
Save it as a new sample. Then, select “Edit sample” to open up Edison:
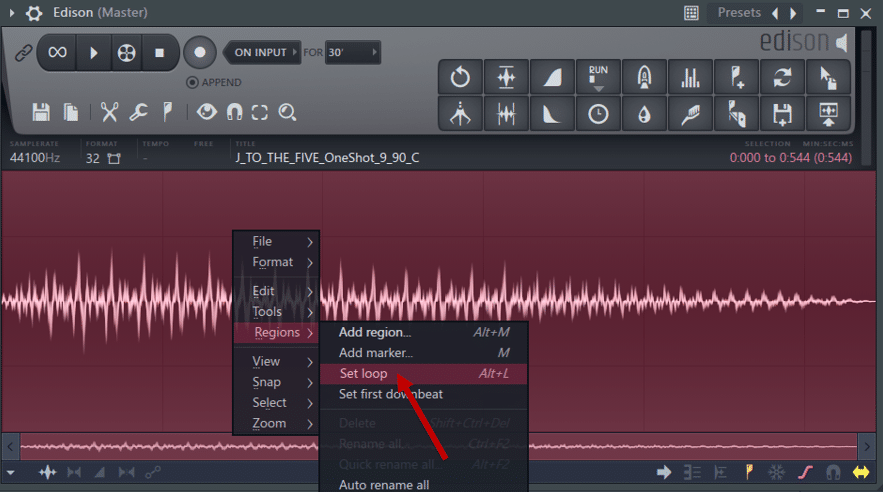
Here, right-click on the waveform, and select “Set loop”:
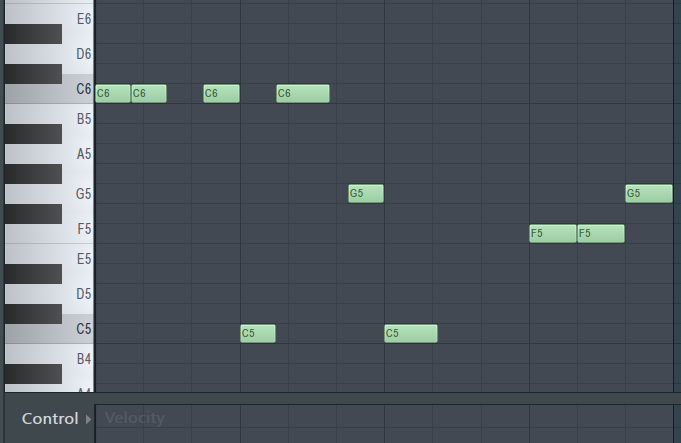
Now drag the sample into your channel rack, and play it like an instrument:
In Ableton Live, you can simply use … Simpler!
Drag your sample into Simpler, and select “classic” mode:

Next, let’s fine-tune this sample a bit. For this, go to “Controls”. Here you can adjust the EQ and envelope of the sample:

Let’s listen to the before and after:
I’ve cut some of the high-end, lengthened the attack, and reduced the release. Next, I’m going to load up an Arpeggiator and a Reverb:

Now, all I need to do is play a chord to get a beautiful arp!
Looking for more underrated arp tricks? We have a full extensive guide over here 🔥
Trick #6 – The Volume Automator 🔊
Automating the volume is a great way to process samples. For this, I like to use the free plugin A1TriggerGate:
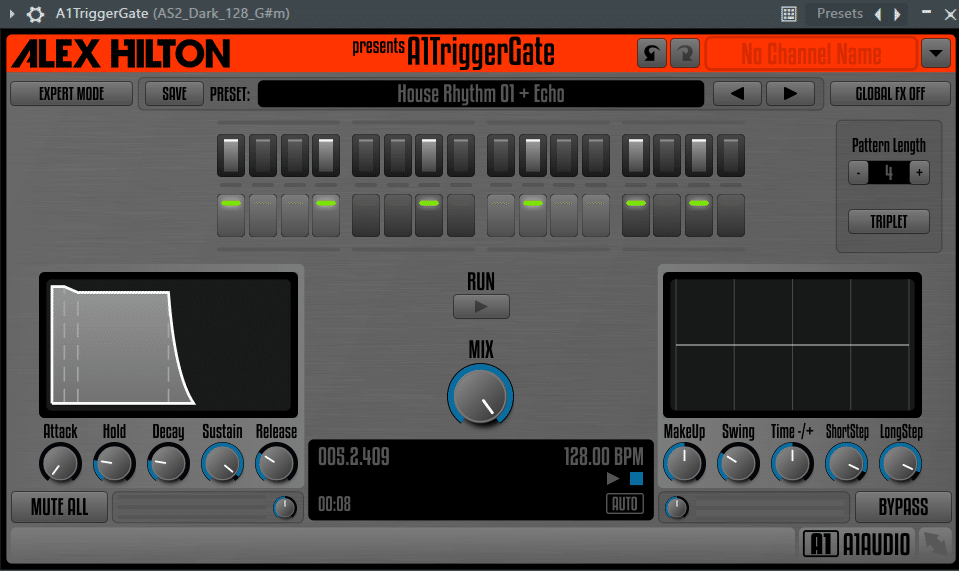
This is truly an amazing plugin to have. You can filter, automate the volume and even add some delay and drive!
To demonstrate, I have this loop with a synth that I like:
However, just dumping the synth there isn’t very… creative.
So let’s see what Triggergate can do!
First, I’ve loaded up the House Rhythm 1 preset. Then, I played with the envelope, filter, and step length:
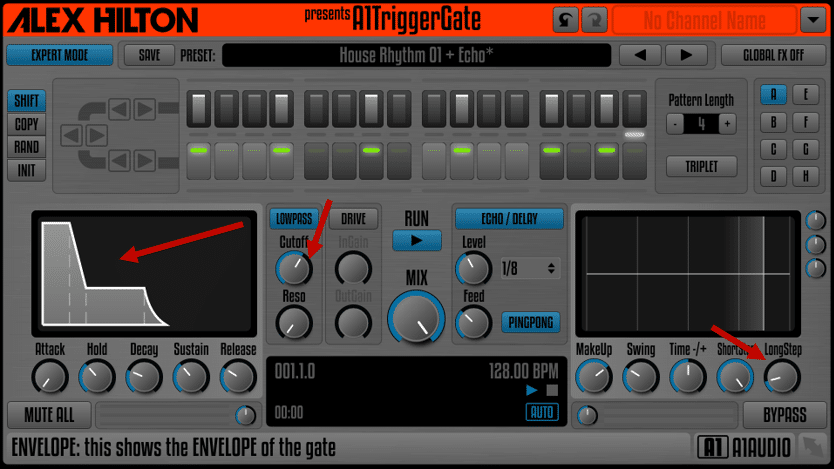
This is what it sounds like:
Not bad! Triggergate gives you control over each step and its volume. You can also randomize the volume of different steps to create interesting patterns.
This trick also works great to process samples like vocals.
Looking for vocals on Splice is a bit of a chore. It’s notoriously difficult to find something that hasn’t been used yet. So processing them is a must if you want to make them unique!
Here, I am using the TranceGate01 preset on both the synth and the vocal:
Trick #7 – The Movement Generator 🎛️
Movement can be achieved in a lot of different ways. One method is to make use of LFOs.
LFO stands for Low-Frequency Oscillator.
These oscillators are used to modulate other parameters.
One way I like to do this is to load up a sample into the free synth Vital:
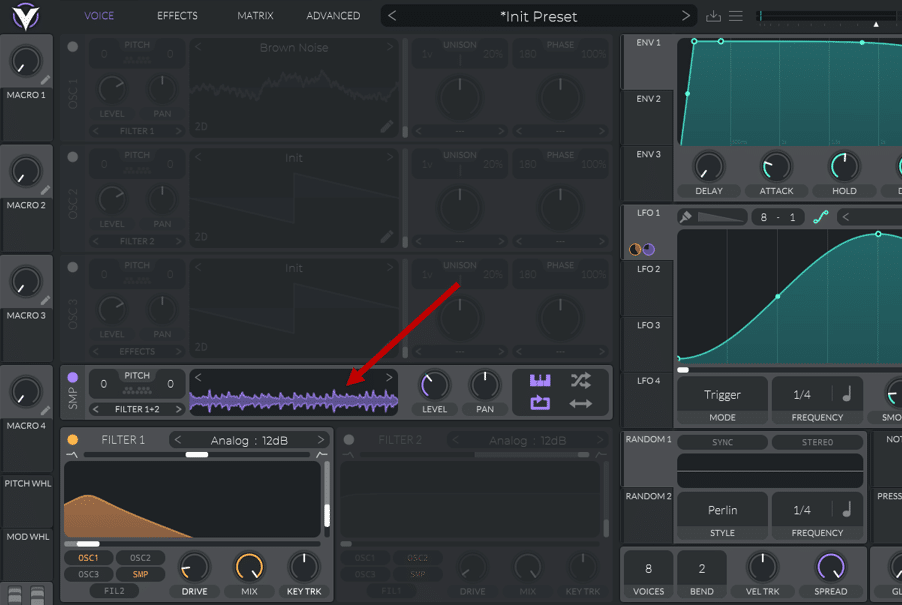
For reference, this is the sample I chose:
Let’s see if we can make it fit into our loop. First, I am going to send the Sampler to the Filters.
Next, I set Filter 1 to a bell shape. I then select a sine wave in LFO 1 and assigned it to the frequency cutoff of Filter 1.
If you need a refresher on the mechanics of Vital, check out our free guide here!
This is what it sounds like now:
I’ve also shaped a bit the envelope so that only a part of the sample plays:
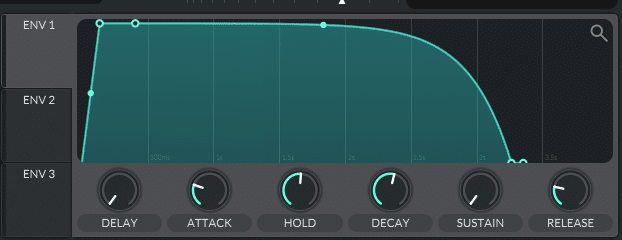
Add a bit of chorus, reverb, and delay, and this is what we got:
Nice! Finally, I’m going to layer up our sample. In OSC 1, I’ll select a “Brown Noise”, and automate the wavetable position with a second LFO:
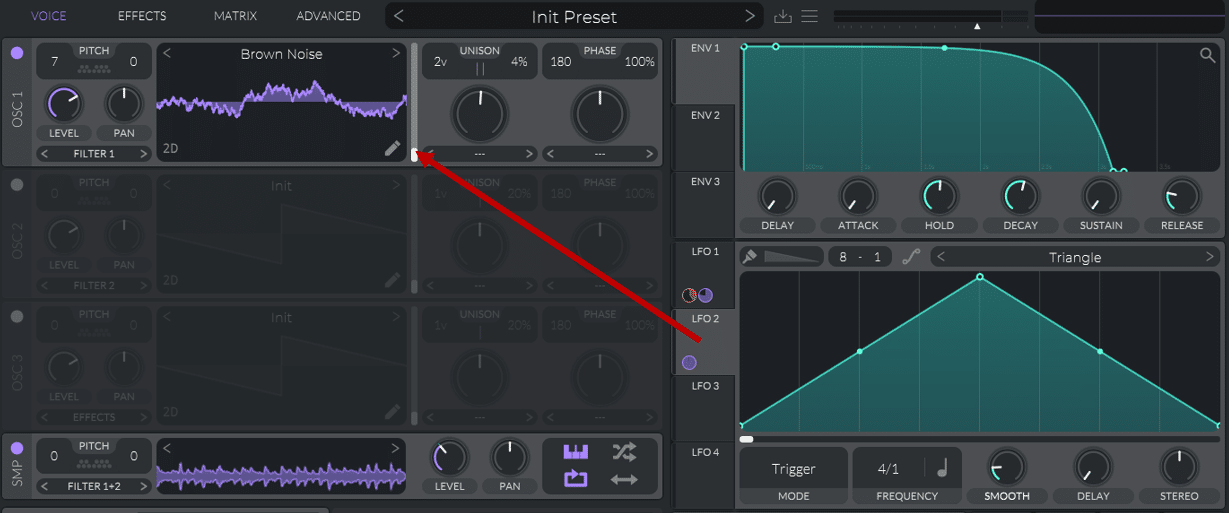
And this is what it sounds like in context:
Pretty far from the original sample, right? LFOs are a great way to introduce movement in your sounds. We’ve done a full guide on them here by the way 😉
Trick #8 – The Randomizer 🎲
For this trick, we are going to go from this:
To this:
For this trick to work, we need to randomize the starting point of our sample.
To easiest way to do this is, you guessed it, in Vital.
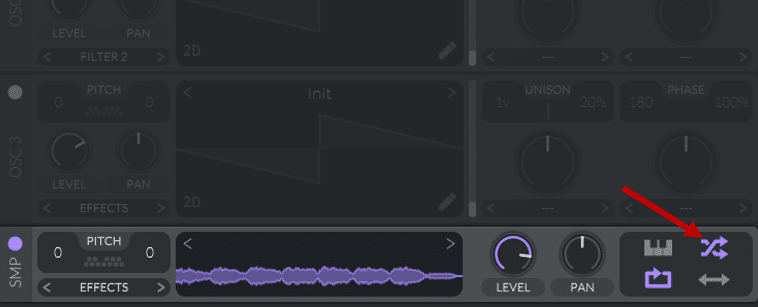
Drag the sample you want to use into the SMP section of Vital. Make sure that “Sample Random Phase” is enabled:
Next, draw in a series of 8th or 16th notes in the piano roll, all C5 notes:
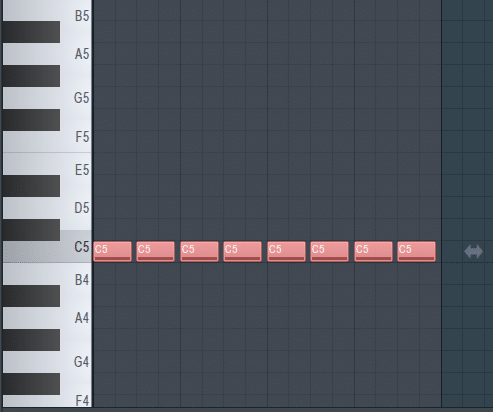
Now, every time we hit a C note, Vital will trigger a different starting point in our sample! Add a bit of reverb, and this is what it sounds like:
Want to go one step further?
Enable OSC 1, and choose any waveform you like. Under the Random LFO 1, select the “Sample and Hold” style. Next, set the frequency identical to the notes you wrote in the piano roll:
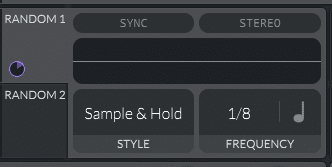
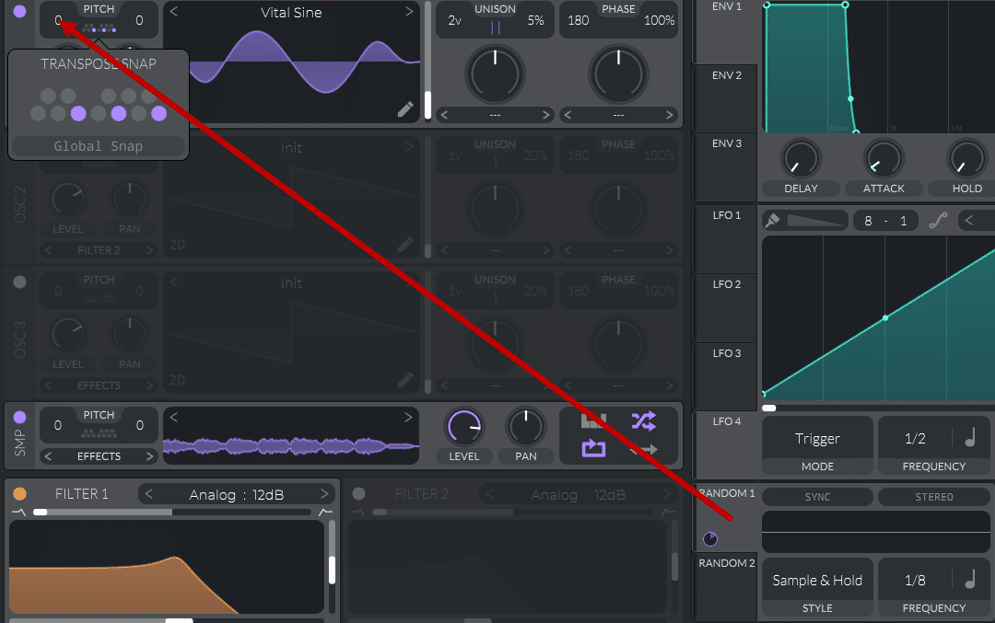
Drag the LFO to the Pitch control of OSC 1. Finally, in “Transpose Snap”, enable 2 or 3 notes within the key of your sample:
This is what it sounds like:
Vital is now layering random notes within the key of our sample.
You might need to play a bit with the waveform and envelope settings. But this is a great way to add randomness to your track!
Trick #9 – The FX Recorder 🎞️
Finally, let’s close off this list with another one of my favorite ways to process samples.
The idea here is to record while you play with presets on different plugins.
Delay in particular gives great results for this. But you can use any plugin of your choice. Let me show you.
First, load a sample. We will use the same vocal as in the previous example. Set a loop around it, route it to the mixer, and load a bunch of effects:
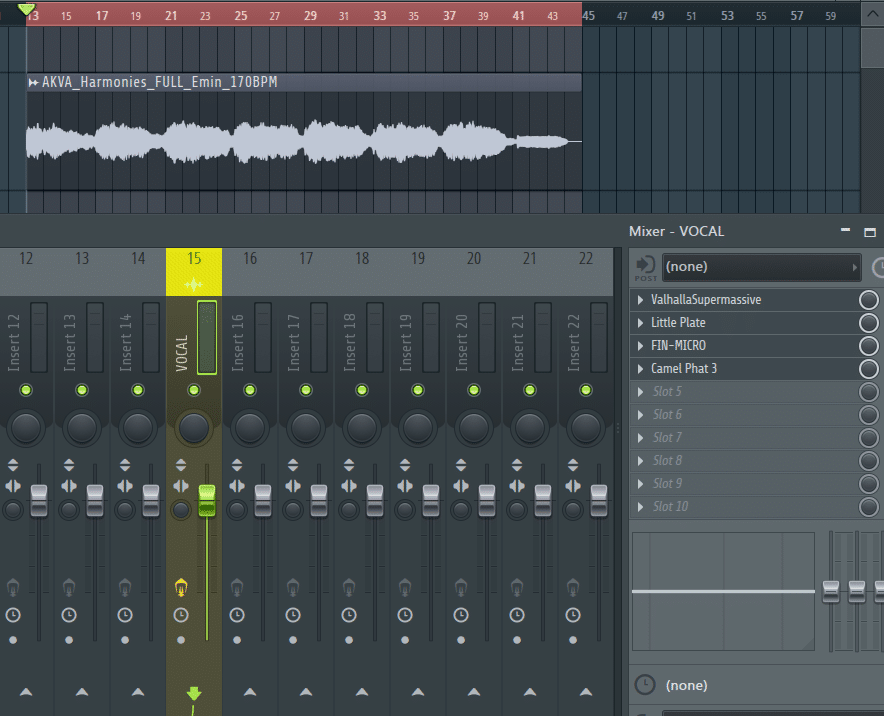
Next, load up Edison on the Master channel, and start recording! While you’re recording, enable one effect at a time. Mess around with the parameters and see what you come up with.
This is a section of what I recorded:
I can already hear some great song starters in there 👀
To do this in Ableton Live, load up your sample with some effects. Next, create a new track, set it to Resampling, and arm the recording:

Loop your sample, start the recording, then start playing with the effects!
Inject analog grit & haze into your music ⚡️
Our Analog Sample Pack is packed with 700+ weird and wonderful samples from synths like the: Roland Juno-6, Roland Jupiter 8, Teenage Engineering Pocket Operators, Korg Microkorg + more!
That’s It For This Guide!
That’s it for this guide!
Hopefully, you were inspired to completely transform your next samples! Did I miss out on any of your favorite techniques? Let me know at [email protected]

