Future Bass is undoubtedly the biggest genre in EDM right now.
It has virally infiltrated a lot of pop music.
Artists like Marshmello, San Holo and Illenium have dominated the industry and brought with them a melodic & euphoric take on the bass drop.
But it sounds complicated to make, right? Just listen to those massive chords, loud, professional drums and catchy melodies.
That’s why we created this framework for making your own future bass tracks – to demystify the process.
No matter whether you use Ableton Live, FL Studio or any DAW, the techniques in this guide can work for you. We do recommend you use Xfer Serum for this guide.
Let’s get into the process and get you making your own beats 👇
Grab the samples, presets and resources from this article in our Future Bass Sample Pack 🎛️
Includes: 61 kicks, 50 snares, 28 808’s, 20 claps + snaps, 9 tom fills, 25 percussive fills, 35 closed and open hats, 6 Future Bass construction kits & our EDM Essentials for Xfer Serum Pack 👇
Table Of Contents
- Find Great Presets and Samples
- Punchy Drums
- Pulsing Chord Progressions
- Infectious Hook
- Energetic Bass
- Interesting FX and Pads
- Arranging for the Listener
- Clean and Punchy Mixing
- Mastering for Loudness and Release
Before You Start: The Basics of Future Bass
While the title may suggest making Future Bass is as easy as applying a formula, that is not the case. This tutorial is to give you a framework for how to make future bass and is not aimed at reducing your creativity throughout the process. Break the rules if you want.
In this guide, I’ll be making a track from scratch as an example, but the point here is to teach you the concepts.
I’d recommend following along with this guide by using the samples and presets provided so that you learn what I’m talking about in a practical manner.
For this example, I’ll use 145BPM as my tempo. 140-160BPM tends to be the range many future bass tracks sit in.
I’ll also make the track in F Minor, seeing as that is popular for a lot of EDM and bass music today.
Step 1: Find Great Presets and Samples
A person is only as good as their tools, right? Maybe, maybe not.
But a producer is definitely only as good as their sounds.
Starting with bad sample packs and dodgy synth patches is going to get you nowhere fast.
Use a service like Splice Sounds (sponsored link) to sift through the millions of amazing samples and presets they have on their platform.
A few hints:
- Use random to find lesser-known sounds
- Get a few options to see what you like best in the context of a track
- Preview before downloading
- Think in terms of sounds working in layers, not in isolation
In this case, use the sample pack you’ve downloaded to find some great samples to start with. You’ll save yourself some time there.
Once you’ve got your sounds, have them in an easy-to-access folder.
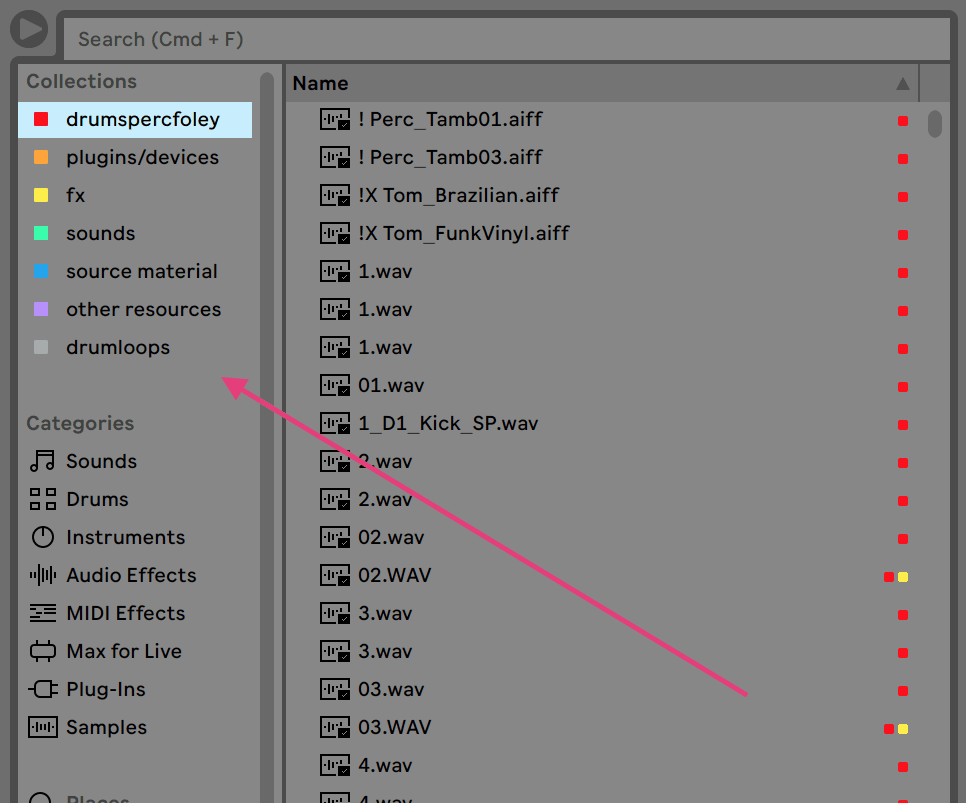
I personally save all my favourite samples in Ableton Live’s collections so I can always access great sounds. In other DAW’s like FL Studio, you may want to consider using a sample organizer, or manually organizing your samples into folders.
Step 2: Punchy Drums
Future Bass borrows a lot from Trap music, including the drums.
Now that you’ve found some suitable samples from digging around, we can make a new project in Ableton Live (or your DAW of choice) manipulate and utilize them to construct an energetic and punchy drum arrangement.
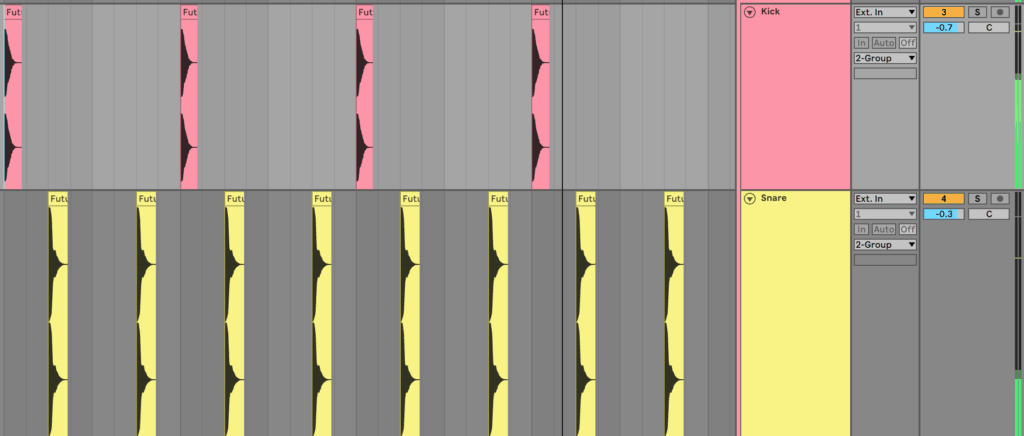
Let’s start by creating a simple kick & snare pattern by placing a snare on the 3 of each bar, and a kick on the 1.
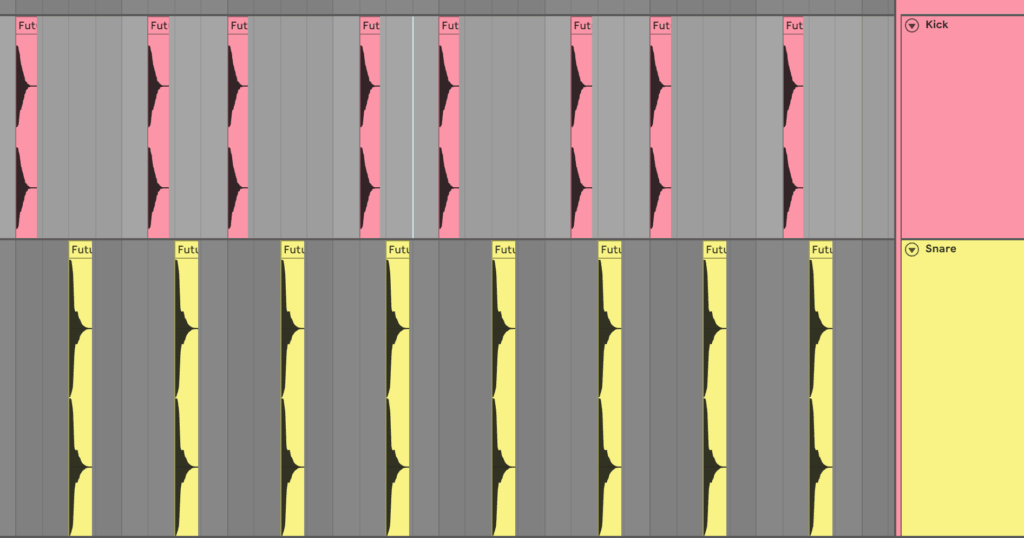
Next, to add some variation to the stale pattern, we’ll add a kick half a beat after the 3 of each bar.
This is still a fairly basic pattern, so we’ll fill it out with some hi-hats. Load the ‘Hat 1’ sample from the sample pack into a Simpler or sample instrument of choice. Fill every 1/8th note out with a hat. Make sure to pitch it down -7st to get it sounding good with the other drums. Once again, this technique is also used in a lot of trap music.
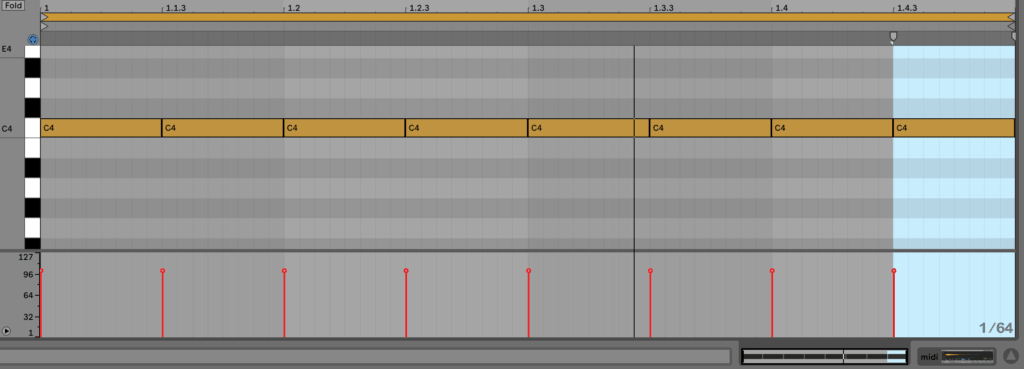

Now you should have a drum pattern sounding like this.
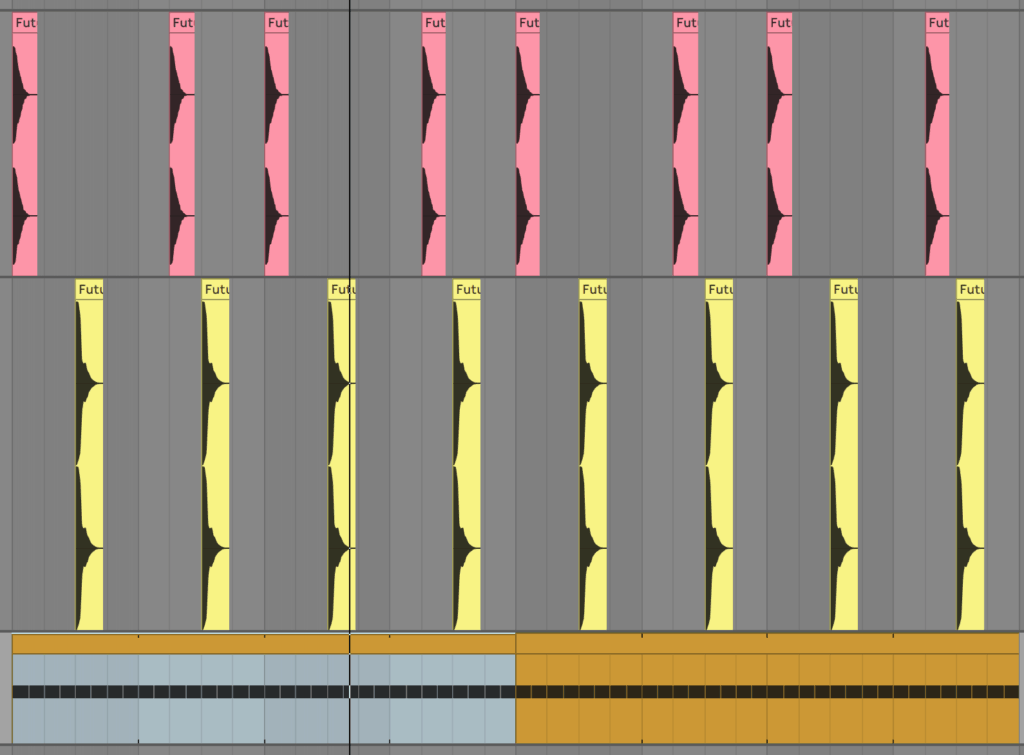
It’s sounding solid but not quite there yet, so we’ll come back and do some processing later.
Recommended: How To Make Trap Music
Step 3: Pulsing Chord Progressions
With some solid drums as a foundation for the track, we need to create those big, modulated chord sounds that give the track energy and attitude.
We’ll use a few layers to achieve this sound, as layering is key to getting a unique yet full sound.
Typically the bass layer revolves around a standard ‘supersaw’ patch, which is achieved by adding multiple detuned saw wave voices in a synth like Xfer Serum.
You can get our Supersaw Patch in the sample pack above.
Let’s lay out a basic chord progression in the key of F Minor.
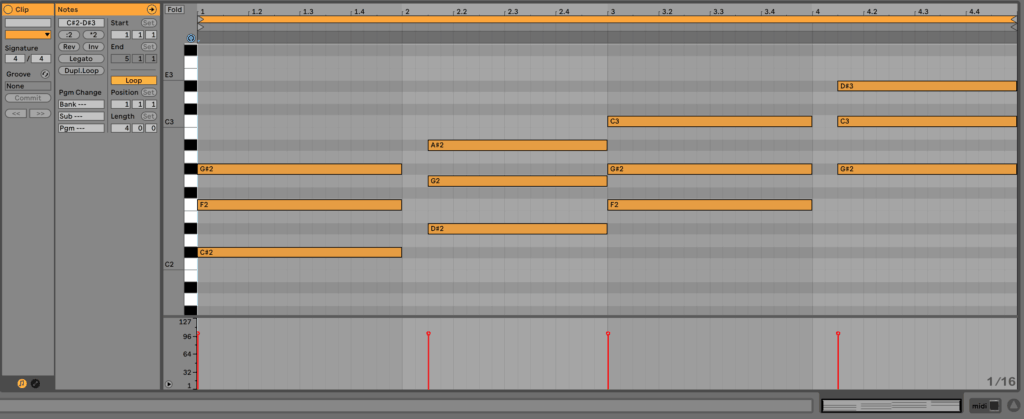
The chords here are Db Major 7, E Major 7, F Minor 7, and Ab Major 7.
Notice the little gap at the beginning of every second chord. This slight variation will give us space to add cool things later.
Now, these chords are fine, but the energy and power that come from future bass chords are often dependant on the voicing of the chords.
So what I’ll do, is move the middle note of each chord up one octave by selecting them all and pressing Shift + Up.
I’ll also double the bottom note by copy-pasting it and pressing Shift + Down.
Now the chord progression should look and sound like this.
A lot more powerful.
The last step to get that future bass vibe is to use an LFO. Thankfully, the preset inside Serum already has one set up, just crank up Macro 2 to activate it.
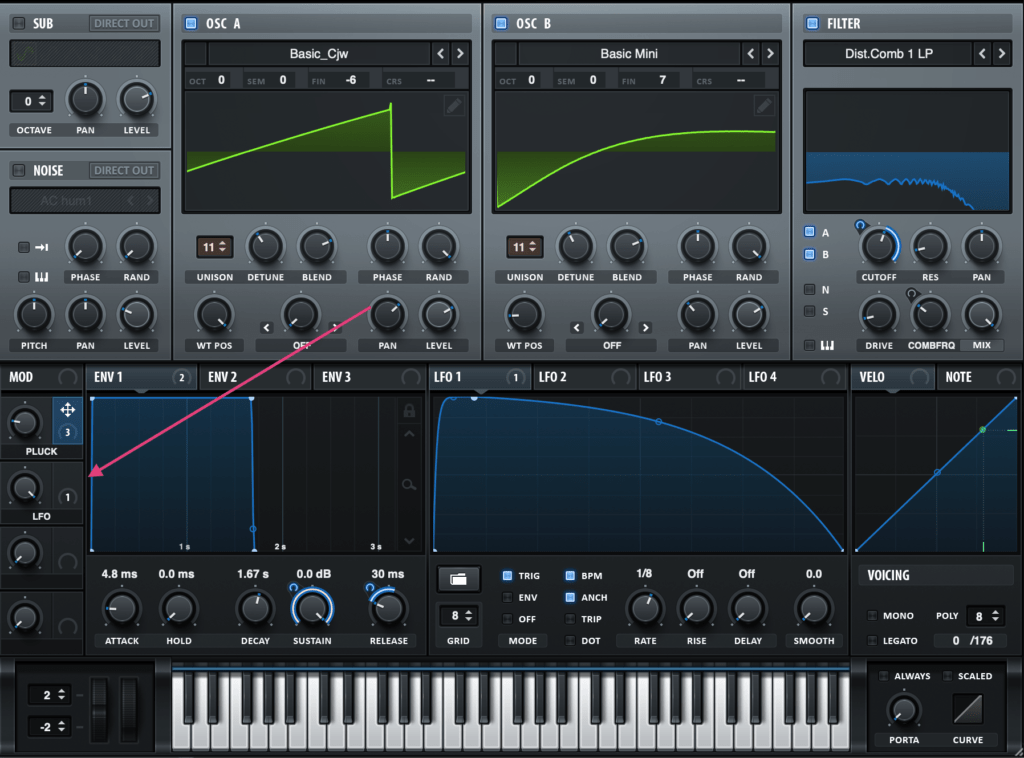
Now you can start to hear that iconic future bass sound.
Grab the samples, presets and resources from this article in our Future Bass Sample Pack 🎛️
Includes: 61 kicks, 50 snares, 28 808’s, 20 claps + snaps, 9 tom fills, 25 percussive fills, 35 closed and open hats, 6 Future Bass construction kits & our EDM Essentials for Xfer Serum Pack 👇
Step 4: Infectious Hook
This is arguably the most important step.
Why?
This is how people are going to remember the track.
Whether it’s a synth melody, vocal chop or even a rapper, you need to consider this early on.
If you plan on getting a featured vocalist on the track, which is very common in Future Bass, make sure to carve out space in your mix. Nothing is worse than a vocal that gets buried underneath a bunch of synths when it’s meant to be the main element.
Otherwise, here are a few ways to get a hook line and melody in your DAW.
Lead Synth
Usually, in synth-driven future bass tracks, the lead synth is bright and catchy, yet gels well with the chords. In fact, sometimes it even follows the same rhythm as the chords to get the cohesive effect.
In this example, I’ll use the ‘Top Lead’ serum preset to sketch out a melody that goes nicely along with the chords we created.
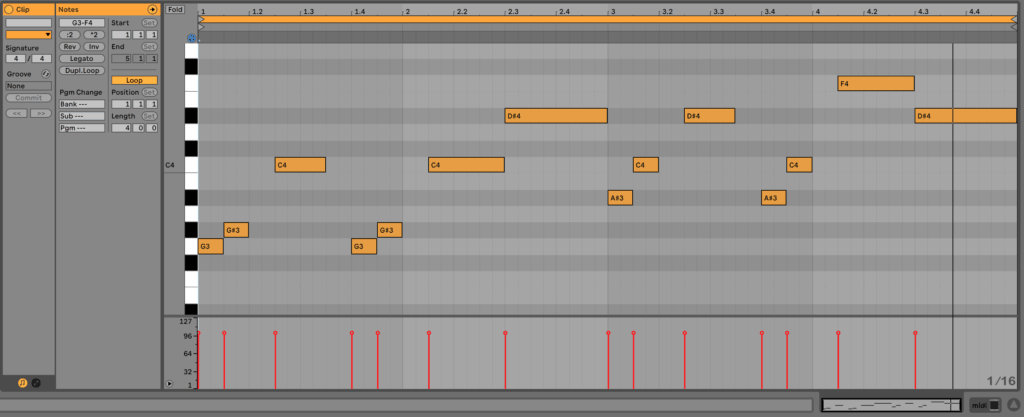
See how the notes only play at the same time as the chords? Here’s what it sounds like with the chords.
But the melody lacks power and cohesion. So firstly, we’ll double the notes on this synth.
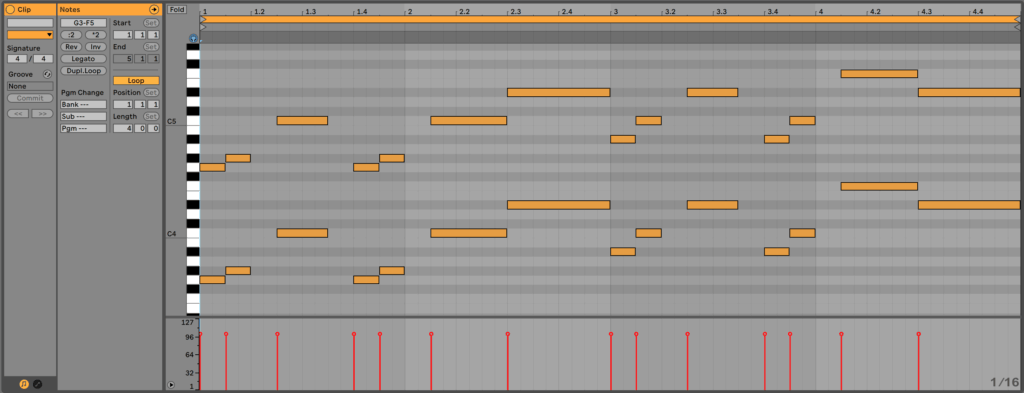
Then, to give it even more, we’ll make a new ‘Supersaw Lead’ patch (same as the one from the chords) and copy over the bottom note. Now it should sound like this.
Coming together with the chords, you’ll be able to hear the track taking shape.
Vocal Chops
If you aren’t using a vocalist but want something more organic and interesting, vocal chops are a common way to go.
Start with a solid sample of a vocal or acapella, and make sure it has some sort of auto-tune or pitch correction on it (pre or post sample).
The best way to work here is in audio rather than MIDI. That way you can chop accurately and pitch individual chops rather than all of them.
I won’t show how to do this in this example, but check out this great video on vocal chops if you are interested (Logic Pro X).
Get Creative
You aren’t limited to just vocal chops or lead synths. You could combine both, or use some other hook element (like a proper vocalist or rapper, or even some other sound).
The possibilities are endless.
Step 5: Energetic Bass
Finding and layering bass synths is a delicate art form, especially considering you’ve got many other layers to fight for space with.
First and foremost, you want a sub-bass to start with.
This fills out the low end and glues all the instruments together.
Load up the ‘Sub Bass’ serum preset from the pack, or load any synth up with a sine wave (just make sure it has maximum sustain and fast attack/release).
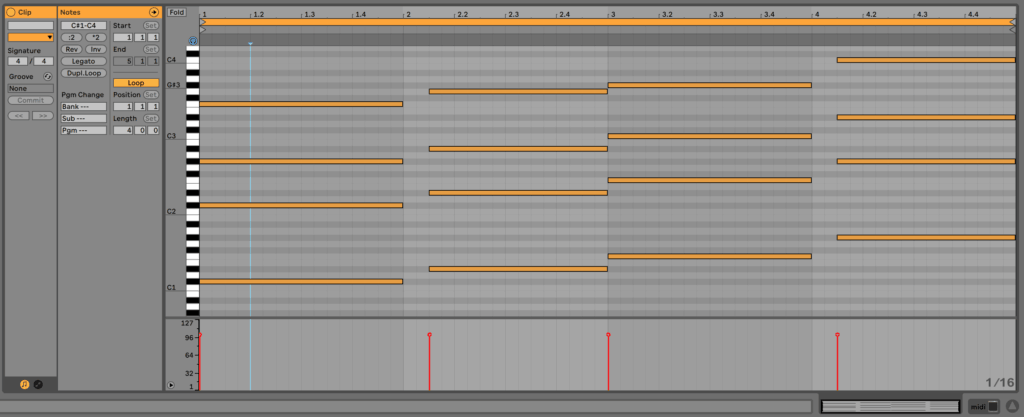
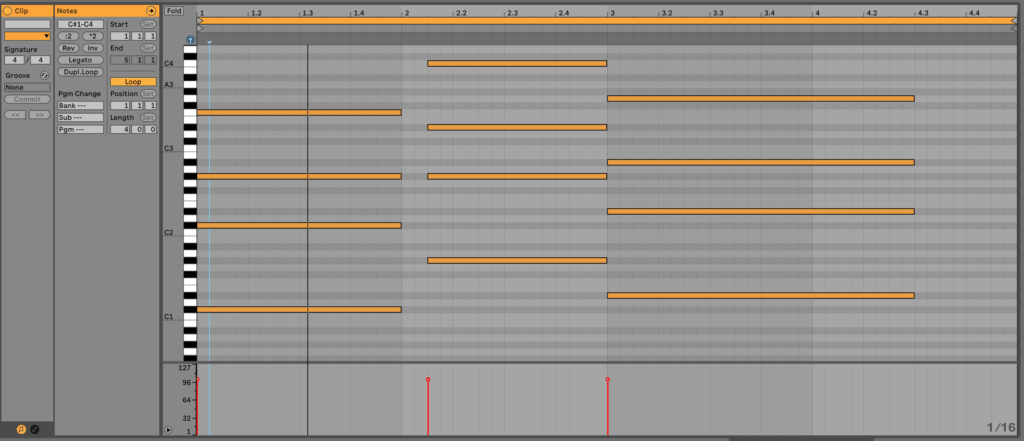
Then, copy over the chords and delete all but the bottom note, moving it down octaves until you get to C#1 as the starting note. It should look something like this:
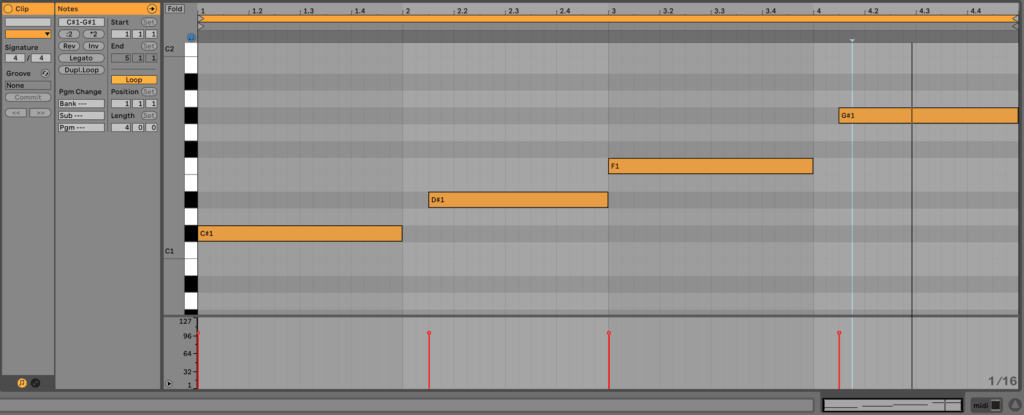
Playing those notes, you’ll notice the last two sound a bit higher. That’s why we’ll move them down an octave to get this.
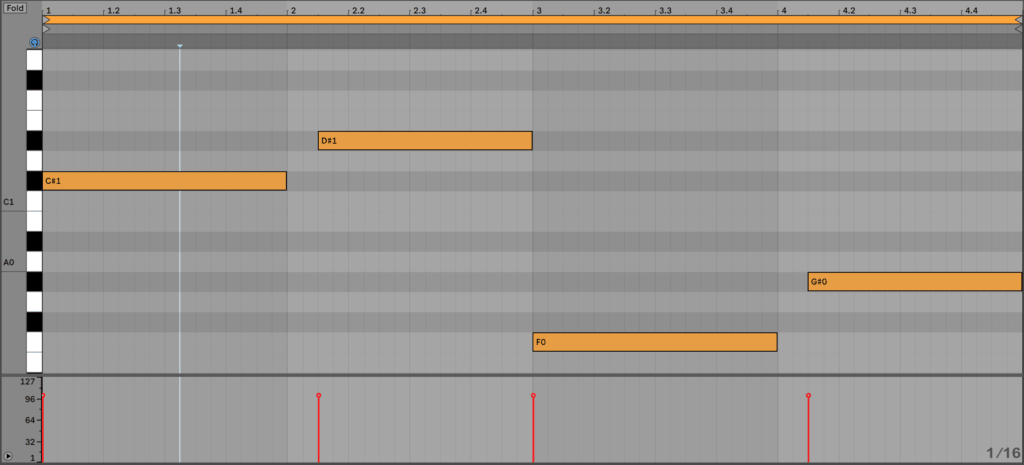
An easy way to start is to get your sub to follow the bottom notes of your chords, but you can get more interesting by changing it up.
Next, you want to layer it with a main bass synth. This will give your low-end character and help it to poke through the mix better. While there is no hard and fast rule here, generally something that compliments your supersaw chords will work well.
For this reason, we’ll use the ‘Processed Saw Bass’ as our starting point. Using distortion and multiband compression in Serum, we can get something unique that works in the mix.
Copy the same notes over and you’ll get this sound.
Here’s how it sounds with the chords and lead synth melodies.
Step 6: Interesting Pads and FX
Now we’ve got the core idea, it’s time to add little bits of variation and ‘ear candy’ to make the idea more interesting and developed.
Once again, there aren’t any rules here, but you can add extra percussion, synth layers, background FX or whatever.
Here, I’ll start by adding the ‘Trippy Crash’ sample in the background to fill out the track a little bit. I’ll place it on every beat to carry across the entire drop.
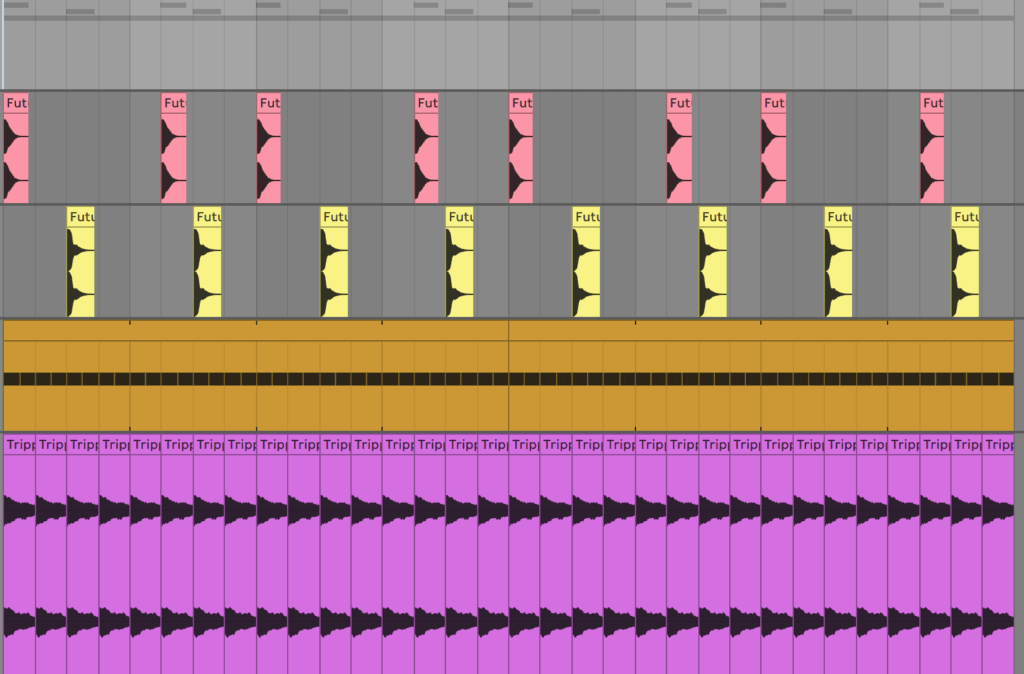
To add one final synth layer to our drop, we’ll load up the ‘Euphoric Chords’ layer on a new MIDI track.
Let’s use the MIDI from the main chords, but we’ll:
- Move it up an octave
- Remove the bottom doubled note
- Add an extra F4 to every chord to add a ‘droning’ effect
The result should look and sound like this.
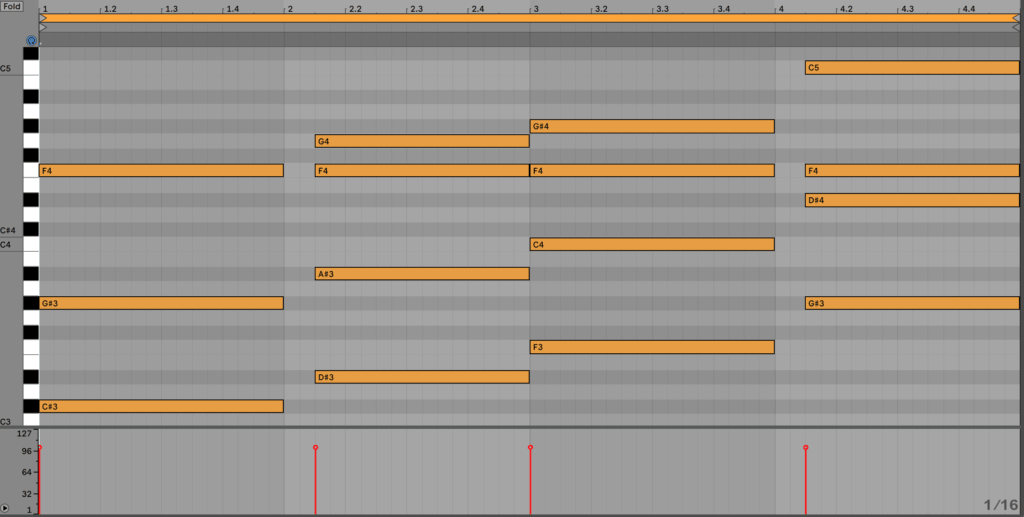
Don’t worry about the distortion, it adds a nice crunch when layering with other sounds.
Altogether, we get a solid drop sound.
But of course, Future Bass is more than just a drop. So let’s learn how to arrange the track and add more elements in that process.
Grab the samples, presets and resources from this article in our Future Bass Sample Pack 🎛️
Includes: 61 kicks, 50 snares, 28 808’s, 20 claps + snaps, 9 tom fills, 25 percussive fills, 35 closed and open hats, 6 Future Bass construction kits & our EDM Essentials for Xfer Serum Pack 👇
Step 7: Arranging For The Listener
A track isn’t complete as an 8-bar loop, so let’s start to copy this out and change some things up.
Typically future bass songs sit between 3-4 minutes, like a lot of pop and EDM. Since this is the drop, we want it to happen around 45-60 seconds into the song, with some form of intro before it.
Normally there tends to be a breakdown after the first drop, with a build into the second. Lastly, the song cools down into an outro.
In this example, I’ll follow that basic structure but leave out the second build and drop for the sake of time.
Start by duplicating the drop pattern to take up 16 bars. This is a standard length for the drop.
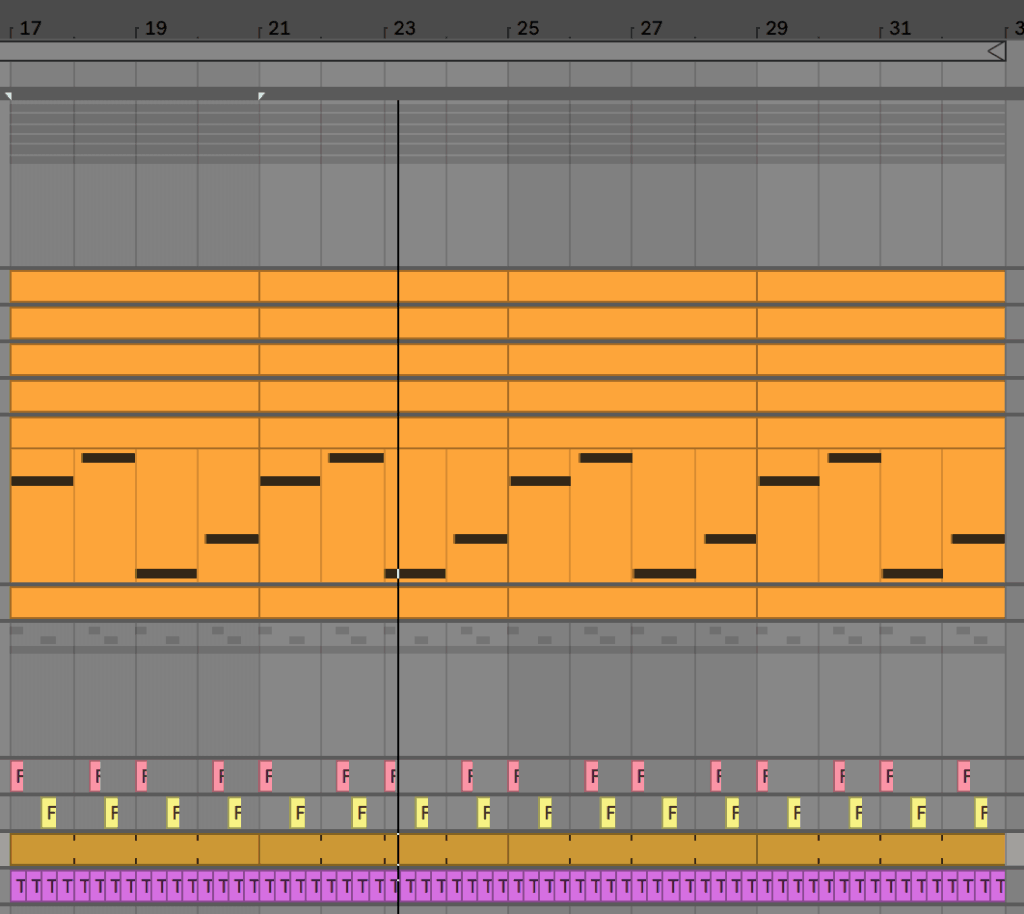
After that, insert some time before and after the drop (Cmd or Ctrl + I in Ableton Live) – in this case I do 16 bars. Normally intro’s would go for double this with a typical intro and build, but 16 can work fine for this example.
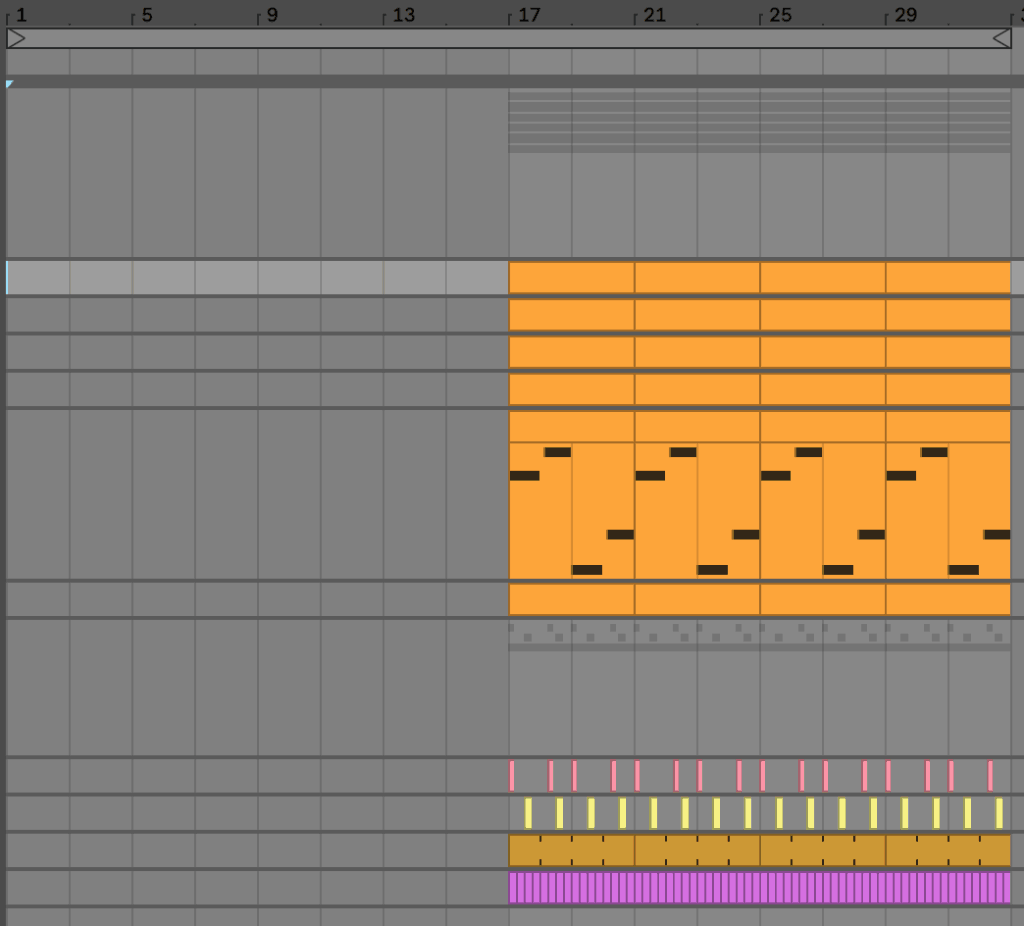
Lastly, duplicate the drop so we can do a switchup and lead into the breakdown, and then leave 16 bars at the end for a breakdown/intro.
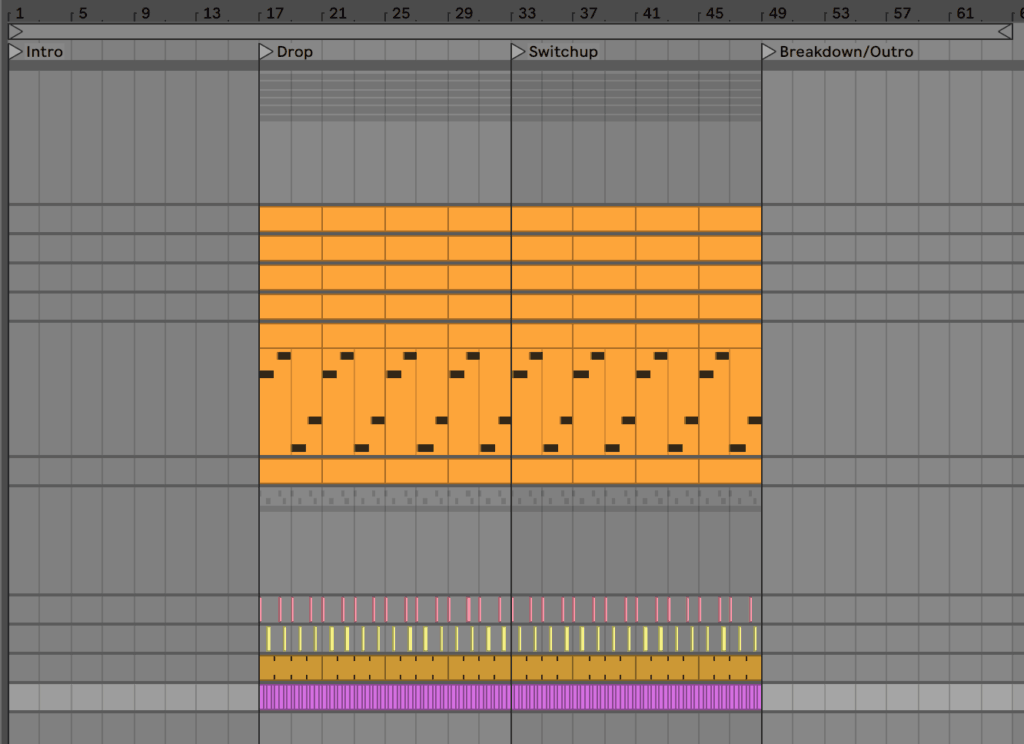
Intro
Now we can start to visually see the track take shape. Let’s start by adding some elements to the intro.
There’s a lot of little things I’ll do, so let me list them out, and show you a screenshot:
- hats in second half of intro
- automate macros on main chord synth to create intro sound
- add filter in first half to introduce sound softly
- add ‘Riser 1’ sound
- add ‘Fill’ sound before drop
- add ‘Clap’ sample that repeats and gets faster
Be as creative as you want here, and don’t feel the need to copy exactly what I do. Use is simply as a starting point.
Here is how my intro sounds.
Switch-up
Now let’s add some variation to the drop. Firstly, I’ll switch up the chords to a IV – I – V progression using the same voicing for all the chords.
This is how it looks.
If you change all the sounds, including the bass, then you will get this kind of sound.
We’ll leave the first half of the switch up like this, but then we’ll start to bring down the energy after that.
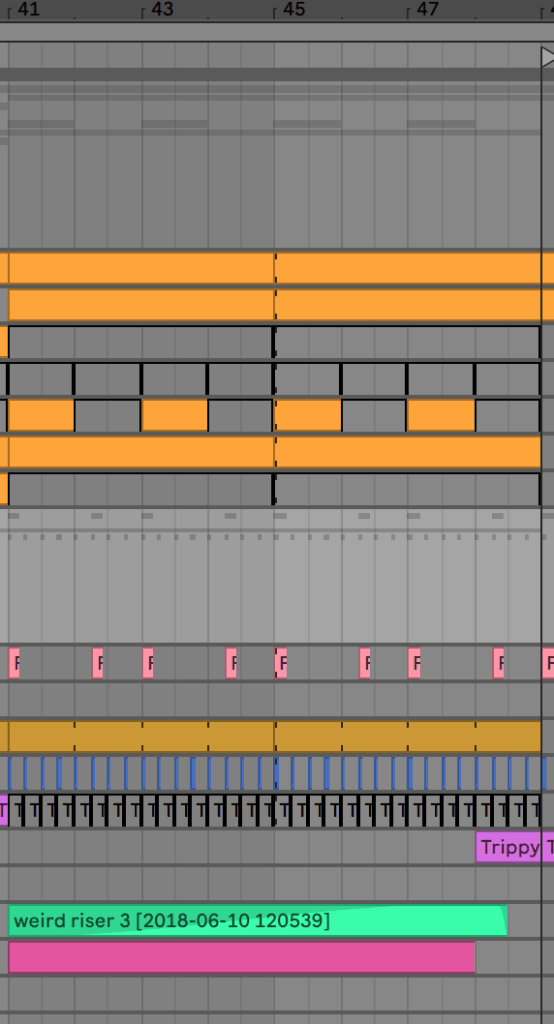
Here’s what I did:
- filtered out the main chords
- removed the main bass and higher euphoric chords
- removed the 2nd melody layer
- removed the crash
- removed the snare
- removed every 2nd bar of the melody
- added the intro pad playing the same notes as the main chords
- added the claps and risers from the build, but not getting faster
- faded the every-beat crashes out towards the middle
- reverse crash at the end
Here’s the result:
Outro
Lastly, I used a similar structure as the intro for the outro.
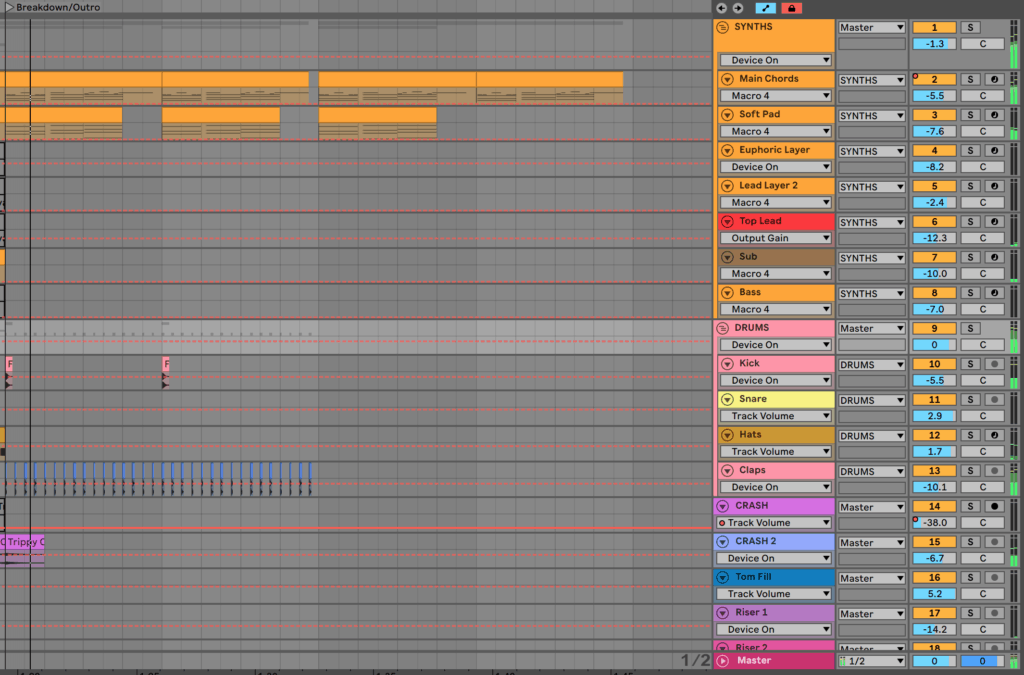
We use:
- The main chords, with the macros adjusted
- A low-pass filter sweeping down
- The soft pad playing the same chords
- The main chords playing same notes as in intro
- Claps in first half of outro
- Kick on first two sets of 4 bars
- Crash on the first beat
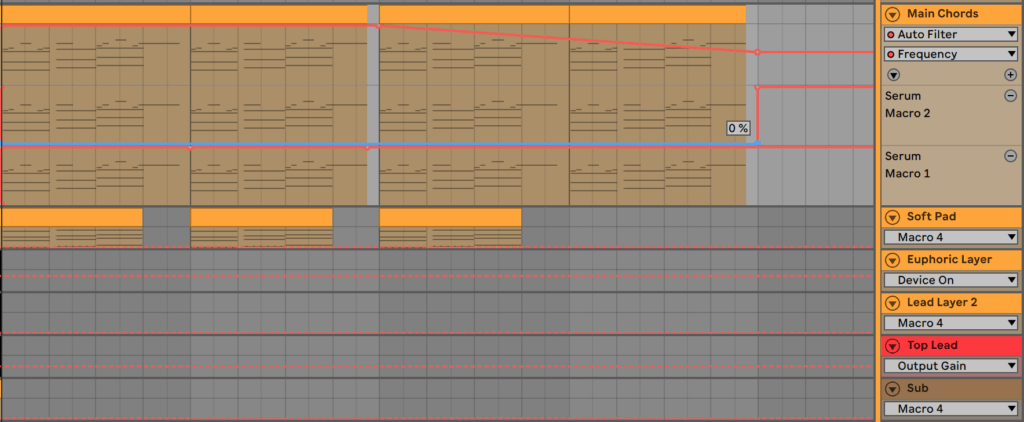
Here’s how it sounds!
Step 8: Clean and Punchy Mixing
So your track has taken form and is starting to sound legit. Now you need to get it sounding nice and clean.
If you haven’t played around with mixing before, now is a great time to start.
In this article, I won’t go over every detail, but I’ll mention the main things I do. Check out the included project file for more details.
Volume
The kick and snare drive the rhythm in future bass, so make sure they poke through the mix loud enough, but not too loud that they dwarf the rest of the track.
Make sure all of the main elements are cutting through, and that the sub-bass sits well with the instruments and the drums too. Loud sub-bass can tend to eat up the room in your track, so make sure it’s not set too high. Listen on headphones with a good bass response to avoid this.
Here are the fader values in the project, for reference. Don’t follow these exactly, as the volume of samples may automatically adjust when importing, but use them as a reference.
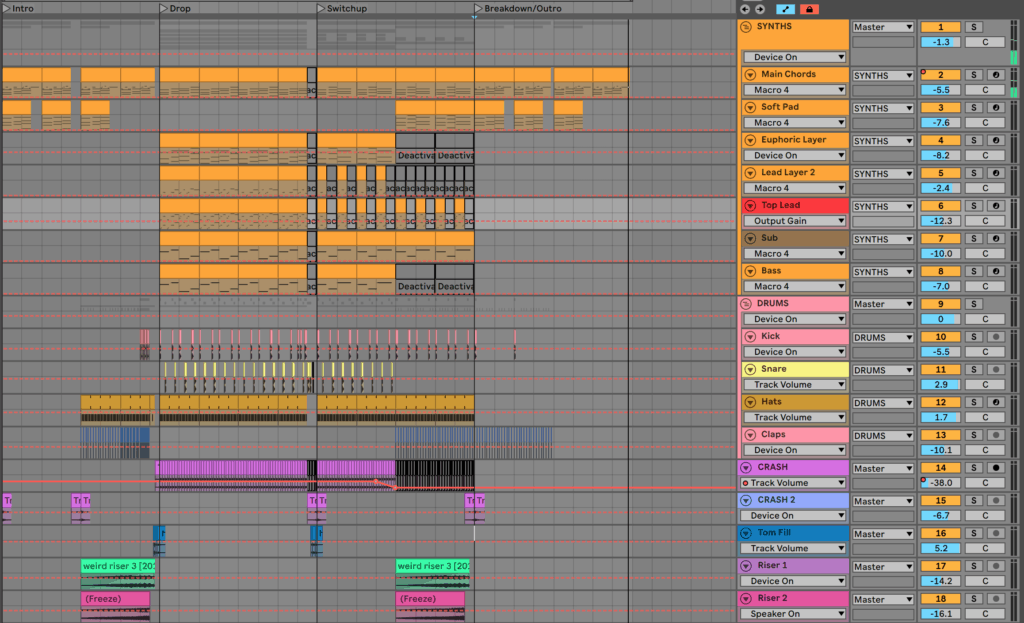
EQ
Try high-passing a lot of the bass out of sounds to get your kick and sub coming through well. Where you high-pass here is very important. Too little and you won’t have any effect on the sound, too much and you’ll thin them out.
Each sound has different characteristics, so listen out for what you want and don’t want in each sound.

Compression
A lot of the sounds are synthesized in this case, and therefore don’t need compression. However, I do dial in some OTT on groups to glue certain elements together, like the drums.
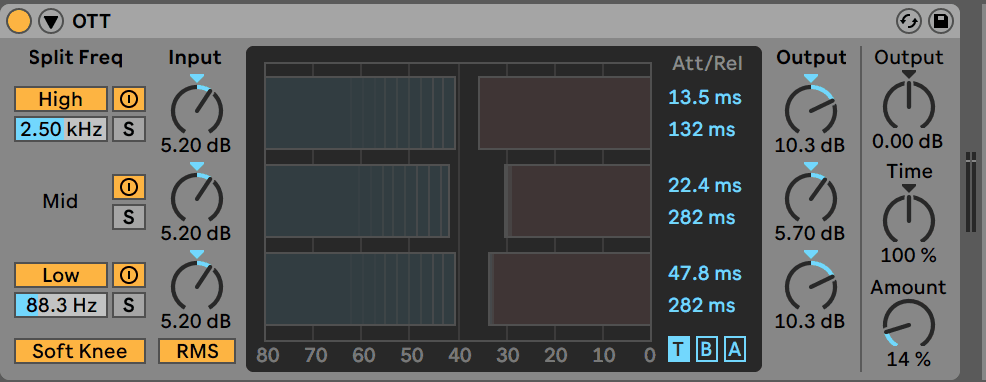
Note: adding a bit of bass compression can also help add weight to your mix 🔥
Other Adjustments
As I mentioned much earlier in the article, the snare wasn’t working very well for me. It needed more of a tail and a ‘compressed’ feel, so I processed it with more OTT and reverb.
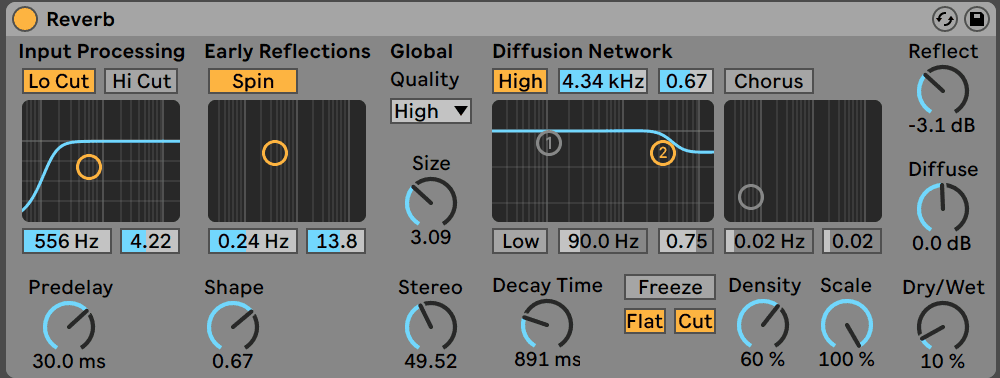

On top of this, I wanted to add more grit to the euphoric chords that occupy the high end. So I added some Pedal distortion in Ableton Live (Guitar Dirt preset, but modified for fuzz distortion) and high-passed it to remove the lows.

There are other things done too, but you’ll have to check the project file for those.
Step 9: Mastering For Loudness and Release
At this point, if you’re not comfortable with mastering, you can get a mastering engineer to do it for you.
But in this case, we can do a rough master to get your track to release-level quality.
Firstly, some extra multiband compression won’t hurt, so use a device like Ableton Live ‘s Multiband Dynamics to process your audio.
I like to use a bit of the OTT preset and the Multiband Compression to gel the mix together.

If you don’t have Ableton Live, make sure to grab the OTT plugin to get the same sound.
Before throwing a limiter on, I like to drive the audio into a soft clipper. This warms the signal up and adds an extra level of energy while adding a solid amount of loudness.
For this, I use Live’s Glue Compressor and just turn up the output gain. The device has built-in soft clipping (as long as the ‘Soft’ button is enabled).
Lastly, I chuck a limiter on the track to keep the volume as loud as possible, giving it a little bit more gain to round off the track. Ableton Live’s limiter is fine in this case, but if you want to achieve more transparent limiting, try a third-party plugin like the Waves L2 or FabFilter Pro-L.
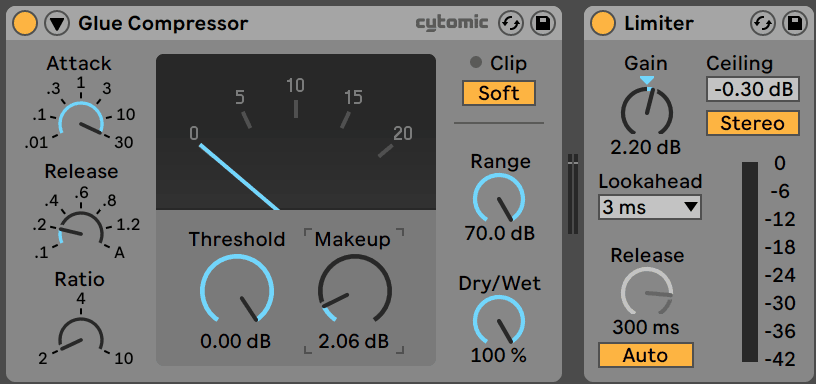
And here’s the final result!
What Next?
Now you know how to make a basic future bass track, you can start practising and make your own tracks!
Need somewhere to start? Make sure to grab our FREE sample pack.
Grab the samples, presets and resources from this article in our Future Bass Sample Pack 🎛️
Includes: 61 kicks, 50 snares, 28 808’s, 20 claps + snaps, 9 tom fills, 25 percussive fills, 35 closed and open hats, 6 Future Bass construction kits & our EDM Essentials for Xfer Serum Pack 👇
Any questions? Email me at [email protected].

