


Want to learn how to make Liquid Drum & Bass like Hybrid Minds, Maduk & Fred V?
You’ve come to the right place. In this guide, I’ll cover:
- How to program crisp, rolling drums that hit the spot
- The process behind a smooth, warm bassline that ties your track together
- Creative ways to layer pads, vocals, and melodic sounds for that perfect vibe
- The best way to turn your loops into full tracks
- How to polish off your tracks with FX
…all while creating a track from scratch.
So no matter whether you use Ableton Live, FL Studio, Logic Pro X, or any DAW – let’s dive in to the ultimate guide to making Liquid Drum & Bass 👇
Note: you’ll need to download our
WARNING: this guide is super in-depth. So feel free to read it in chunks and bookmark it for later.
Table of contents
What is Liquid Drum & Bass?
For the purposes of this guide, “Liquid” (or “Liquid Funk”) refers to the smooth, soulful, melodic, or even jazzy/funky styles of Drum & Bass.

This sound was curated heavily by DJs like Fabio, Grooverider, and Calibre in the late 90’s and early 2000’s.
Since then, it has developed into a staple part of the broader Drum & Bass sound.
Artists that loosely fall into this category include:
- Nu:Tone
- London Elektricity
- LSB
- Hybrid Minds
- Spectrasoul
- Calibre
- Lenzman
- Logistics
- High Contrast
Of course there are many others, but I’d need a separate article for that 😉
There are 3 key elements that characterize Liquid DNB: pitched-up old-school breakbeats, smooth sub-bass, and the use of subdued melodic sounds (instead of heavy basslines). In this guide, I’ll show you how to make all three.
So with that, let’s get cracking with making a Liquid DNB track from scratch!
Looking for something more advanced? Check out our 37 Liquid DNB Production Tips here 🔥
Phase #0: The Standards
Before we get straight into it, we need to set up our DAW project to be suited to Liquid Drum & Bass.
It’s worth mentioning here that you don’t need a complex set of equipment to make high-quality Liquid. Just a computer with a DAW, some headphones, and some good samples/plugins will do.
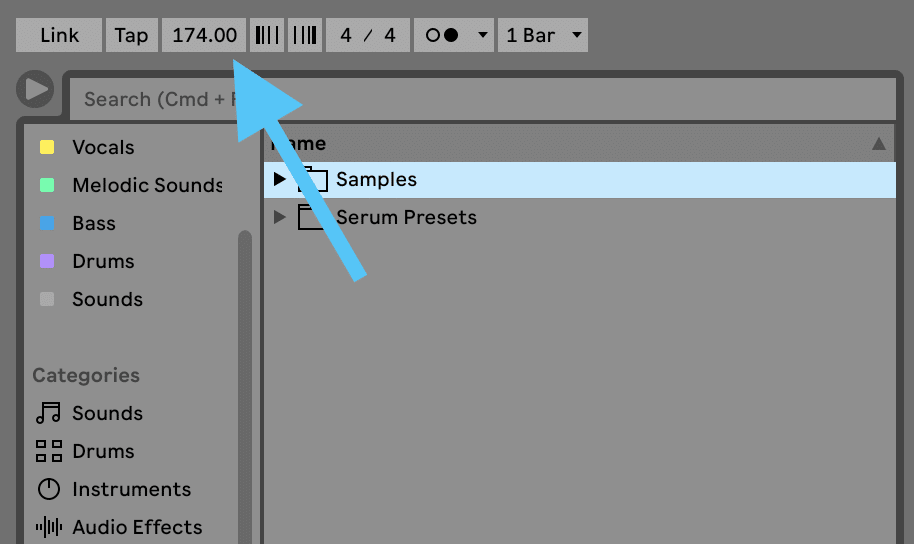
Secondly, the tempo of Liquid Drum & Bass tends to sit in the range of 165-175BPM, but the most common one is 174BPM. This speed gives it that nice, driving feel that the genre is known for.
So let’s create a new project in our DAW and set the tempo to 174BPM accordingly.
Secondly, like most electronic dance music, Liquid DNB is in 4/4 time. So no need to adjust any time signatures here.
Lastly, we’ll need to pick a key for our track. Most Liquid is written in a minor key, with F Minor being the most common.

Why? Because the notes around F0 (which is the root note of F Minor) sound really good on club systems and subwoofers.
This isn’t to say you can’t write Liquid in other keys, but this is a huge benefit. All scales are equal, but some are more equal than others 🤣
We’ll keep this in mind when we write our musical elements and bassline, but for now let’s build out a drum loop – the solid foundations of our Liquid DNB track.
Phase #1: Programming Crisp, Rolling Drums 🥁
There are many different ways to approach drum programming in Liquid Drum & Bass production.
But the main goal is to use a combination of loops and one-shot samples to craft a unique drum arrangement. In this track I’m making, I’ll do both.
Let’s start with our two most important drum sounds – the kick and snare.
Kick & Snare One-Shots
In Drum & Bass, the main kick and snare are usually programmed with one-shot samples. This gives you the flexibility to make them sound exactly how you want, and punch through the mix.
You can do this either in audio (drag onto the track) or MIDI (via a drum sampler), but in this case, I’ll use audio. Personally, I love the visual and flexible workflow of working in audio.
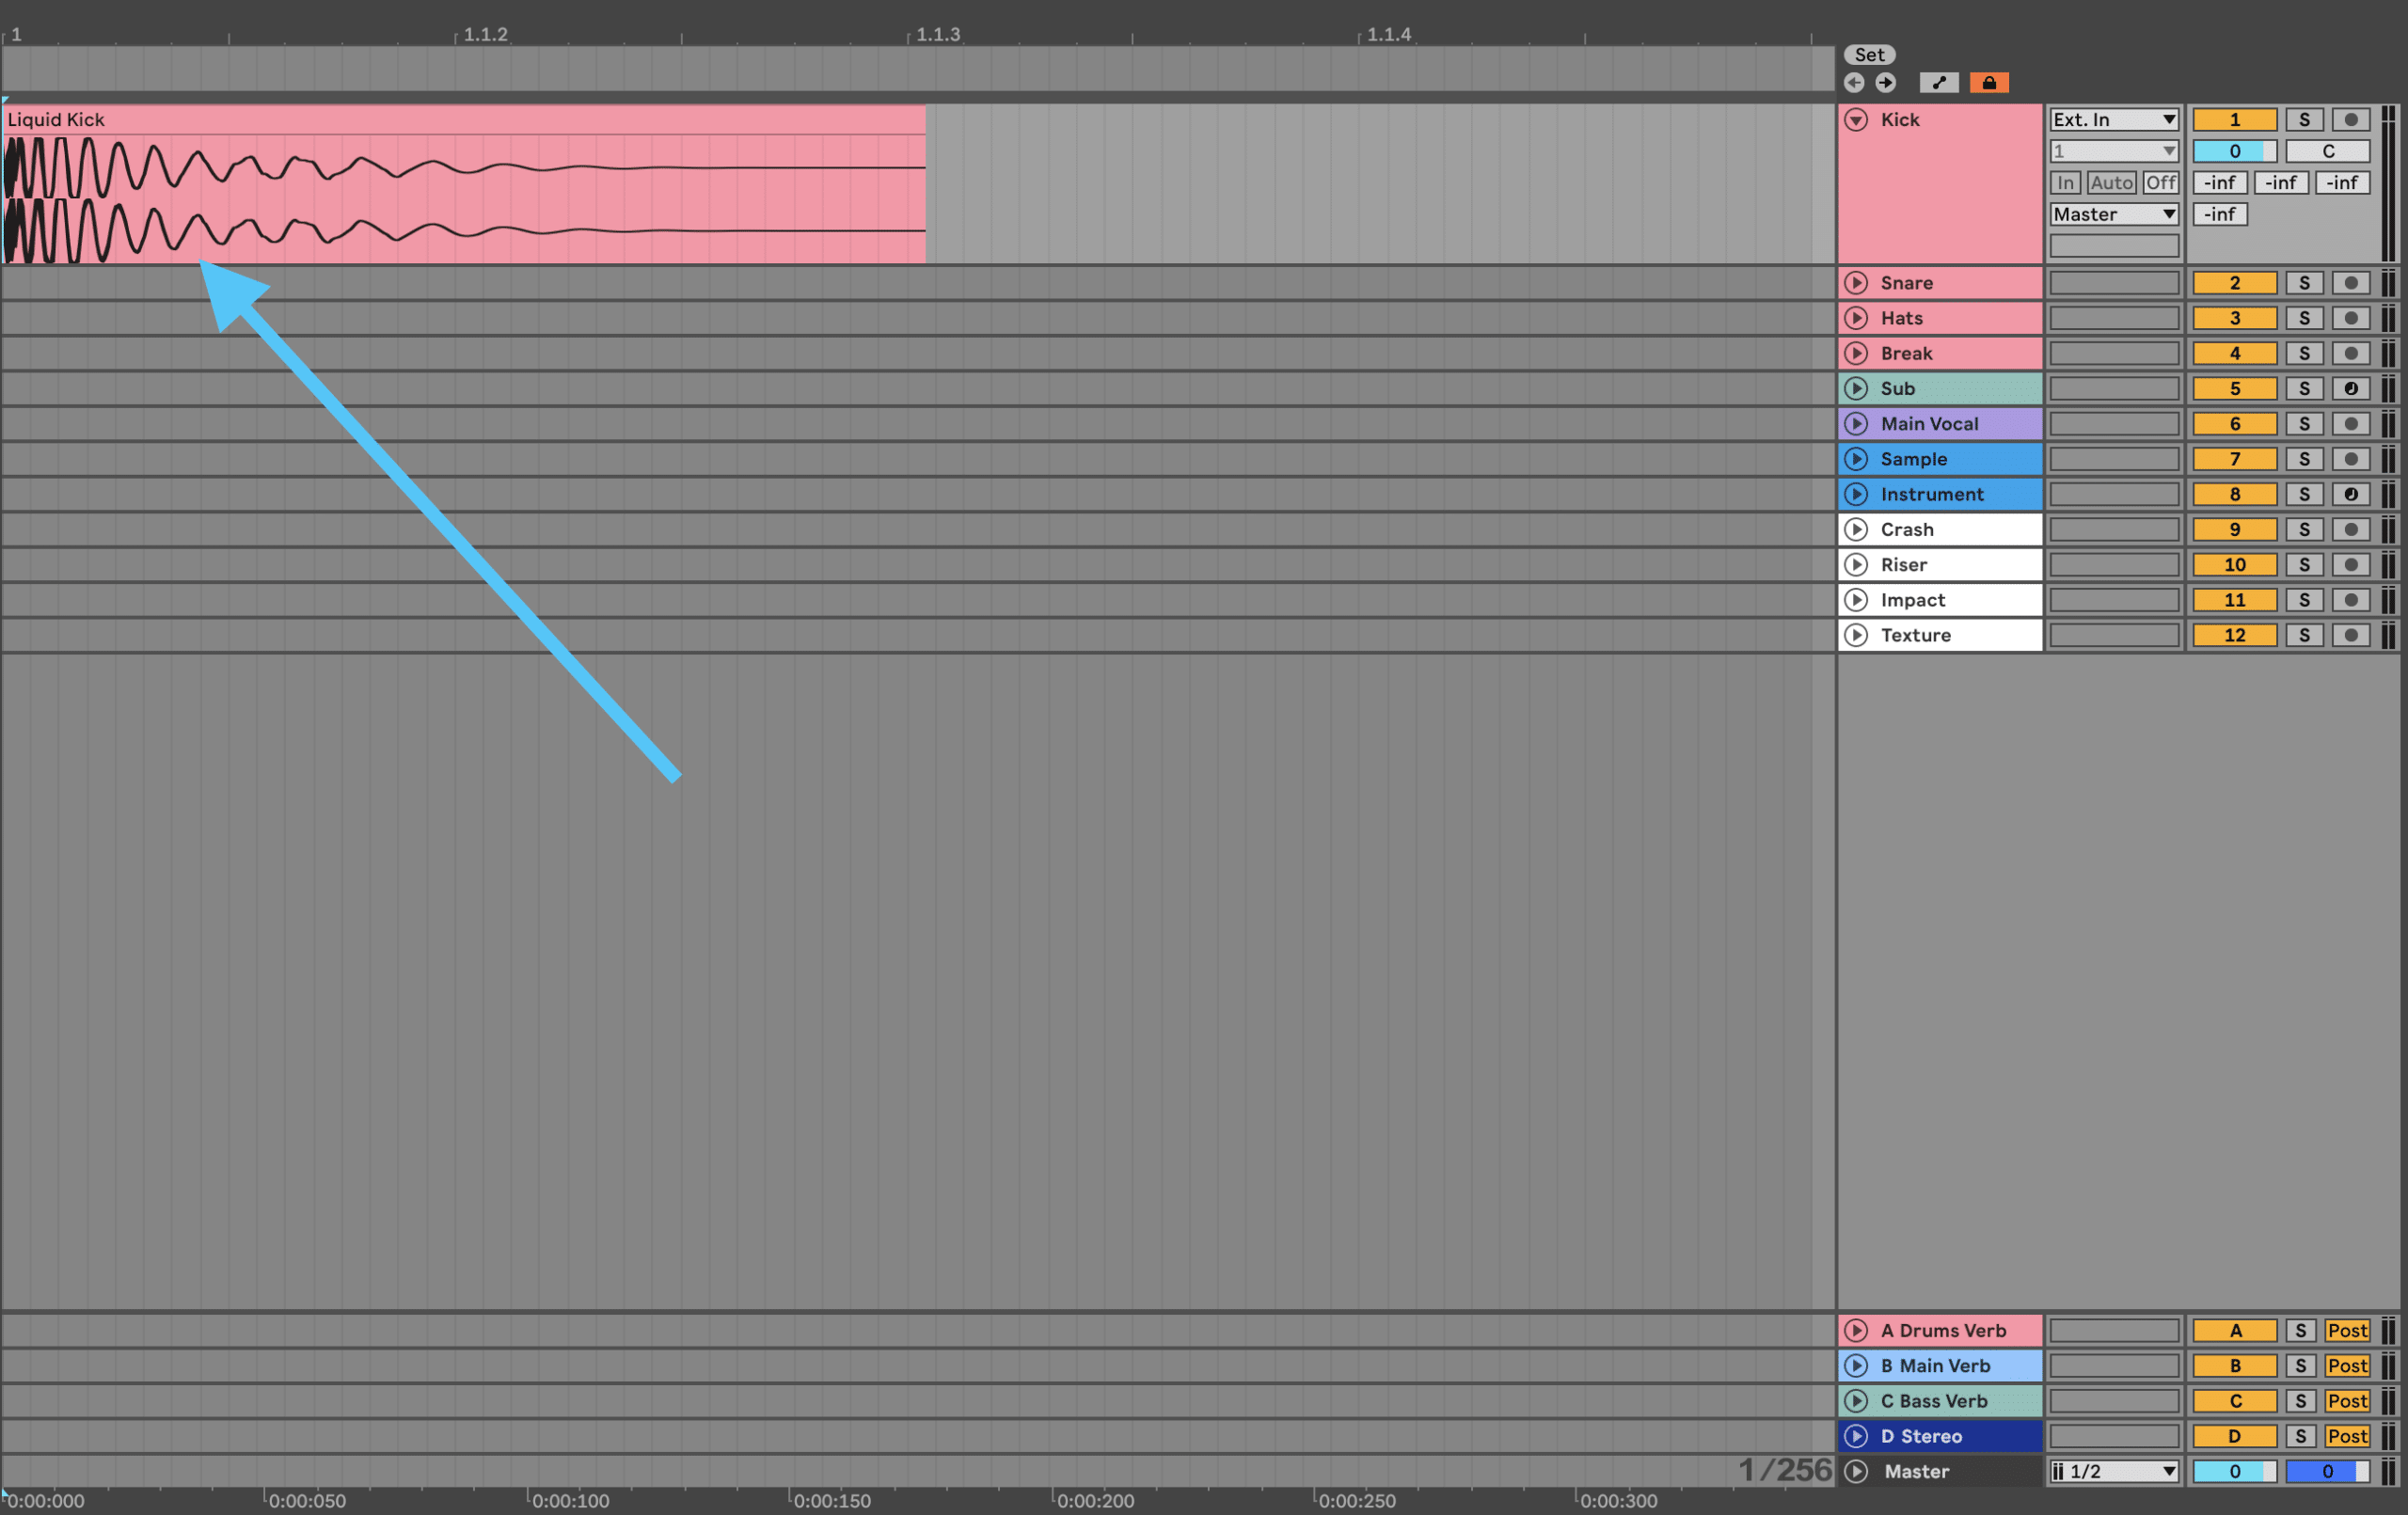
Let’s start with the kick. Grab the ‘Liquid Kick.wav’ sample from the Liquid Starter Pack and drag it into your DAW’s arrangement on a new track.
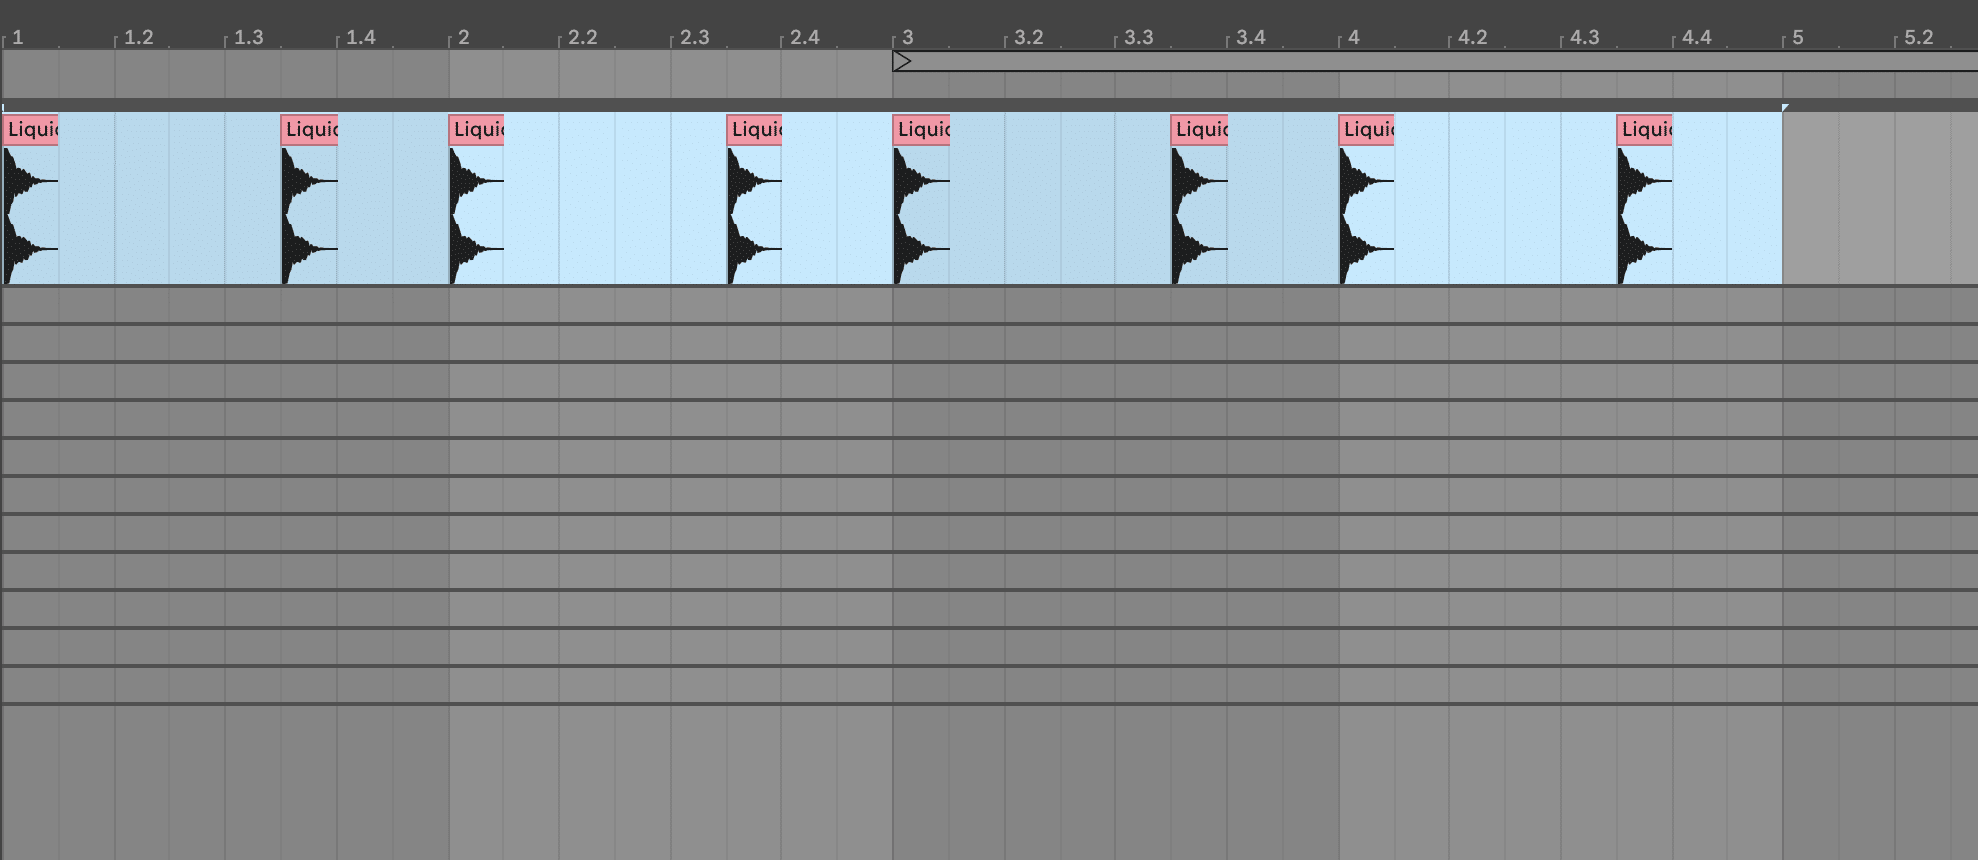
Now we can start to program a kick pattern with this sample. Leave the first sample on the first beat of the first bar (1.1.1), and copy-paste a second on 1.3.3. Then duplicate the pattern 3 more times over 4 bars so we have something to work with.
This will create the basis of the common ”two-step drum pattern that defines most of Liquid Drum & Bass.
The Snare
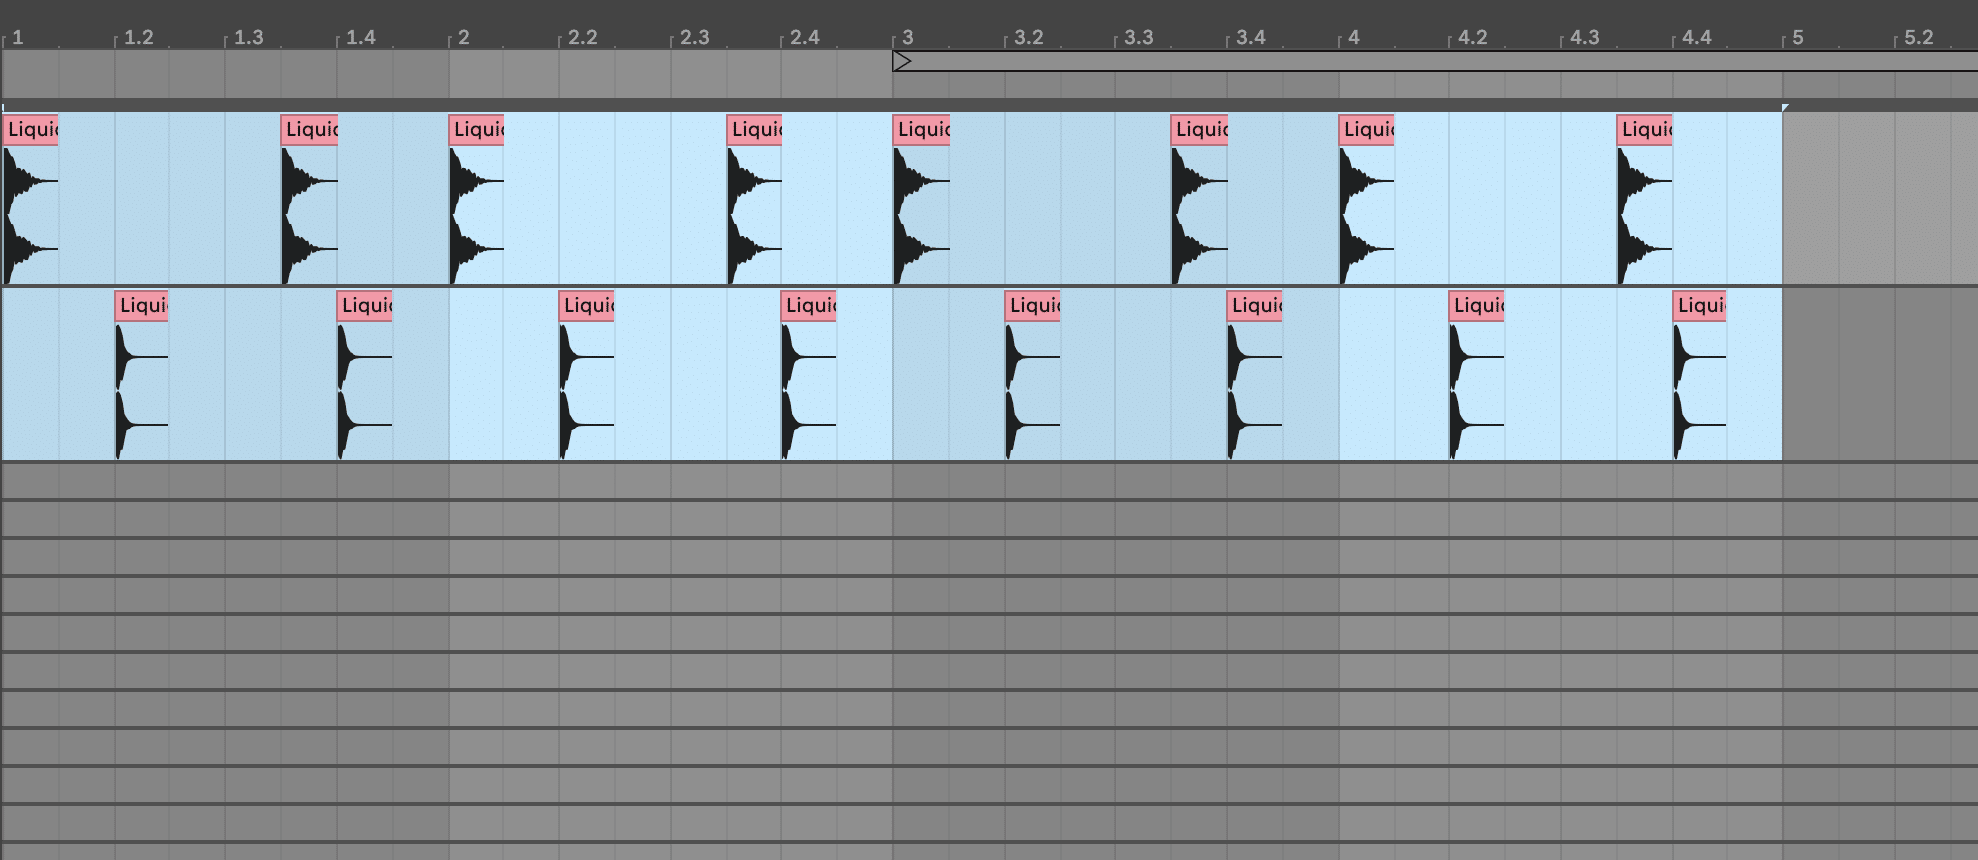
Now let’s bring our snare in. Drag the ‘Liquid Snare.wav’ sample into a new audio track, and place it on every 2nd and 4th beat.
Already we can hear the foundation of the beat coming together. But there’s a lot of empty space that can be filled in, so let’s add some hat one-shots – the ‘Liquid Hat.wav’ sample from the pack.
Hats are great for carrying both the rhythm and energy of your drums, since they’re more frequent and repetitve in drum loops than kicks or snares.
Let’s fill every 1/8 gap where the kick and snare aren’t. This will drive the track along and create a nice groove.
And with just 3 good-quality samples, we’ve formed the foundation of a nice Liquid drum loop. But let’s flesh this out further and make it sound more organic with some breaks and loops.
Top Loops vs Full Loops
Some drum break loops in sample packs contain a full drum arrangement. You could just drag and drop these loops and use them as is (and there’s nothing wrong with this – early Jungle/DNB tracks did this by sampling old-school funk breaks and just pitching them up).
However, you might be wanting to do a little more than using someone else’s drums verbatim. This is where top loops come in.
Top loops typically contain high-end percussion (hats, shakers, crashes, and rides) without a solid kick and snare. This allows you to layer in your own one-shots while maintaining the feel of an organic drum break.
You can find top loops as samples (hats, shakers, or high-passed breaks), or you can turn any full drum loop into a top loop with a simple high-pass filter.
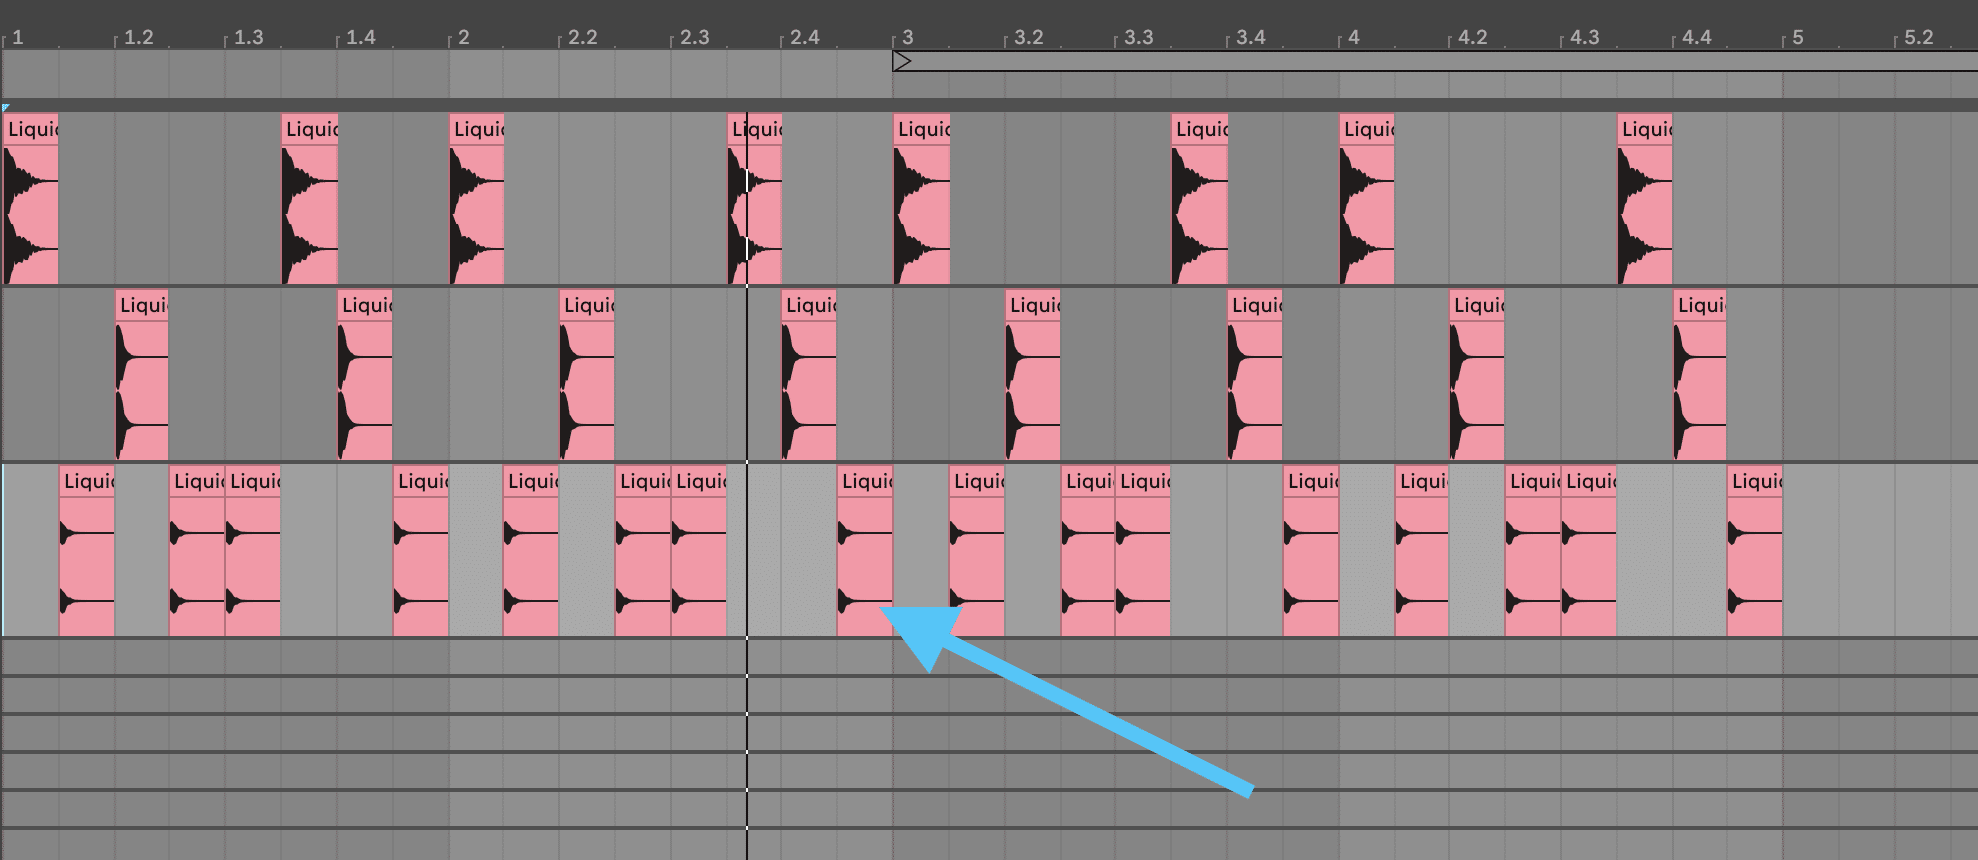
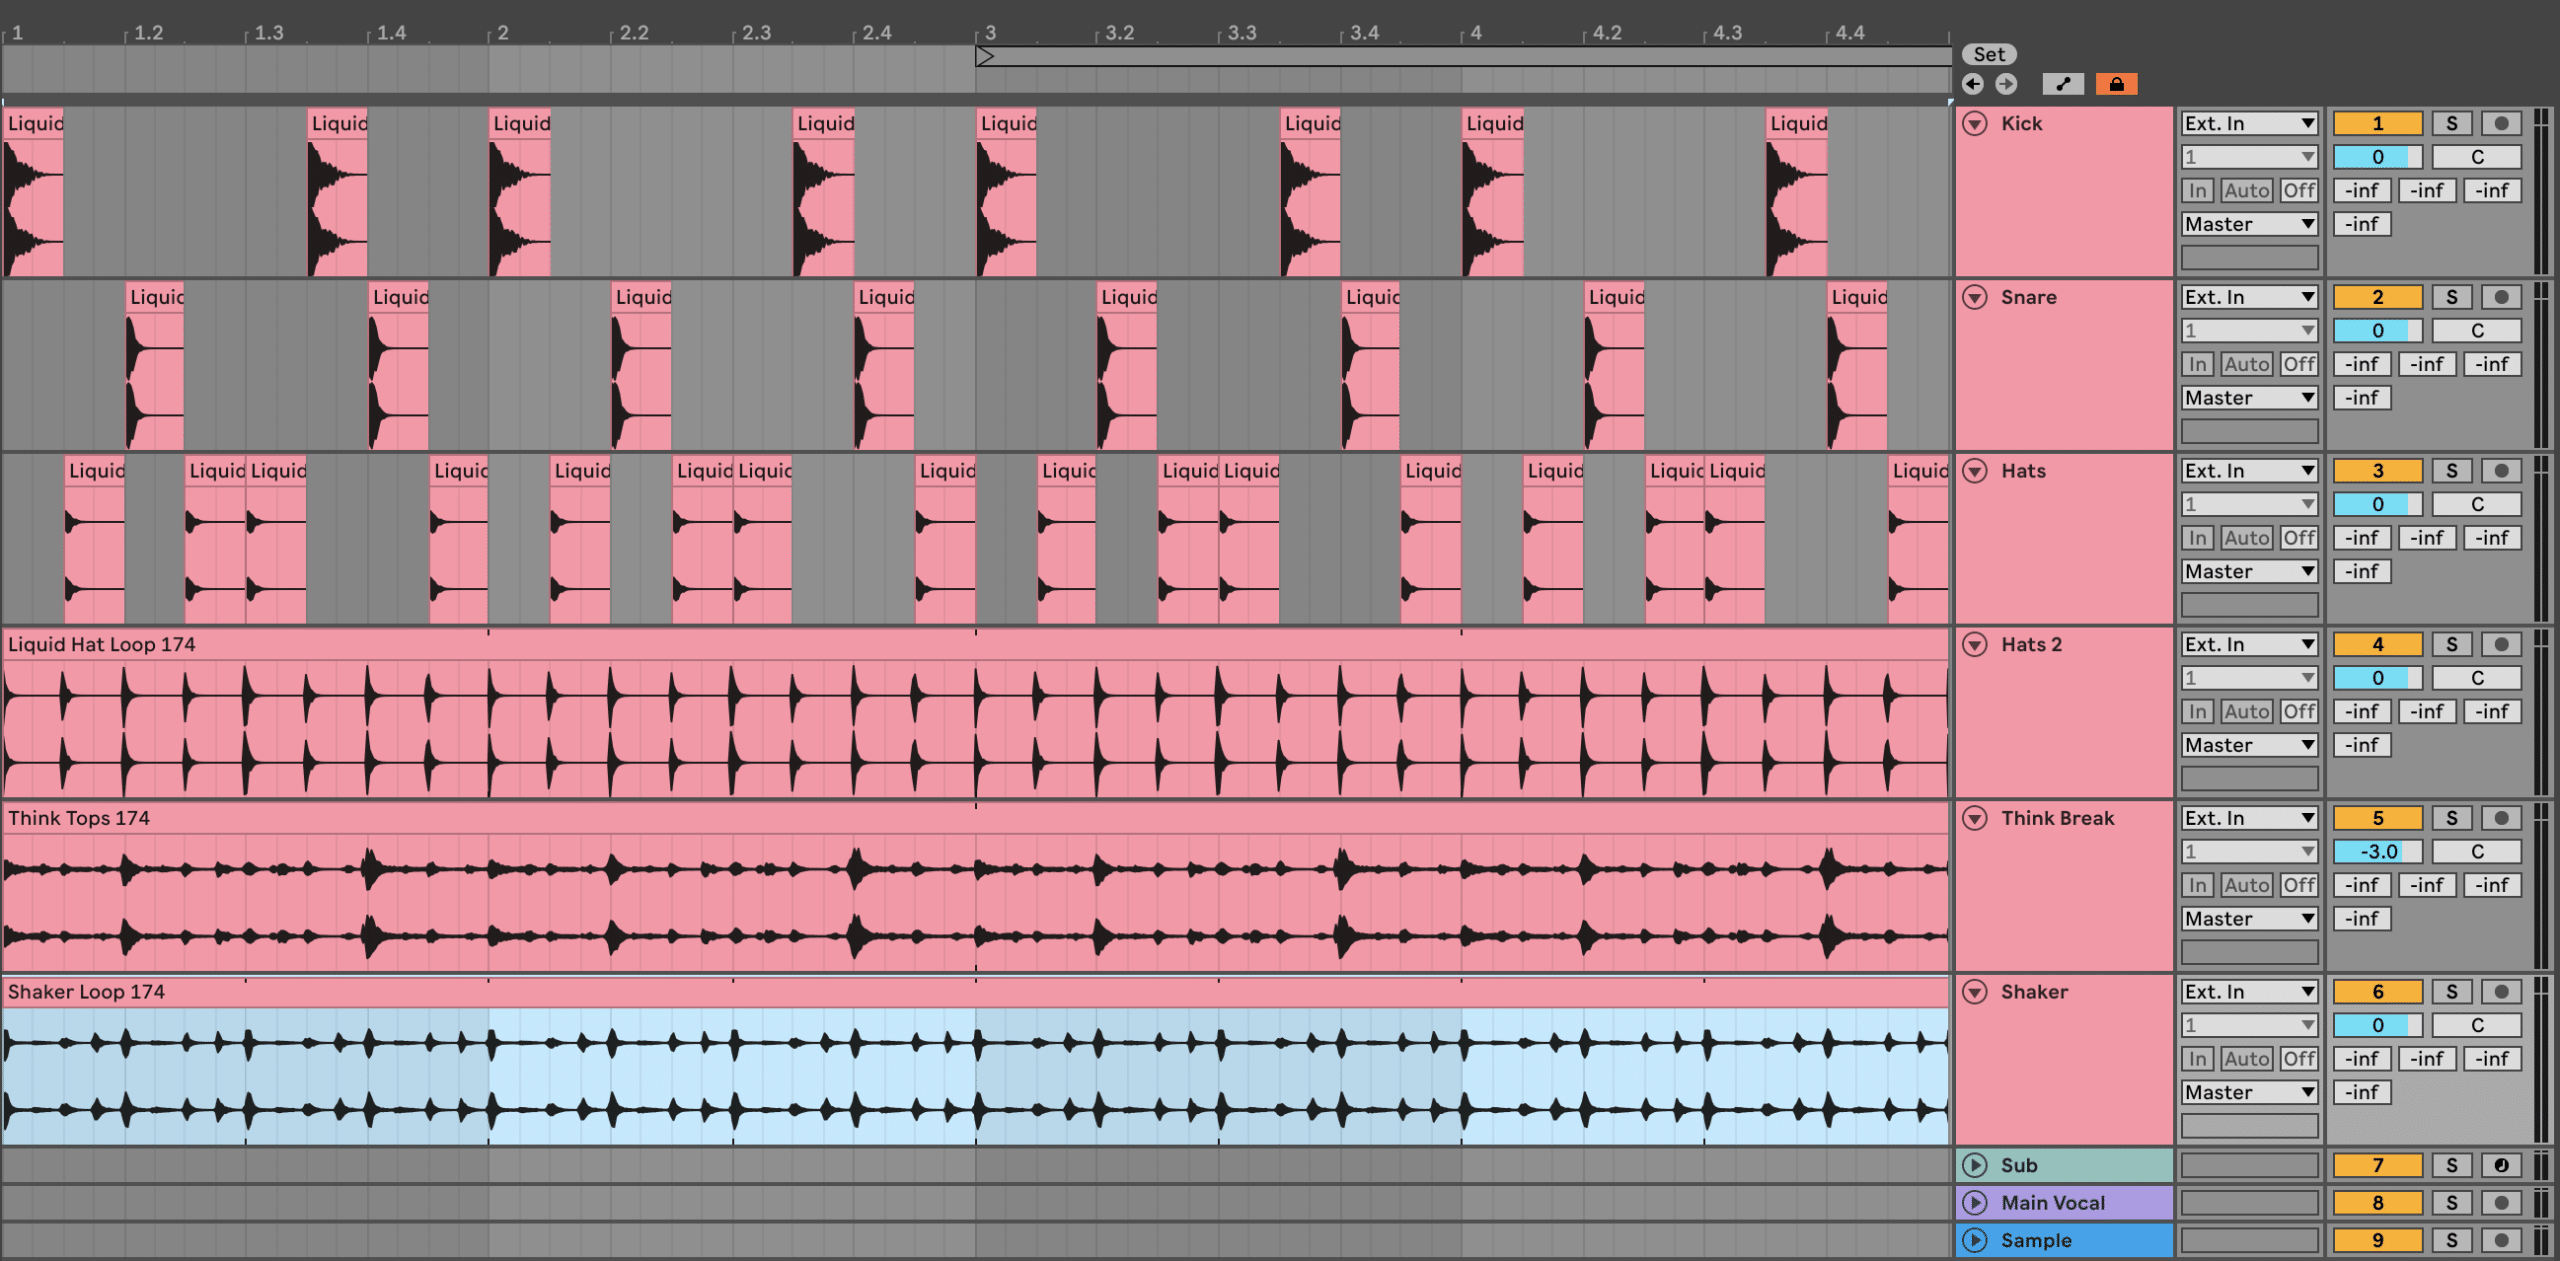
In the case of this track, I’ll just pull in a second hat loop (‘Liquid Hat Loop 174.wav’) for now to emphasize our existing loop. It’s also a 1/8 hat pattern, so it’s more just reinforcing what already exists.
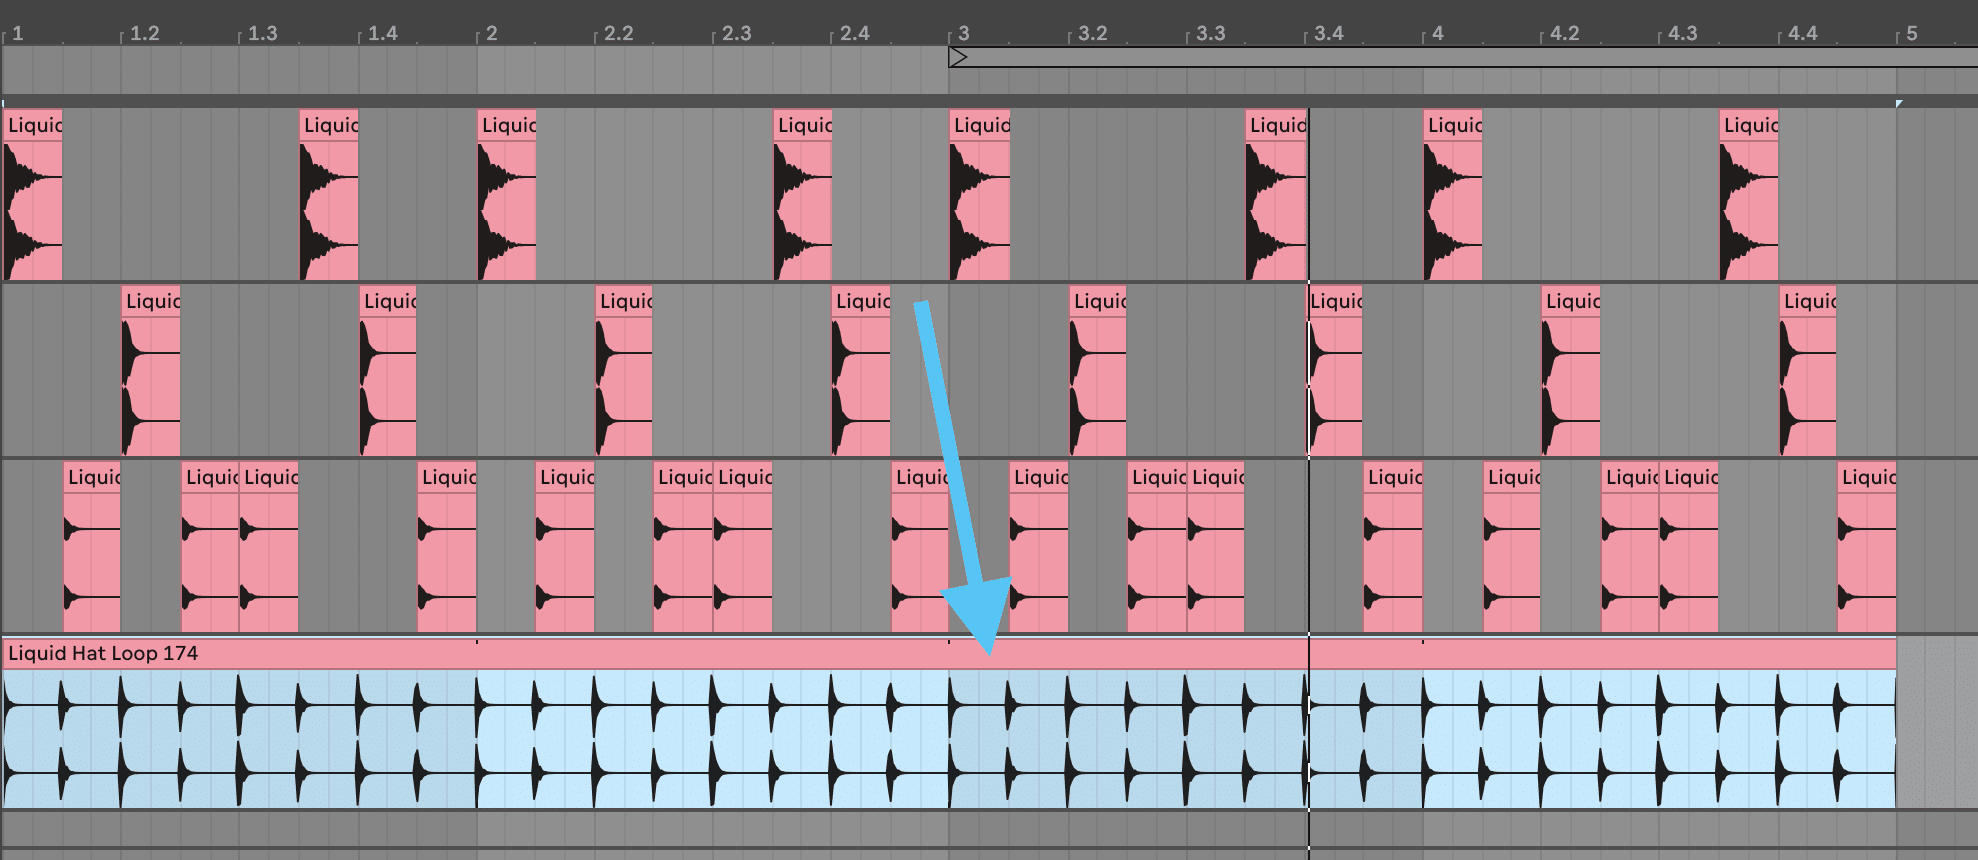
Now the drums are starting to sound solid 👌
We can take this further by adding some an old-school drum break top loop to inject some flavour, but let’s cover how this normally works first.
Using Drum Breaks
While you do have the option of taking raw funk drums, pitching them up, and processing them to sound a certain way – much of this has been done for you in modern sample packs.

Since we’re not wanting to reinvent the wheel, I’d recommend using these samples to create entirely new drum sounds through additional layering, chopping, and processing.
Plus, you’ll save a load of time.
In this case, since we’re layering something in with existing drums, we can take a loop and blend it to taste.
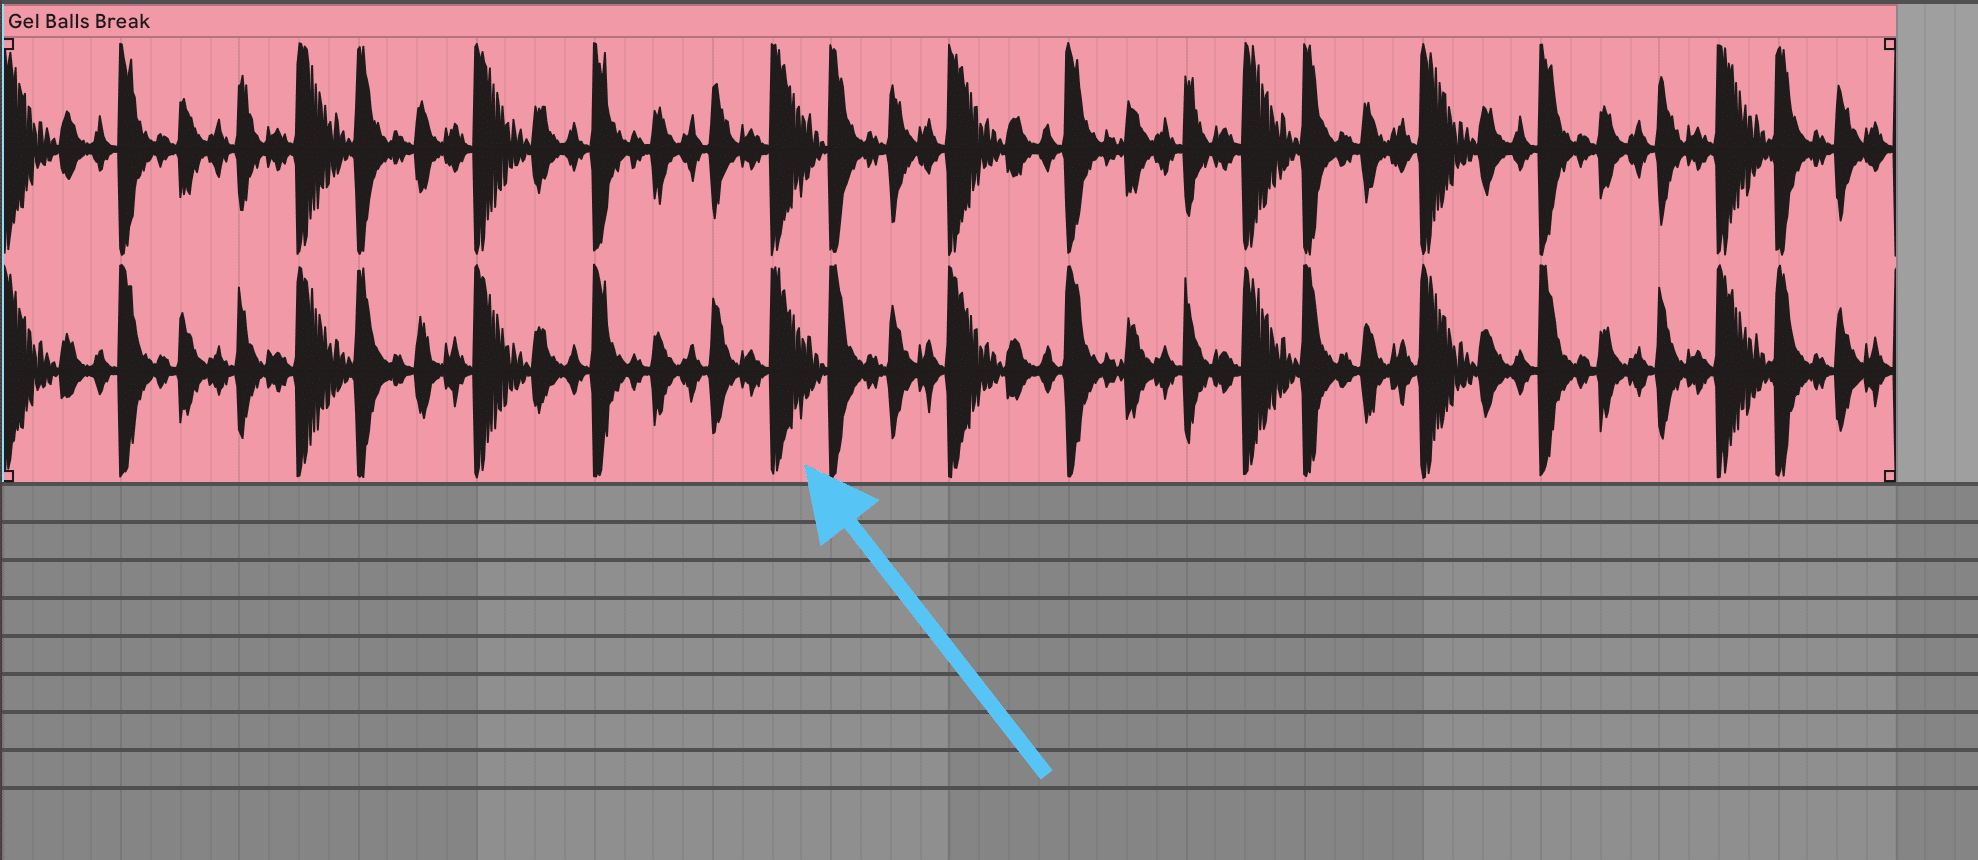
In the Liquid Starter Pack, you’ll find a ‘Think Tops 174.wav’ sample that is a processed in high-passed Think Break, a sample from the famous ‘Think (About It)’ from Lyn Collins:
This break is a classic because it has such a nice shuffle to the drums (especially in the middle of the loop) and it has that iconic vocal squeak.
Let’s simply drag it in and loop it over the 4 bars (and turn it down a little bit on the fader).
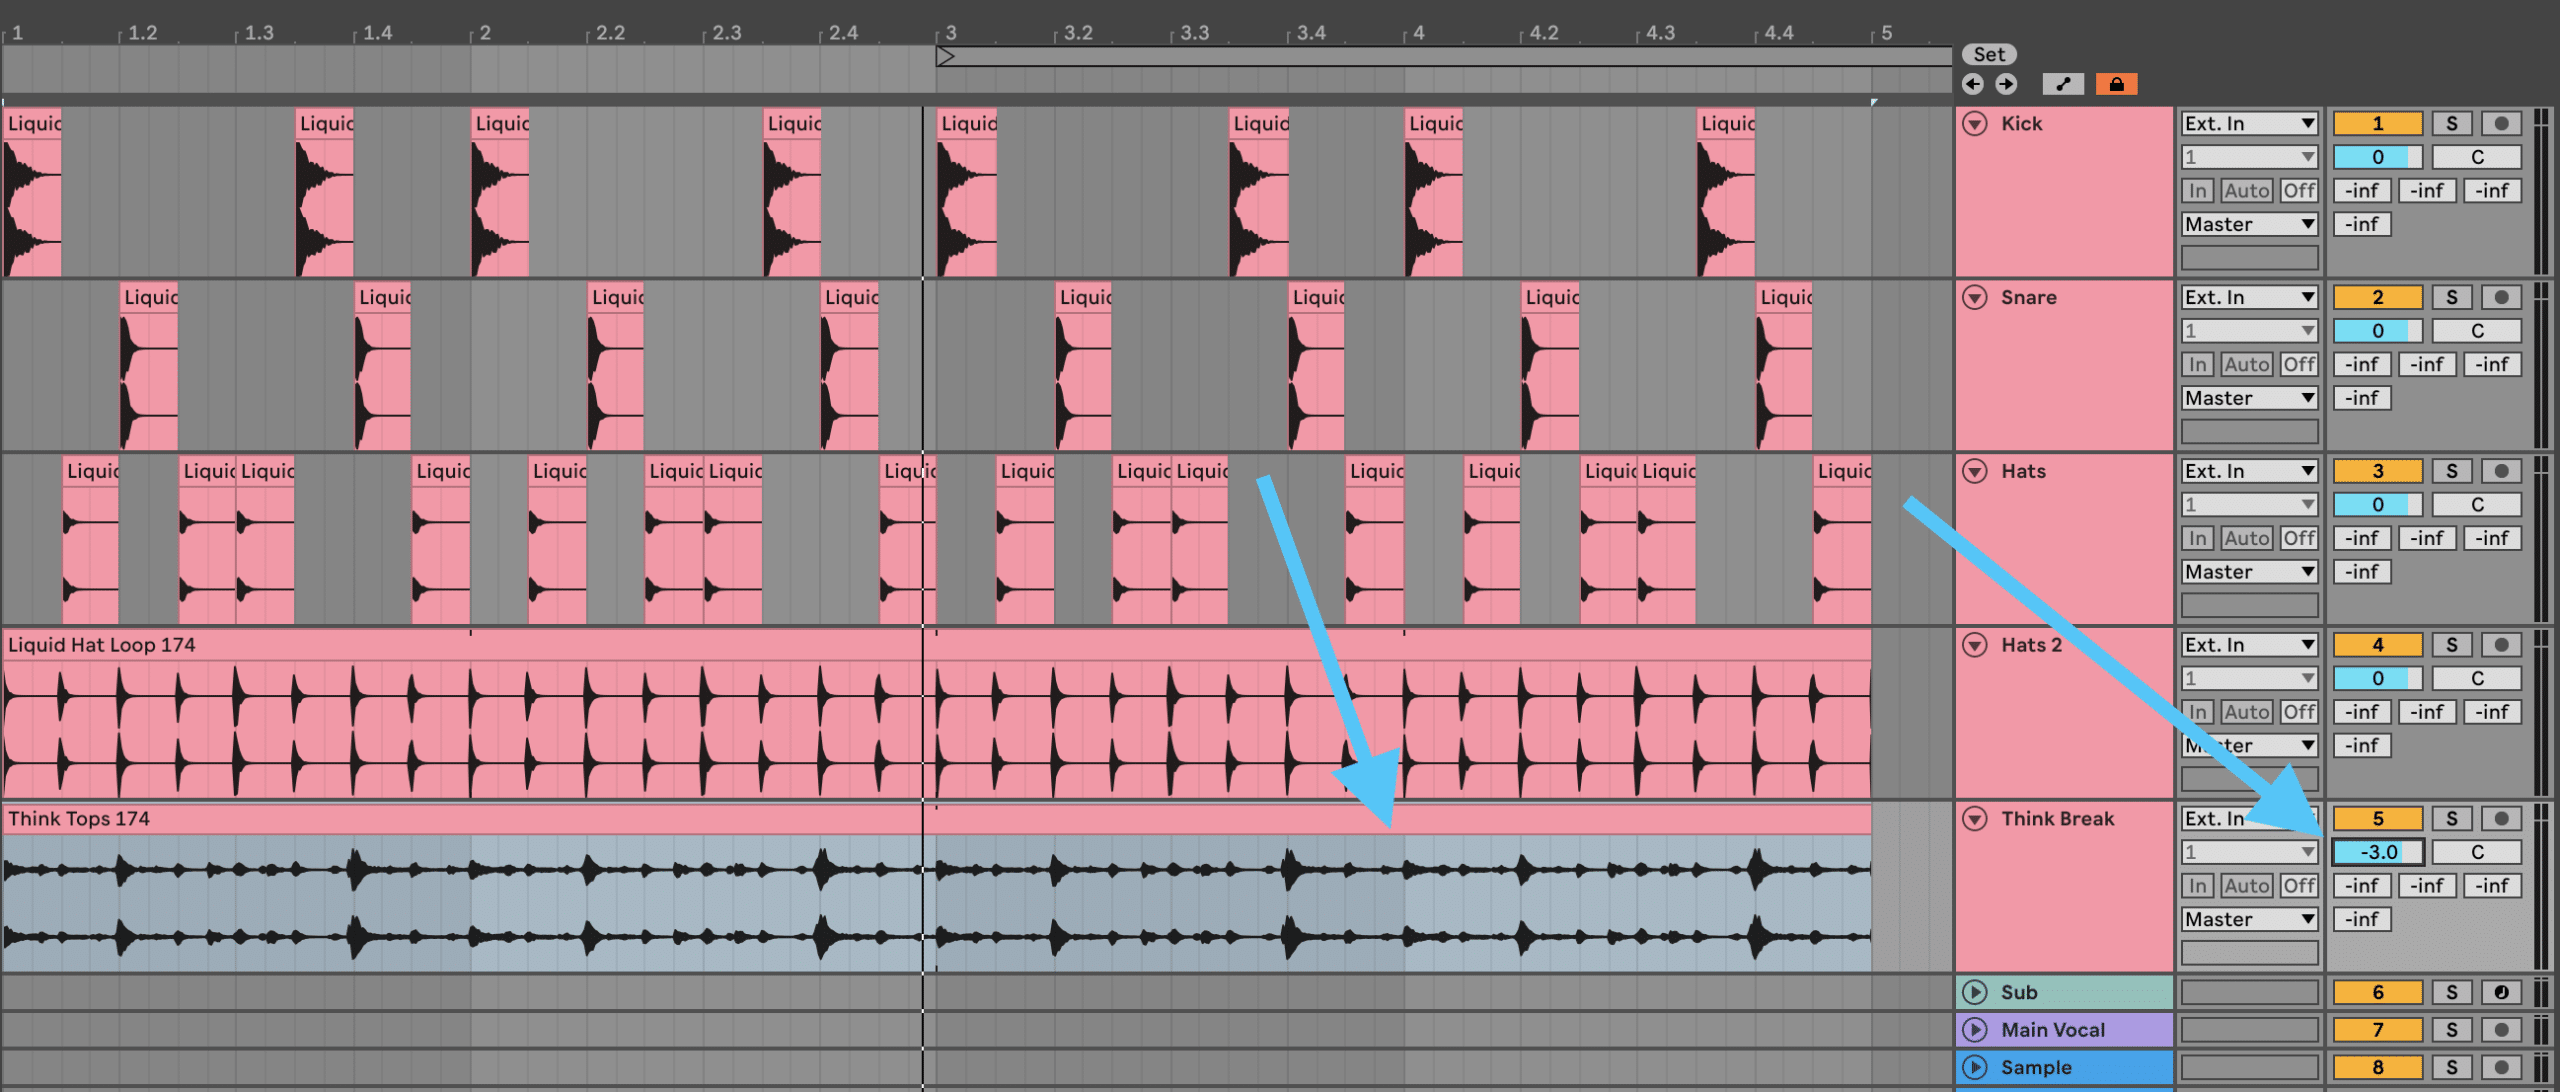
Simply adding in that break makes all the difference, and now this is really starting to sound fleshed out.
Adding some shakers
To make this sound complete, full, and layered – let’s add one more loop in: ‘Shaker Loop 174.wav’. I love adding shakers in because they add a nice ‘noisiness’ to the loop. I think it also makes the whole drum loop sound a bit more modern.
Simply just drag and drop and loop it out:
Of course, you can always create your own drum breaks by using a Drum plugin like Addictive Drums or NI Studio Drummer. But that’s beyond the scope of this tutorial – we’re keeping things nice and simple this time around.

There are still a few mix changes to make to these drums, but we’ll cover that off later in the guide.
Now that we’ve got our drums, let’s move onto the stuff that makes Liquid what it is – the musical stuff.
Phase #3: The Musical Stuff 🎶
Although Liquid is a subgenre of Drum & Bass, the varying styles within Liquid can be quite different.
Liquid tracks can feature any number of instruments and sounds, including:
- Lush pads
- Driving synth arps
- Soulful pianos
- Funky guitar licks
- Vibey vocal samples
- Soaring leads
…and much more.
Either way, it’s undeniable that the musical ‘stuff’ is what makes Liquid such a distinctive subgenre of Drum & Bass. It’s smooth, it’s musical, and it’s why we love it.
In this track, I plan on using a number of these, but let’s start with a piano sample that we can chop up and process. This process is inspired by tracks like Tokyo Prose – Rescue:
So let’s see how you can put your own spin on a sampled piano.
Soulful Piano Sample
Let’s start by loading up the ‘Soulful Piano Riff.wav’ sample from the pack into a new audio track. Make sure no warping or timestretching is enabled (it should work at 174BPM).
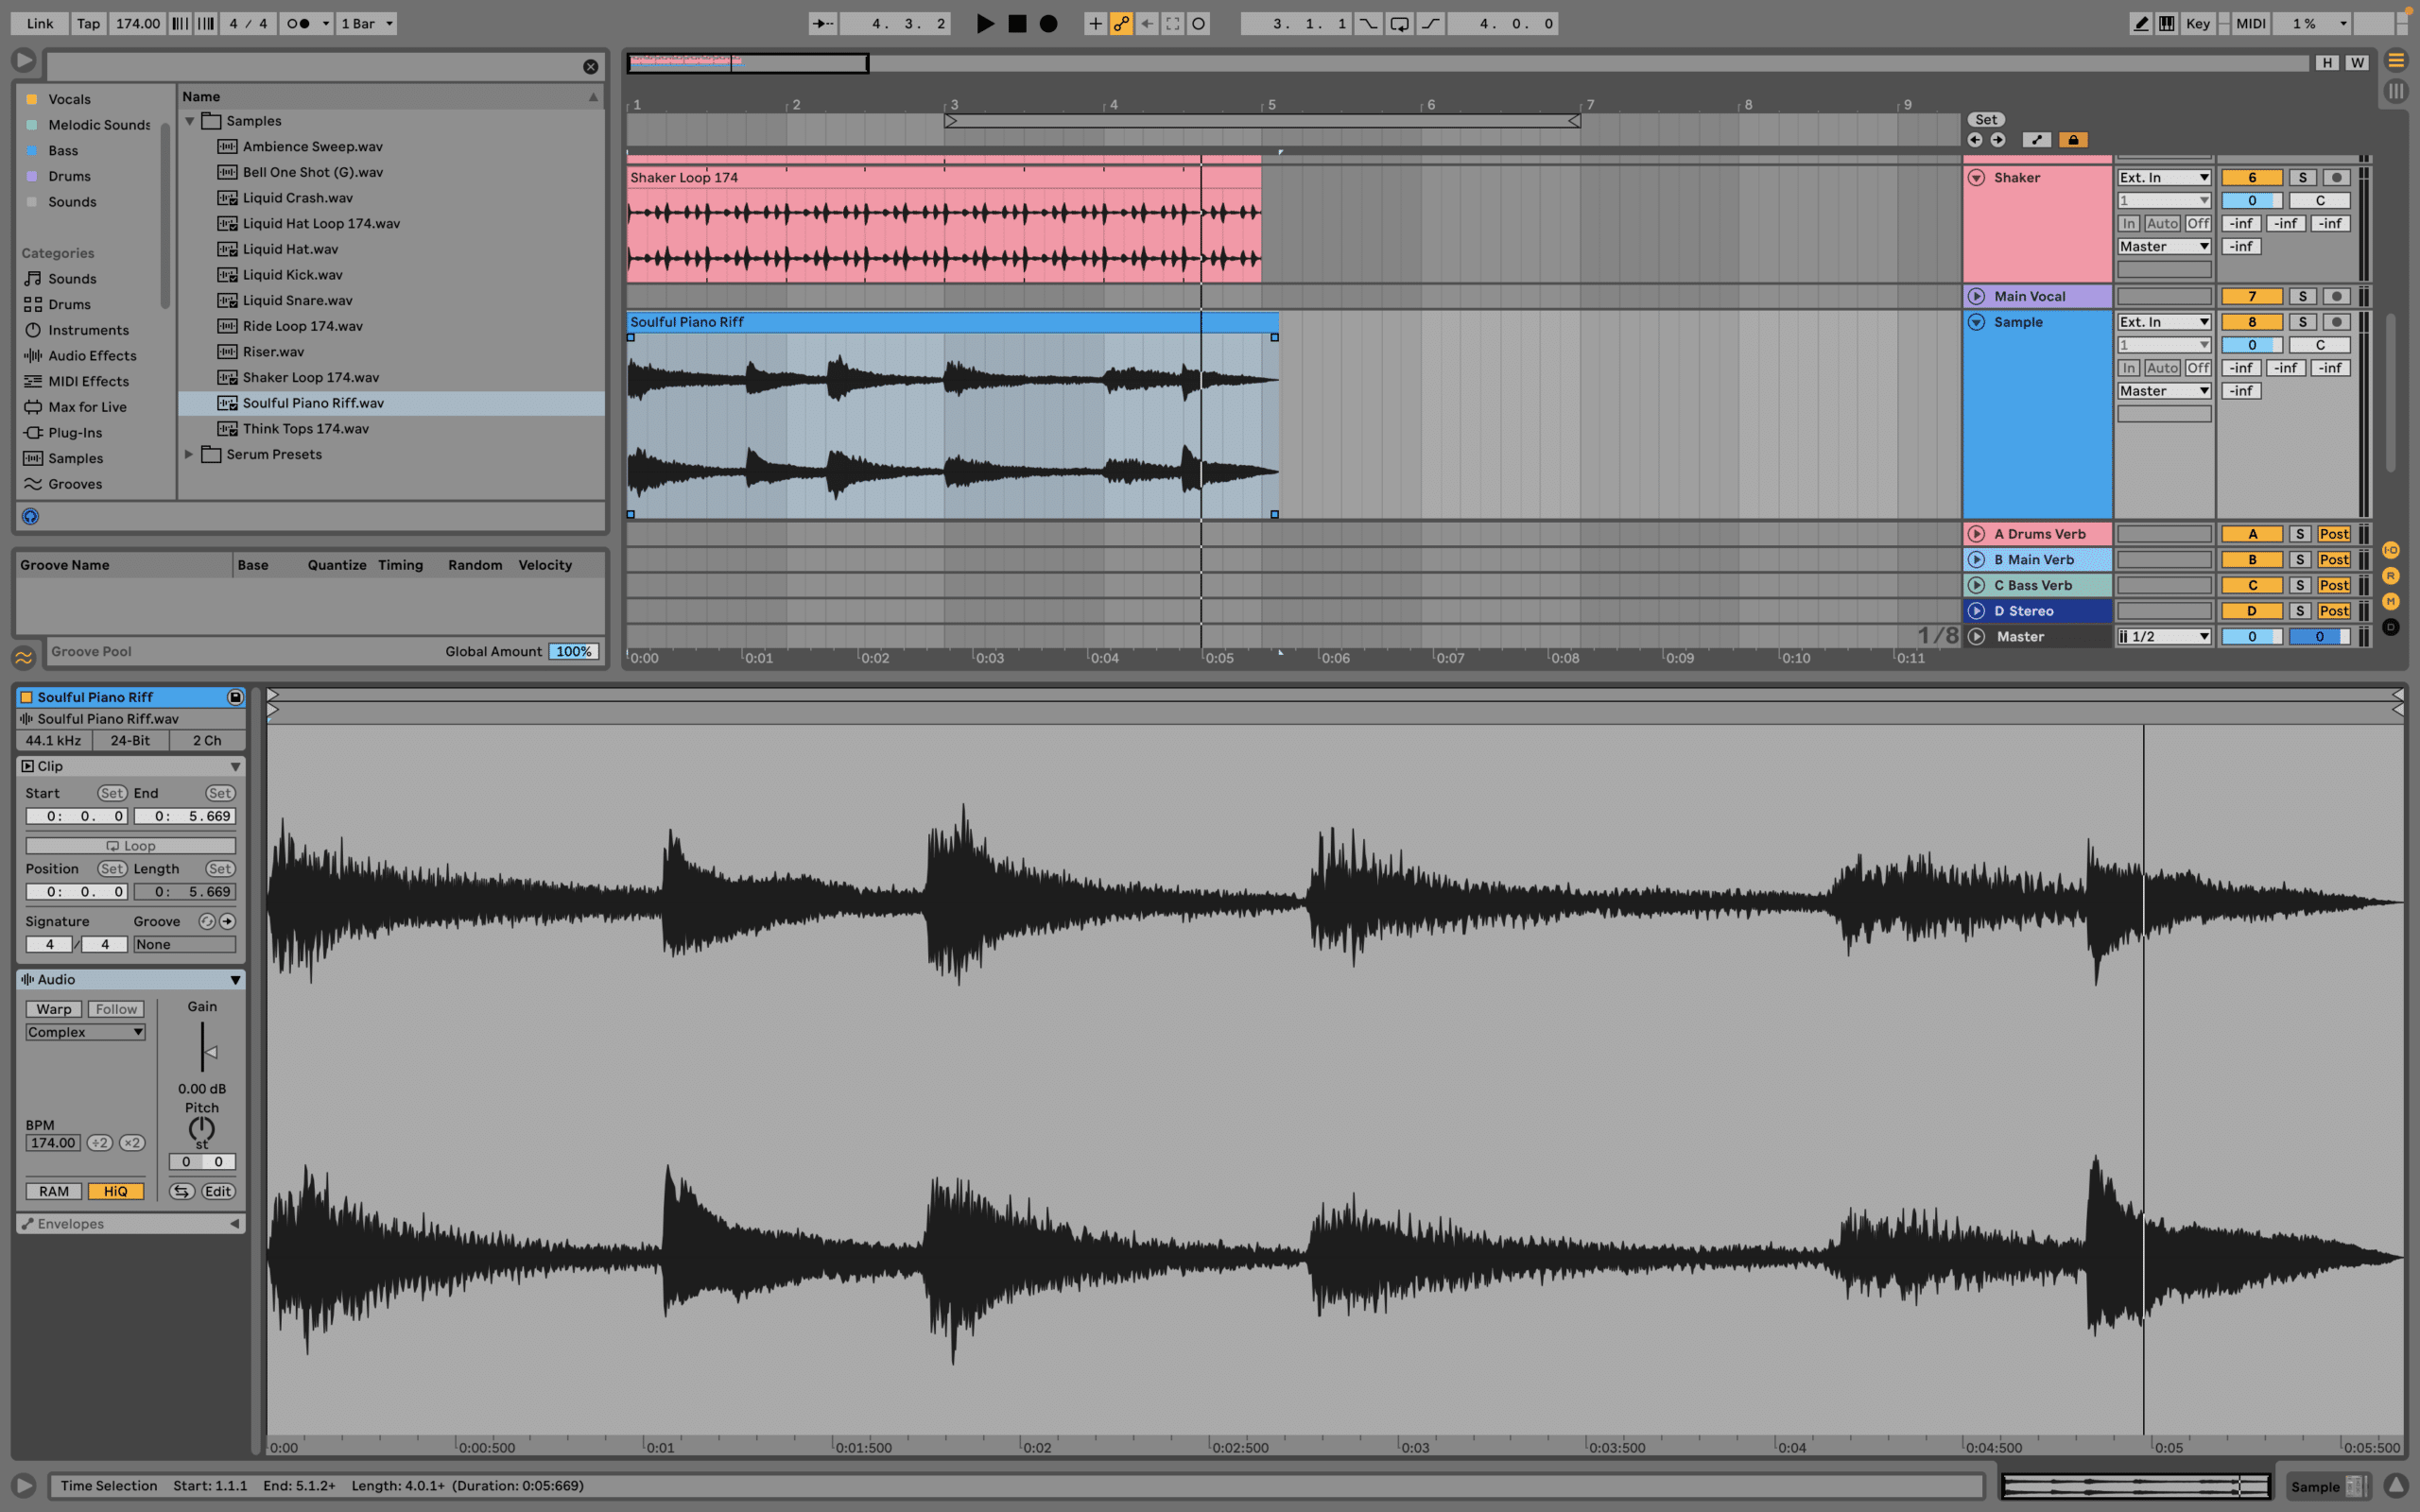
This is a nice sample in it’s own right, but let’s have some fun with it.
I’d encourage you to have a play around and chop it up however you like. But here’s how I’ve approached it:
First, I’ll pitch the sample down 1 semitone. This gives it a moodier feel for me, which I think will suit the drums (plus it’s a great starting point to instantly make a sample your own).
Then, I’ll move the start point of the sample to something later in the sound – around the fourth chord – so we’re not starting from the original start point.
Making the sample your own
From here, I’ll chop it up and pick some of the other chords, and move the rhythms around. Here’s what I ended up with if you want to copy me exactly:
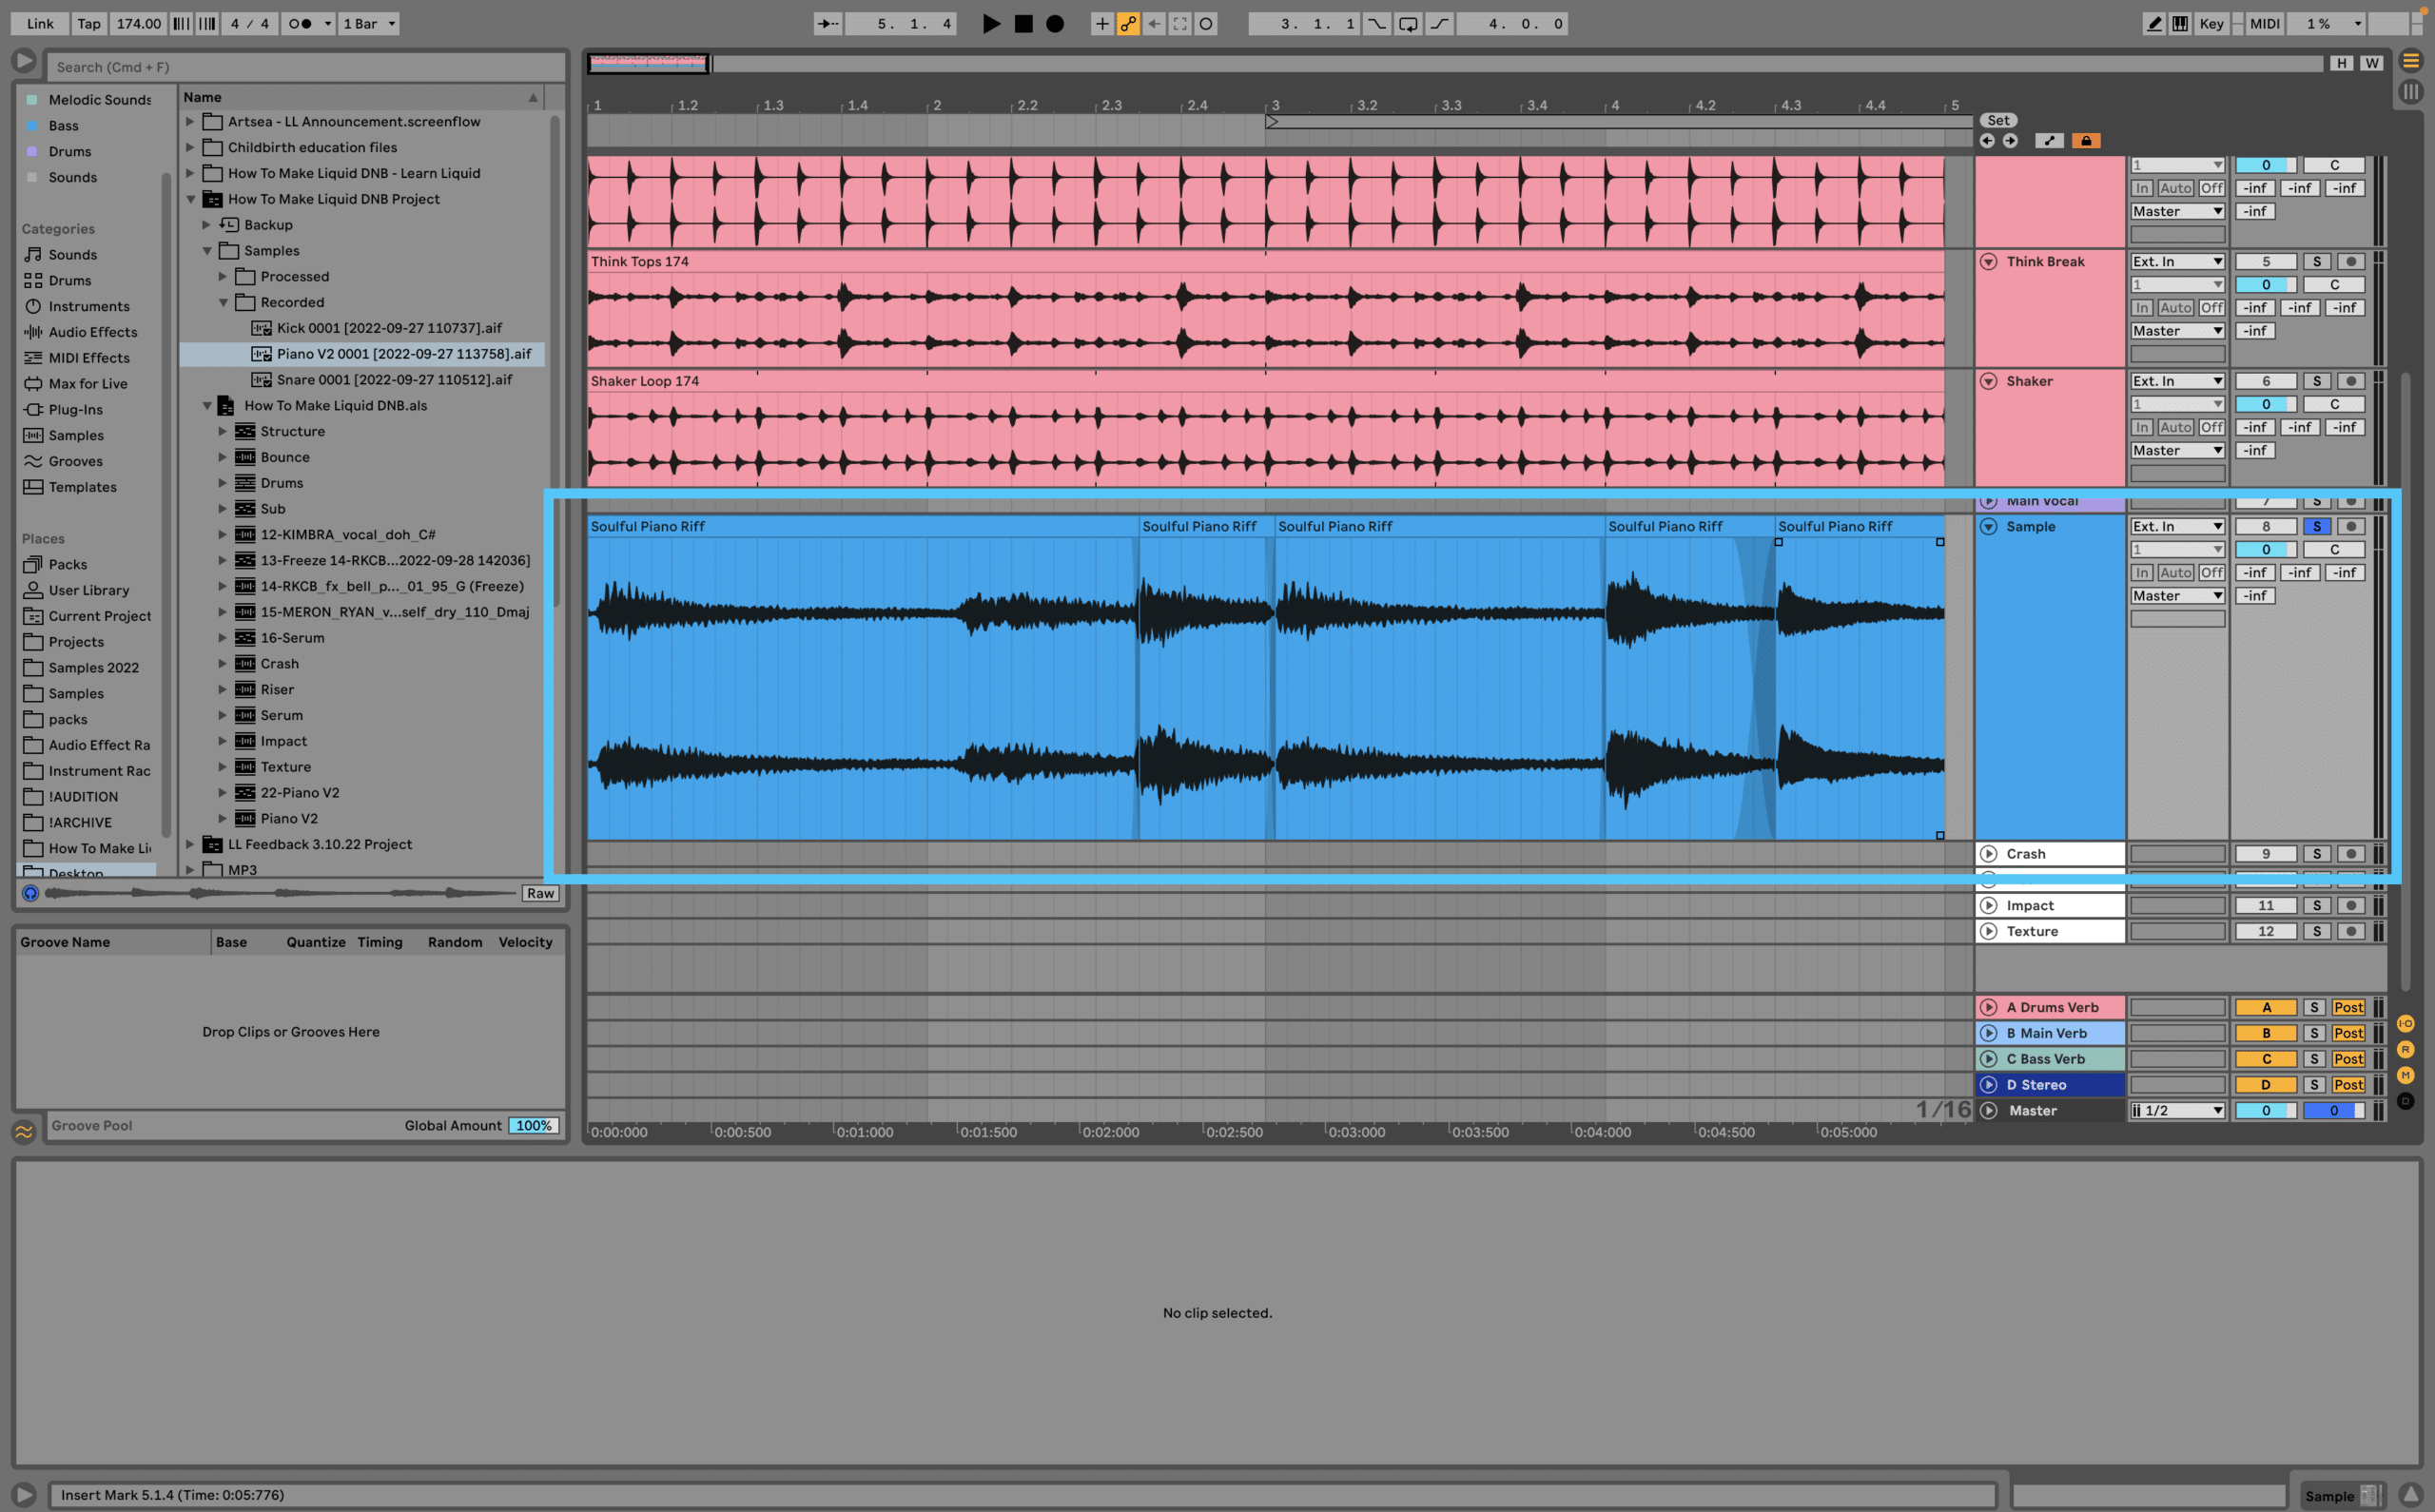
I’ve crossfaded some of the edges of the samples together to avoid any pops and clicks from the samples ending. If your DAW supports this, I’d highly recommend doing this.
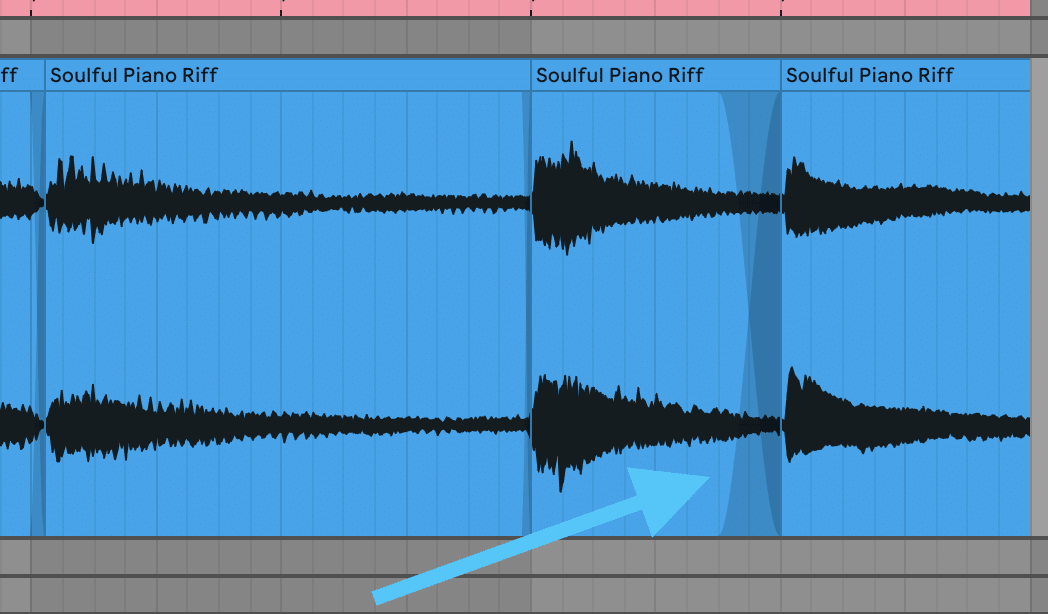
Now we’ve got our own original-sounding piano pattern that we can use. You can hardly tell it was from the original sample.
But if you ask me, I think we could make it sound even moodier…
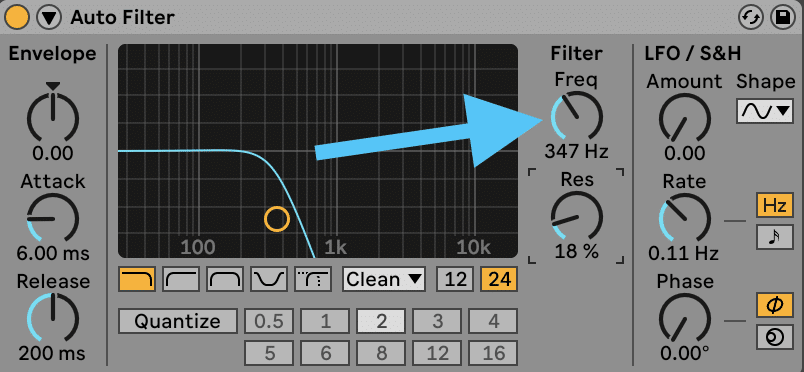
This is where a low-pass filter comes in. These are great for making anything sound ‘muted’, and they’re super common in Liquid DNB production.
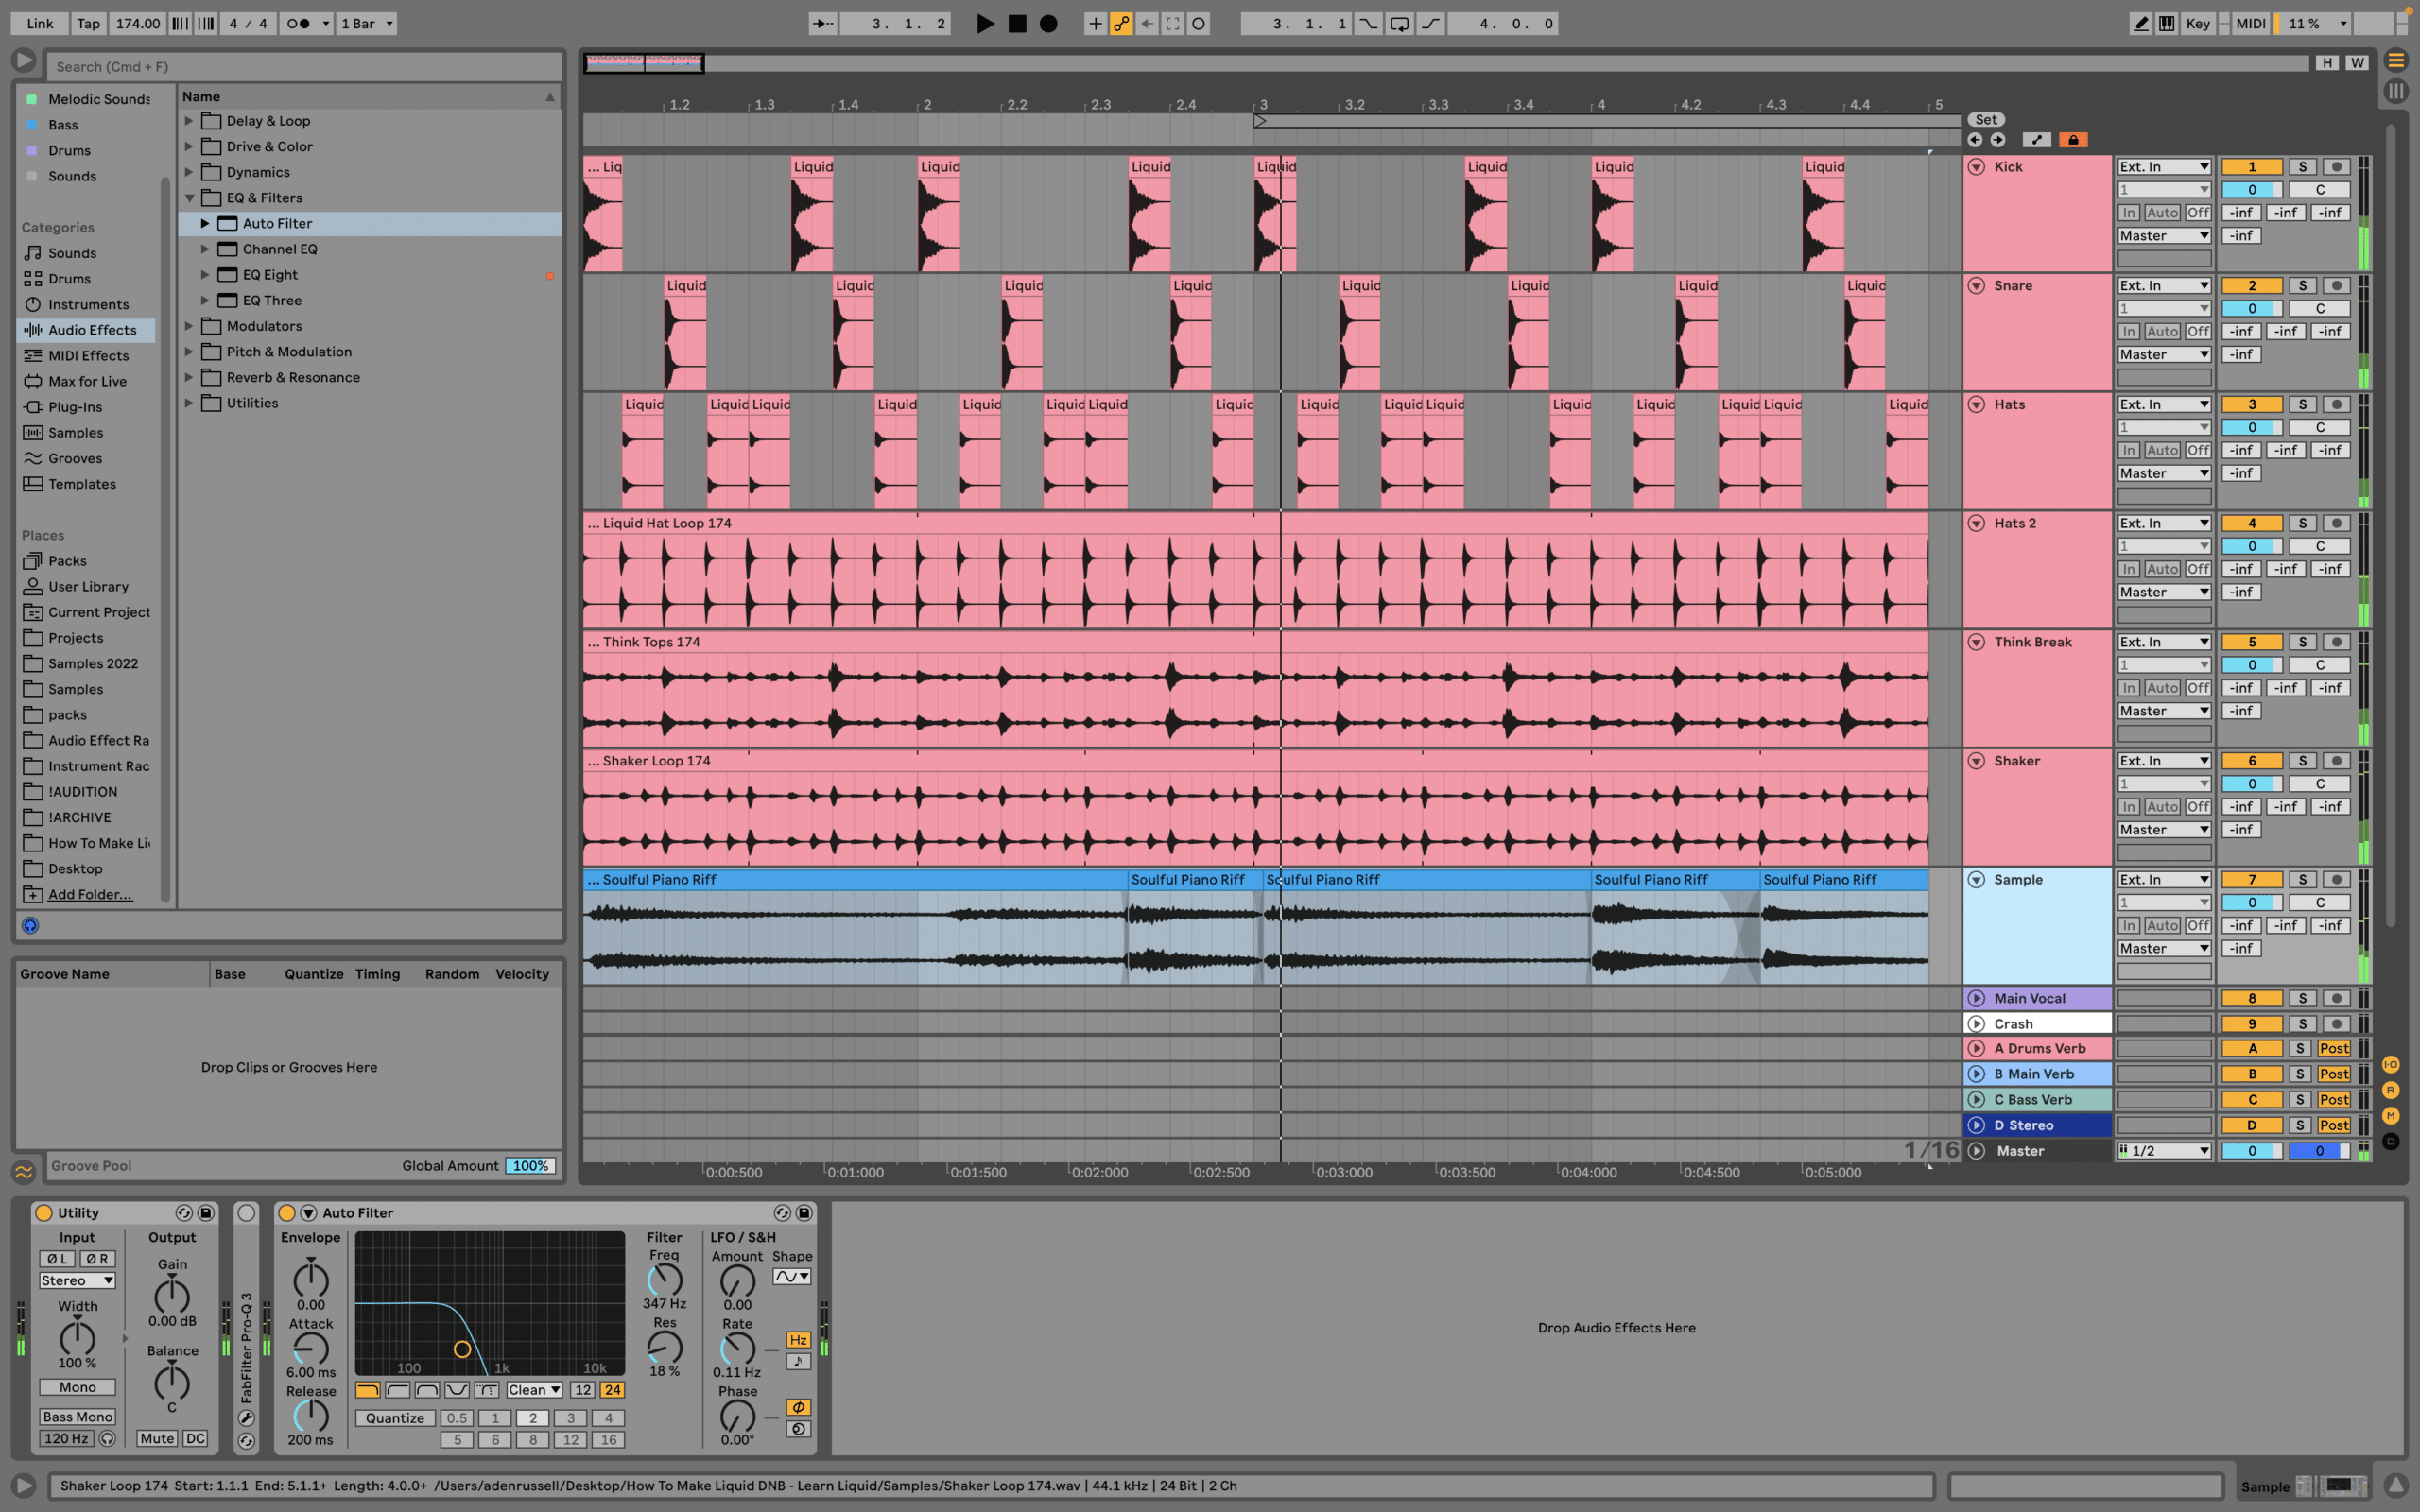
So grab your favourite filter device/plugin and chuck it on the piano track. I’ve got mine set to 347Hz, which sounds like this:
Here’s how it’s all sounding so far with the drums as well:
Those vibes are really starting to come together 😍
Now that the drums and piano are down, let’s move onto the third un-missable ingredient – the bassline.
Phase #4: Deep Basslines 🔊
Bass is obviously integral to Drum & Bass…
But unlike other Drum & Bass subgenres, Liquid is (usually) less about the sound design and more about composition and the notes you choose.
But it’s still important to cover how to design these sounds (or at least which presets to choose). So let’s go over the basics:
Liquid Bass Sound Design
There are two approaches to designing basses for Liquid.
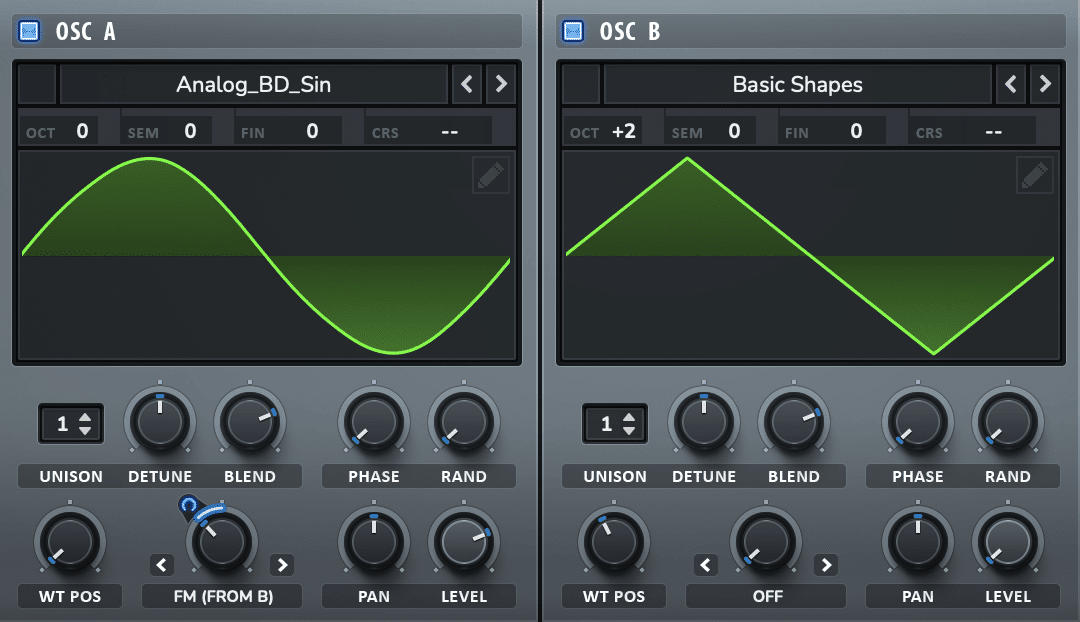
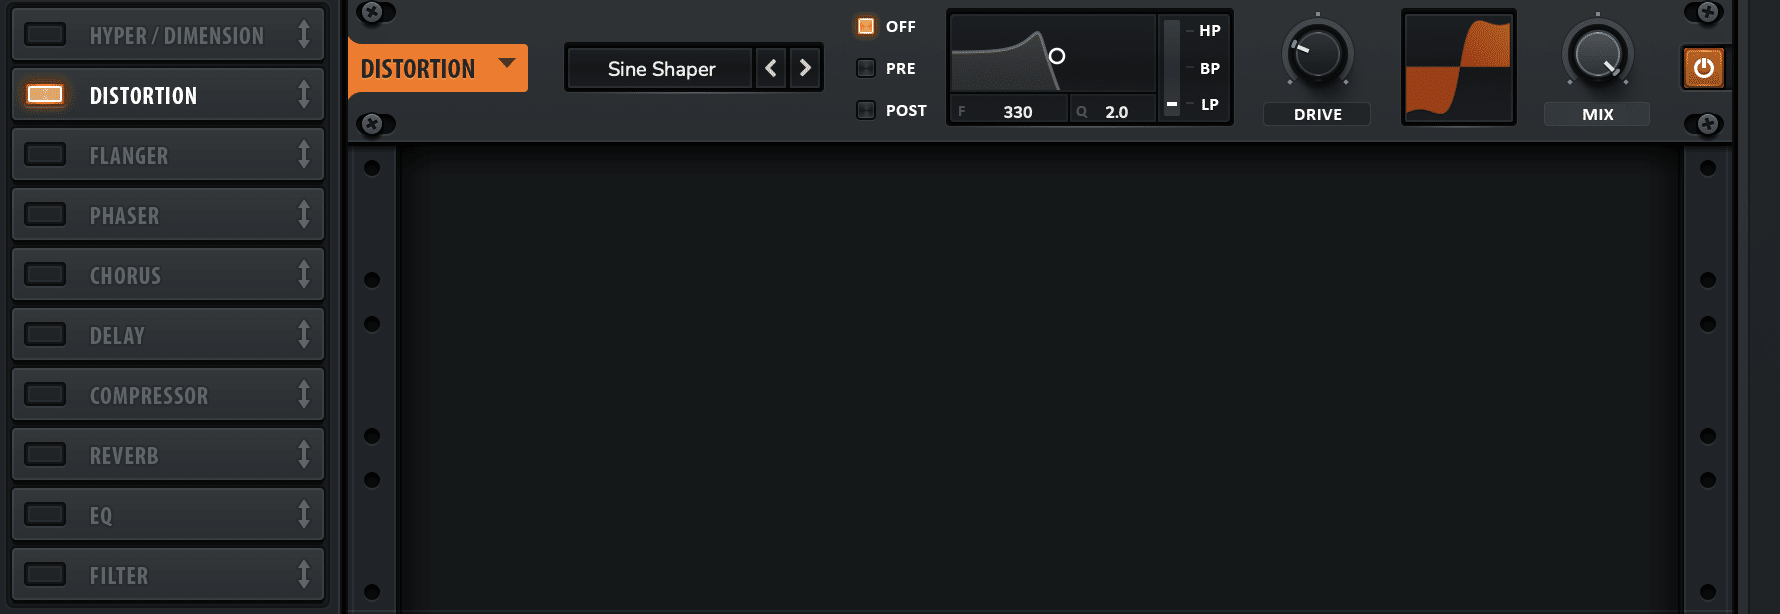
The first is what I call the ‘additive’ approach. This is where you start with a simple waveforms, and using distortion, FM and other FX to beef it up a bit.
The other is the ‘subtractive’ approach, where you start with a fat, full sounding DNB bass, and use a low-pass filter to tame most of the frequencies except the sub.
Both are great approaches, but I prefer the subtractive approach in most cases.
So although we’ll be using simpler, ‘deeper’ sounds (often using a low pass filter), the notes that you choose for the bass pattern are important.
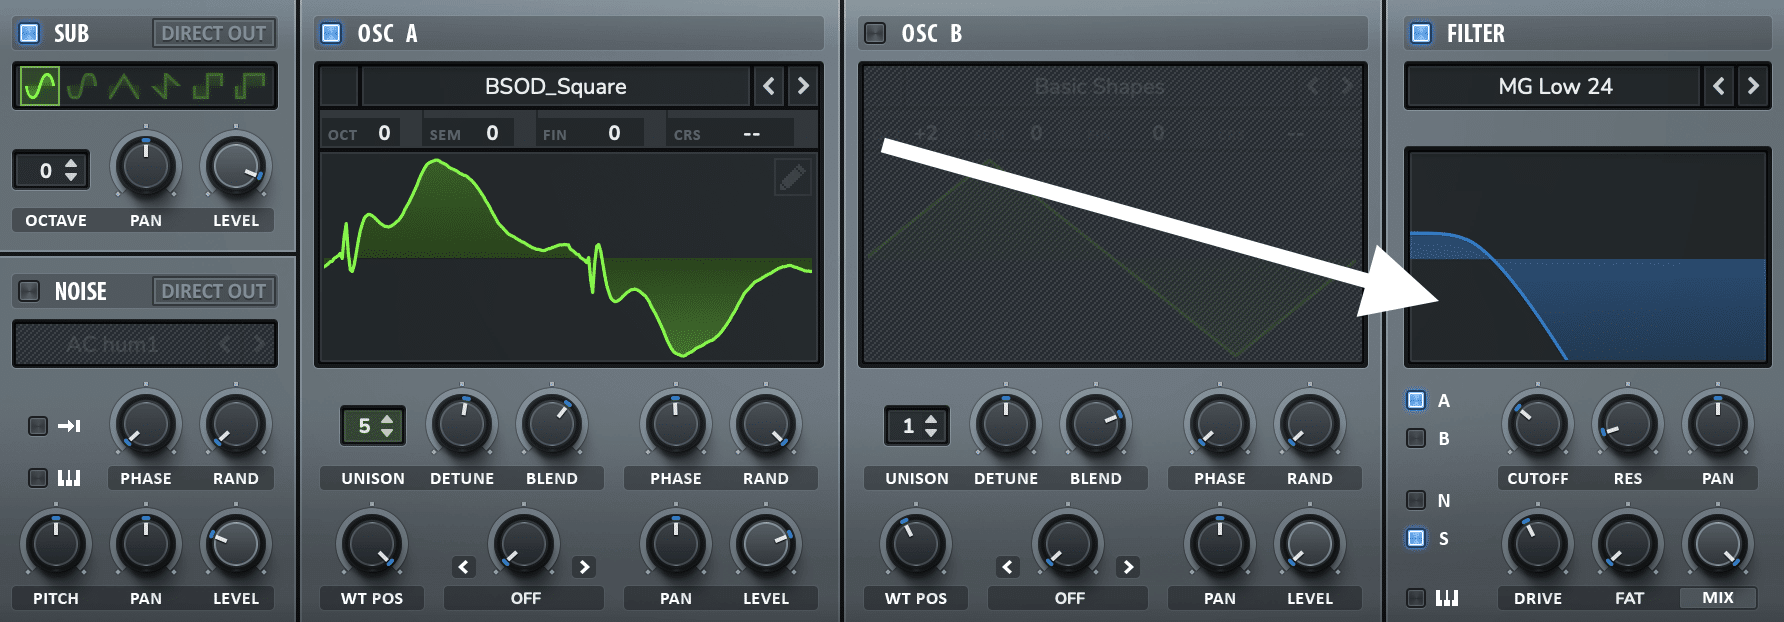
For this track, we’ll be using Xfer Serum, with the ‘BS PWM Sub’ patch loaded up from the Liquid Starter Pack.
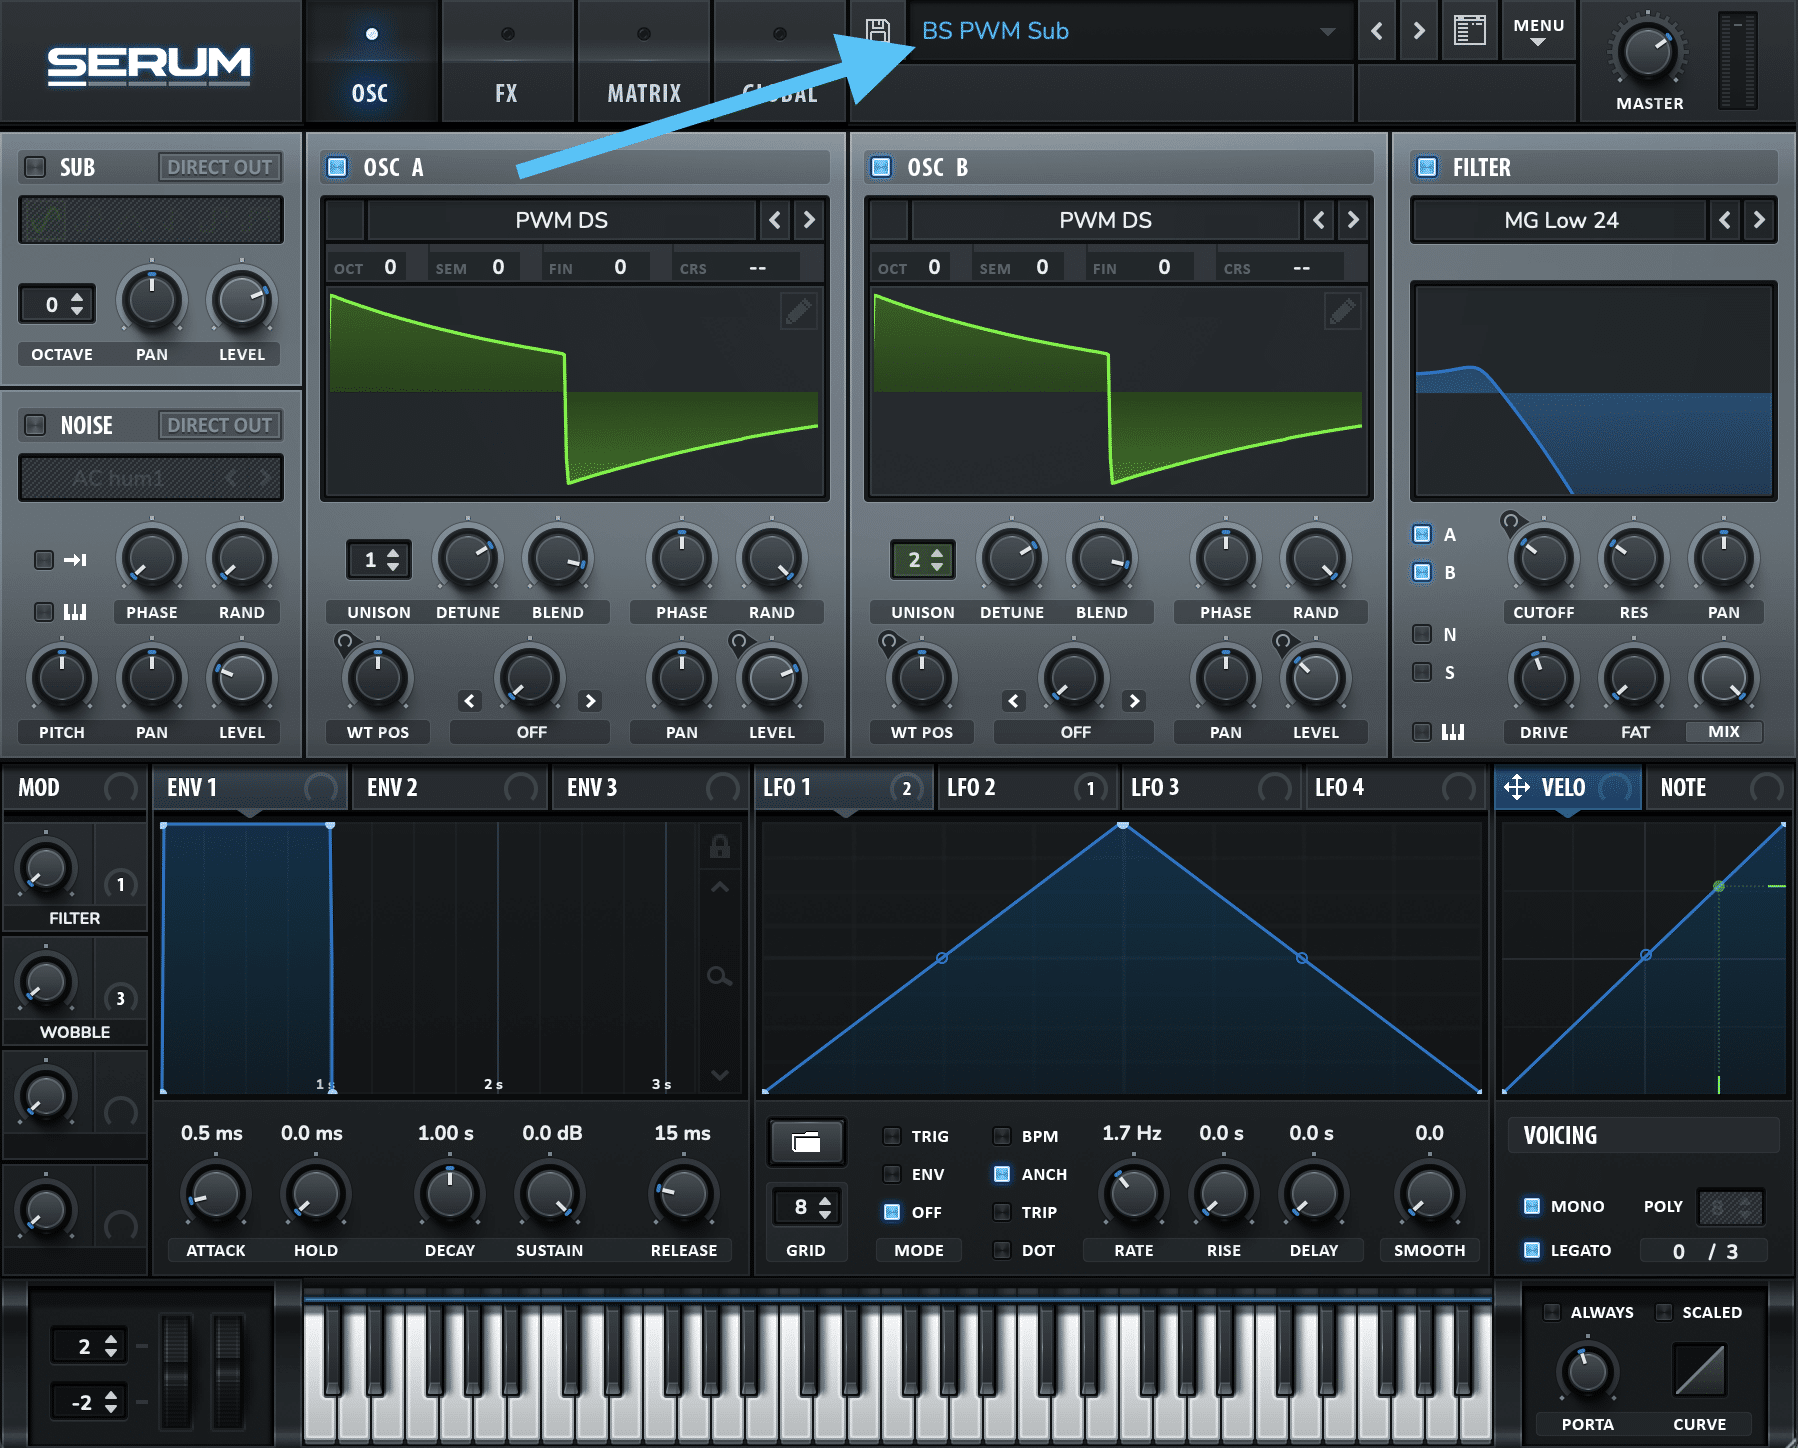
Fun fact – this is practically the exact same bass that I used on my tune Your Heart 👀
This sound has some nice movement via a modulated Square wave, and a low-pass filter to take the aggression out of it. We’ll be using some of the macros too, but more on that later.
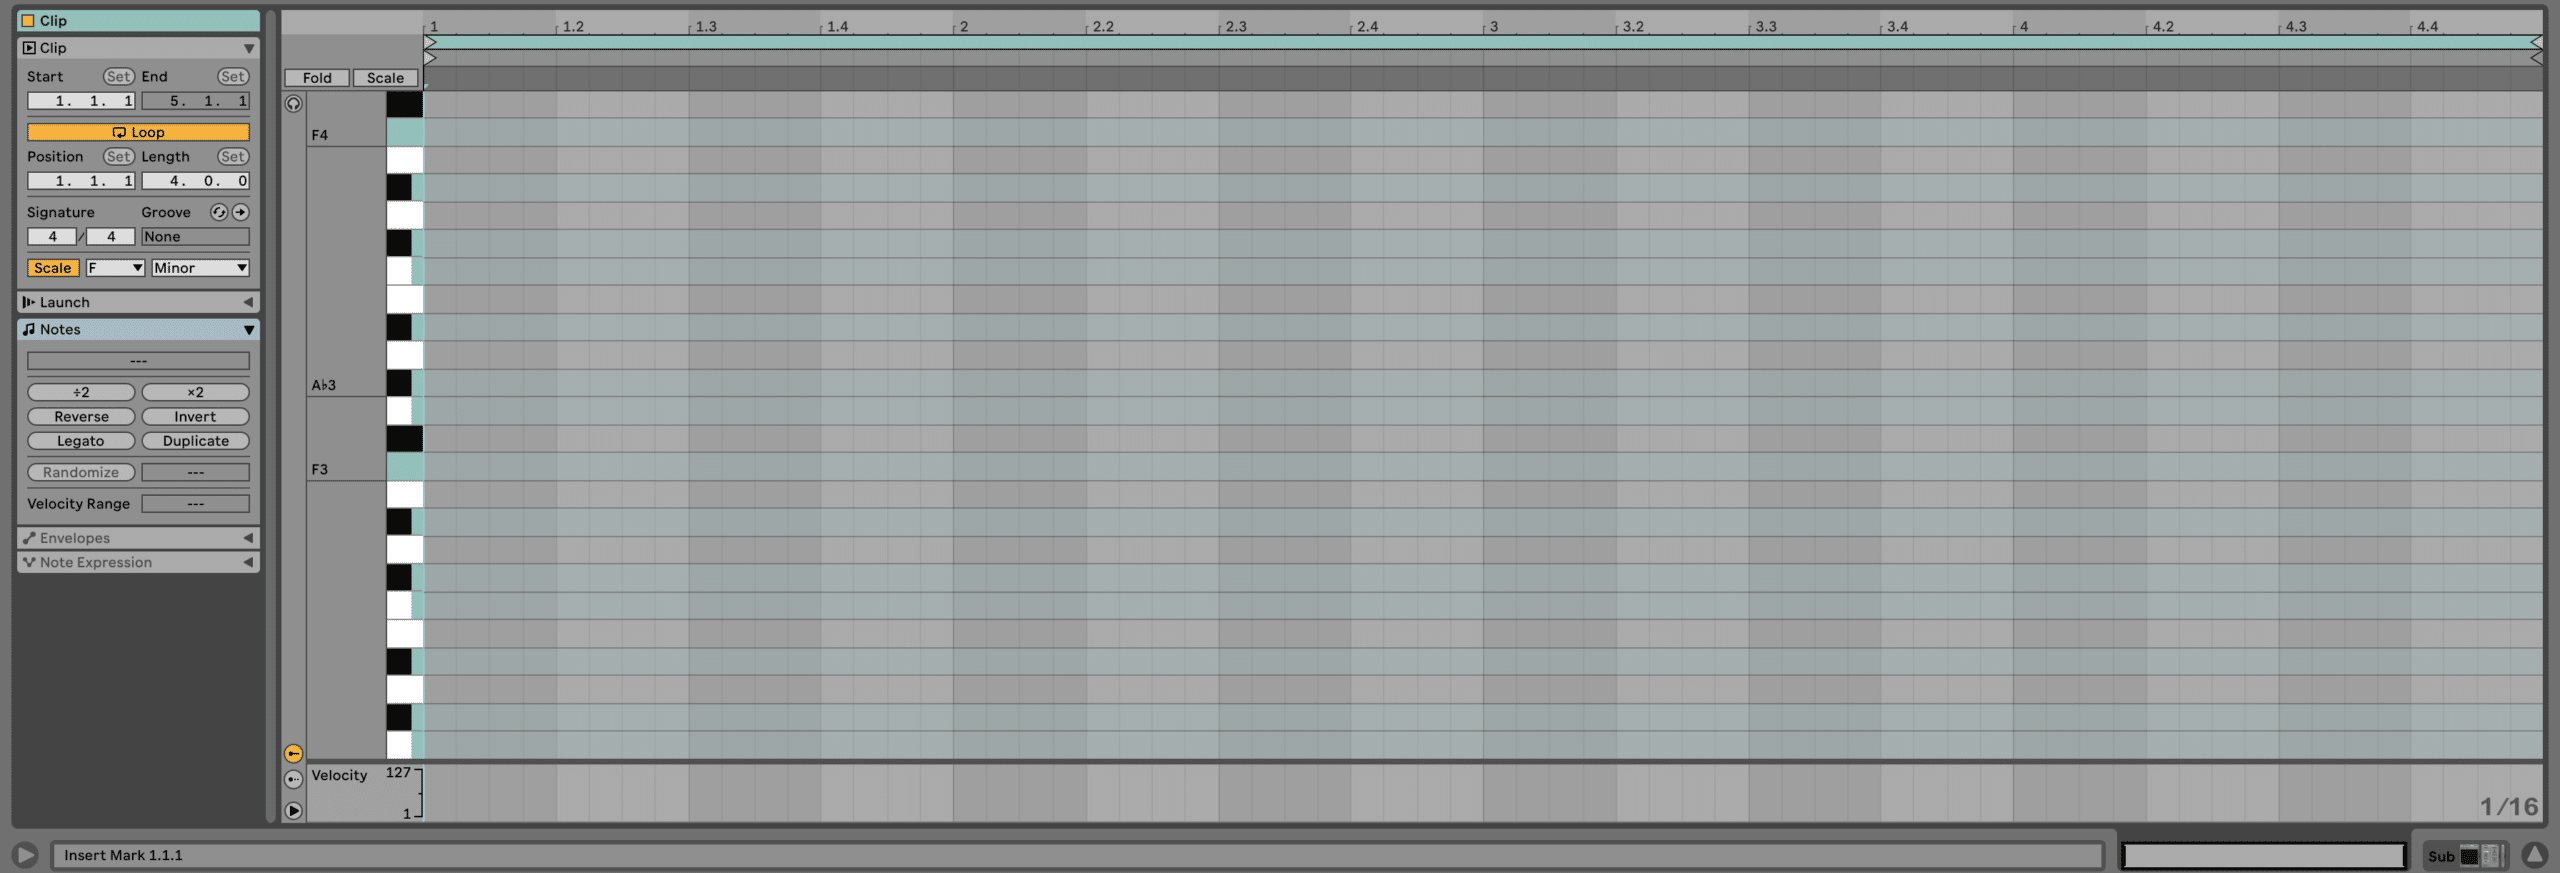
Let’s create a new MIDI clip and start writing some notes.
Writing a Liquid drum and bass bassline
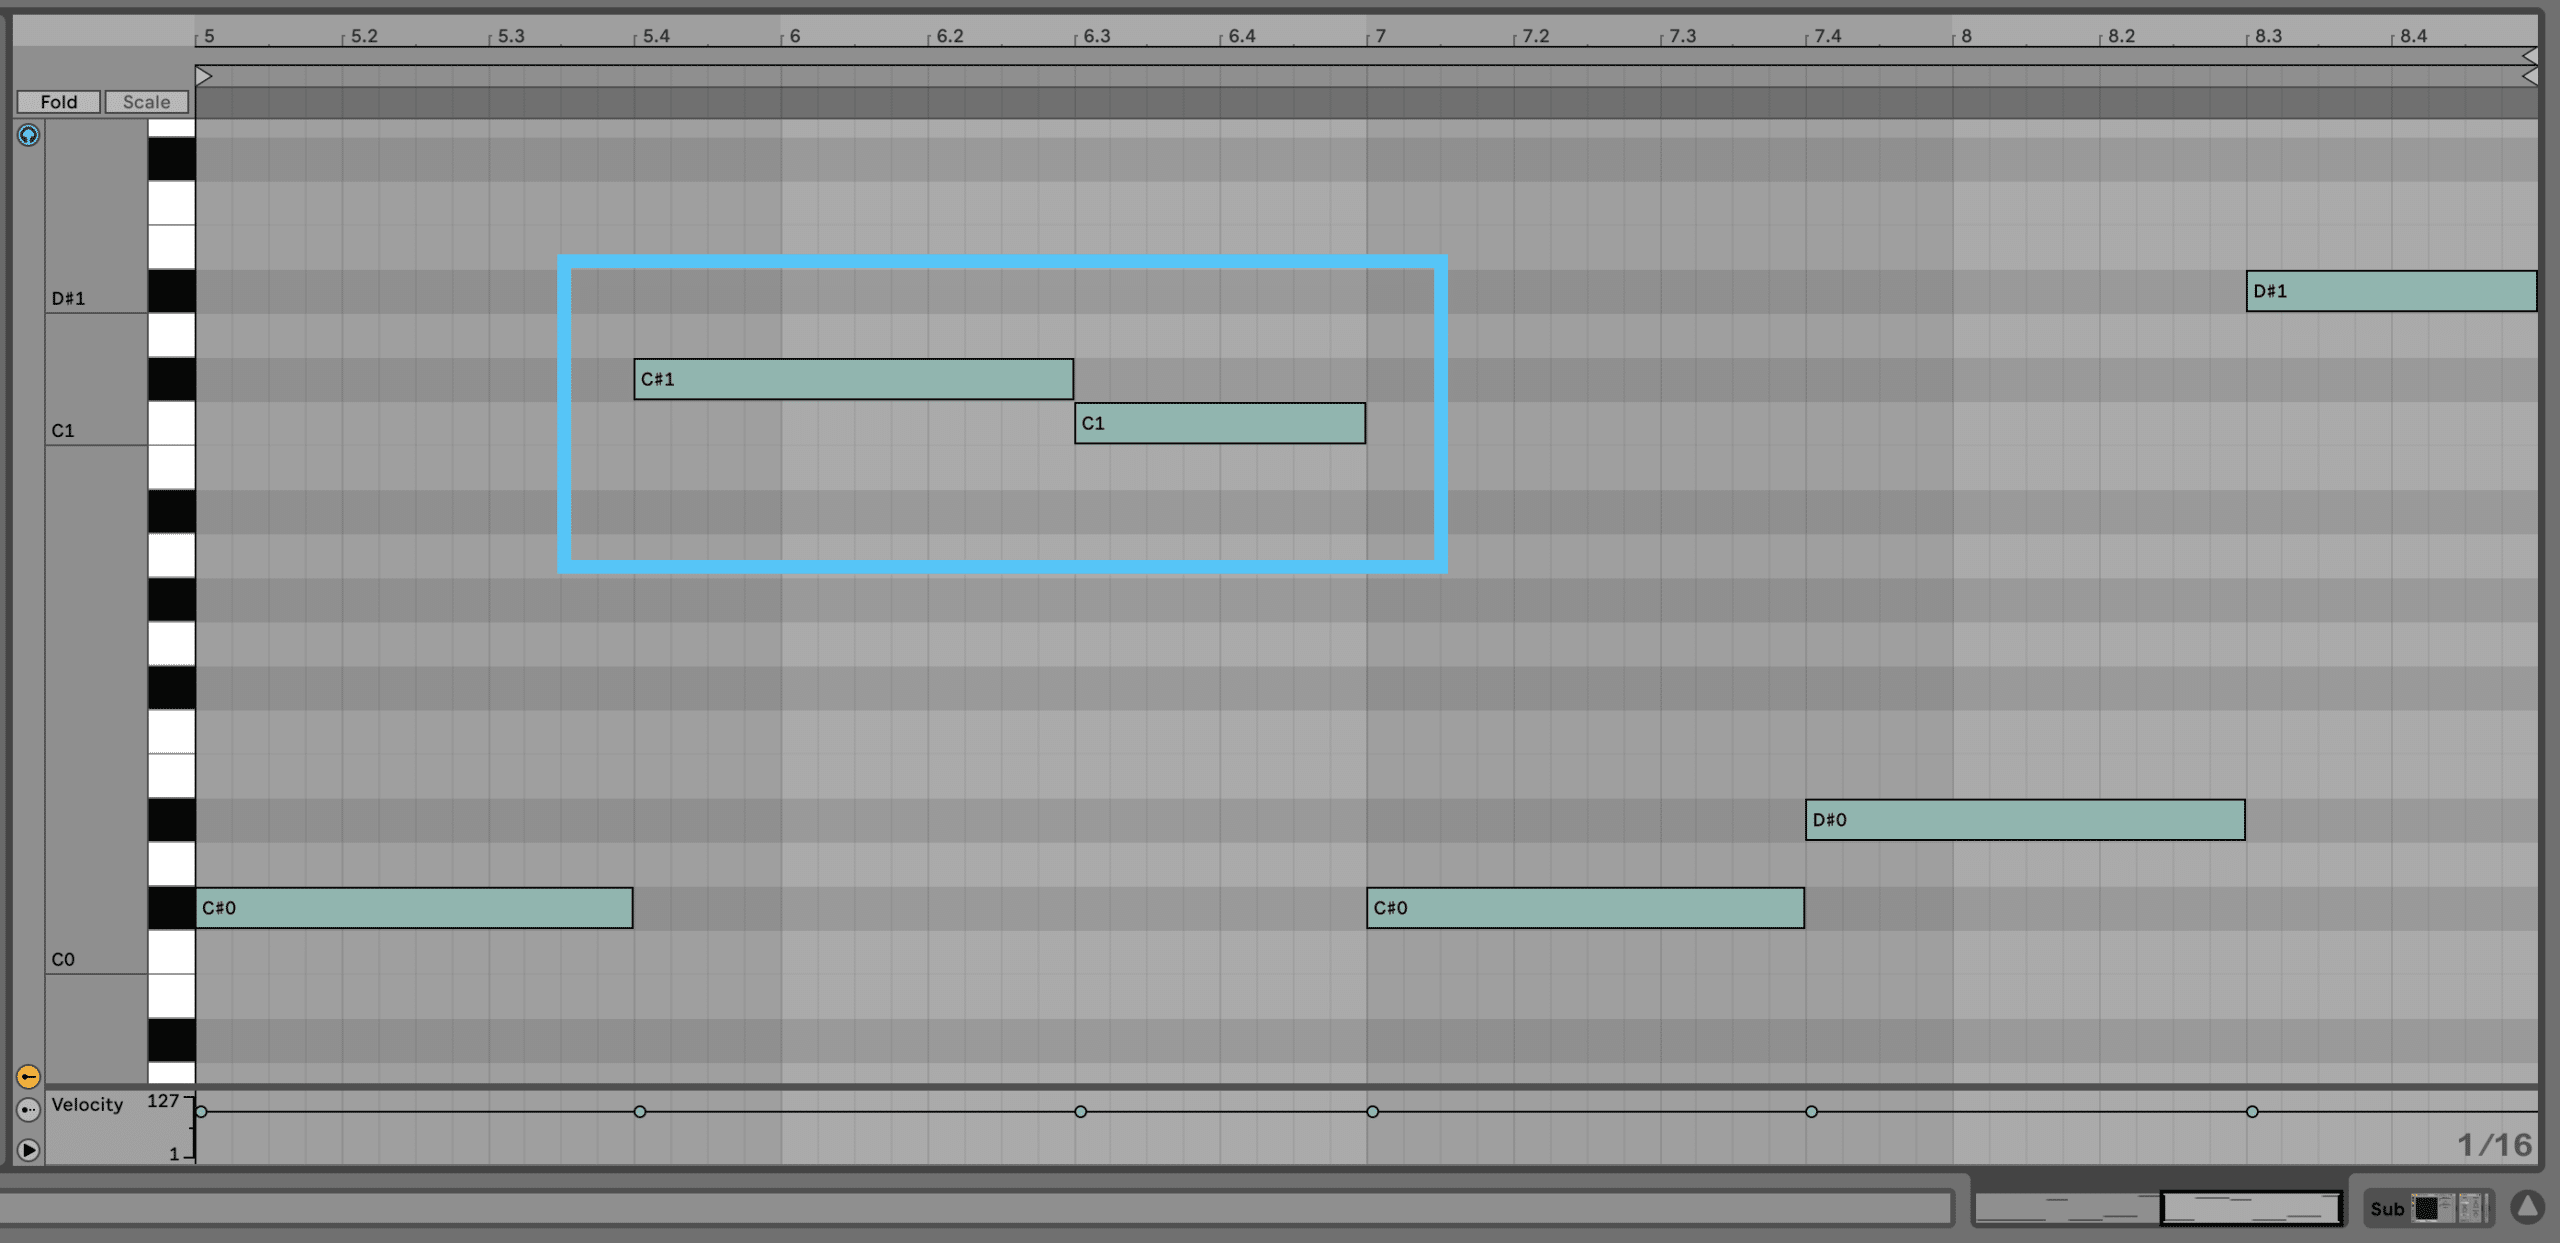
Since we decided that this track is in F Minor, let’s write using that scale. Depending on your DAW, you can enable scale highlighting to help you discern which notes are in that key:
Now let’s write a pattern! I’ve decided to write one with the notes below.
It was a nice combination of interesting note jumps and more subtle note movements (but feel free to write your own one here):
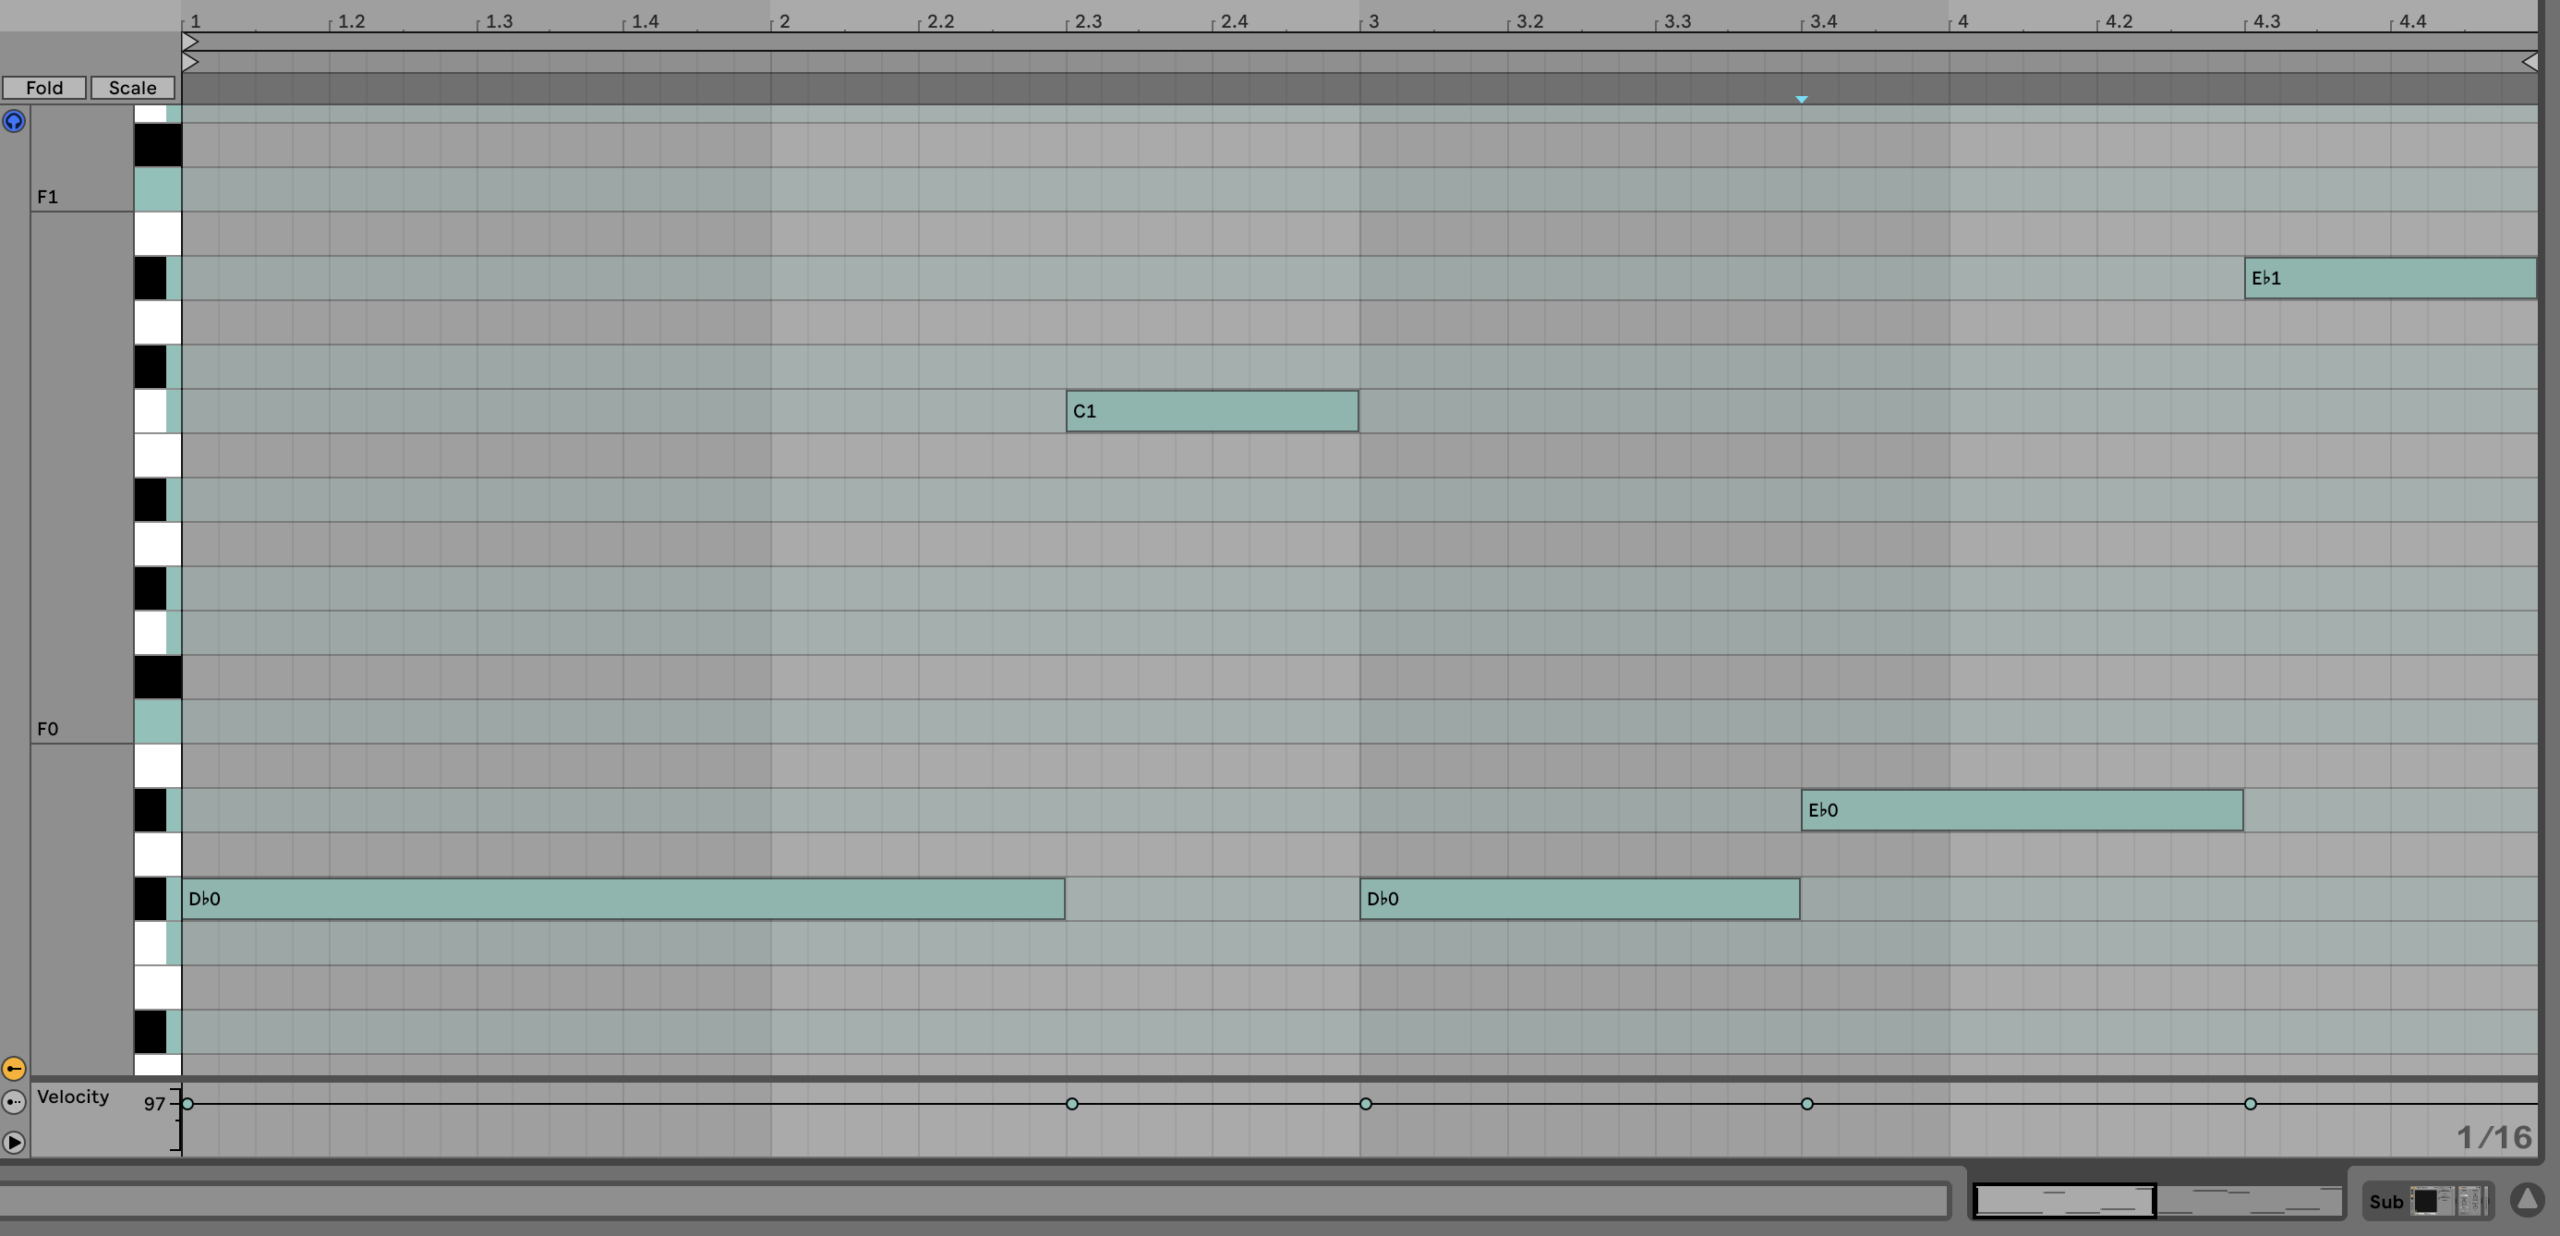
The note jumps help the bassline stay interesting and add a bit of movement to the track.
But looping these 4 bars alone means the track is going to get boring. So let’s expand our whole track to 16 bars by duplicating the 4-bar loop 3 times:
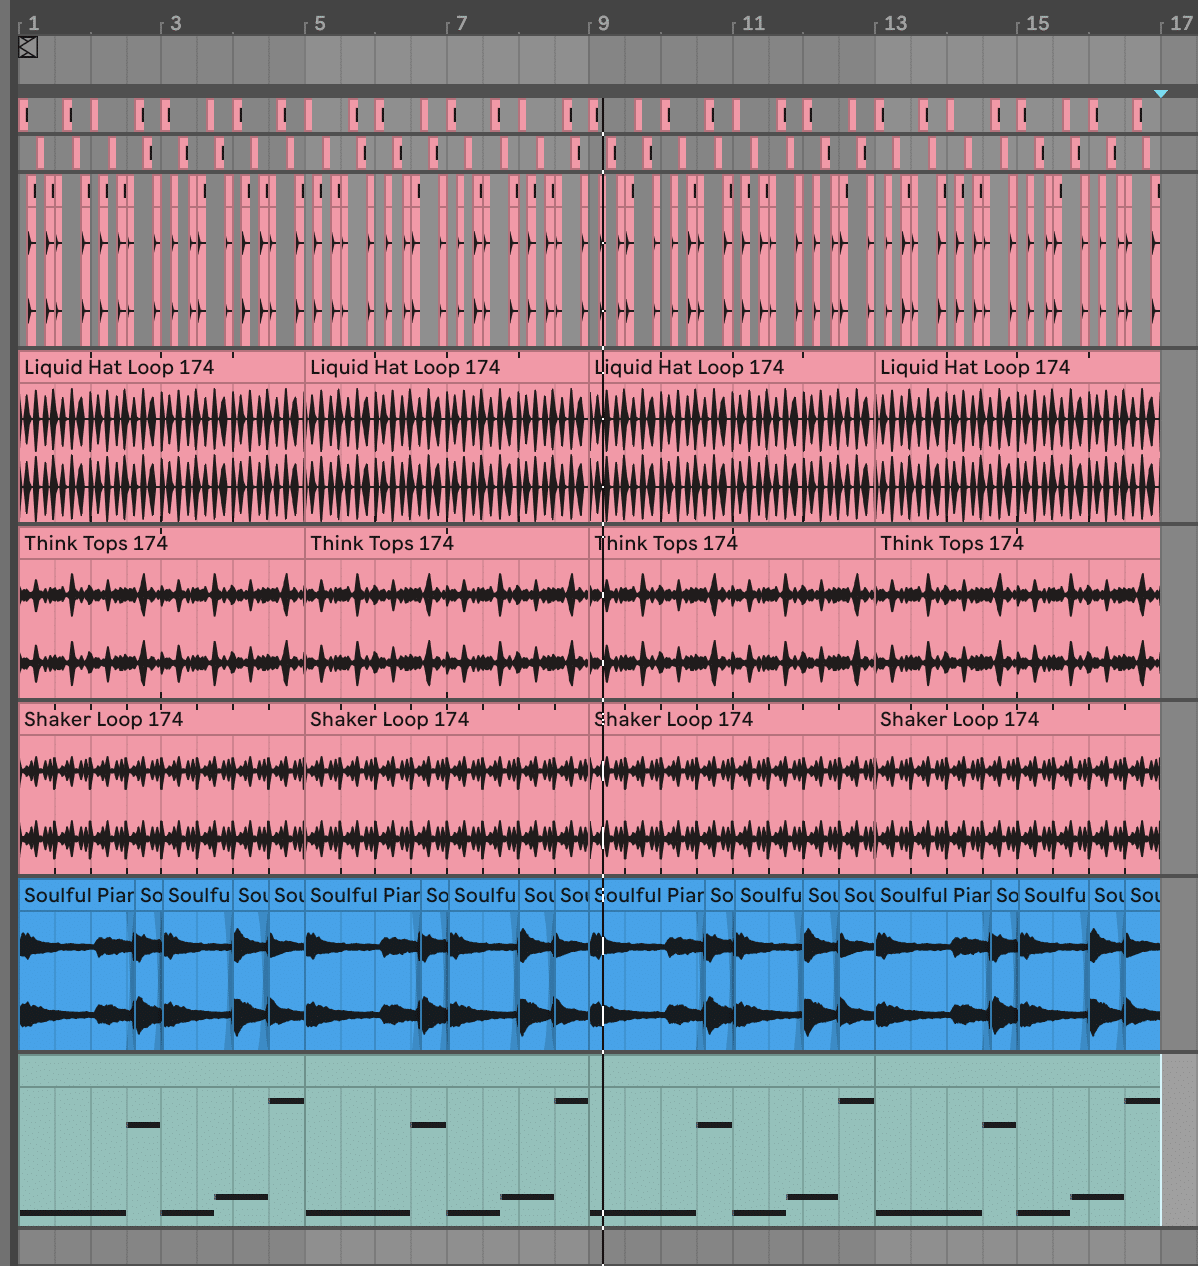
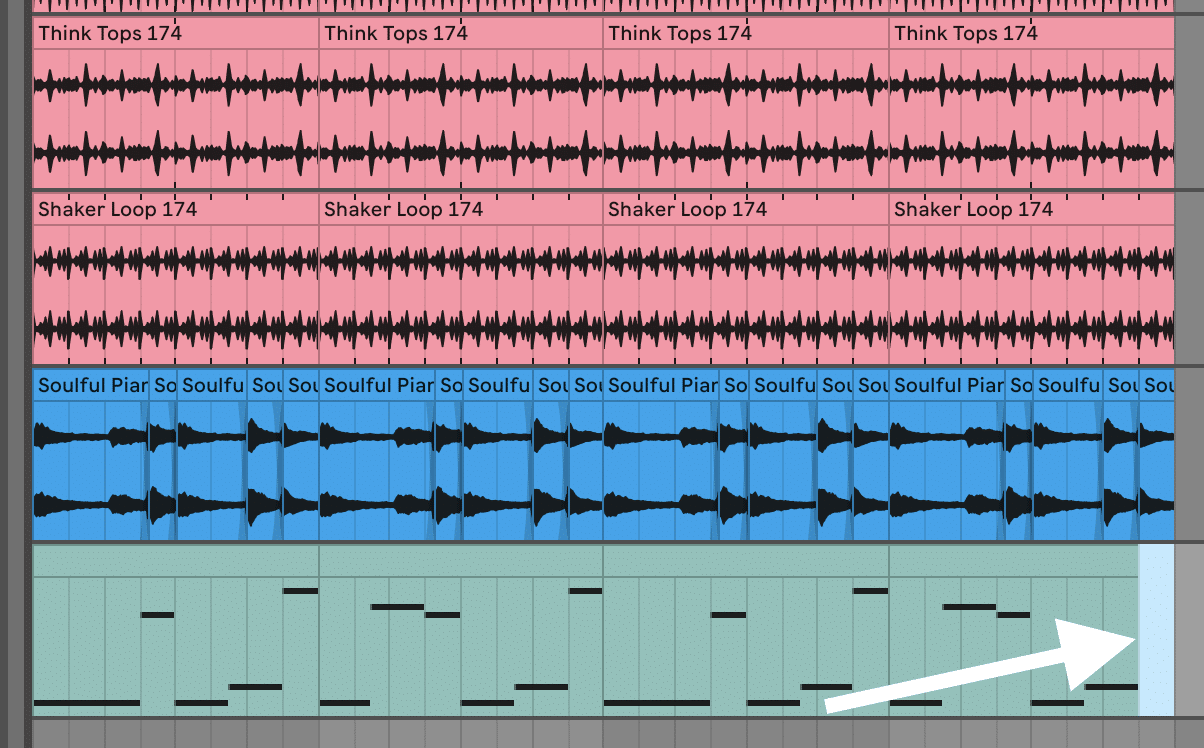
And now we can add some variation to the bassline. Let’s change up every second 4-bar pattern so that there’s an extra bass run:
That’s a little better. But let’s top it all off by muting the bassline for 2 beats at the end of our 16 bar phrase. This will let our low-end breathe a little more:
Lastly, simply blend the volume to taste. I’ve turned mine down around -4dB on the fader.
Now this is sounding like a proper Liquid Drum and Bass tune! But we can do a bit more to turn this from a static loop into something fuller and richer…
Phase #5: Fleshing Out The Loop 🔁
This is probably one of the most important parts of the Liquid DNB production process.
When you’re creating your main loop, it’s far easier to create a great-sounding 16-bar loop and work from that, rather than have to go back and tweak things once you’ve already started arranging.
So we can take our main elements, improve them further, and add some ear candy to spice things up. Let’s start by adding more variations to our drums.
Drum Variations
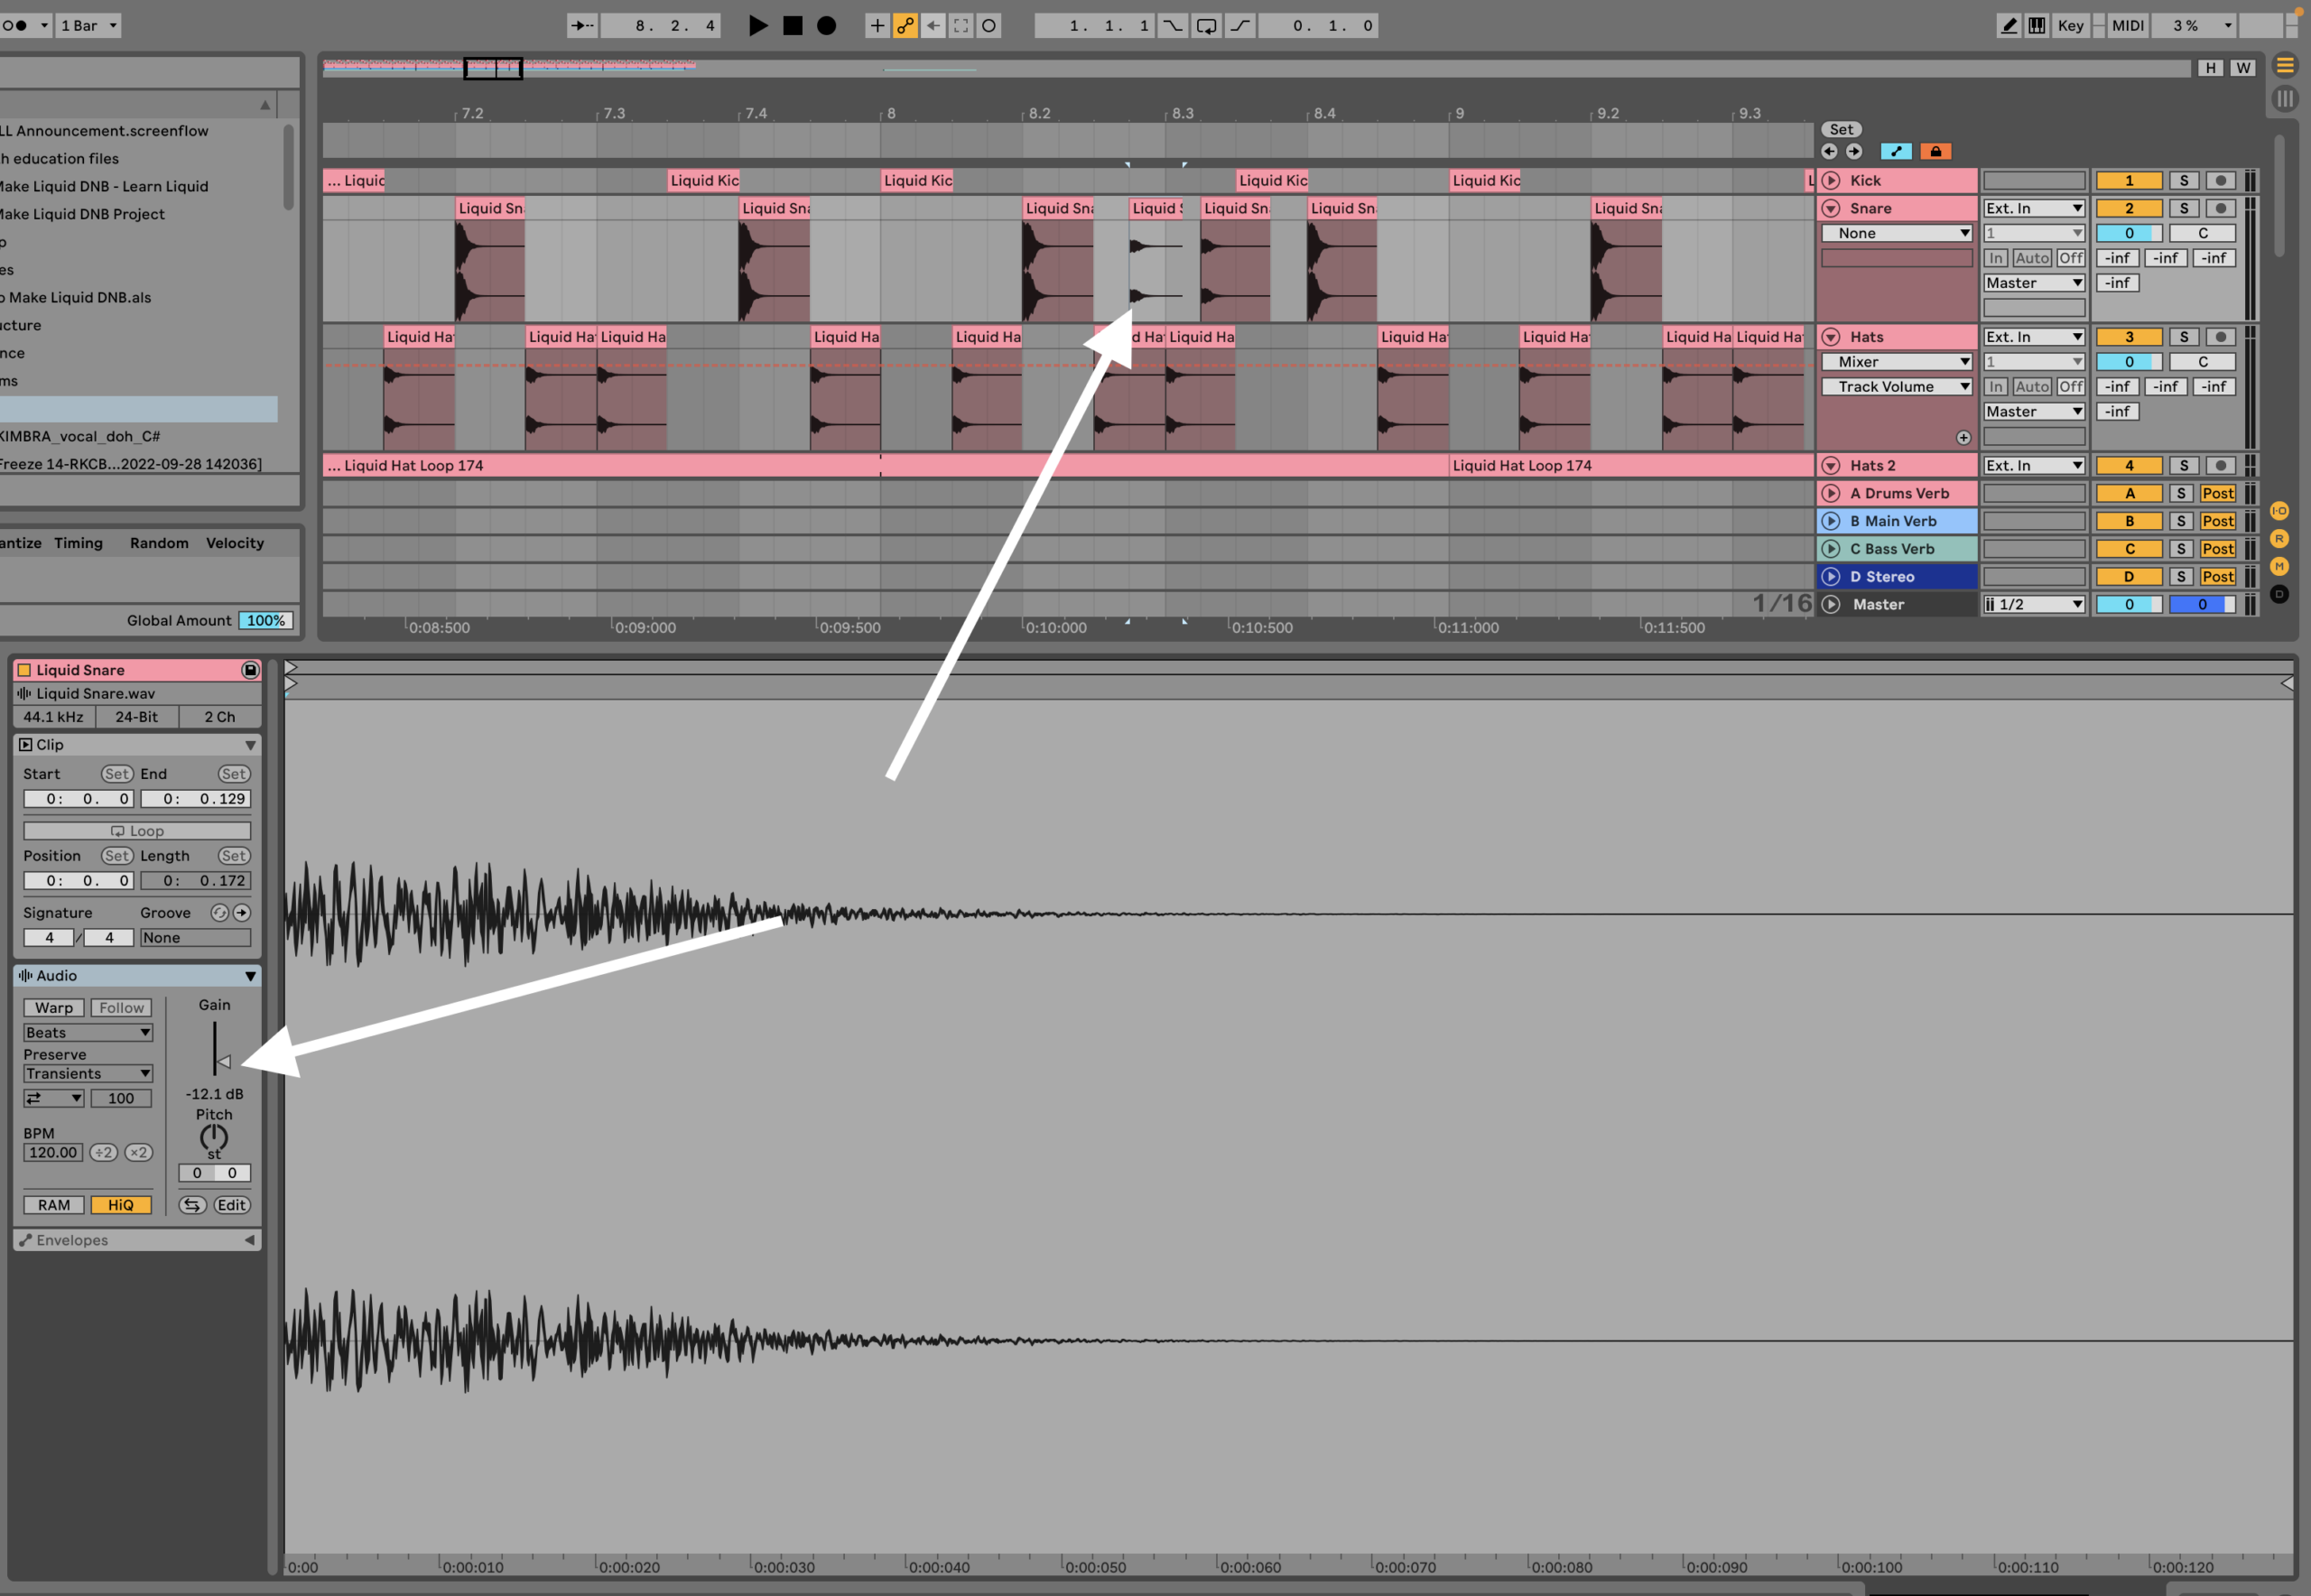
By adding what we call ‘ghost hits’, we can add rhythmic flourishes to our kick and snare. This gives the beat more of an organic, driving feel.
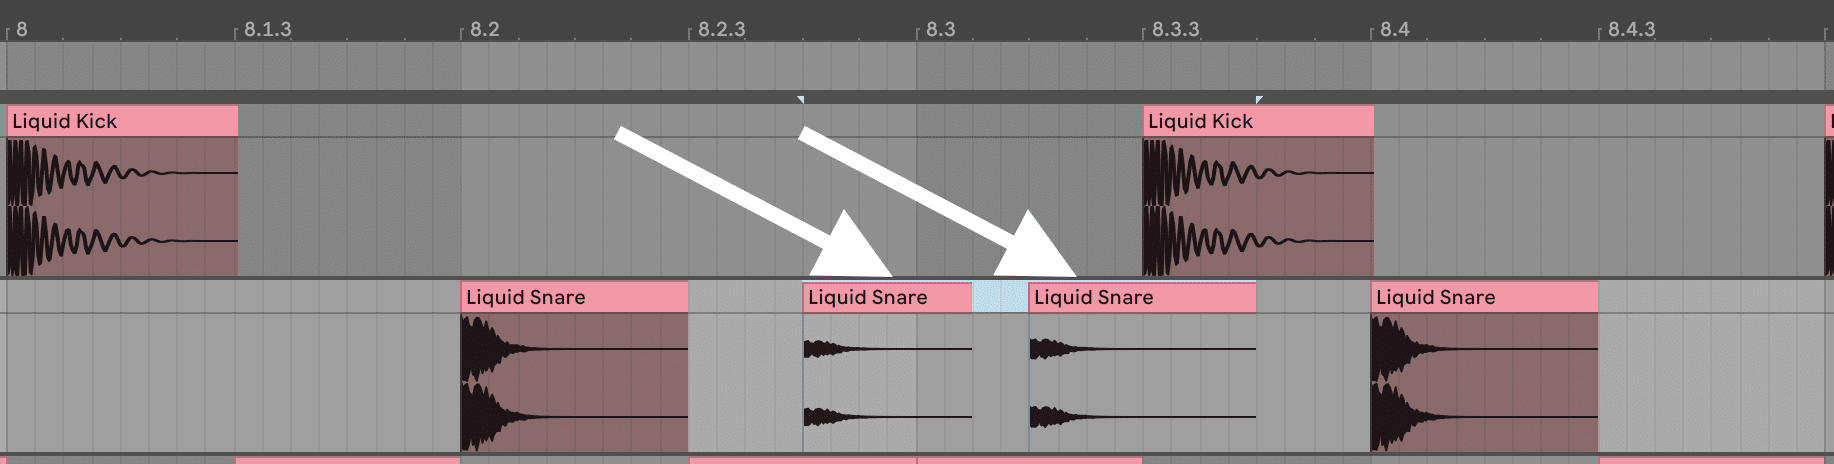
To create a ghost hit, simply take the original sample and turn it down by 6-12 dB (or if you’re using MIDI, adjust the velocity). This will push it into the background so that the main hit still has more punch. I’ve done so on my snare here:
Once you’ve created it, simply move it wherever makes sense. Normally, I like to add a ‘shuffle’ with my snare on the 2.4 and 3.2 beats of a given bar. I’ve done so in bar 8 here, which builds tension into the second half of our loop:
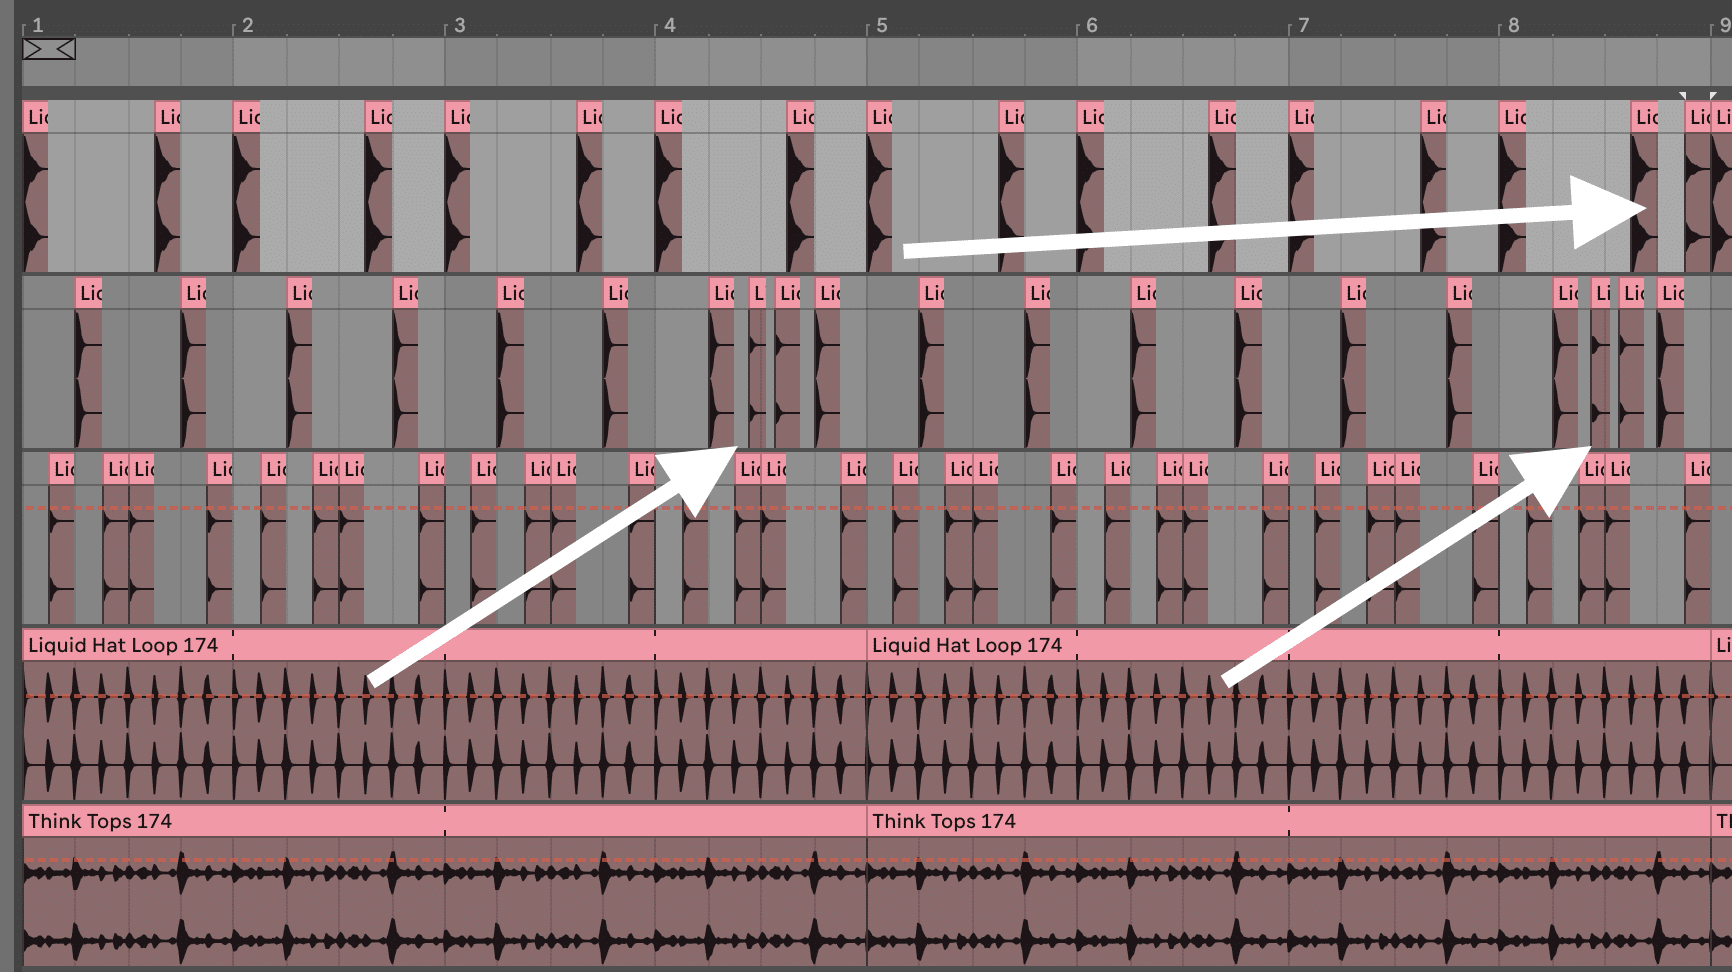
Sounding mint. Now I’m going to copy the ghost hits to every 4th bar, and then place a ghost kick at the end of every 8th bar leading into the next bar:
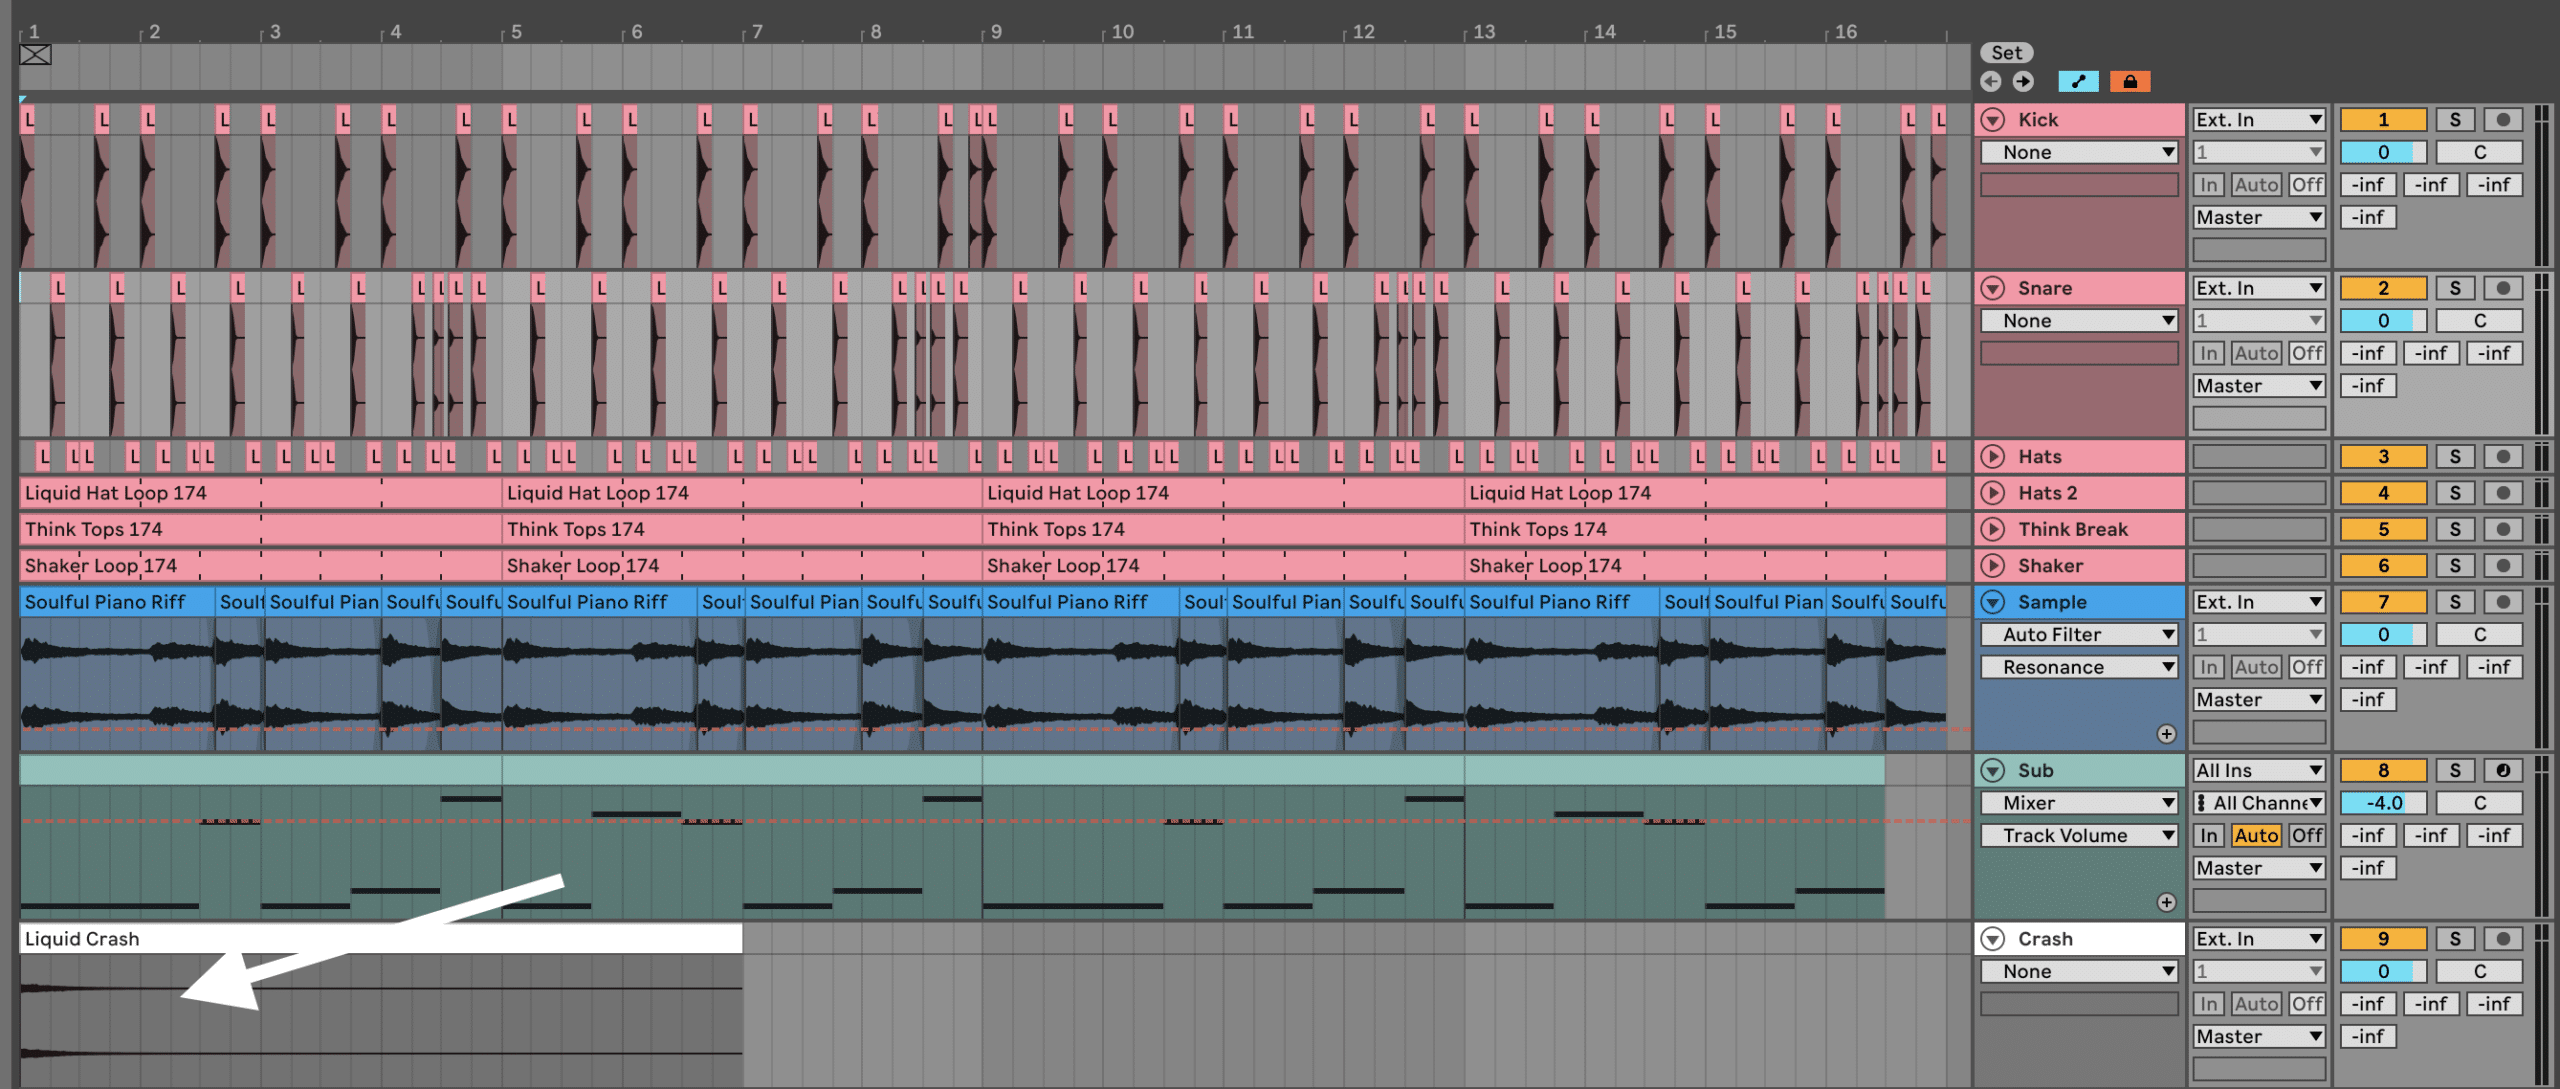
Let’s top this all off with a crash on the first beat of our loop. Since this will be the first section of our drop, it makes sense to add impact to the beginning.
Simply load the ‘Liquid Crash.wav’ sample from the pack and drag it onto the 1:
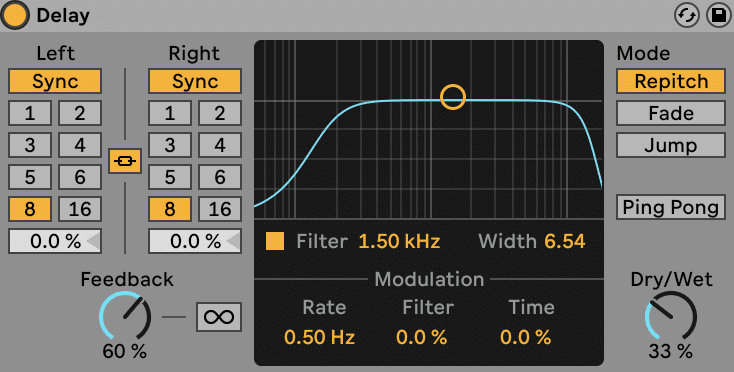
This sample has a little bit of reverb and delay baked in, but I’d like to give it more of a rhythmic echo.
So bring on your stock delay plugin and add a 2-beat delay effect. This will echo the crash out over time, ‘melting’ it back into the mix.
Vocal Sample
Many Liquid Drum & Bass tracks feature vocals – whether sampled or featured. This helps to create more of a solid hook that makes the track memorable since humans can instantly recognize the sound of a voice.
In this track, I’m going to bring in a vocal sample from Splice. I’d encourage you to find your own vocal sample, perhaps from one of the packs listed here!
(Or if you’re a talented singer, you know what to do 😉)
I’ve picked one from a multi-genre Splice Sound pack called Meron Ryan Vocal Sample Pack called ‘MERON_RYAN_vocal_hook_cant_help_myself_dry_110_Dmaj.wav’.
Although I could spend a whole article talking about how to process vocals, let me cover off what I did to make this sample my own:
- Pitched it down -6st with Ableton Live’s Complex warping mode on
- Chopped the last note out and changed it to -2st – creates a new melody
- Added chorus using the TAL-CHORUS-LX plugin
- Cut out the lows and boosted the highs with an EQ
- Gently limited the vocal to make it more consistent
- Added a delay throw on the last note to create a cool effect
- Created a reverb send and sent the vocal to it (so I can send other instruments to it as well)
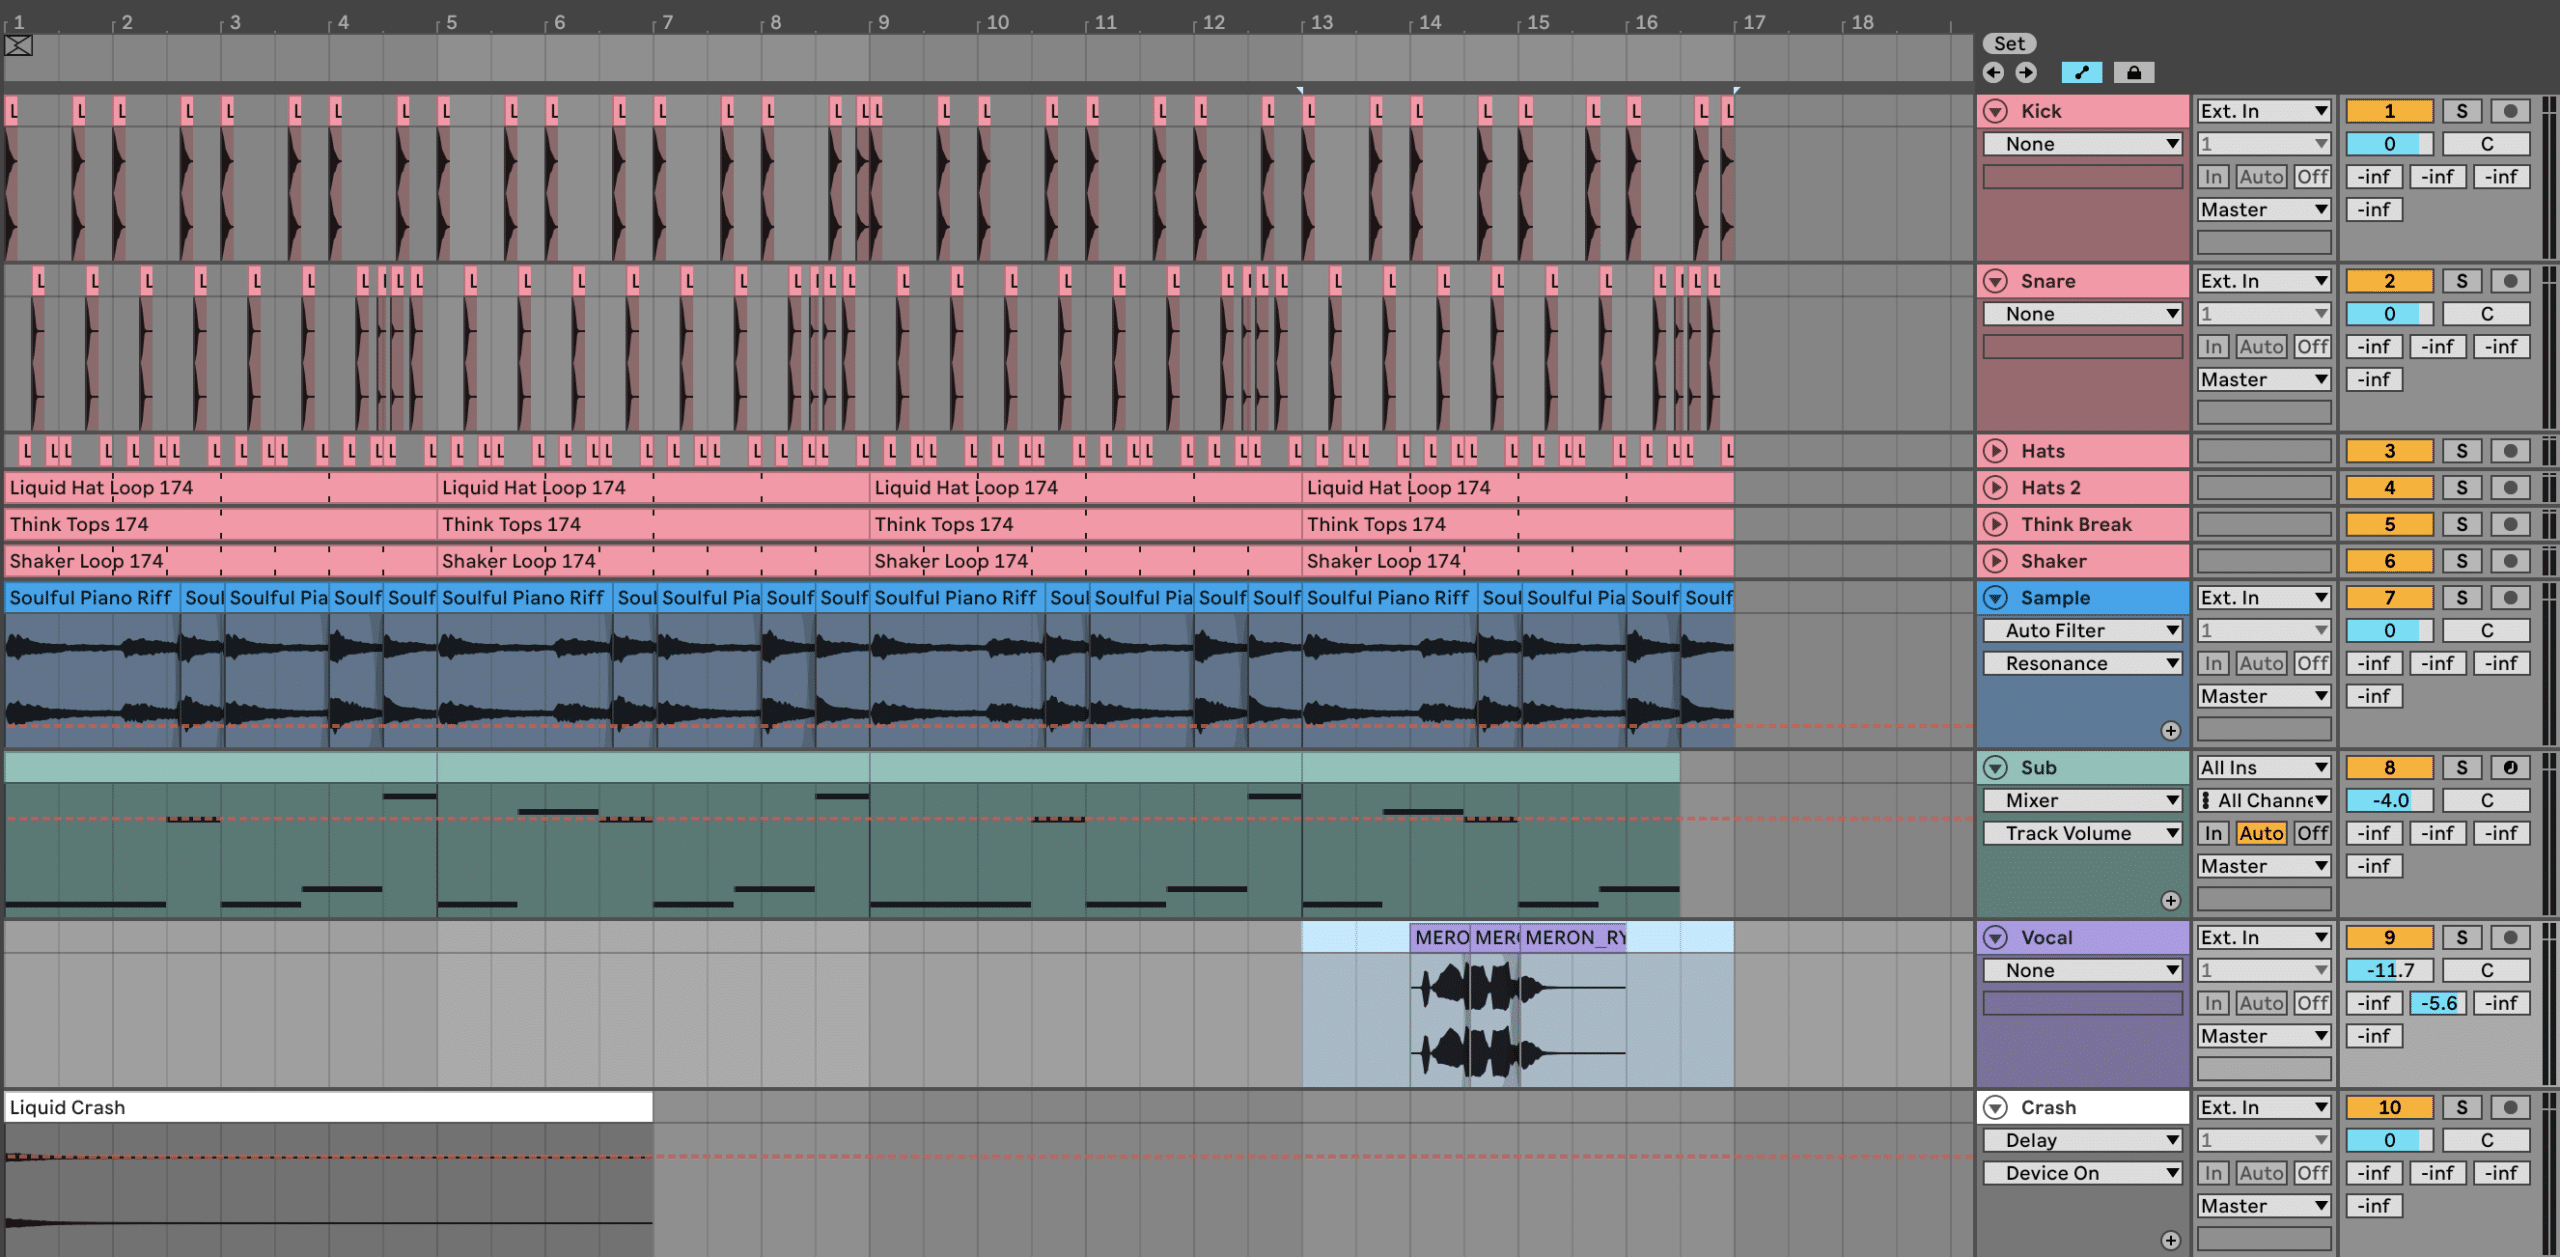
- Placed the sample on bar 14
(Feel free to copy any of these techniques).
Here’s where I got to!
Liquid Drum and Bass at its best 😍
Musical Ambience
To add some background texture to our arrangement, we’ll want to add some sort of pad or ambient sound.
In this case, I’m going to use 2 different sounds – a Serum preset and a sample. Let’s start with the sample.
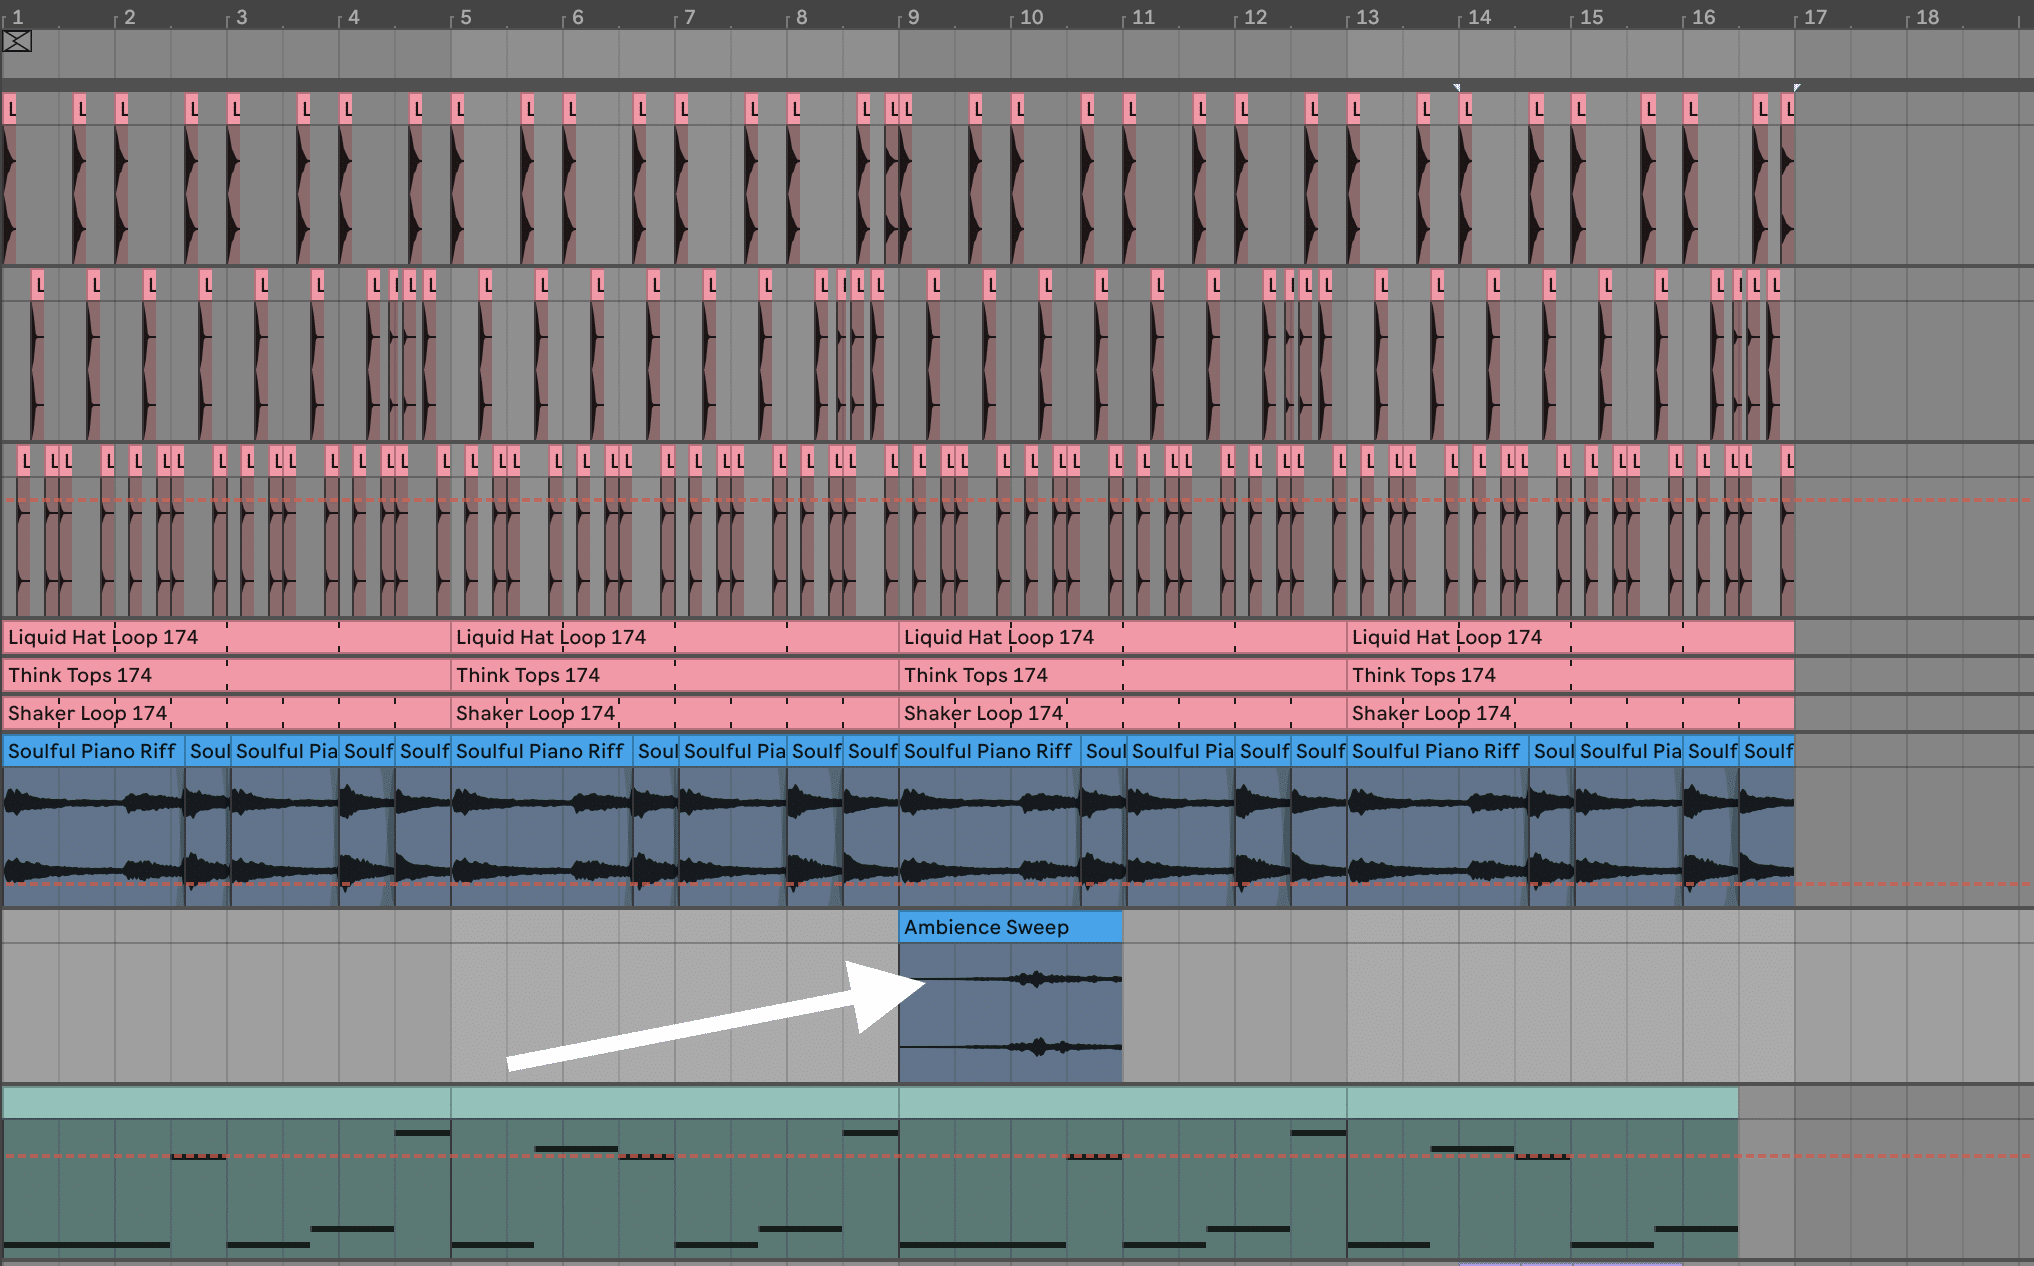
Create a new audio track and drag the ‘Ambience Sweep.wav’ sample on to it.
Place it on bars 9 and 10 so it sweeps into bar 11 like so:
Now simply placing the sample as is could be fine, but I want to drown it out a bit more.
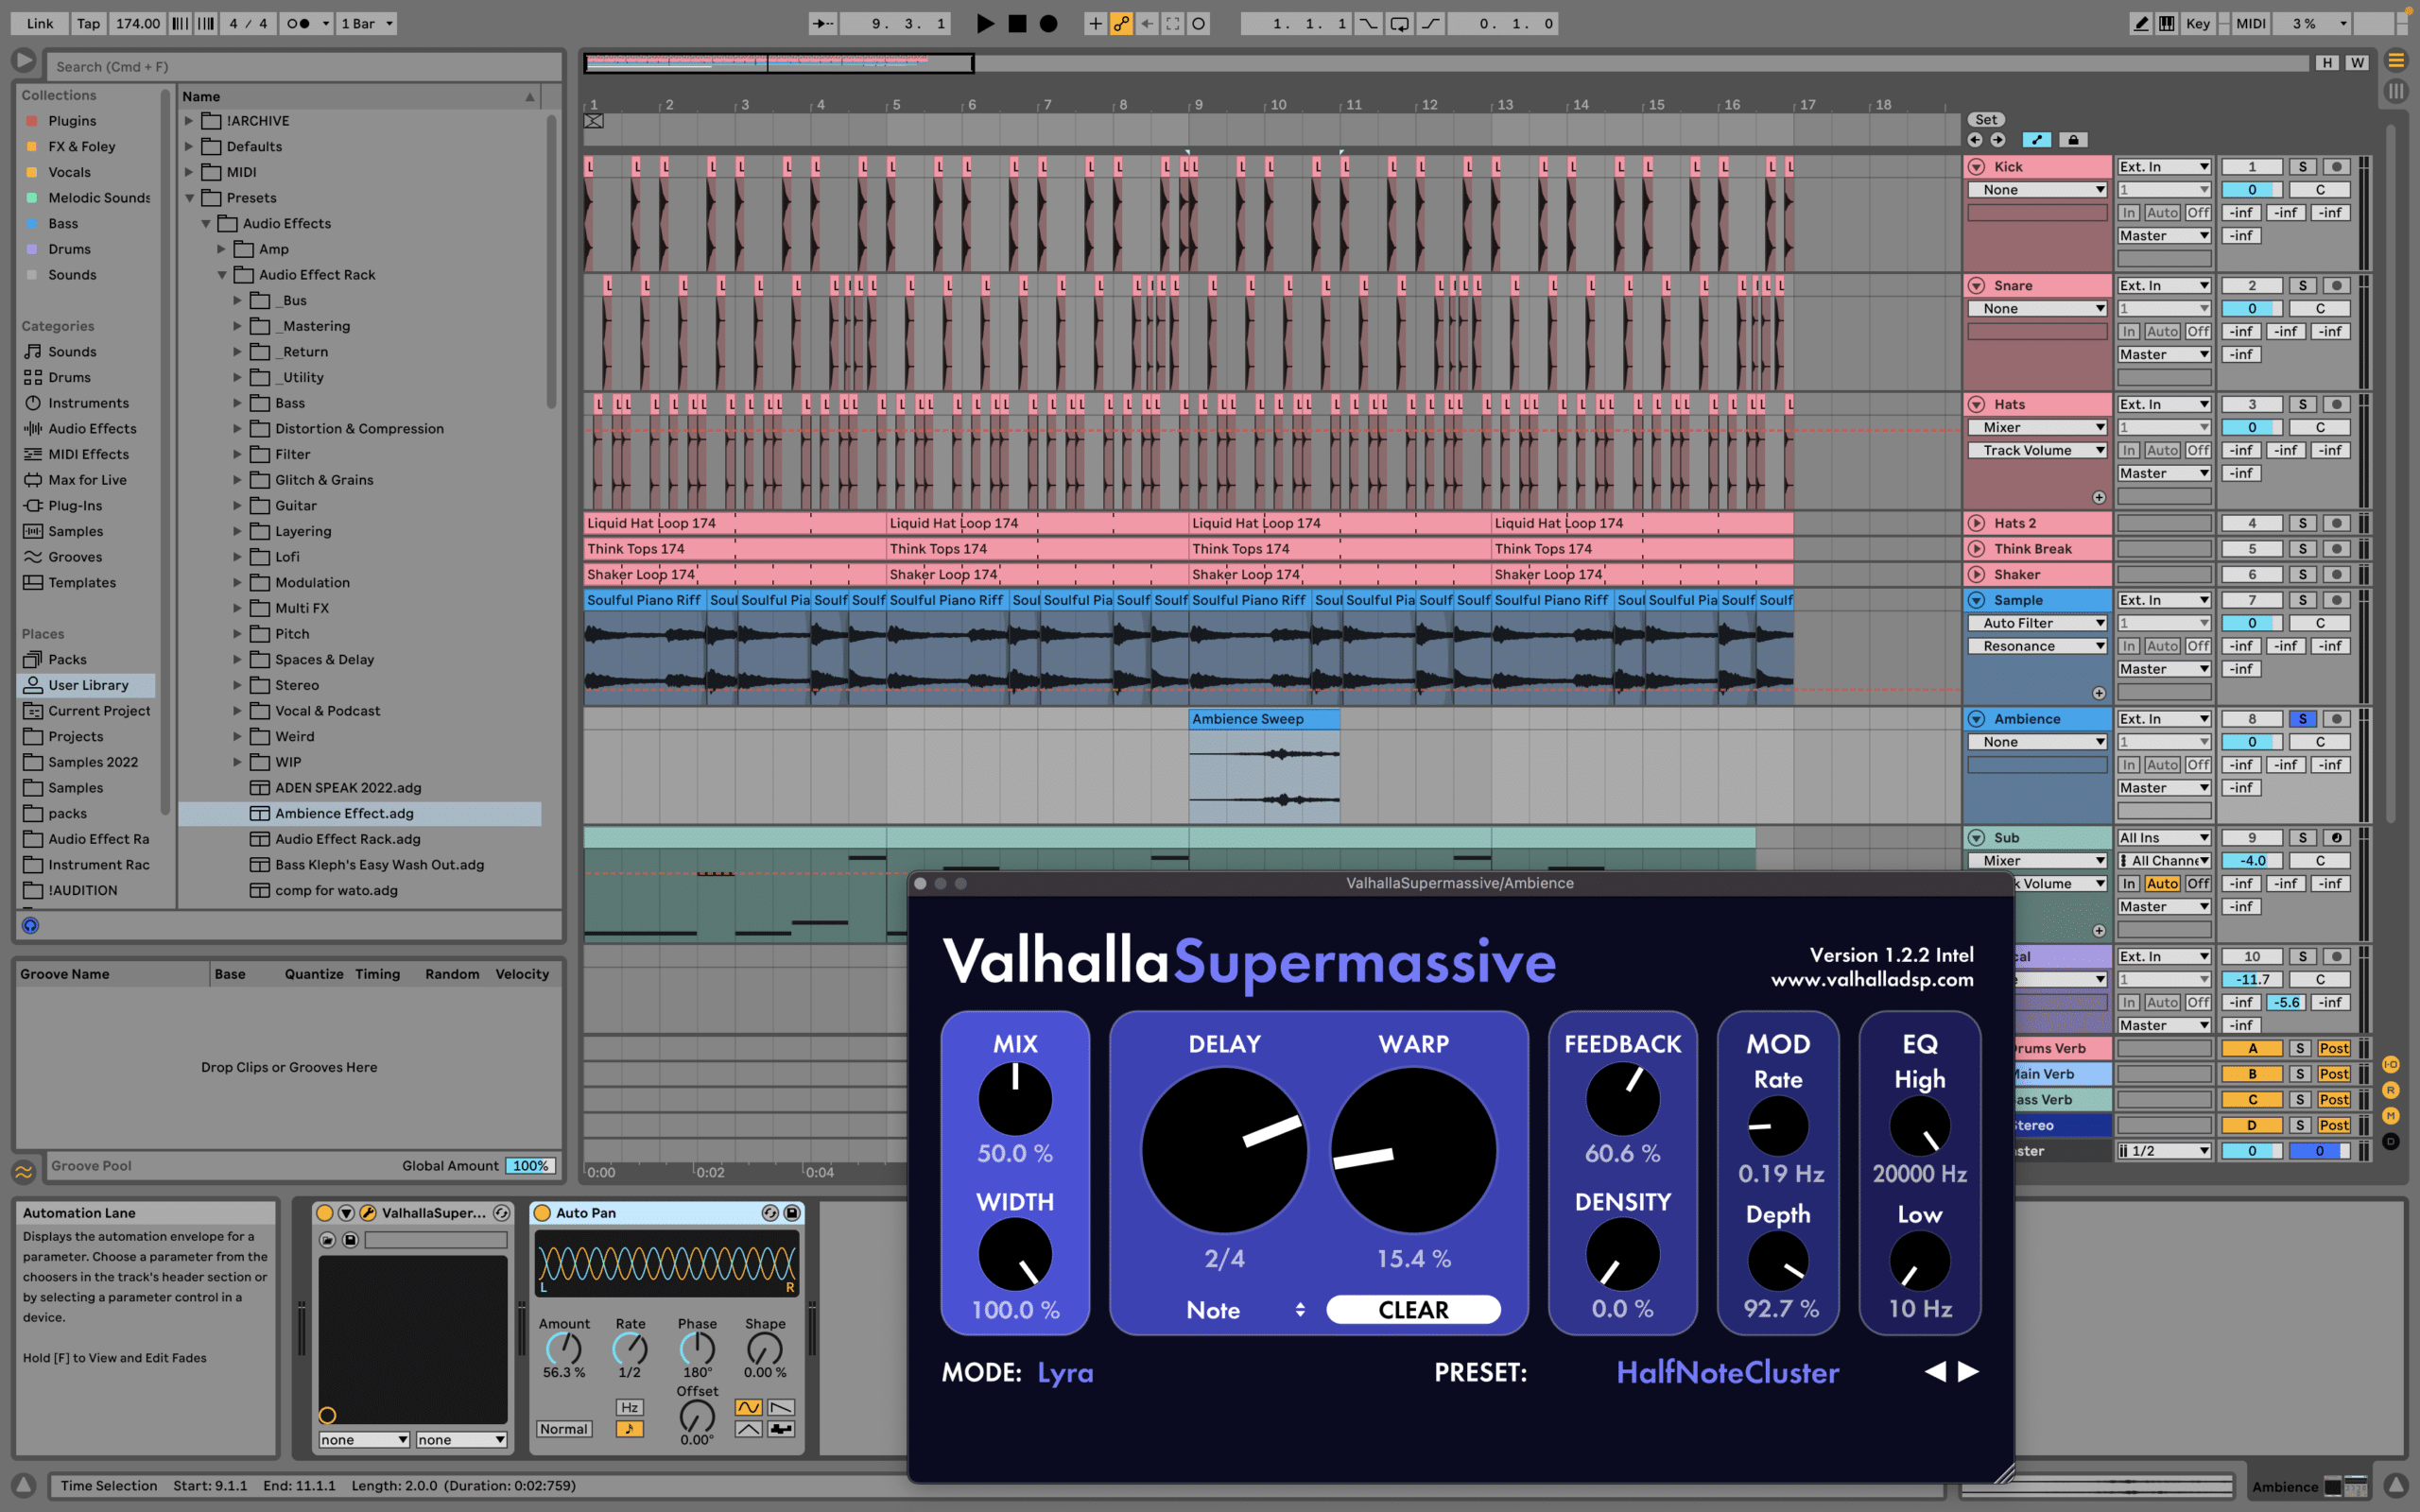
To do this, I’m going to load up the free Valhalla Supermassive plugin, which adds a combination of washed-out reverb and delay.
I simply scrolled through the presets until I found something Iiked – the ‘HalfNoteCluster’ preset:
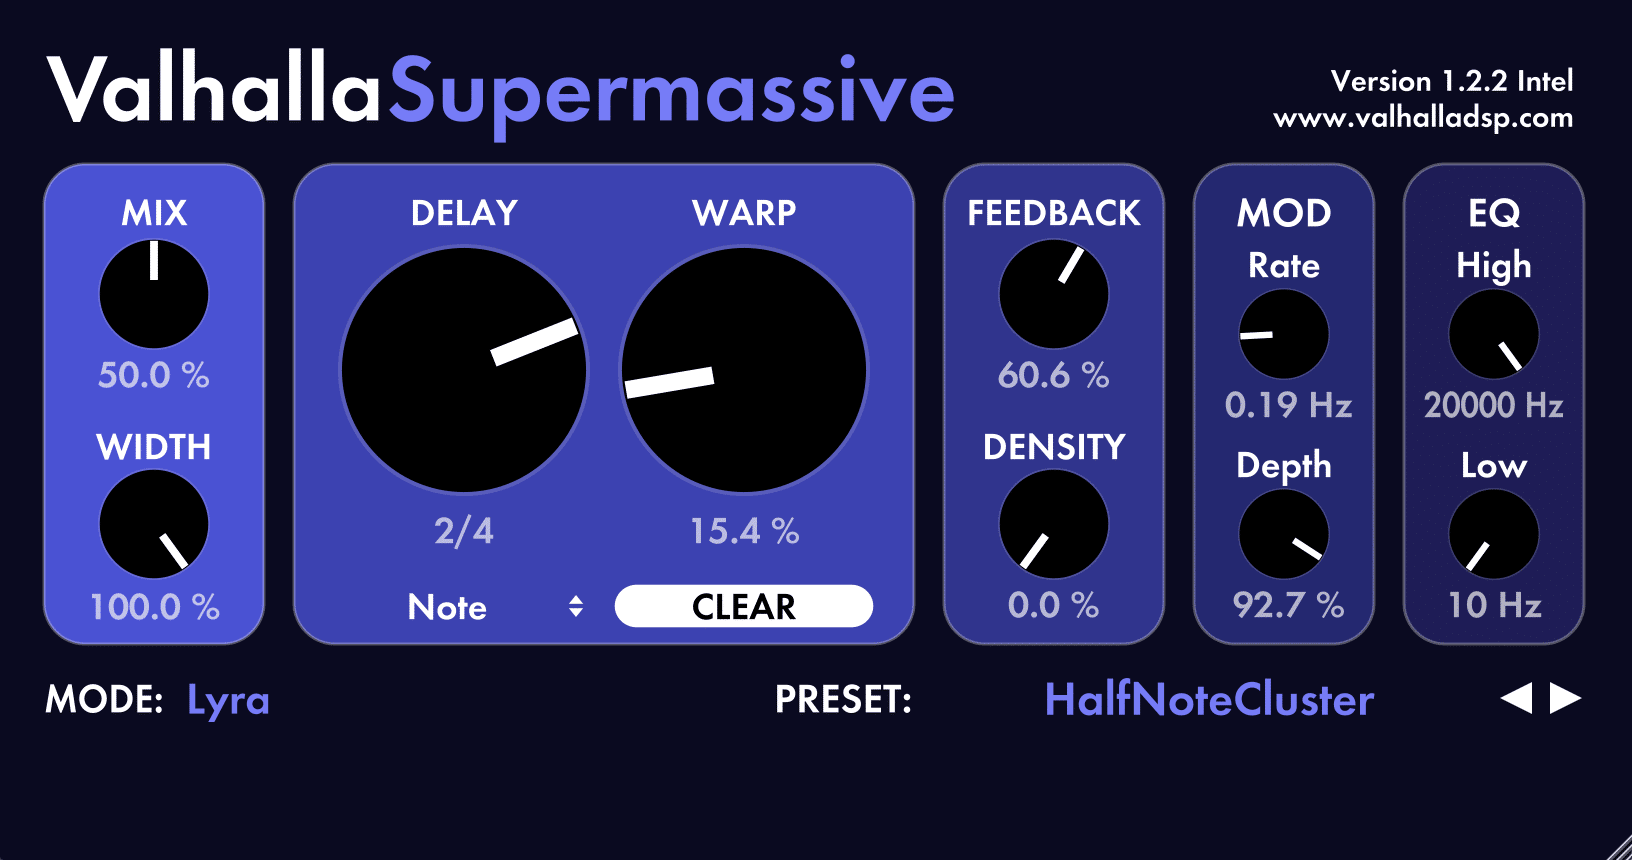
This adds that perfect etheral sound, turning it into a stretched-out pad.
One step further…
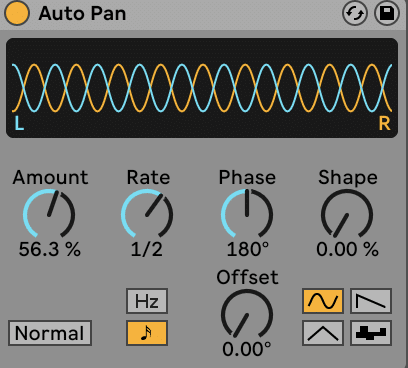
But I want to go further by adding some stereo effects, so I’m also going to add Ableton Live’s Auto Pan device to move it left and right. Feel free to use any panning device or plugin here.
These are the settings I used to get a nice (but not too over-the-top) effect:
Here’s how it sounds in context of the track.
This is nice, but it’s still quite a subtle effect. So let’s add a second synth drone in to fill out the upper frequencies.
Let’s load up the ‘PD Thin Drone’ preset into a new instance of Serum:
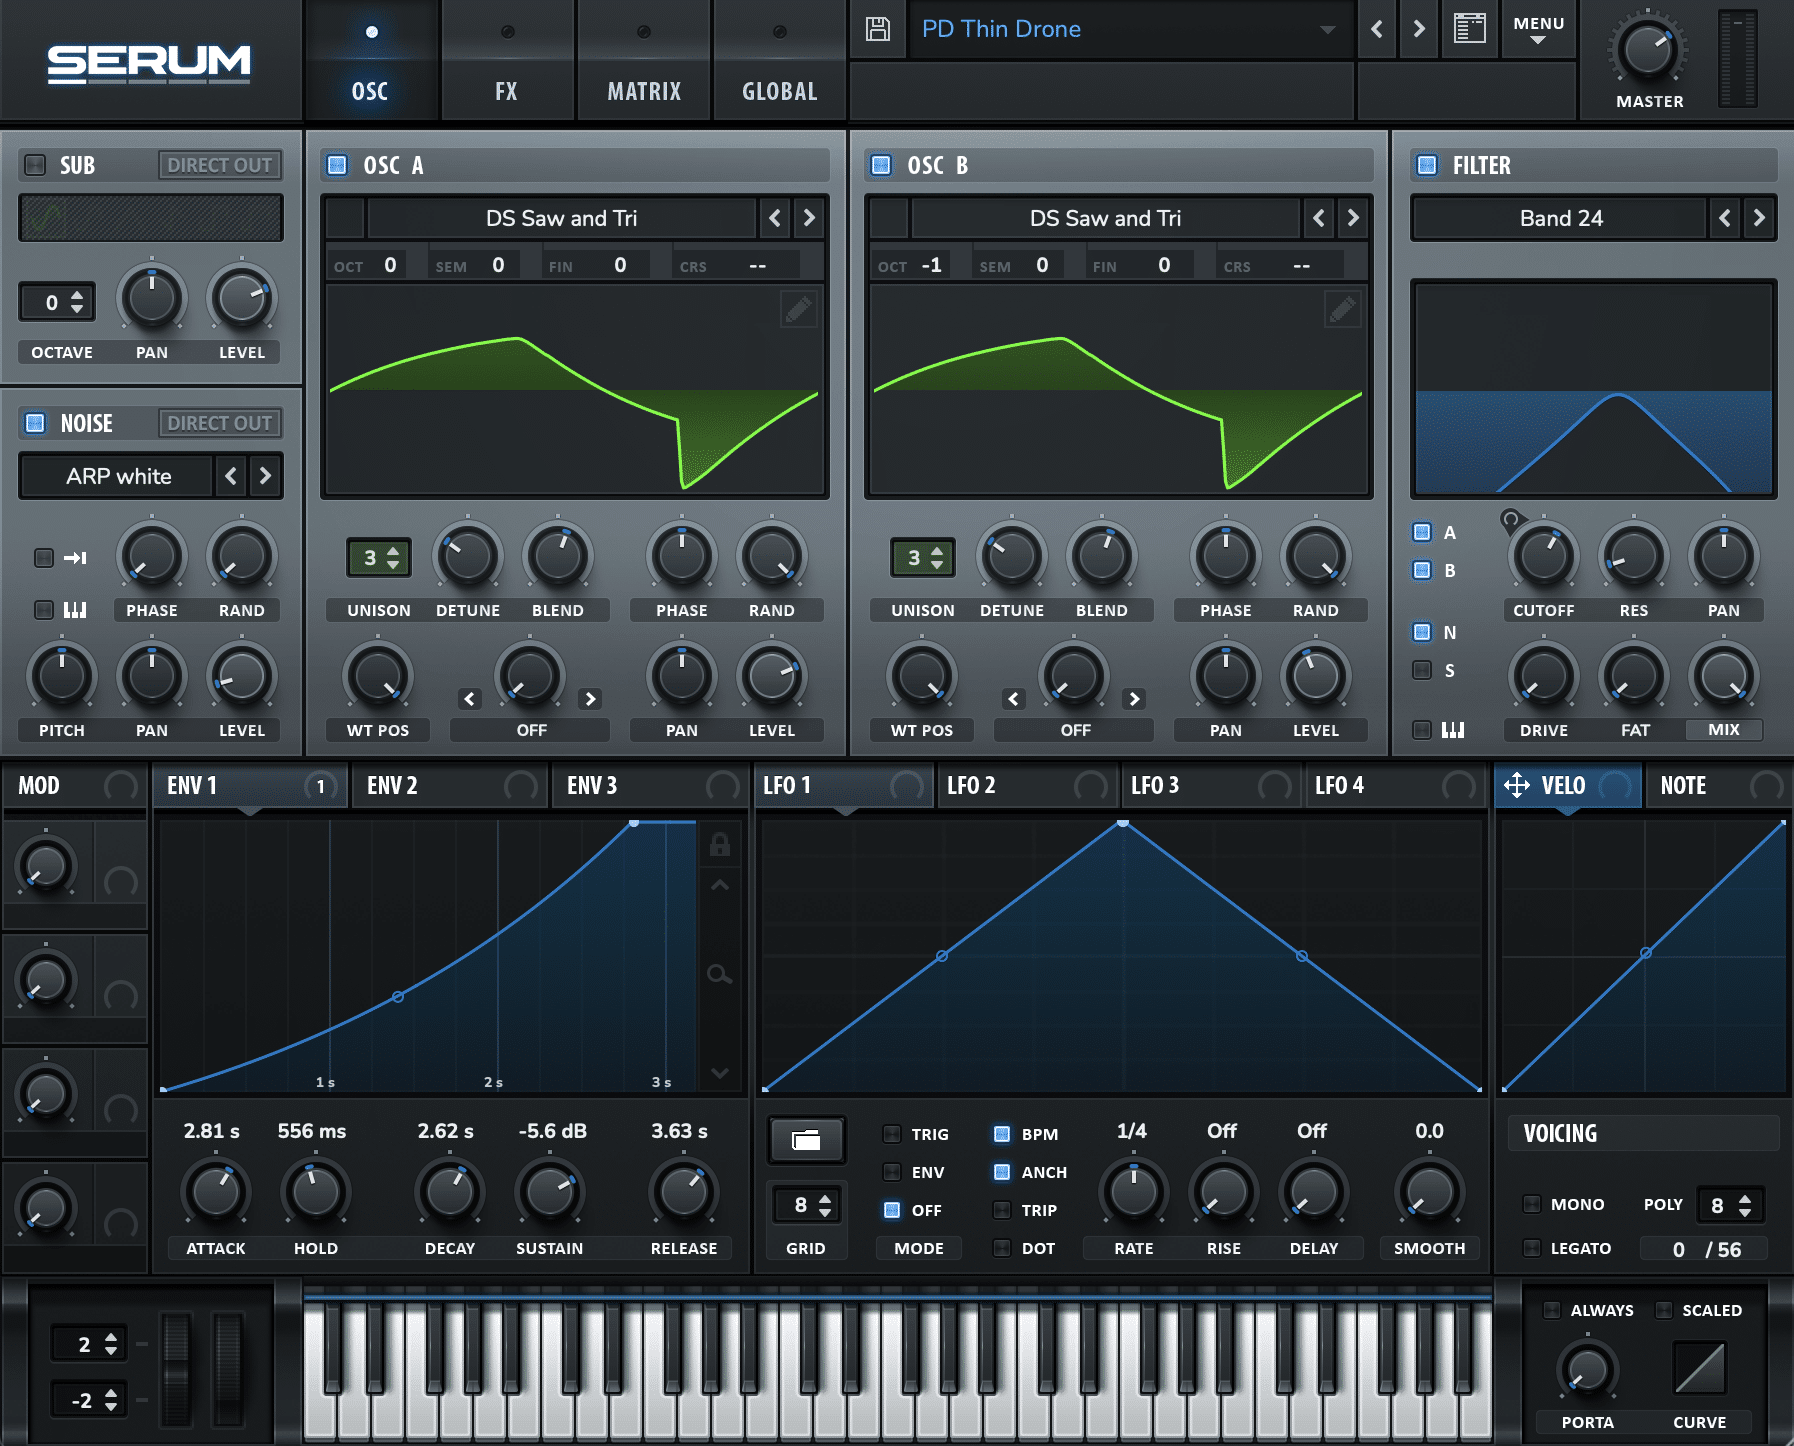
The bandpass filter, slow attack/release, and noise on this one give it a ‘nasaly’, old-school vibe.
Let’s create a new MIDI clip and draw in a 7-bar F3 note. This will create a long, drawn-out drone effect, and the long release will bleed out past the 7 bars.
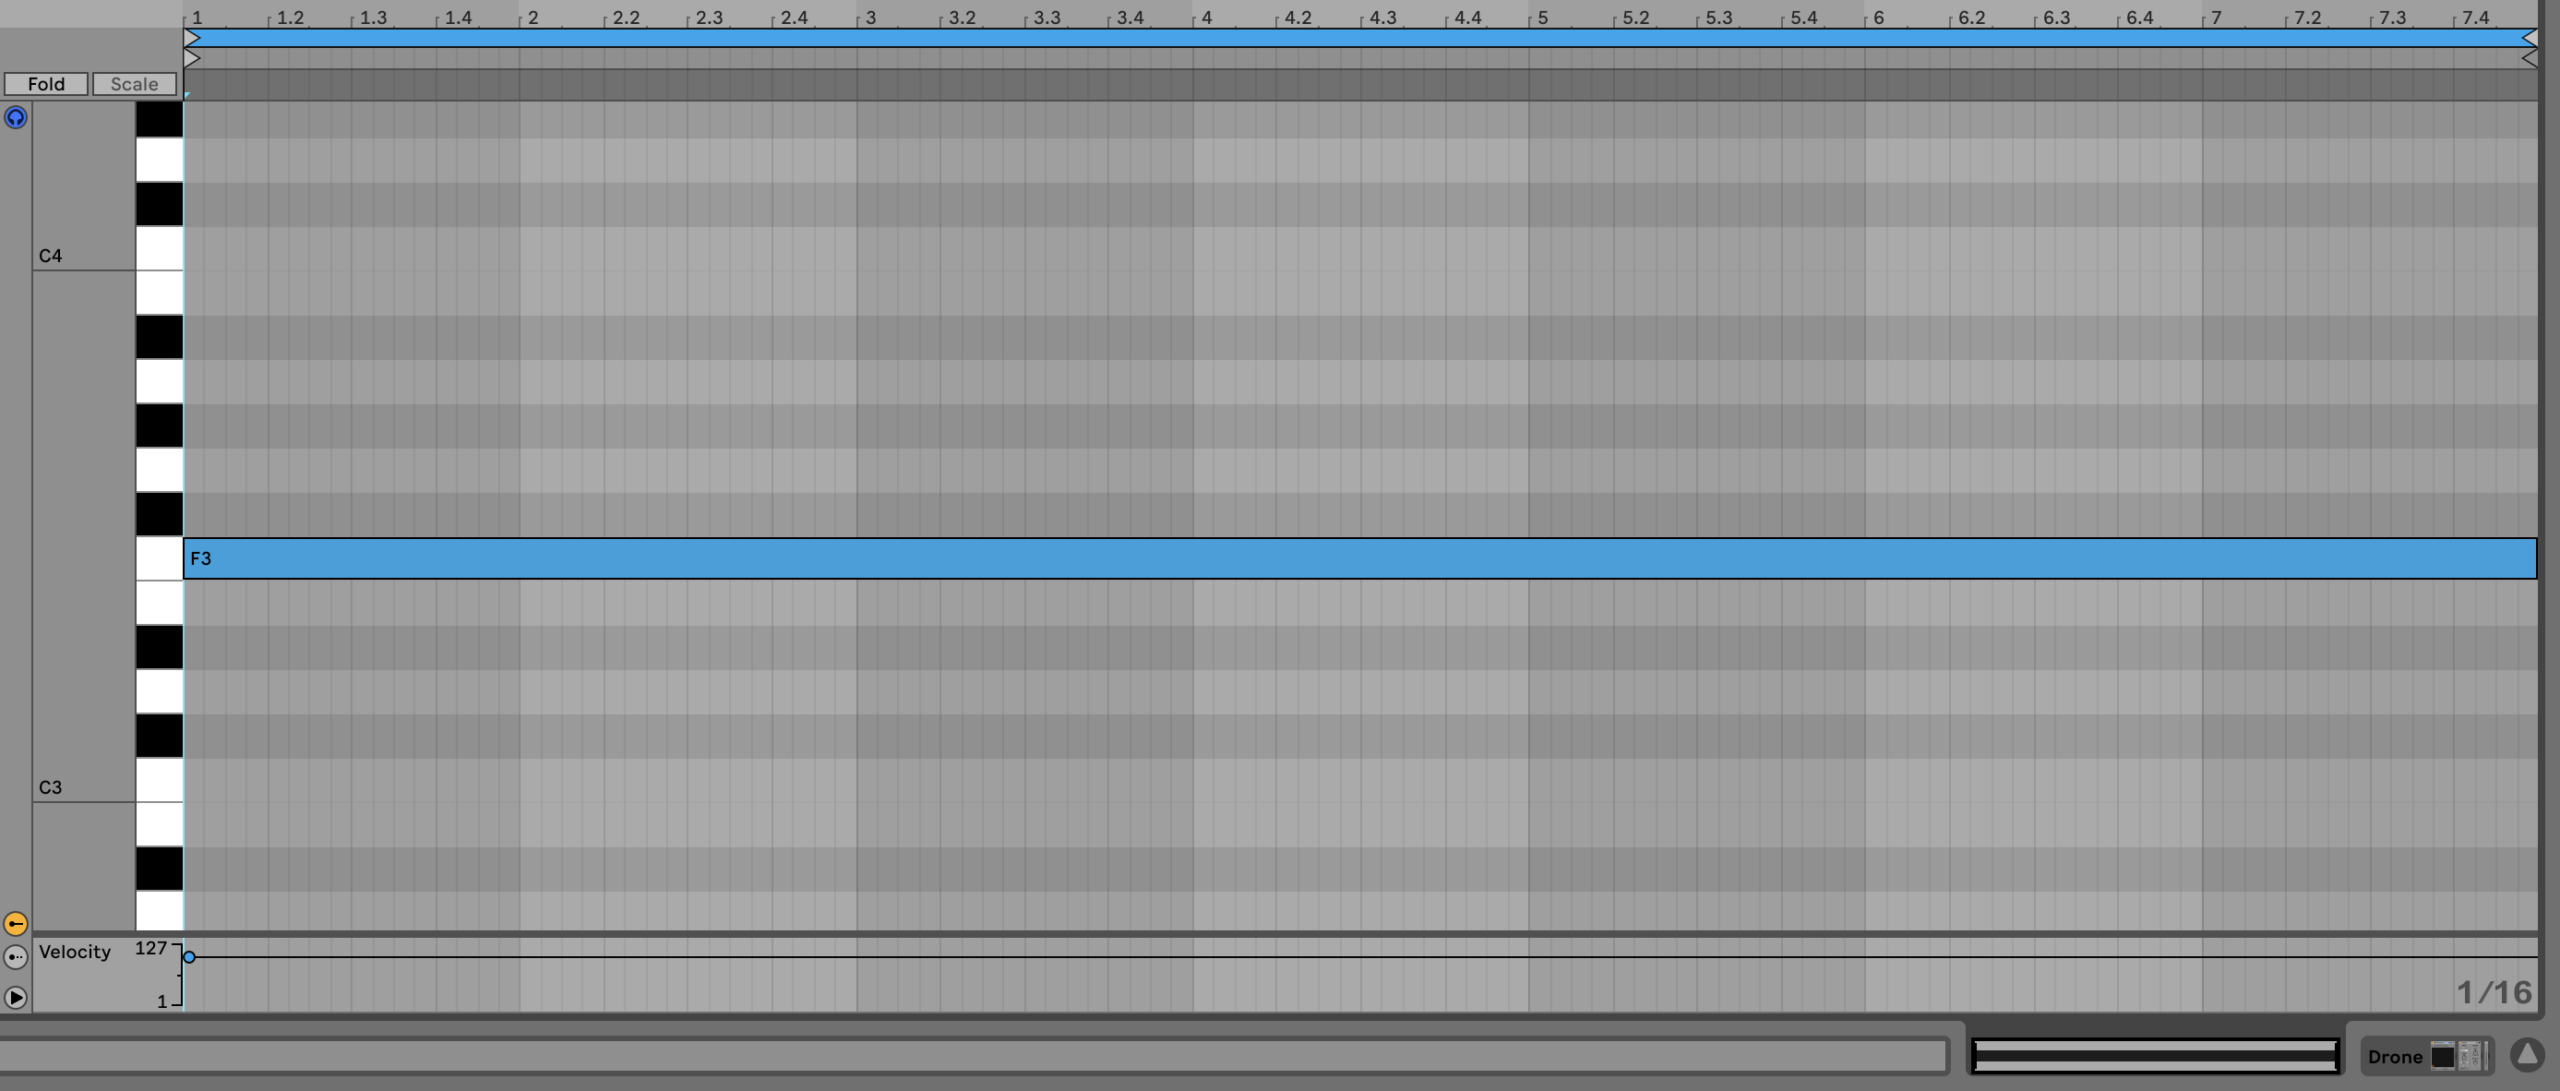
And now let’s listen to see how it sounds with the track, blending the volume so it sits in the background.
These little details are now starting to add up to make the track feel more nuanced and professional.
Phase #6: Building Tension & Structure in Liquid DNB 📈
Once you’ve got a solid-sounding 16-bar loop, it’s important to start breaking out of it as soon as possible.
This is the point at which most Liquid producers get stuck. They get a vibe going, but don’t have any idea how to take it further.
The good news is that there are a number of techniques you can use to escape this loop trap. All it requires is making a lot of seemingly small tweaks, that all add up to create a nuanced track.
Let’s start by mapping out the arrangement.
Creating A Track Framework
Although we’ve been working on what will eventually be the drop, we need to plan out our track.
As we know, Liquid Drum & Bass all happens in 16-bar sections. And to make things easier, most Liquid DNB tracks follow a similar structure:
Intro (1-2 sections) – Breakdown (1-2 sections) – Build (1 section) – Drop (3-6 sections) – Breakdown 2 (1-2 sections) – Drop 2 (3-4 sections) – Outro (1-2 sections)
For the purposes of this guide, we’ll use the following simplified structure (we’ll skip the second drop):
Intro/Breakdown (1 section) – Build (1 section) – Drop (3 sections) – Breakdown/Outro (1 section)
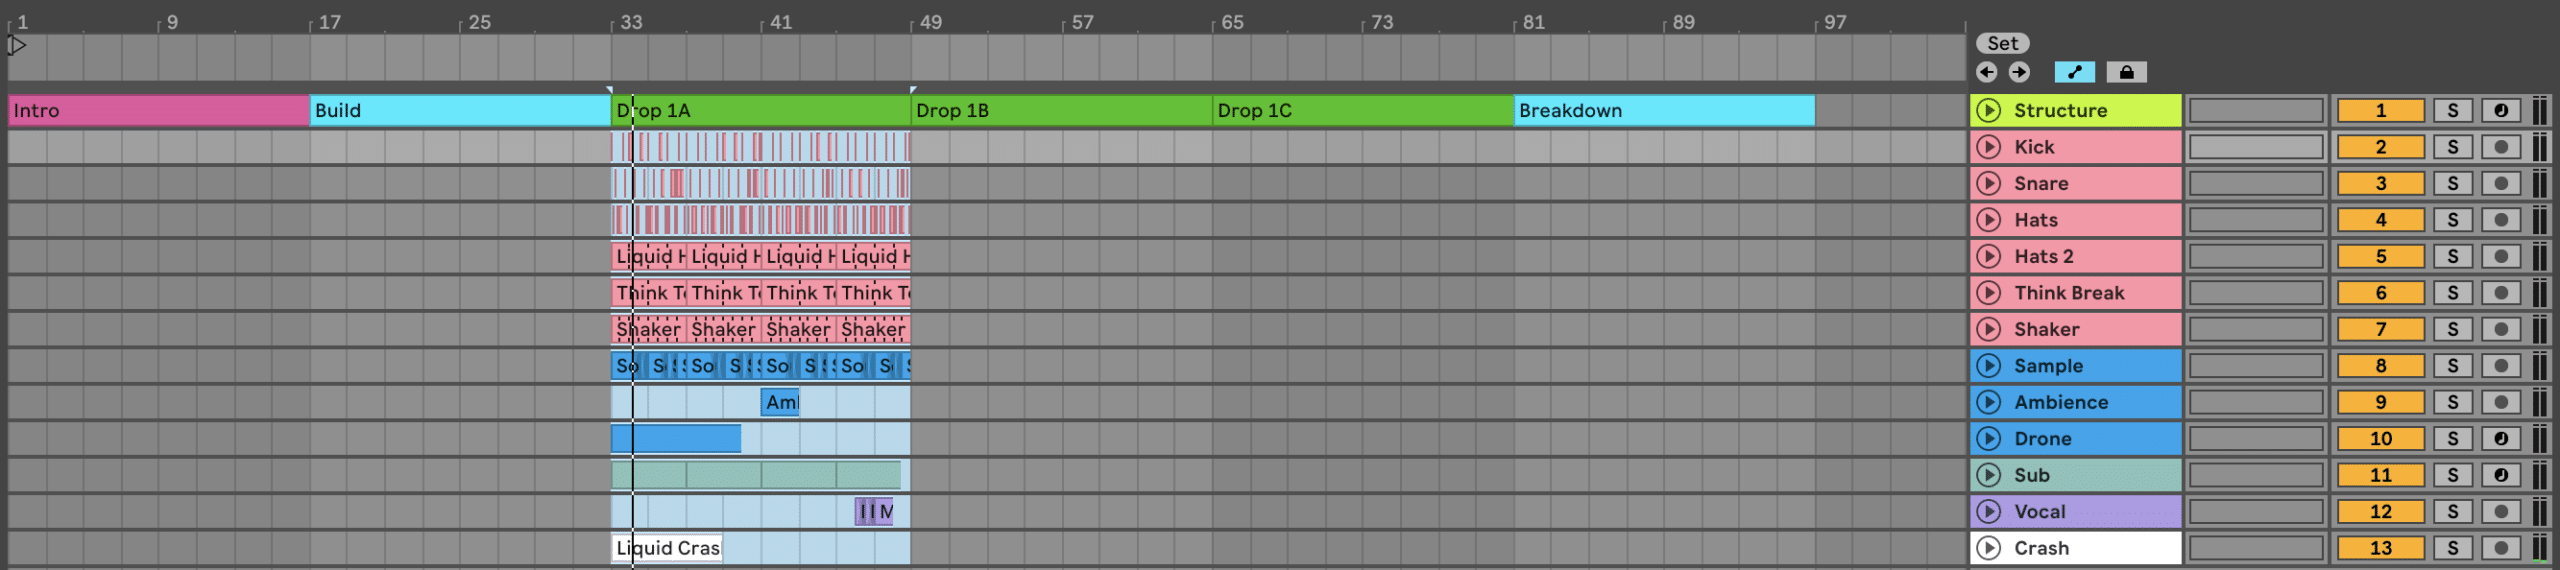
To outline the track structure, I like to create ‘dummy’ MIDI clips with different colours on a new MIDI track:
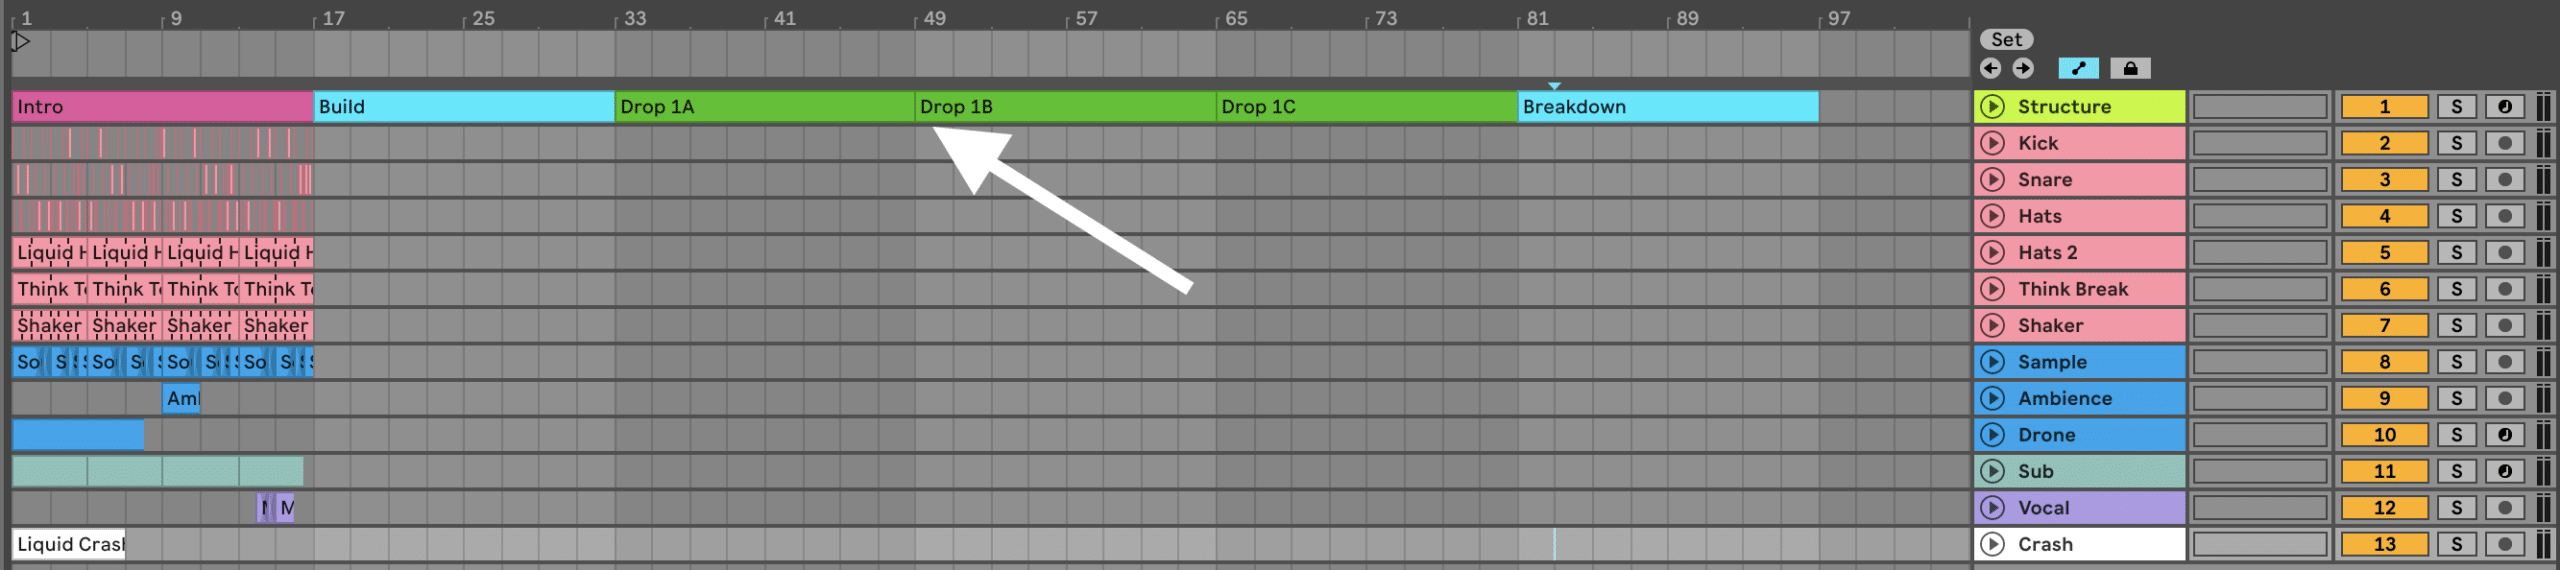
Now we have something to work with. Let’s drag our current drop into place at Drop 1A:
Great. Let’s move on by turning to our intro and build sections.
Arranging A Captivating Intro & Build
Since your intro is the first thing your listeners will hear, it’s important to get right.
But you also want to consider making your intro DJ-friendly by having at least some rhythmic elements present.
So I’m going to start by bringing in the ‘Ride Loop 174.wav’ sample from bar 1 to bar 15 (leaving 2 bars of silence into the build section). Because it’s not the full drum loop, it will provide something to latch onto rhythmically while still primarily focussing on the musical elements and FX.
Let’s also add some volume automation so it fades out towards the end. I like to use Ableton Live’s Utility to do this (so I can still mix the fader volume later on).

Now it’s time to tease the piano since it’s our main element.
Teasing the main element
There are a number of ways to do this, but I’m going to start by copying over the existing drop pattern, but muting every 2 bars from the pattern. The aim of this is to let it breathe and not introduce the full idea until the next section:

I’ve left the last 4 bars as is so it blends into the next section in a less-predictable way. You don’t want all of your arrangement changes to happen right on the 1 of the next section as this makes things sound too robotic.
Next we’ll copy over our Ambience hit from the drop, and we’ll reverse our crash cymbal into bar 17 to build a bit of tension.

Lastly, we’ll start to automate the filter on our piano so it opens up towards the end of this section. Here’s the curve I drew, and it pairs quite nicely when combined with the reverse crash:

How to create a build
Now onto the classic Liquid Drum and Bass build.
Let’s copy over the following from the drop:
- Piano
- Drums
- Ambience
- Drone
- Vocal
But we’re going to make a few changes so this section transitions smoothly into the drop – starting with the drums.
First, remove the last 4 bars of drums from this section (bar 29-32). This will allow the track to breathe before the bassline comes in.
Then you’ll want to group all of the drums together (except the ride loop we added in the intro) and add a low-pass filter (I’m using Ableton’s Auto Filter).
Simply start the filter and bring it up over time towards the drop. This will introduce the drums in a subtle way while still building energy:

To top this all off, let’s bring the low pass filter back down for the last 4 bars of the build, and create a kick build.
This is where the kick increases in rhythm towards the drop – usually in a 1/4 note -> 1/8 note -> 1/16 note fashion.
Here’s how I’ve built mine, with some extra gain automation so that the kick gets quieter towards the drop, making the first kick of the drop have more impact.

Now all that’s left to do is to build tension with our other instruments.
Let’s play around with the filter on our piano again to create a nice amount of energy:

Adding some FX
Now there are a couple of things left to do in the FX department – bring in a riser and reverse crash.
First, simply drag in the ‘Riser.wav’ sample from the pack and align it so the end of the sample is right at the beginning of the drop. Bring it down in volume to push it into the background – we don’t want it to take up too much space in the mix.
Then bring over the reverse crash we used in the earlier build (bringing the sample down a few dB).

And there you have it – a full intro, build and drop!

Now that the first half of our track is sorted, we can have some fun with the drop by creating drop variations.
Creating Energetic Drop Variations – Drop 1B
In order for your Liquid Drum and Bass track to stay interesting, adding differences between each drop section is key – even if it’s just a simple extra drum layer.
For the second set of 16 bars in the drop, I’m going to add a second counter melody over our main piano. This will create a nice sense of variation without changing up the track too much.
Let’s do this by loading the ‘Bell One Shot (G).wav’ sample into your sampler of choice. I’ll be using Ableton Live’s Simpler.
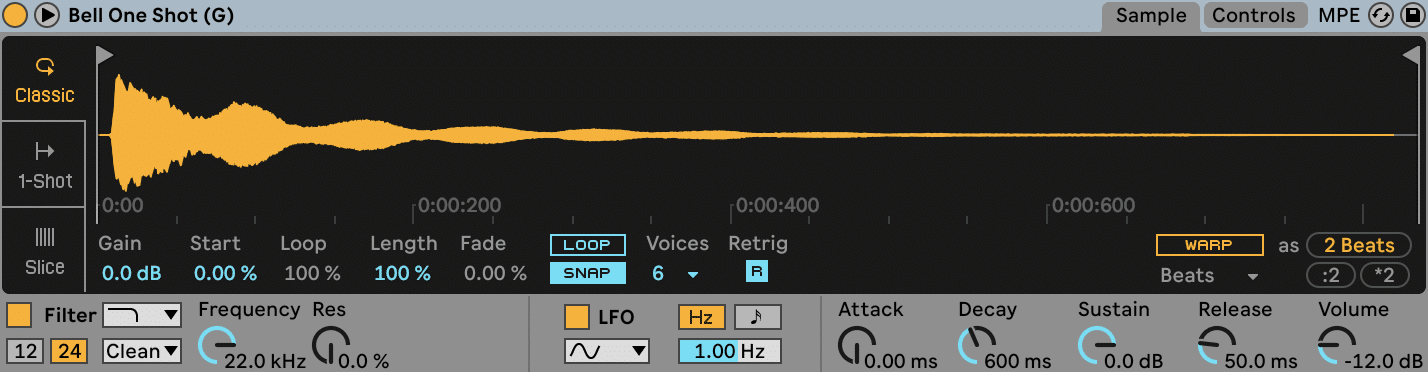
To make this sample usable, we’ll want to adjust a few of the settings on our Simpler. Here’s what I did:
- Pitched the sample up 5 semitones so it aligns with our keyboard notes (C is an actual C)
- Pitched the sample down -36ct so it is in tune
- Adjusted the start point of the sample so it’s at the beginning of the sound
- Switched on the complex warping mode so the sample stays in time regardless of the note we play
- Added 1ms of attack to avoid any clicking
- Added a subtle LPF at 15.3kHz and 24% resonance to tame the high end


Great. Now we can write a nice counter melody.
Writing a counter melody
It’s important here that it’s not too different from our piano melody, so let’s write something that feels like it aligns pretty well.
Here’s what I came up with:

Since this phrase is 8 bar, I’ll duplicate it twice and shift the second version up one octave to create a rise in energy.

Now let’s copy over all of our existing elements from Drop 1A, and make a few changes:
- Remove the first 4 bars of drums and bass to create a mini-breakdown. This will give listeners a break from the main elements.
- Automate the piano filter to open up towards the end of Drop 1A, close it back down and fully close it after 4 bars and then up again at the end of Drop 1B (pictured below)
- Remove the Drone
- Add a delay synced to 1/4 note to the Bell sound to give it more rhythm and space (pictured below)
- Mute two of the notes in the beginning of the Bell pattern to leave space for the piano at the start of Drop 1B (pictured below)
- Create a filter automation on the bass at bar 40 and 56 (pictured below)
- Automate the Sub’s Macro 2 parameter at bar 60 to create a little bass wobble
Drop 1C
There’s not a lot left to do in this section, except to bring the piano back and layer it up with our new countermelody. Except this time, we won’t use the octave-higher version for the second 8 bars – we’ll just keep it as is. Just to make things a little different between each section.
We’ll also continue the drums throughout the whole section, bring back the Drone, and add back our riser and reverse crash from the build section.

Next, I’ll bring the Ride Loop from the intro over to develop the drums a little further (without any volume automation).

Lastly, I’ll remove the drums and bass from the last 2 bars. This will allow the vocal to shine leading into the breakdown/outro.
And there you have it!
Finishing Strong with the Outro
We’ve covered a lot of ground in this tutorial, so I’m going to go simple with the outro and just filter out the main piano chords over 16 bars with a crash in the middle:

Let’s move on to mixing and mastering to make this thing sound polished 👍
Phase #7: Mixing & Mastering 🎚
Now that we’ve got a proper-sounding, fleshed-out track – all that’s left to do is to give it a final polish.
It’s important not to skip this stage, as it will transform a basic-sounding mix into something truly professional. So let’s get stuck in.
Fader Balancing
Although there is an art to fader balancing, it’s also a science.
And it’s probably going to make 90% of the difference to your mixdown (since it’s basically like EQ for your whole song).
Want more bass? Turn up your kick and sub.
Need more mids? Boost your musical elements.
Trying to bring out more high-end? Turn up your hats and FX.
Although you may get a different result depending on your ear, here are the fader levels I arrived at for each instrument. You can also grab these from the project file in the Liquid Starter Kit:
- Drums Group: -0.5dB
- Kick: -2.5dB
- Snare: -2dB
- Hats: 0dB (panned left 5)
- Hats 2: 0dB (panned right 5)
- Think Break: -4dB
- Shaker: -3.6dB
- Ride Loop: +1.6dB
- Piano Sample: 0.5dB
- Ambience: -10dB
- Drone: -3dB
- Bell: 6dB (had to boost on the instrument too)
- Sub: -4.5dB
- Vocal: -5.6dB
- Crash: -3.3dB
- Riser: -3dB
EQ
If you’ve done well with sound selection and fader balancing – good news. EQing won’t be a complicated process.
Most of the time, I’m only adding a high-pass filter to cut out space for my kick and sub, as well as making any little cuts to annoying resonances.
Here are the major EQ changes I made in this track (and why I made them):
Kick: boosted to lows to add more weight and thump

Shaker: wanted to tame the high end a bit as the drums were quite bright

Ride Loop: notching out a harsh resonance in the cymbal

Piano Loop: take out the lows to stop any clashes with the sub and tidy up the sound

Bell: clear out the lows and mids to make the sound only in the upper frequencies, and to boost the highs we lost through filtering but in a controlled way.

Drums Group
In order to get a unified mix, it helps to use a combination of buss (group) and send/return processing so that different combinations of elements can be effected together.
The first area I like to tackle is the drums. Since drums are transient-heavy and punchy, it can be difficult to control their loudness.
It’s also not a good idea to rely on your mastering to solve these issues, so let’s tame our drums a bit with some group limiting.
Typically I tend to use FabFilter’s Pro-L2 on the unity gain (1:1) setting so I don’t get any actual increases in loudness – just the limiting effect. Then I’ll just adjust the input gain to taste – here are the settings I used:

Reverb Sends
Since our mix right now is fairly dry, we can use a reverb send both as a mixing tool (i.e. to put all of our sounds in the same ‘room’) and to achieve that atmospheric Liquid sound.
But we don’t want to go and add 20 different reverbs to our individual channels, so this is where reverb sends come in.
I tend to set up 3 different reverbs:
- One for my drums (a shorter ambience)
- One for my musical elements and FX (a lush room or hall reverb)
- One for my bass (low end cut out and quite a bit of brightness)
You can copy my exact plugins and settings here for each (although you can replicate these in most reverb plugins):
Drums Verb:

- Drums Group: -31dB
- Ride Loop: -14dB
Music Verb:

- Piano: -16dB
- Ambience: -5dB
- Drone: -7dB
- Bell: -5dB
- Vocal: -5dB
Bass Verb:

- Bass – automate along with filter sweep

Mastering
If you end up releasing your music with a label, chances are that they will do a master for you.
But it’s important that you at least give your music a ‘test’ master so when you send it out, it holds up in terms of sonic quality and loudness.
I’ll be honest – 80% of this work is done by a good limiter. Again, I opt for the FabFilter Pro-L2 limiter on the ‘Transparent’ mode, and basically just crank it up until it sounds good.

A great way to tell if your music is in a good place loudness-wise is to:
- Compare it to a reference track (basically another Liquid DNB track that you like)
- Use a loudness meter (I love Youlean Loudness Meter 2) to measure your LUFS
For my reference track, I’ve picked Leniz – Mourning Tears.
And that’s all I’m going to do for the purposes of this guide (and to show you the power of just one limiter). Here’s our final export!

That’s A Wrap!
And with that, we’ve created our very own Liquid Drum & Bass track! If you’ve followed along until this point, pat yourself on the back and congratulate yourself! 🥳
I hope you’ve enjoyed this process, and can walk away with a new perspective when you go on to make your own music.
If you haven’t already, make sure to grab the project file and samples for this one above and take a look at the final result.
If you have any questions or suggestions, feel free to reach out to me at [email protected] 🙂
