Want a bunch of Liquid DNB tips to inspire your next tune?
Look no further than this huge list of 37 different tips & tricks that I (and many other producers) use in the studio daily. I’ll cover stuff like:
- Unique ways to use breaks in your track
- Go-to bass sound design techniques
- Where to find a variety of different musical samples
- Mixing secrets for loud, pro-sounding tracks
- + much more!
Before we get stuck in, make sure to bookmark this one for a later time so you can keep using them 🔖
Let’s go! 👇
New to music production? 🧑💻
Watch our Free Masterclass on how to learn electronic music production the smart way (without months of confusion & frustration) 👇
Table of contents
- Tip 1: Resample Your Main Bass For Fills
- Tip 2: Create a pad from a vocal
- Tip 3: Reverse a sound
- Tip 4: Use Splice/Loopcloud samples in radical ways
- Tip 5: Find the next ‘classic break’
- Tip 6: Use Chorus on your vocal samples
- Tip 7: Create huge pads with Valhalla Shimmer or Supermassive
- Tip 8: Slice out the kick and snare
- Tip 9: Low-end targets
- Tip 10: Test your loudness
- Tip 11: Mono your musical samples
- Tip 12: Avoid pure sine waves
- Tip 13: Use reference tracks
- Tip 14: Have some classic breaks on hand
- Tip 15: Branch outside of Liquid/DNB sample packs
- Tip 16: Save your go-to sounds
- Tip 17: Structure your track early
- Tip 18: Get some good bass presets
- Tip 19: Work with a featured vocalist
- Tip 20: Get a good piano
- Tip 21: Spice up your drums with fills and variations
- Tip 22: Create a unique second drop
- Tip 23: Everything sounds good through a low-pass filter
- Tip 24: Use a real bass sample
- Tip 25: Watch your sidechain
- Tip 26: Stop mixing your instruments too quietly
- Tip 27: Delay is your best friend
- Tip 28: Incorporate your unique influences
- Tip 29: Automate the volume
- Tip 30: Create the classic sine wobble bass
- Tip 31: Create your own effect racks
- Tip 32: Layer up your FX
- Tip 33: Switch to a half-time drum pattern in the breakdown
- Tip 34: Sample from obscure sources
- Tip 35: Collaborate with someone else
- Tip 36: Change the key of your track
- Tip 37: Keep experimenting!
- Want Even More Liquid DNB Tips?
Tip 1: Resample Your Main Bass For Fills
Since Liquid tends to be written with ‘simpler’ bass sounds, it can be fun to resample & process them to create more aggressive bass fills.
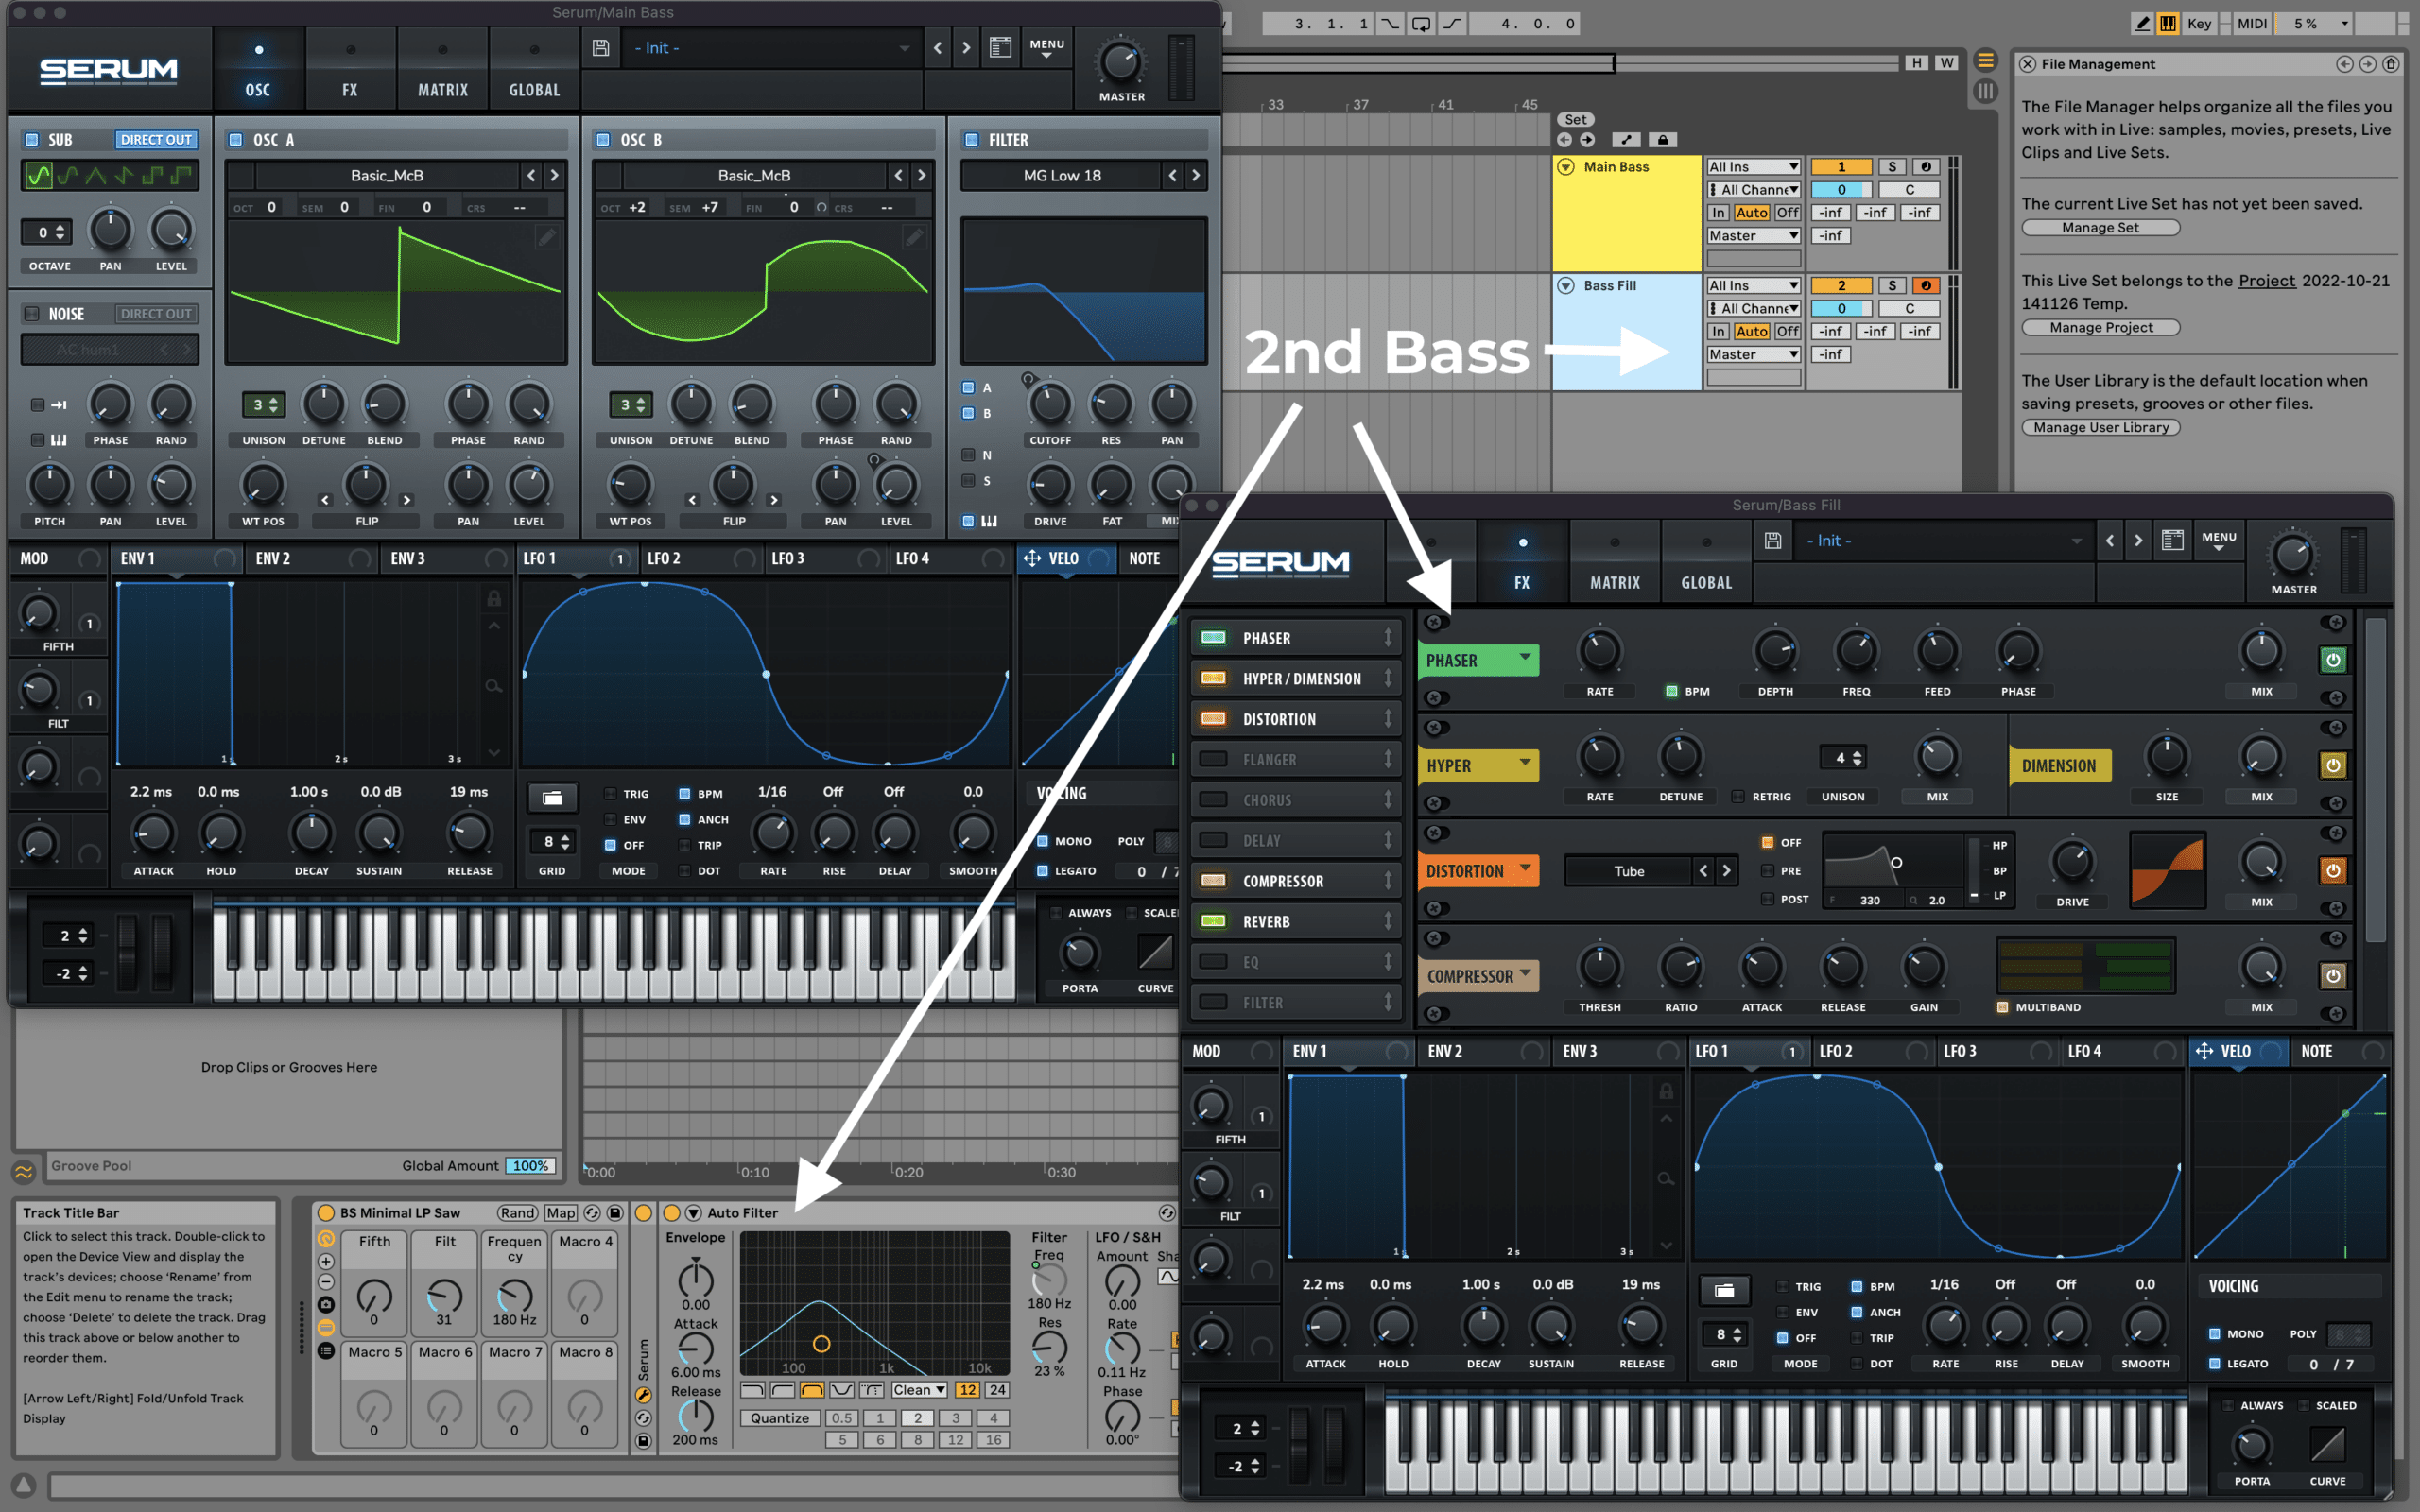
You can take your main sound, duplicate it, open up any filters, chuck on any number of FX, and go nuts with modulation/automation.
After that, bounce your new bass to audio. Then simply chop out any cool bits that you like!
Tip 2: Create a pad from a vocal
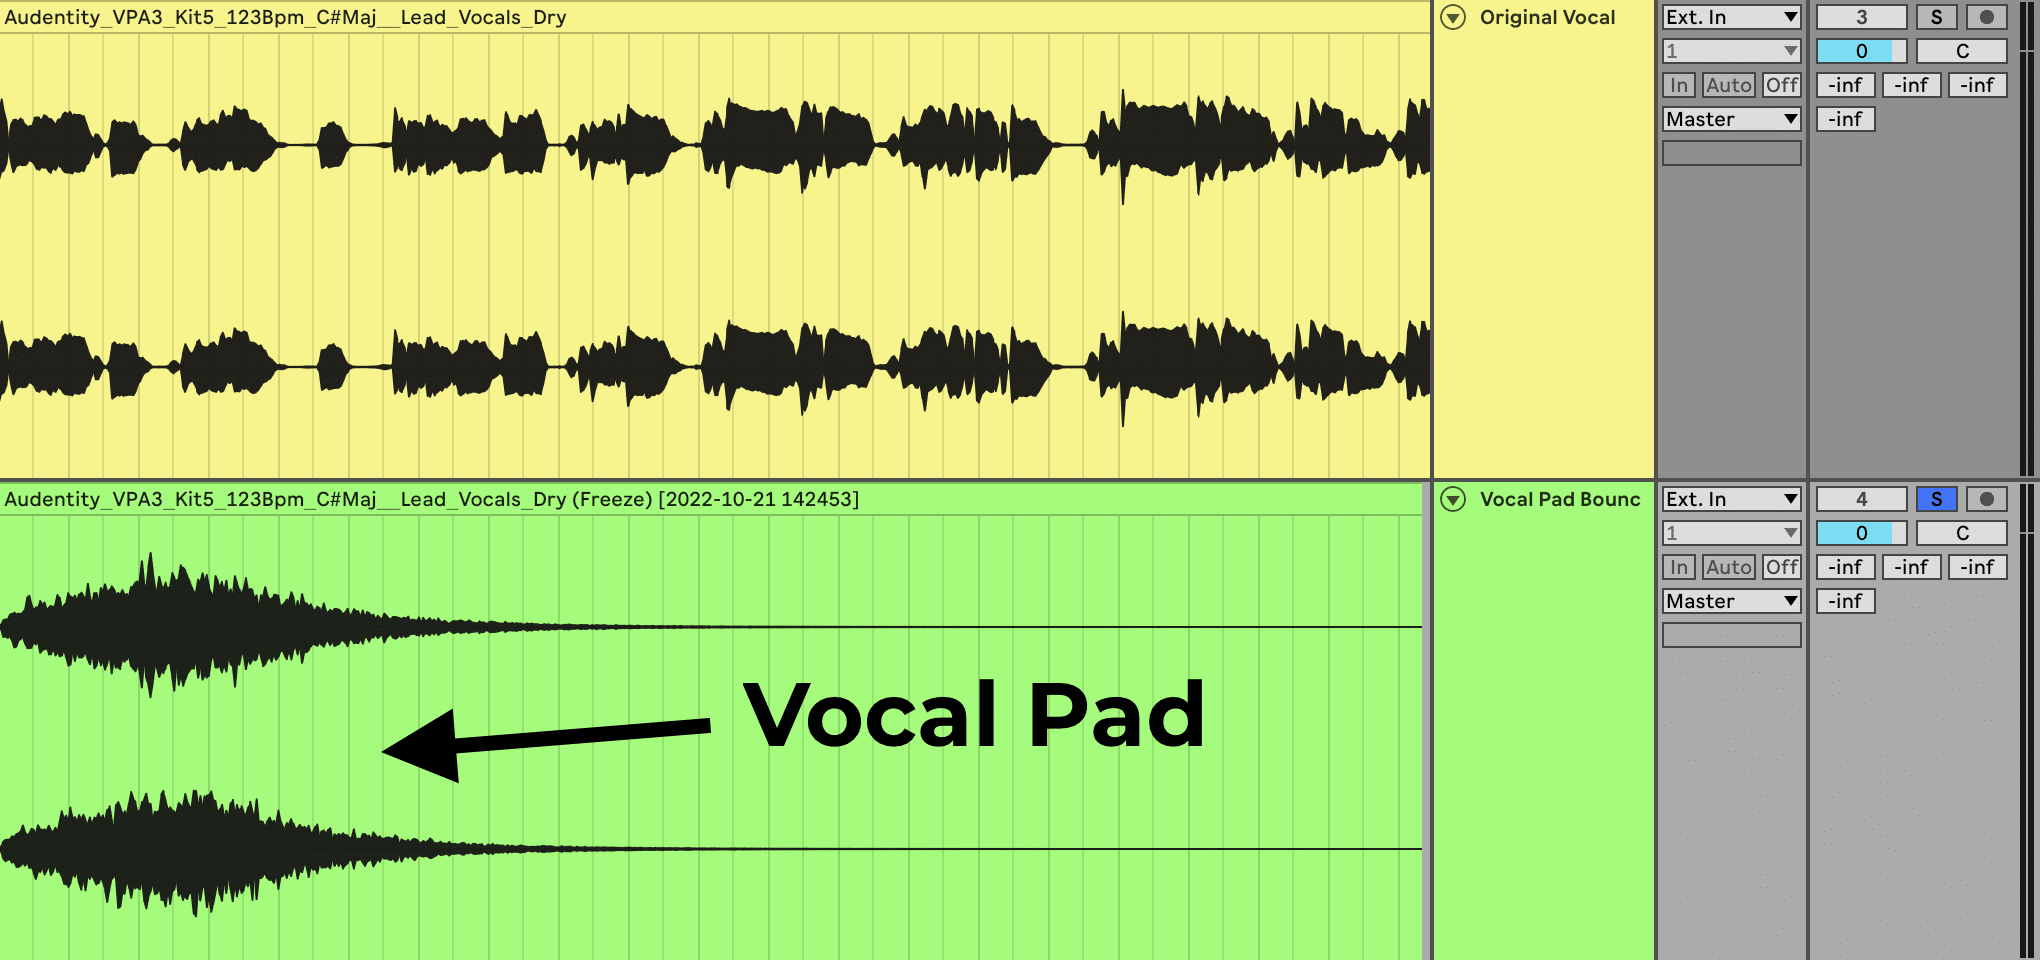
Sick of boring Liquid pads? Try resampling a vocal by taking your favourite slice, stretching it out, and adding a bunch of reverb – like so:
Original Vocal:
Vocal Pad:
Perfect for layering in the background!
And you can take this further with…
Tip 3: Reverse a sound
This is one of my personal favourite Liquid DNB tips.
I don’t know why, but reversed pianos, vocals, pads, and even drums all work so well in Liquid. This effect adds a lovely ‘sucking’ and tension-building effect, and it’s effective for creating unique sounds that grab the listener’s attention.
The easiest way to do this is to use your DAW’s native reverse functionality on an audio clip (most major DAWs can do this, including Ableton Live & FL Studio). Here’s that on the last vocal pad:
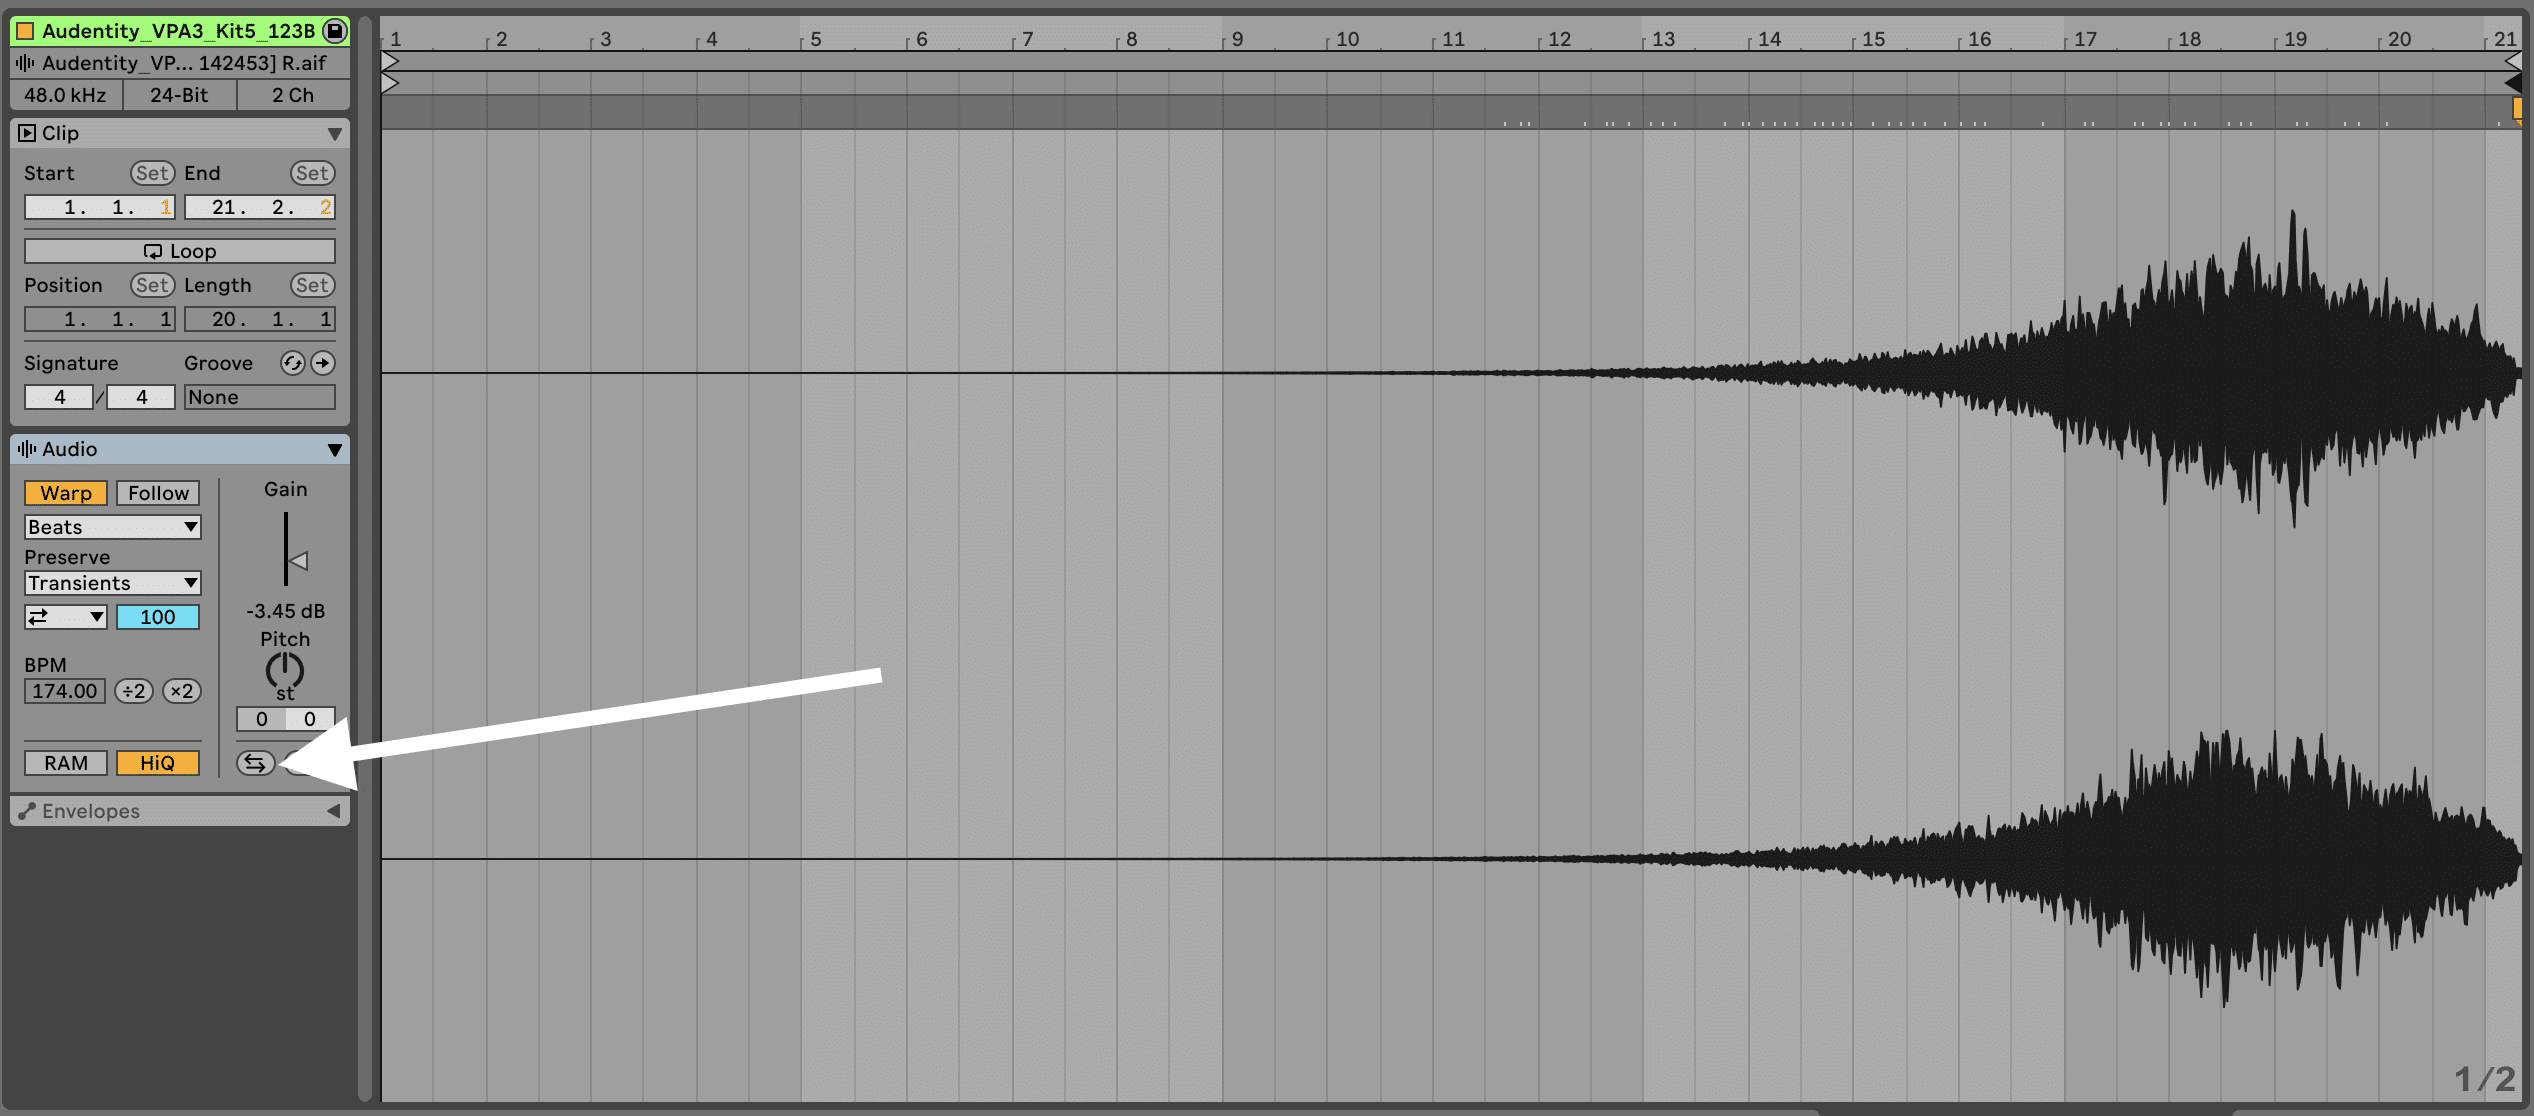
If you’re using a MIDI instrument, you will need to bounce/flatten it first to apply this processing.
Tip 4: Use Splice/Loopcloud samples in radical ways
Sampling from services like Splice & Loopcloud (or just using any sample pack) is cool and all, but most of the time it can be too ‘drag and drop’.
Instead, I’d encourage you to go a step further when using these sounds. Chop them up, pitch them around, layer them together and process them creatively.
Once you take a few extra steps, you’ll realize it’s not hard to put your own spin on someone else’s sample and create something truly original.
Tip 5: Find the next ‘classic break’
Drum & Bass was created by taking funk drum loops and pitching them up. So why not find some more modern funk sample packs, and apply the same process?
Here’s a nice sample I found:

And here it is at 174BPM:
With a bit of processing and layering, it’ll be perfect for my next Liquid banger!
Tip 6: Use Chorus on your vocal samples
Sometimes a dry vocal sample can sound a bit cheesy and uninspiring.
This is where Chorus comes in – it adds a bit of motion and thickness and makes it feel more ‘serious’.
To demonstrate this, here’s a dry vocal sample from Splice:
Now here it is with a bit of stock Ableton Live Chorus-Ensemble with the following settings:
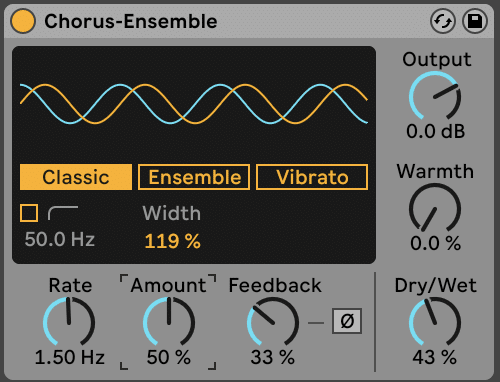
Much better.
Tip 7: Create huge pads with Valhalla Shimmer or Supermassive
I’m a fanboy of the Valhalla plugins for a reason – they’re reasonably priced and insanely good-quality.
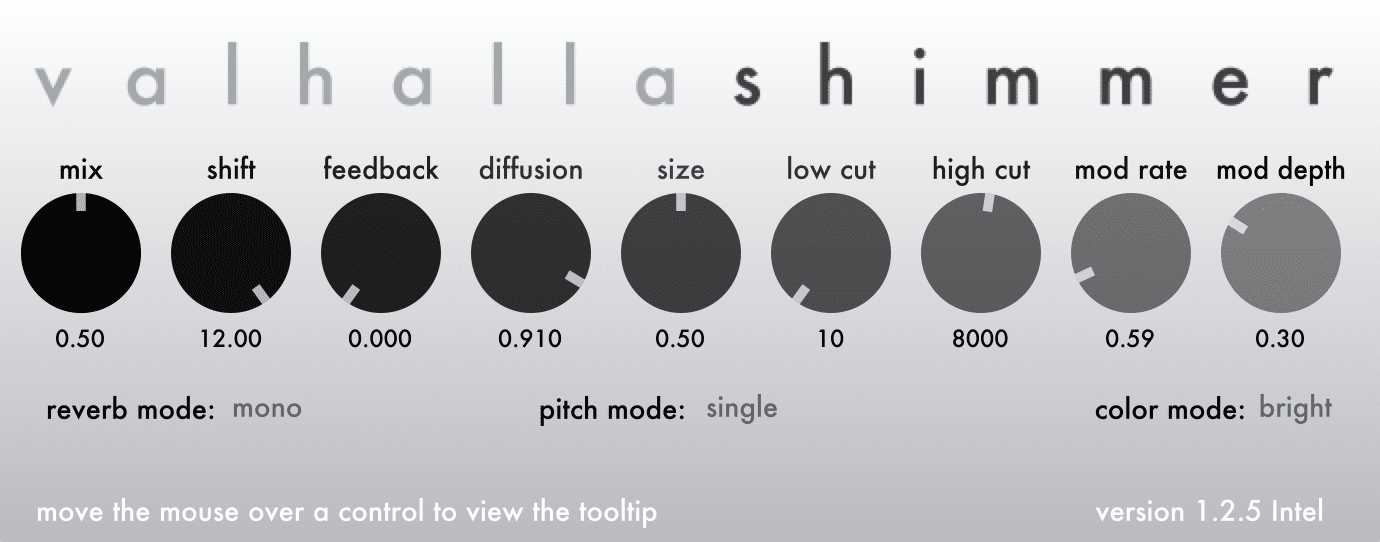
Shimmer in particular is one of my all-time favourites, and it’s great for those lush, vast reverb soundscapes. I personally love to just load up one of the presets on a pad sound or chord progression and tweak it to taste.
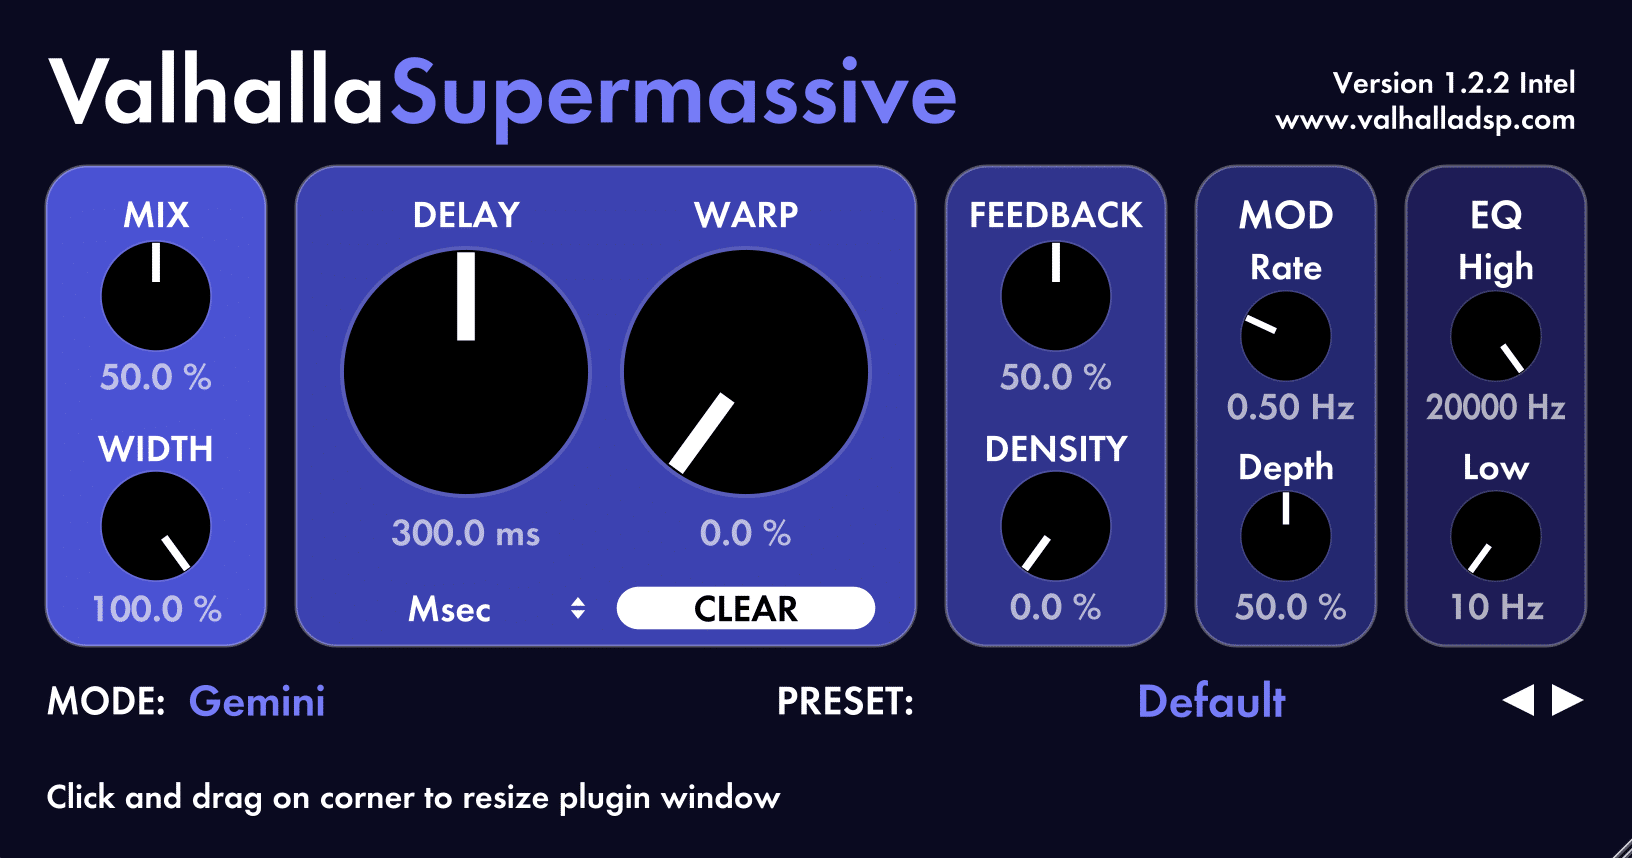
Another one of my recent favourites is Supermassive, which is a delay/reverb/chorus plugin all in one. It has a bunch of different modes depending on what you’re going for and is great for experimental atmospheres (check out the Large Magellanic Cloud mode in particular).
New to music production? 🧑💻
Watch our Free Masterclass on how to learn electronic music production the smart way (without months of confusion & frustration) 👇
Tip 8: Slice out the kick and snare
Sometimes when you’re layering up your drums and breaks, one of the samples has some great tops, but there’s also a not-so-ideal kick and snare baked in. Besides, you might already be using your own one-shots.
Sometimes a simple high-pass filter will solve this, but if you want a cleaner result, slicing out the individual hits works wonders.
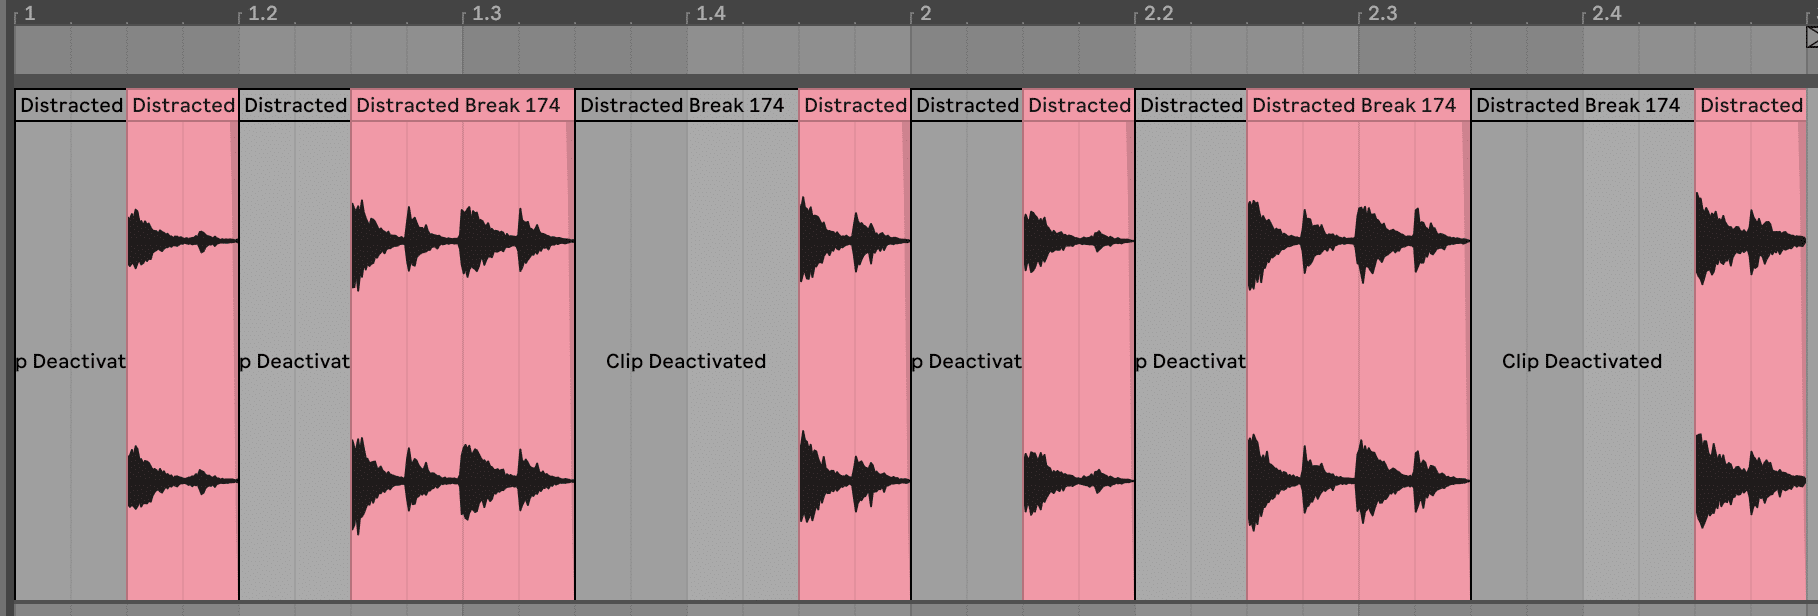
Remember to fade any edges here when removing samples to avoid clicks/pops.
Tip 9: Low-end targets
When making Liquid (or D&B in general), you have to mix it to what the track needs.
But there are also objective ‘standards’ for mixdowns – particularly for the low-end.
I aim to have my sub-bass averaging between -7dB and -5dB, and my kick drum between -18dB and -12dB – after mastering/limiting.
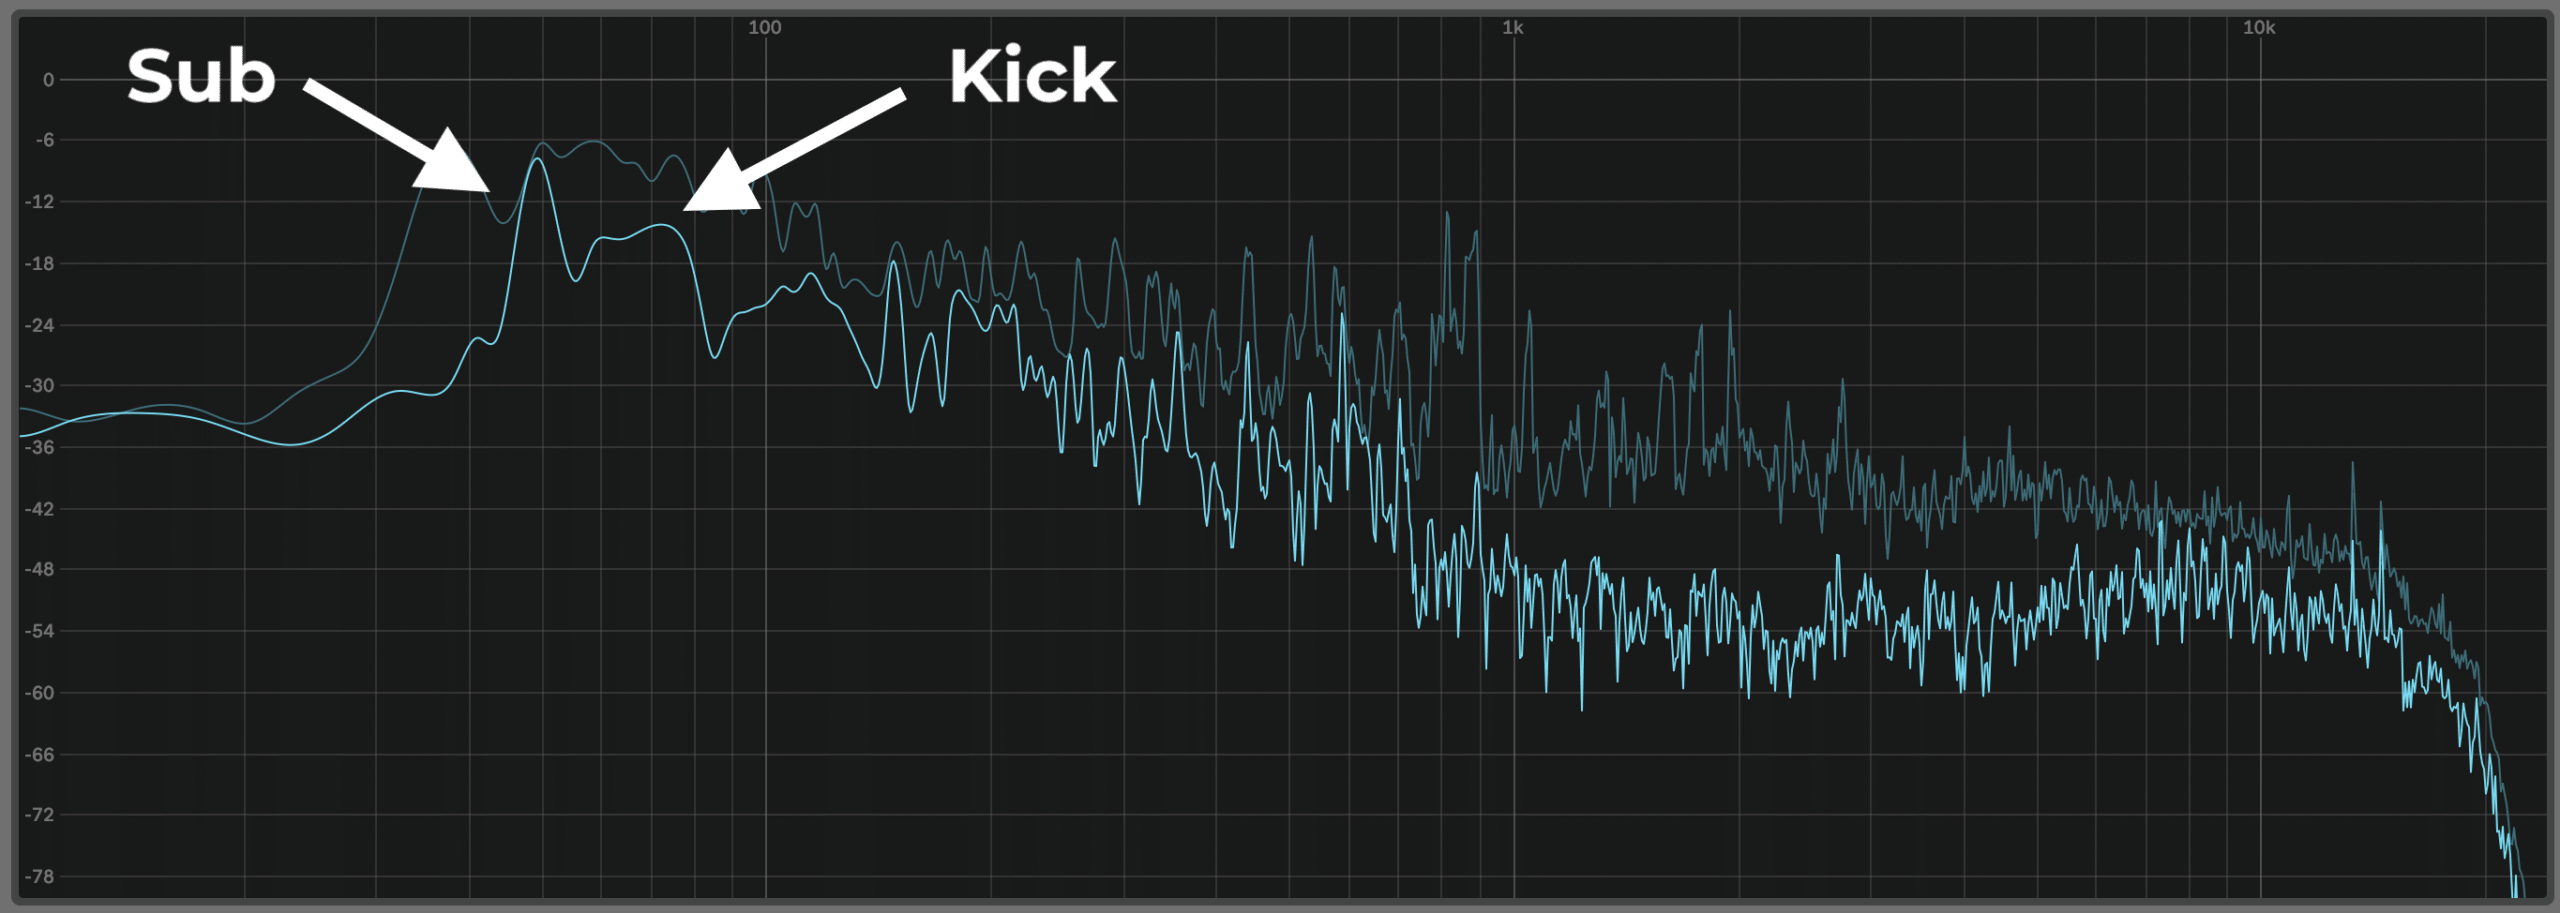
This tends to result in a balanced kick-bass relationship and a more club-friendly track.
And on that note…
Tip 10: Test your loudness
We’re not all mastering engineers, but it’s crucial that you give your track a ‘test master’ to ensure it’s going to hold up when it comes time.
Plus, it will help you identify any weaknesses in your mix.
Simply load up your favourite limiter (mine is FabFilter Pro-L 2 on the Transparent setting) and boost up the gain until you start hearing distortion. Then back it off until the distortion is gone.
This level of loudness is likely where your mastering engineer will aim for (or where you’ll aim for if mastering your own music).
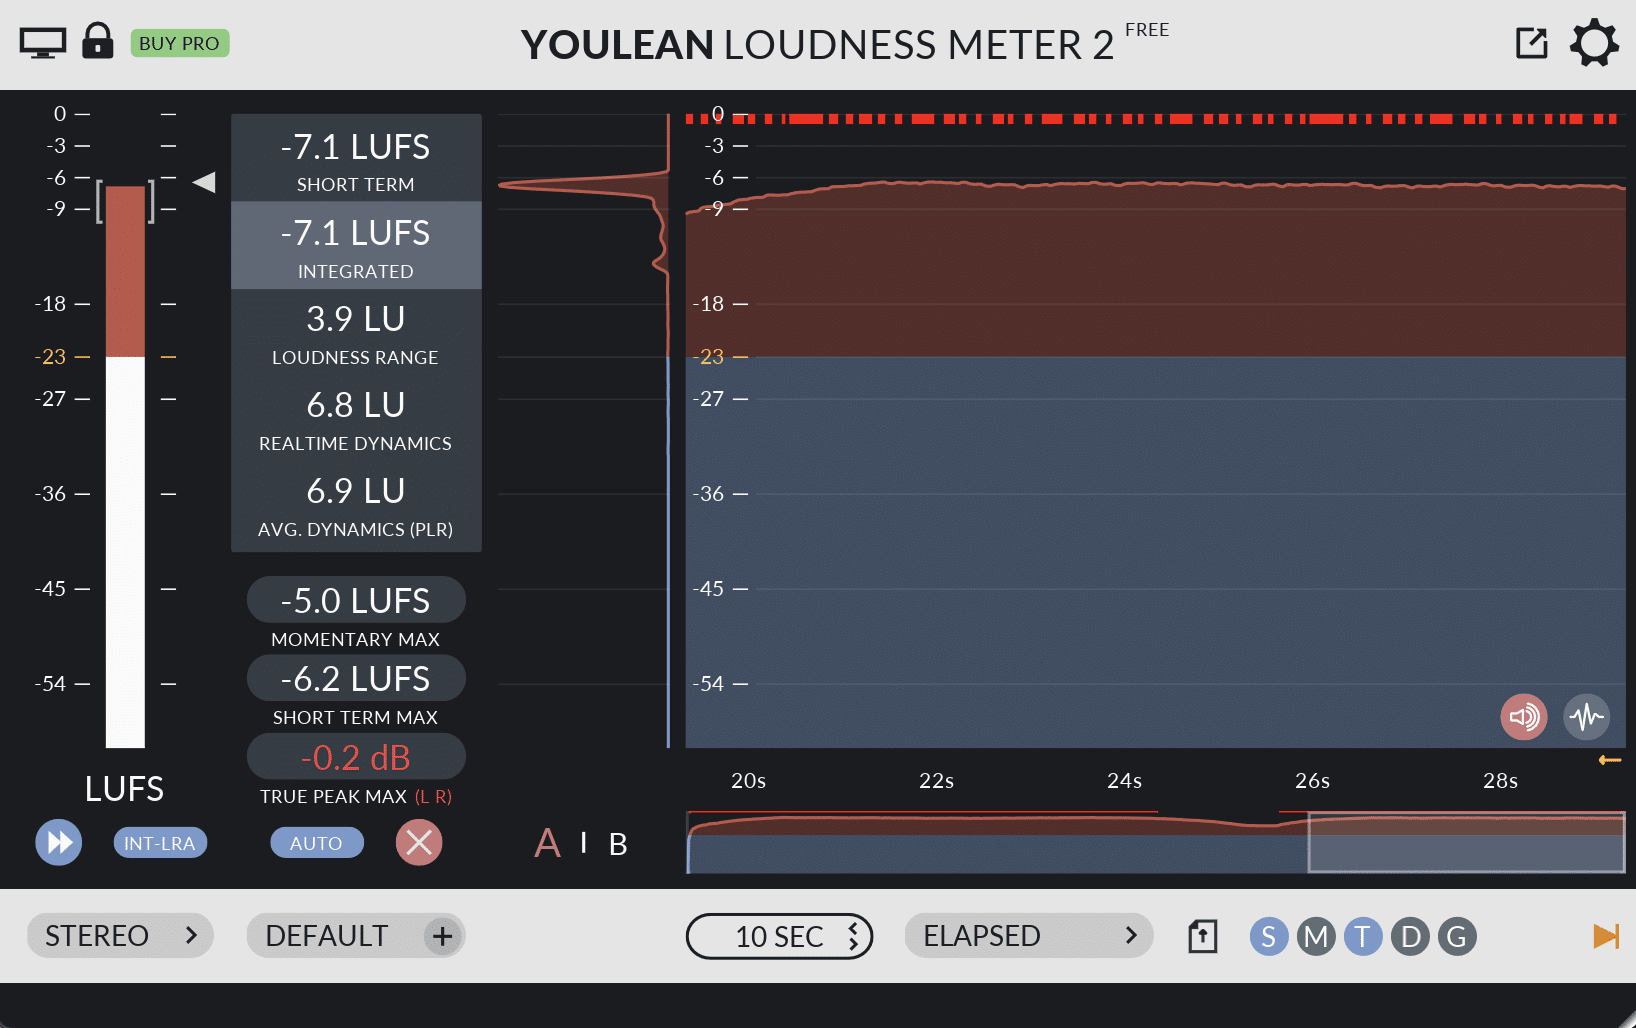
If measuring your LUFS value, I’d aim for no more than -6LUFS, and no less than -9LUFS for your short-term loudness during the drop.
Tip 11: Mono your musical samples
If you’re sampling some old-school music/sounds, to retain that classic sampled feel, you may want to consider ‘monoing’ the sound.
This mimics the process that older samplers used – they often only sampled one side of the stereo track.
Take this piano for example:
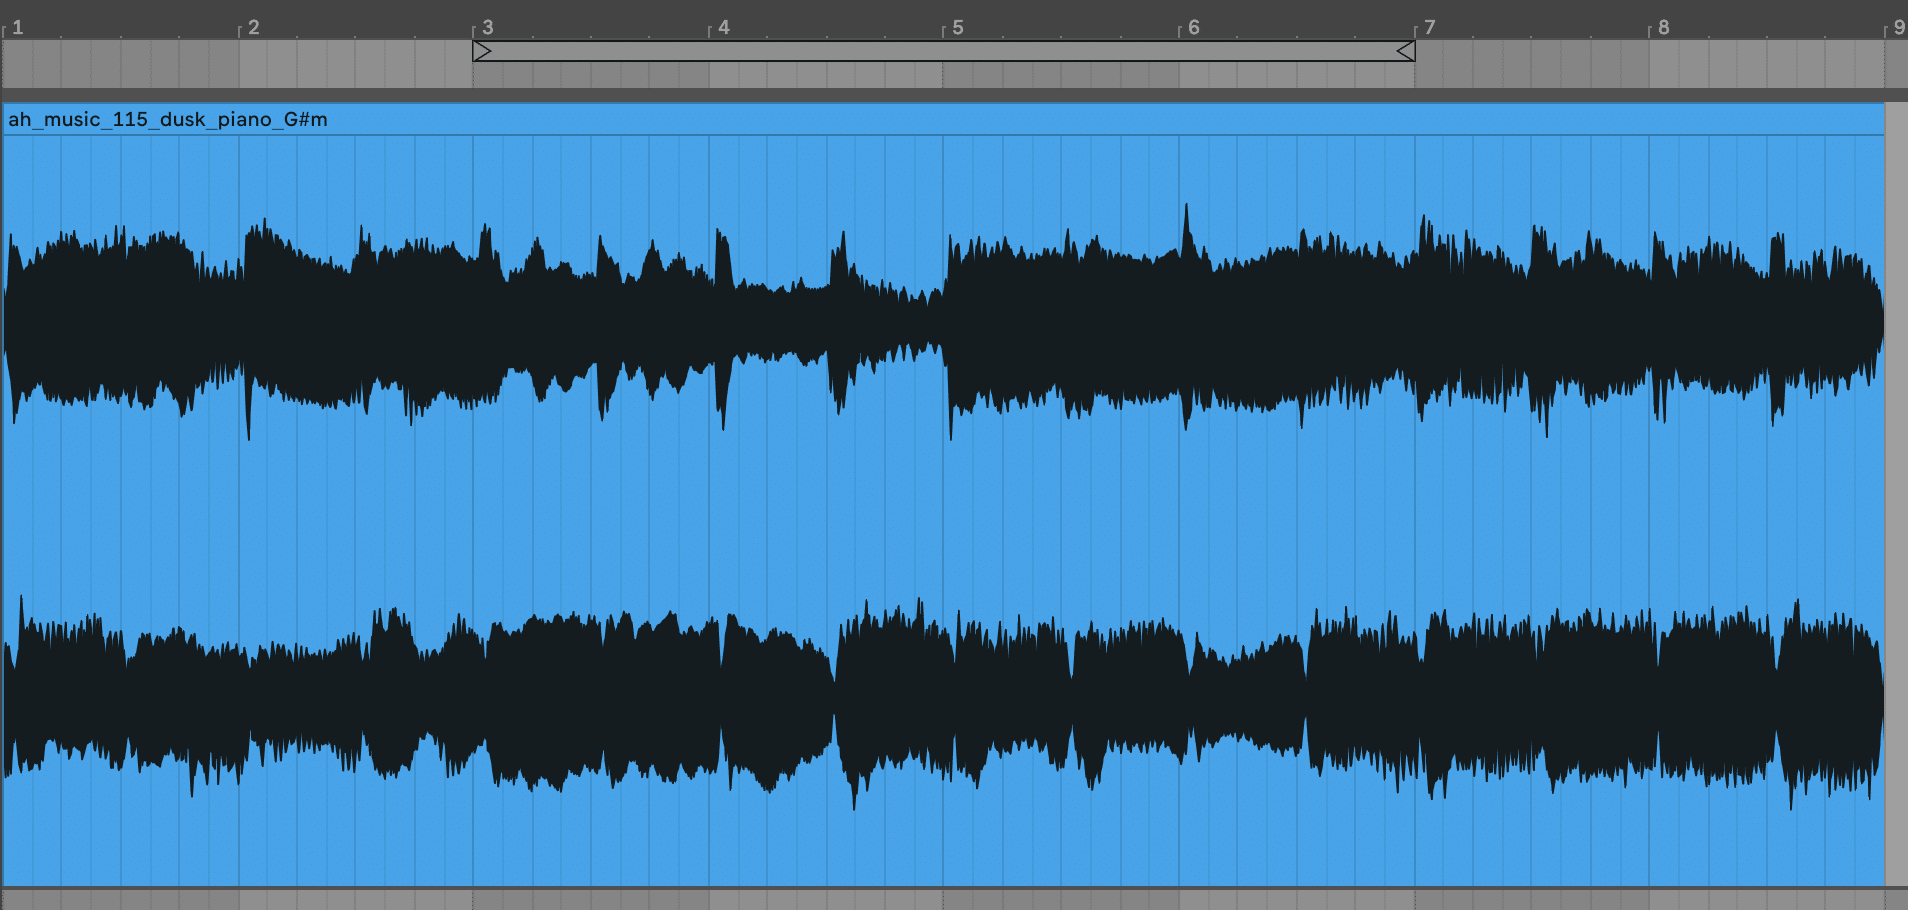
Lots of width and stereo image. Here it is if we mono it using Ableton’s Utility on the left side only:
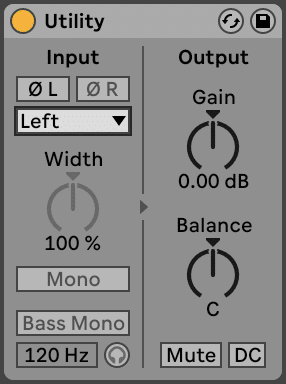
Now it has a bit of ‘grit’ – perfect for an old-school Liquid tune. This doesn’t always work for every track, but it might be exactly what you need.
Tip 12: Avoid pure sine waves
Sine waves are reproduced well on club systems, but not at home for all your fans on Spotify. So you need to balance low-end weight with playback compatibility.
This is why I avoid ‘pure’ sines, and either layer something else in, or use a complex sound that is filtered down closer to a sine:
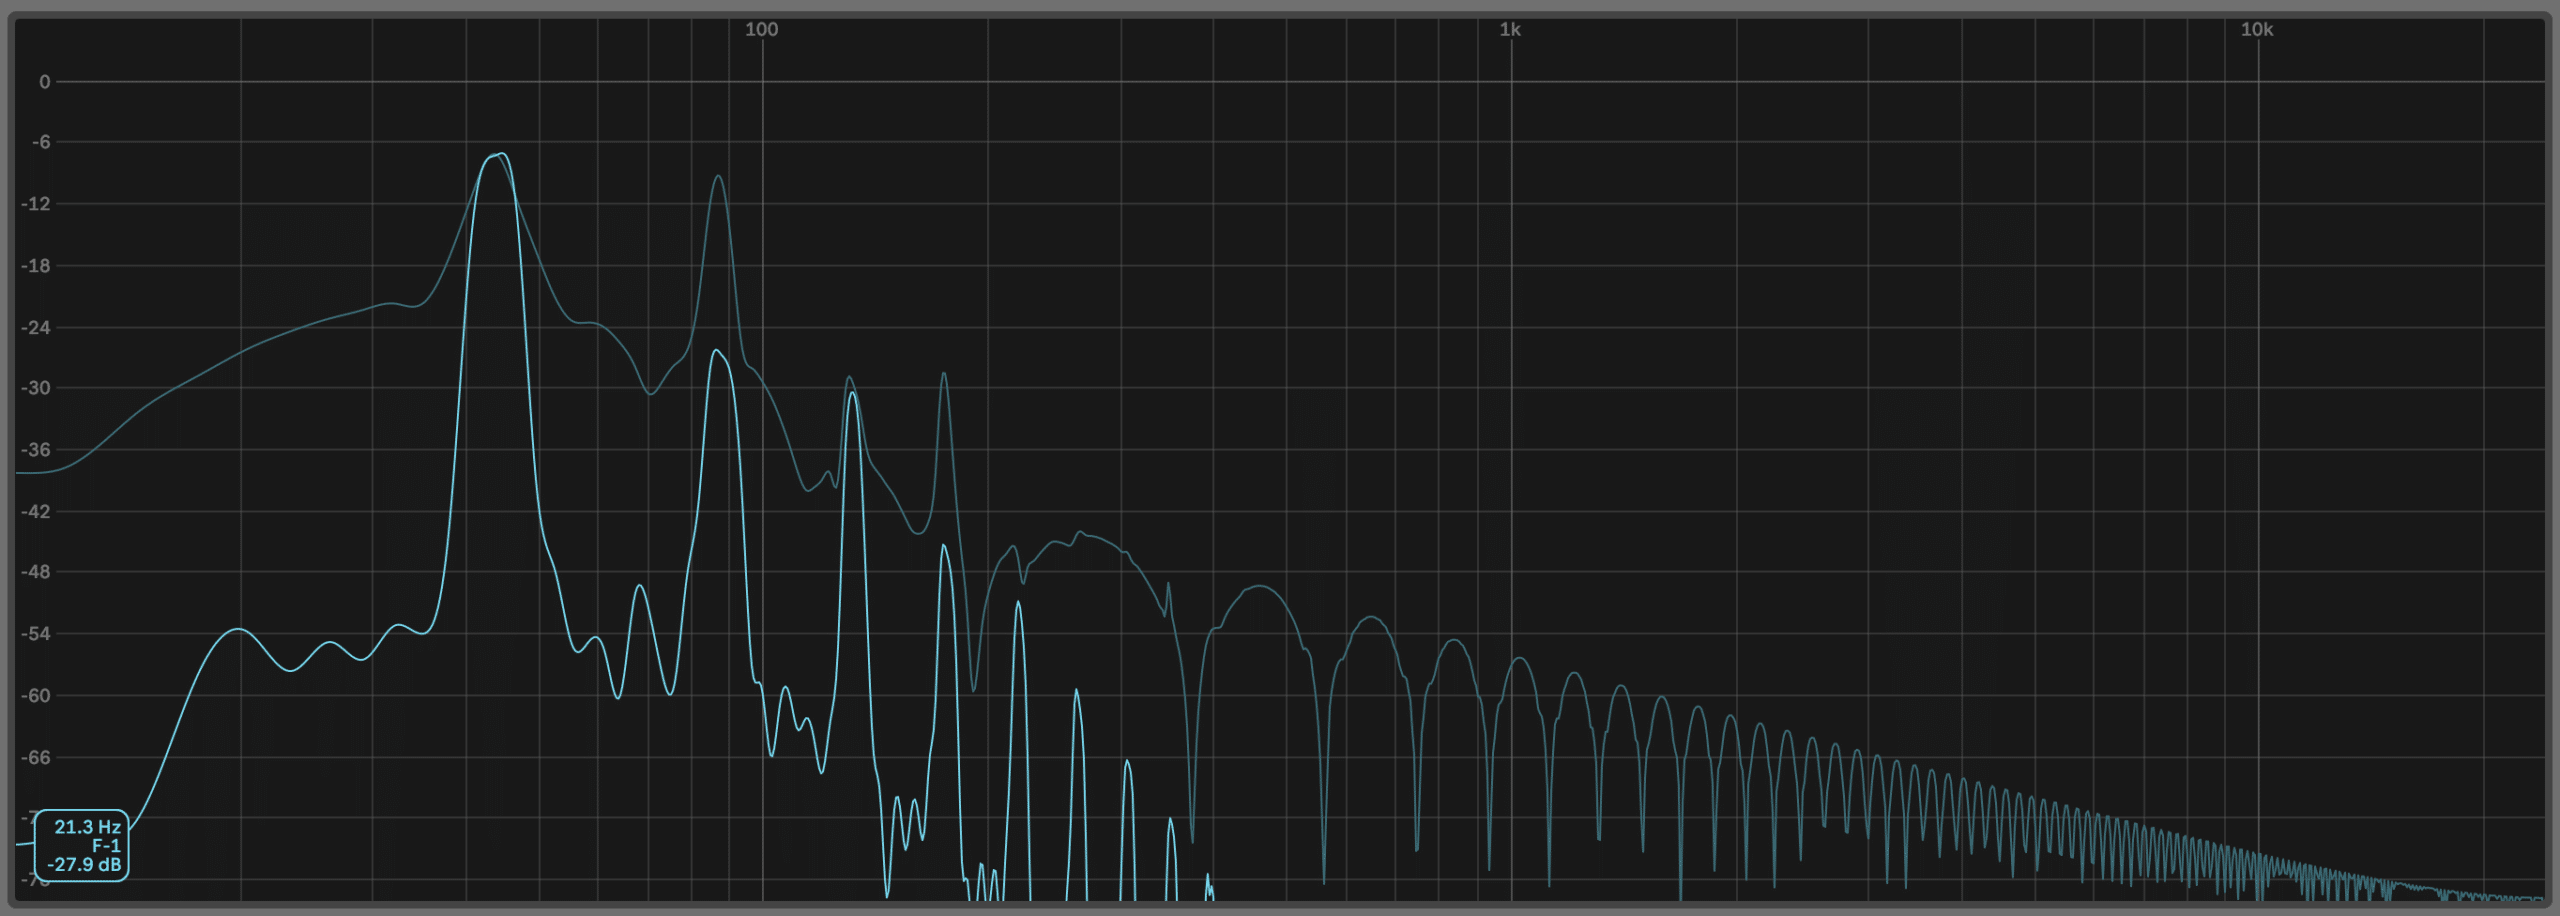
Either approach will ensure that there are more bass harmonics in your sound that come through on phones, AirPods, laptop speakers, and other smaller systems.
Tip 13: Use reference tracks
As just mentioned, Liquid Drum & Bass is often engineered both for club and home playback. So it can be tough to mix well for both environments.
This is where using a professionally-released reference track in a high-quality format (ideally WAV/AIFF, but MP3 320 is acceptable) will help point your mix in the right direction.
Remember to occasionally pair this with Tip 10 so you can hear how your track will stand up to other tracks in terms of loudness too.
You can also use reference tracks for more than just the mix – you can copy structure, get inspired from the arrangement, break apart sounds, and a whole lot more. They’re like cheat codes for music production.
New to music production? 🧑💻
Watch our Free Masterclass on how to learn electronic music production the smart way (without months of confusion & frustration) 👇
Tip 14: Have some classic breaks on hand
Sometimes you need something different, and sometimes you just need an Amen or Think break.

Having a good-quality, processed version of these breaks is invaluable, so it’s always there when you need it.
By the way, we have a full guide on the best classic breaks here 👀
Tip 15: Branch outside of Liquid/DNB sample packs
Although this article is specifically for Liquid DNB tips, the best inspiration for a Liquid track will usually come from outside the walls of our own genre…
So if you’ve been using strictly Liquid packs for sound selection, it’s time to dig deeper.
Dive into some techno sequences, funk basses, ambient pads, soul vocals, melodic house synth presets, or some indie guitars.
Tip 16: Save your go-to sounds
I typically think of go-to sounds as drum samples, FX samples, and certain instrument patches/sounds. These are the types of sounds that you will re-use in one form or another across multiple tracks.
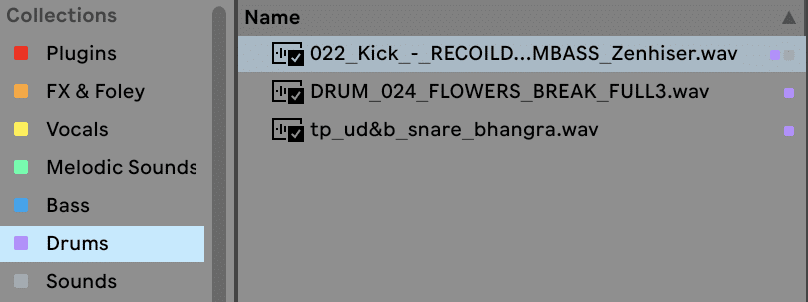
That way you won’t have to scroll for hours trying to find that perfect kick sample you came across once. Just save it using something like Ableton Live’s Collections feature, or a dedicated ‘Favourites’ folder, and you’re good to go for next time.
Tip 17: Structure your track early
There’s nothing more frustrating than getting stuck in your 16-bar loop and not knowing where to go next. This is where using dummy clips to structure your track early can be super helpful.
Just create a clip/pattern (depending on your DAW) for every 16 bars of your track like so:

You can even combine this with Tip 13 and create your structure around a reference track.
Tip 18: Get some good bass presets
If you’re newer to Liquid DNB production, you might feel daunted by sound design – particularly for basses.
Even though there are some who shun the usage of presets, the reality is that everyone uses them. So why not download/buy a few presets to test out in your own productions?
Tip 19: Work with a featured vocalist
This one is less of a ‘Liquid DNB tip’, but if there’s a ‘cheat code’ for Liquid DNB production, it’s working with a vocalist.
I worked with my friend Fleur De Mur on this track here, and it brought a whole other dimension to an otherwise instrumental tune:
Or if you are a good singer yourself, you can record your own voice (like I did here on my track Transitions):
If you’re not sure how to reach out to vocalists, I’ll be posting a guide on how to do this later 😉
Tip 20: Get a good piano
Pianos are essential in many streams of Liquid DNB, and obviously, in music in general.
And for a reason – they sound classic, warm, and homey.
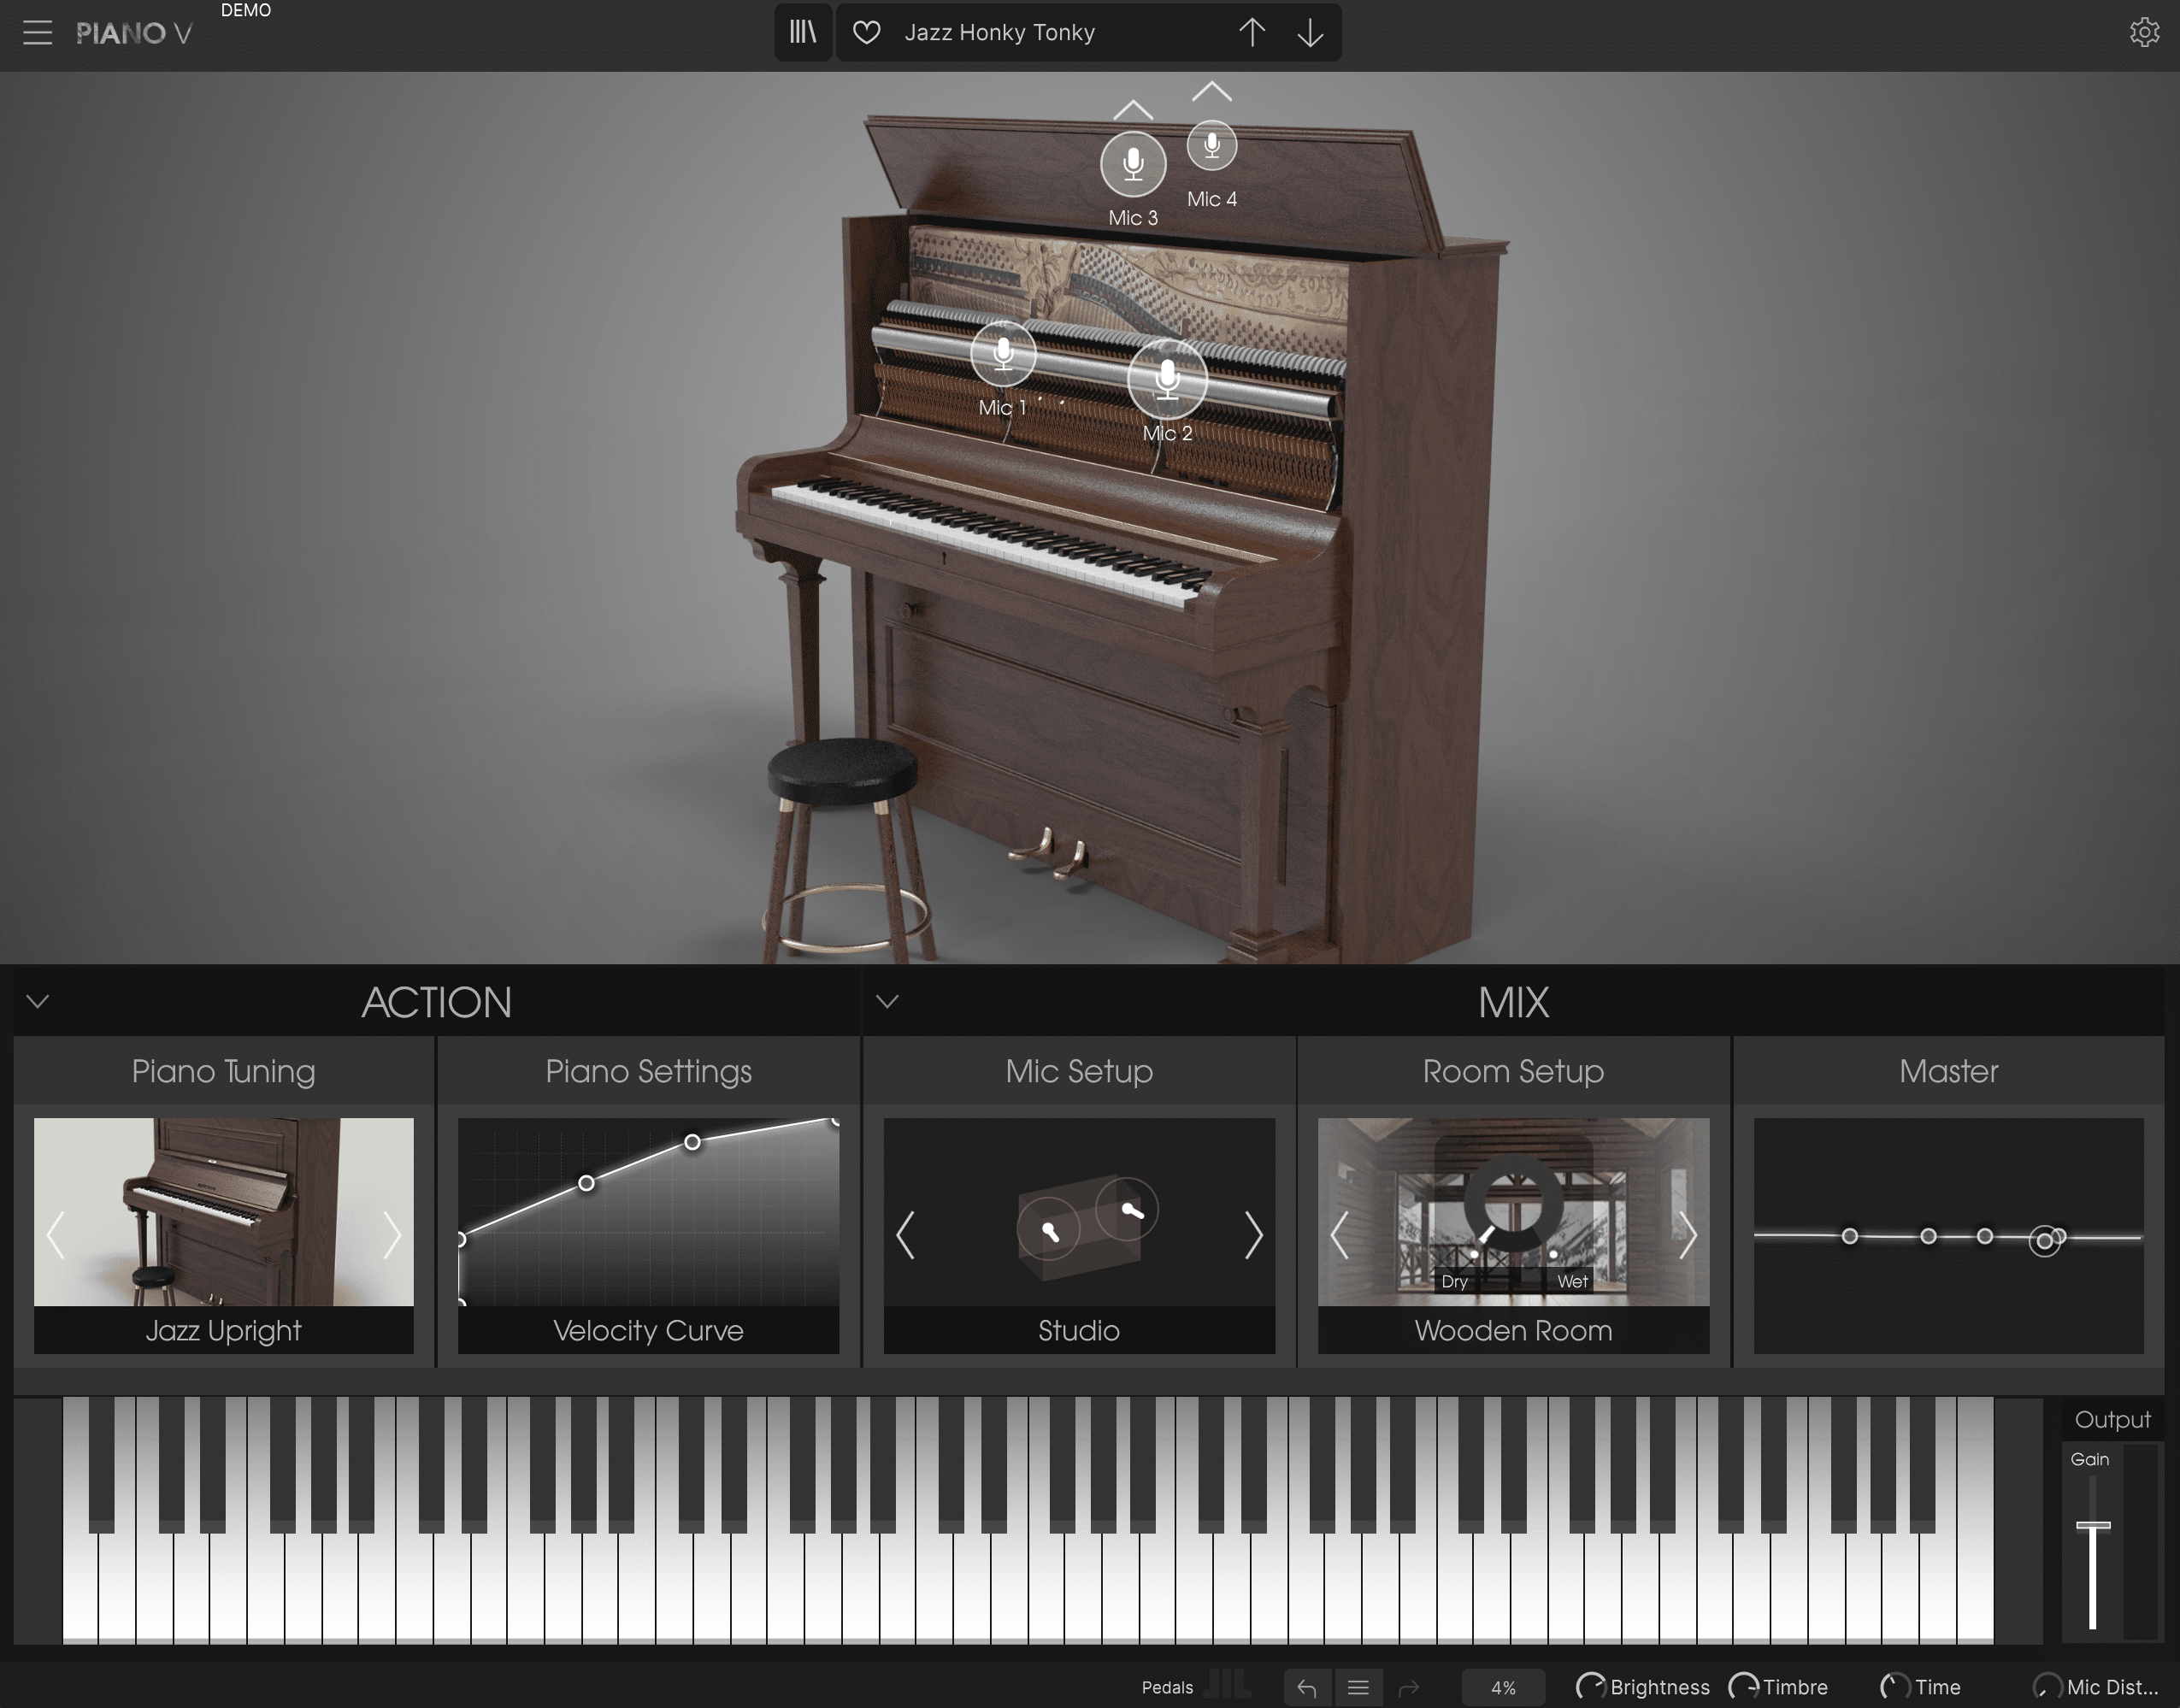
Here are a few that I recommend:
- Spitfire LABS Soft Piano (free)
- Spitfire x Ableton Upright Piano (included in Ableton Suite)
- Kontakt The Giant (paid)
- Arturia Piano V (paid)
Tip 21: Spice up your drums with fills and variations
This is one of the most important liquid DNB tips.
Since rolling drums are a staple in Liquid DNB, they can become tiring on the ears quite fast.
To help, you can create fills and drum variations to keep things interesting.
There’s no one-size-fits-all approach here, but here are a few creative ways you could implement this:
- Mute your drums for the last 2 bars of a 16-bar section
- Filter your drums down over the second 8 bars of a section
- Use a snare fill sample leading into the drop, and between sections
- Bring in a ride cymbal for a certain 16 bars to increase energy
- Vary up the kick and snare rhythm every 4-8 bars to keep things fresh
Tip 22: Create a unique second drop
Nothing is worse than a second drop that is a 100% replica of the first.
This is where you can create a payoff for listeners who have listened to your song for this long.
Plus, it’s nice to have a different second drop if your DJing and the next track isn’t cued up in time (it’s like you mixed into another tune anyway).
Here’s an example in a track of mine, ‘Chateau’:
Tip 23: Everything sounds good through a low-pass filter
Pianos. Pads. Drums. Basslines.
All of these sound good through a low-pass filter – by removing the harsh edge, you can sculpt a much smoother arrangement (and mix).
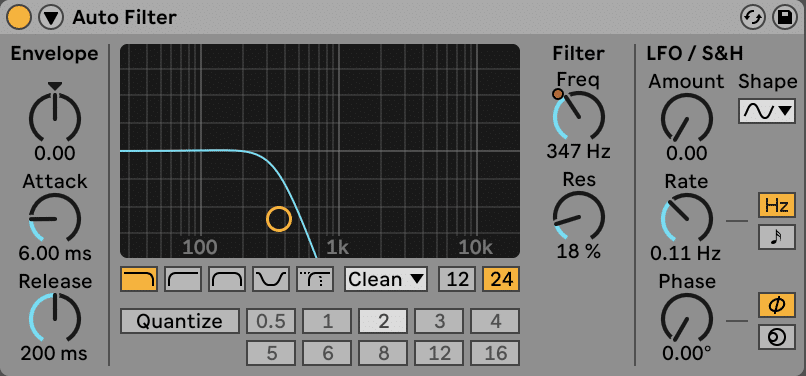
This effect sounds particularly great on musical elements and bass sounds, and I use it heavily in my How To Make Liquid DNB mega-guide.
Tip 24: Use a real bass sample
I don’t know about you, but I always tend to write ‘original’ basslines. But sometimes chopping and processing a real bass guitar sample can be a fun way to re-compose your own bassline.
You can hear on a track like Alix Perez’s ‘Desanka’ that the bassline isn’t synthesized – it’s sampled:
With a bit of low-passing and EQ, you can make a bass guitar riff work in any track, or you could use an instrument like Kontakt/Trillian to write your own riff!
New to music production? 🧑💻
Watch our Free Masterclass on how to learn electronic music production the smart way (without months of confusion & frustration) 👇
Tip 25: Watch your sidechain
If you’re a producer who never uses sidechain from your kick/snare to your bassline and other instruments, you might be missing out on a game-changing mix technique and creative pumping effect…
A great example of this in action is ‘Dayfall’ from Telomic & Emily Makis:
But in my experience, when a student sends me a track with too much sidechain compression, it can ruin the mix (depending on the vibe).
I tend to aim for a subtle effect these days – no more than 3-6dB of gain reduction.
Tip 26: Stop mixing your instruments too quietly
One of the biggest problems I hear with Liquid is that the drums and bass are in the forefront, but the musical pads, synths, pianos, and other instruments are all pushed toward the back.
Let’s not forget that the whole point of Liquid is that it’s more ‘musical’ than other DNB subgenres, so we want those musical elements front and centre.
To help with this, maybe reference a track (like in Tip 13) that has a solid musical hook, and mix your track similarly.
Tip 27: Delay is your best friend
Want anything to sound more spacey and atmospheric? Simply use a BPM-synced delay.
I personally love using syncopated intervals like 3/4, 3/8, and 3/16 delay tails on vocal chops and ear candy like so:
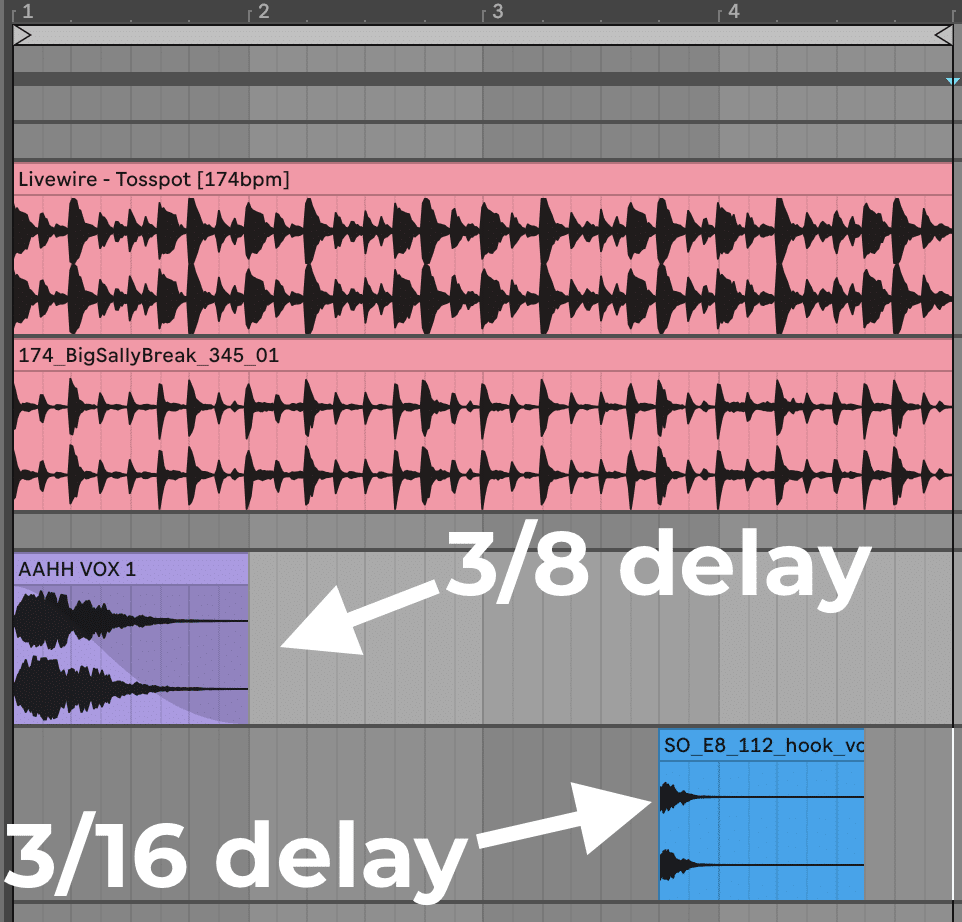
If you want to get more exotic, you could use an analog echo plugin like Soundtoys Echoboy. So much character to those delay tails!
Tip 28: Incorporate your unique influences
Drum & Bass can sometimes feel like a rinse-and-repeat game, so it helps to have your own unique sound if you want to stand out.
Here are a few examples:
- Play guitar? Why not make that a part of your sound?
- Have a knack for sound design? Use your technical prowess to create never-before-heard sounds.
- Love listening to classical music? Try incorporating some unique strings and piano combinations into your music.
- Sing? Use your own vocals in your music!
- Can you play a weird instrument? It might give your music a unique edge.
I get it – we all love other DNB too (I’m a huge LSB fan for example). But the more you can think outside the box, the greater your music will stand out.
Tip 29: Automate the volume
Speaking of LSB, one tip I learned from one of his videos a long time ago was to automate the loudness of elements throughout sections.
This works well in more ‘rolling’ style tracks that repeat the same idea a lot – just put on something like Ableton’s Utility and change the gain by 6dB over a 16-bar section.

Works wonders to build tension and create energy.
Tip 30: Create the classic sine wobble bass
This bass is a classic in a lot of Liquid Drum & Bass for a reason – it sounds so freaking cool.
You can hear it in tracks like Cnof’s ‘Sincere Joy’:
Start by loading up a sine wave in your favourite synth. I’ll be using Serum:
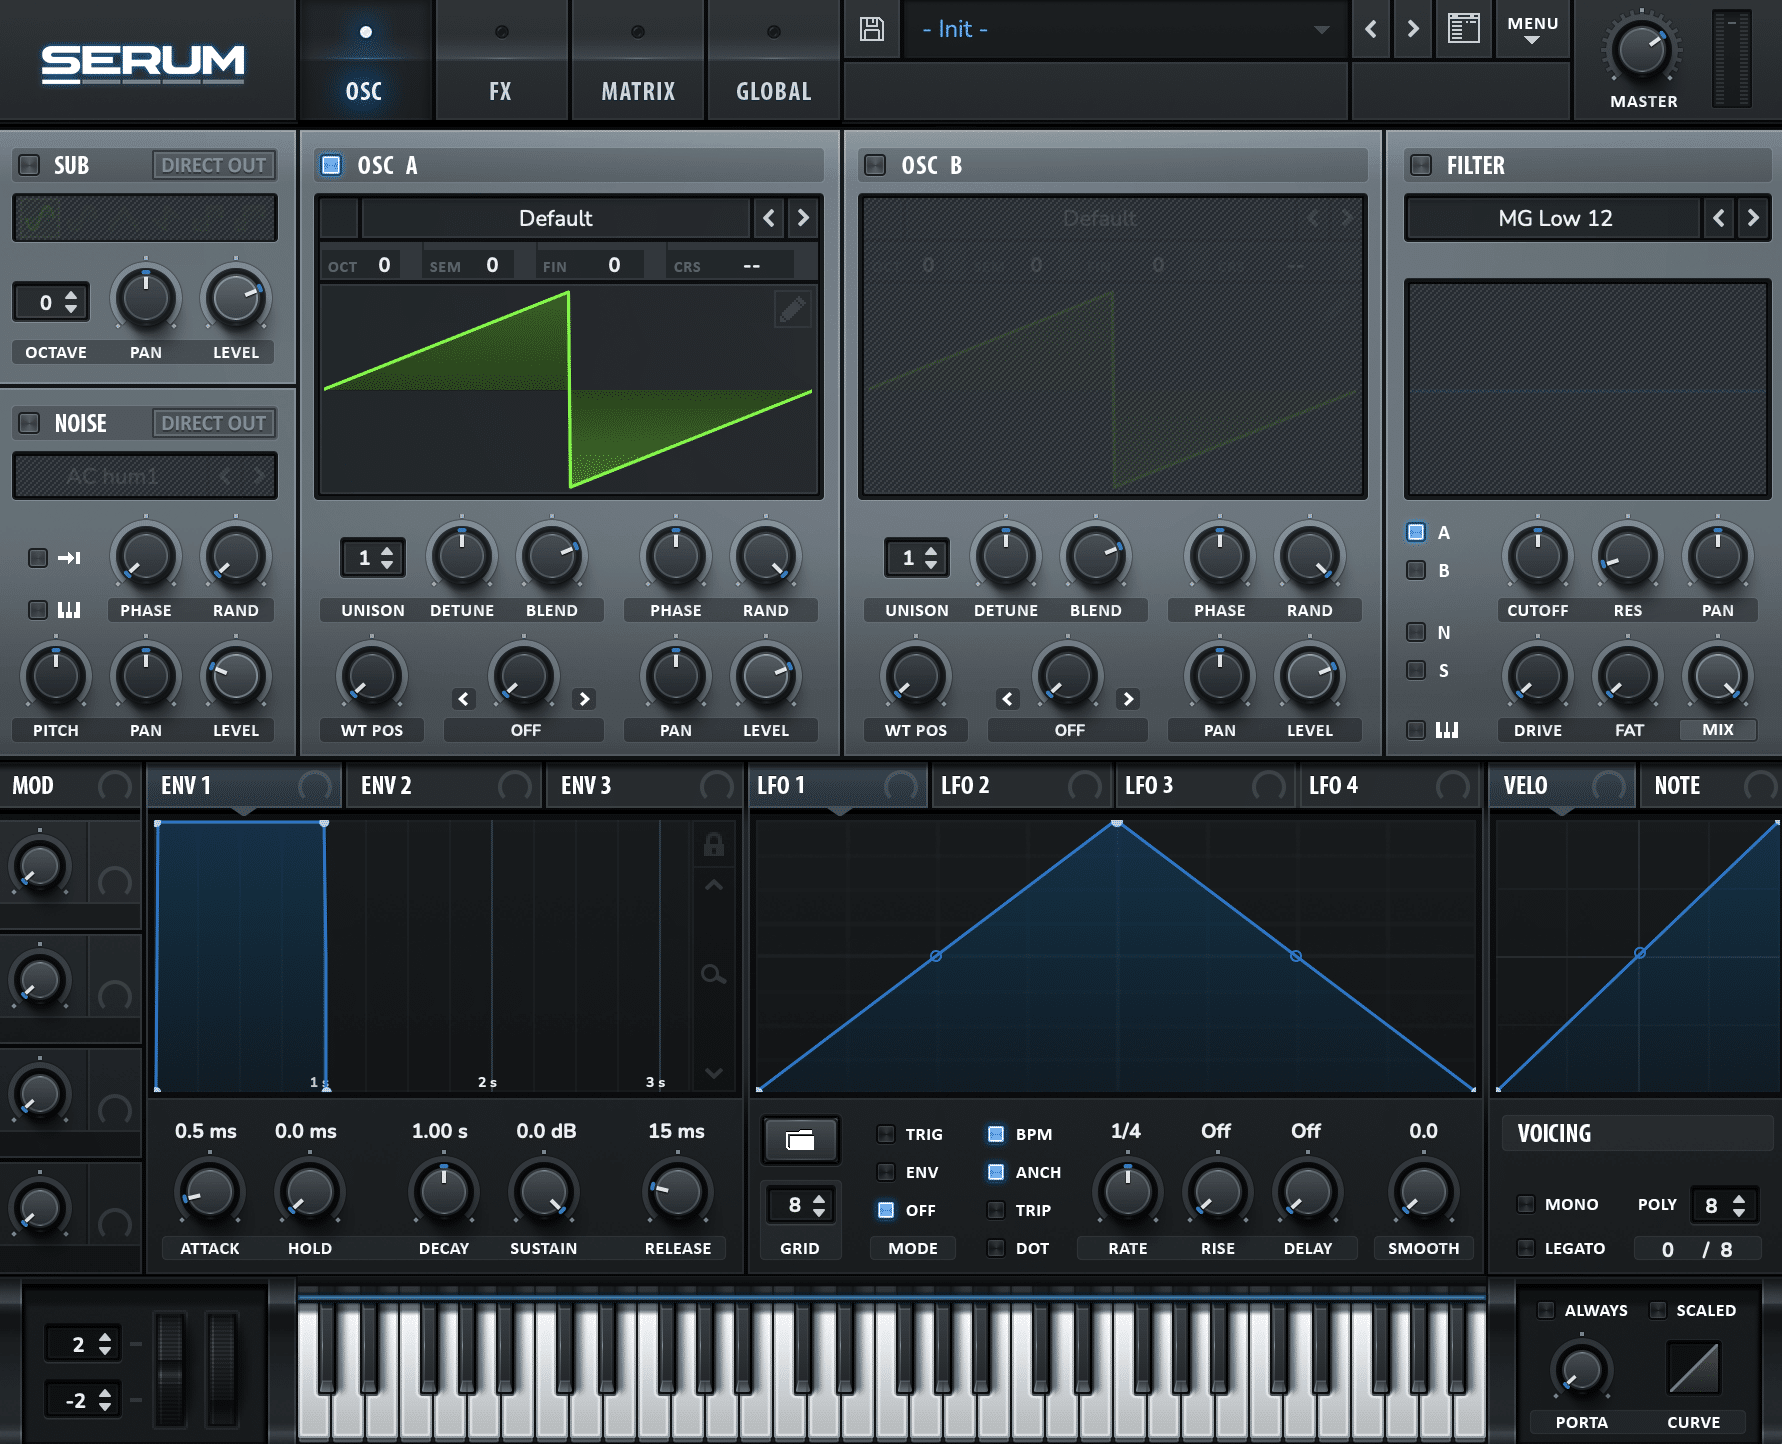
Pitch it down -40st. Then turn on the second oscillator with the same sine wave. But this time, you’ll want to pitch it up +40st.
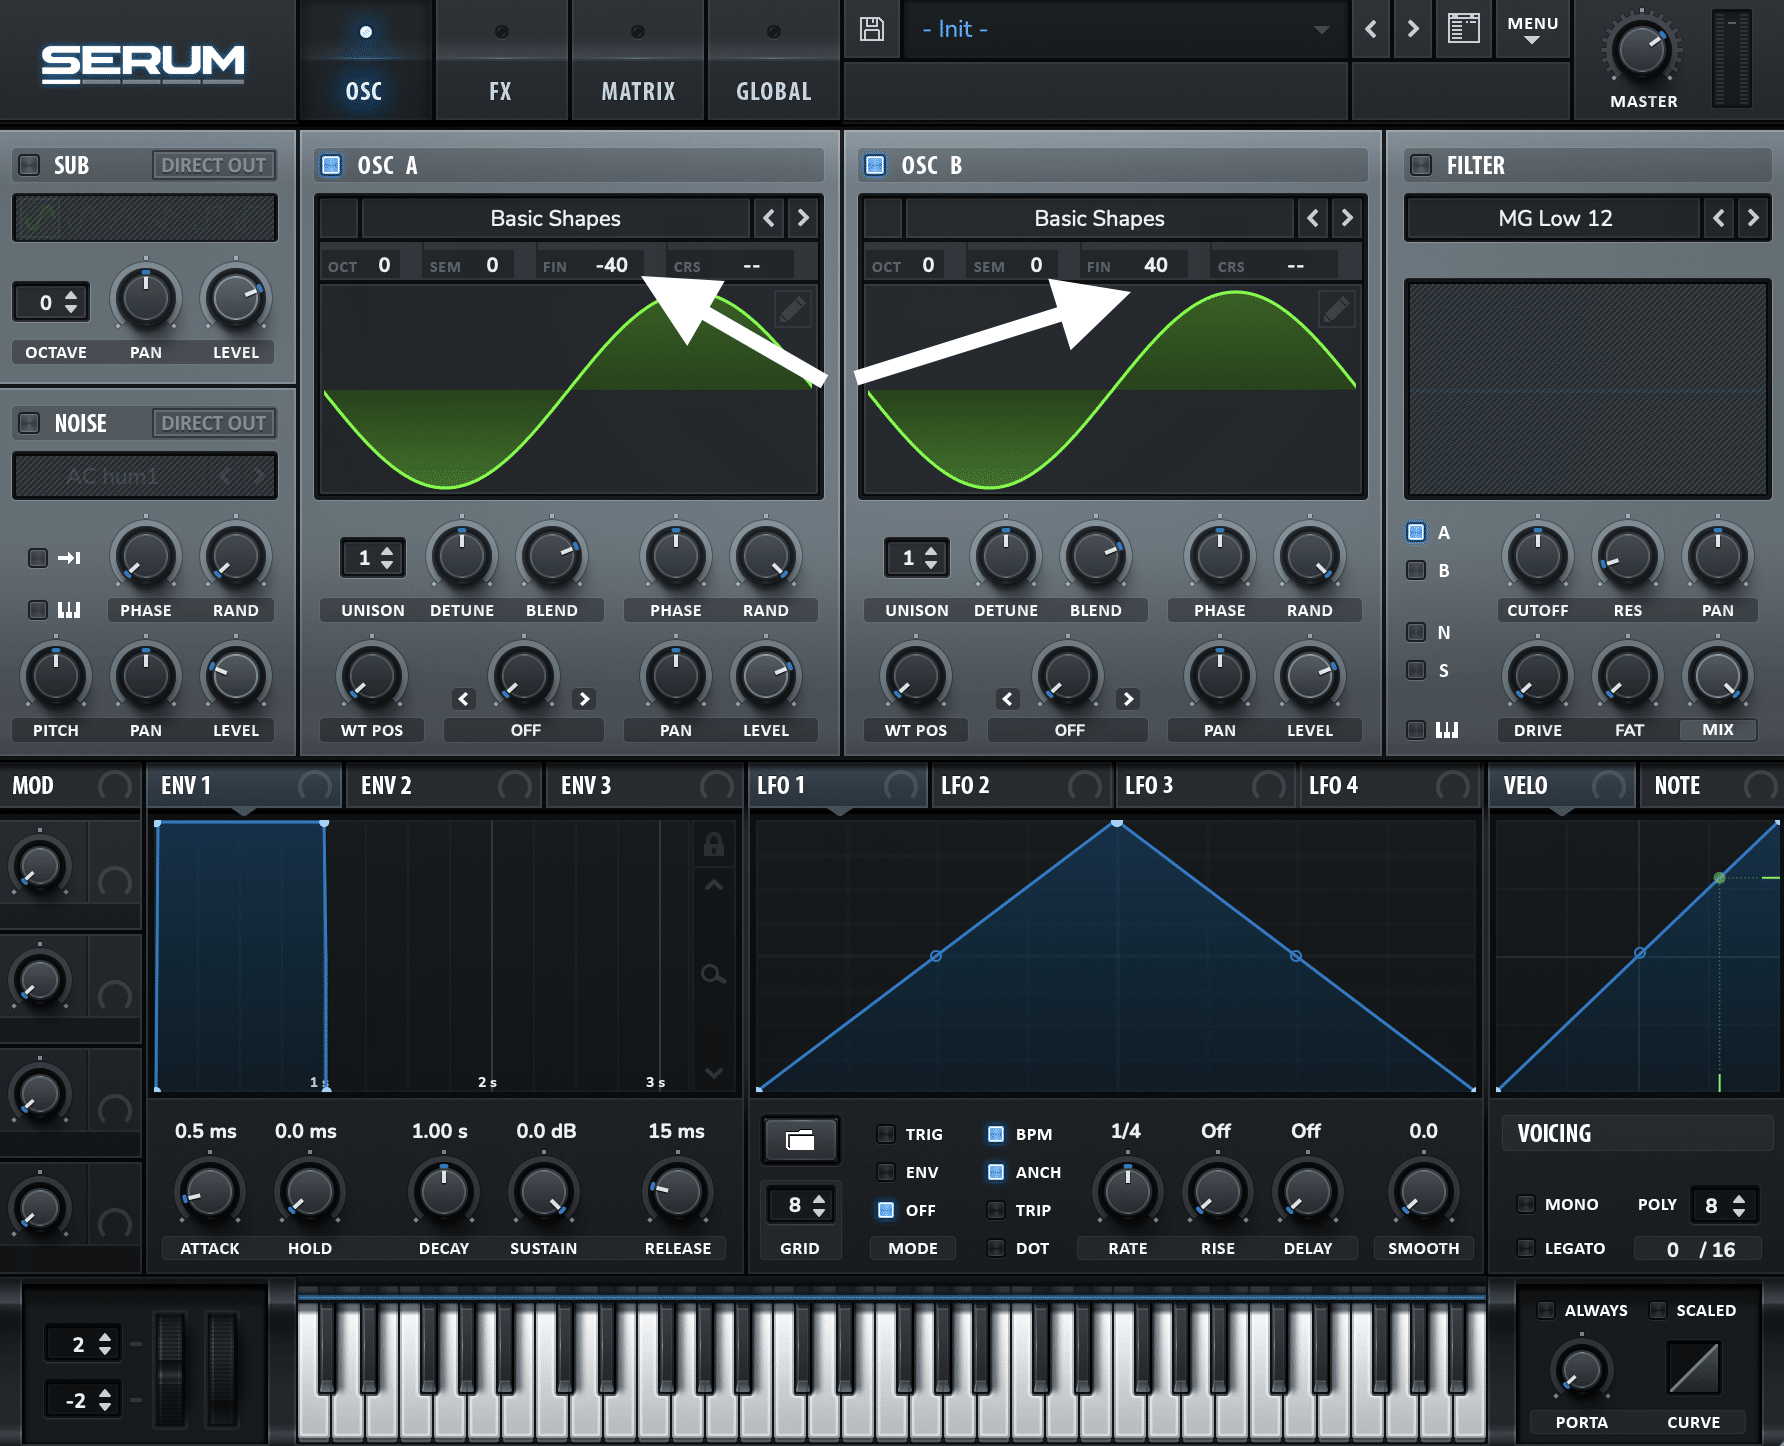
Now the two sine waves are slightly detuned from each other, creating phase cancellation.
Simply change the amount of detune in either direction to increase or decrease the speed of the wobble.
Lastly, save this preset so you can come back to it whenever you need it!
Tip 31: Create your own effect racks
One of my favourite Liquid DNB tips is to process musical samples with a number of FX. Sometimes it’s fine to use samples as is, but I like to make them sound wildly different.
One way I do this is by saving preset combinations of my favourite FX into Ableton Audio Effect Racks (although you can do this in any DAW one way or another).
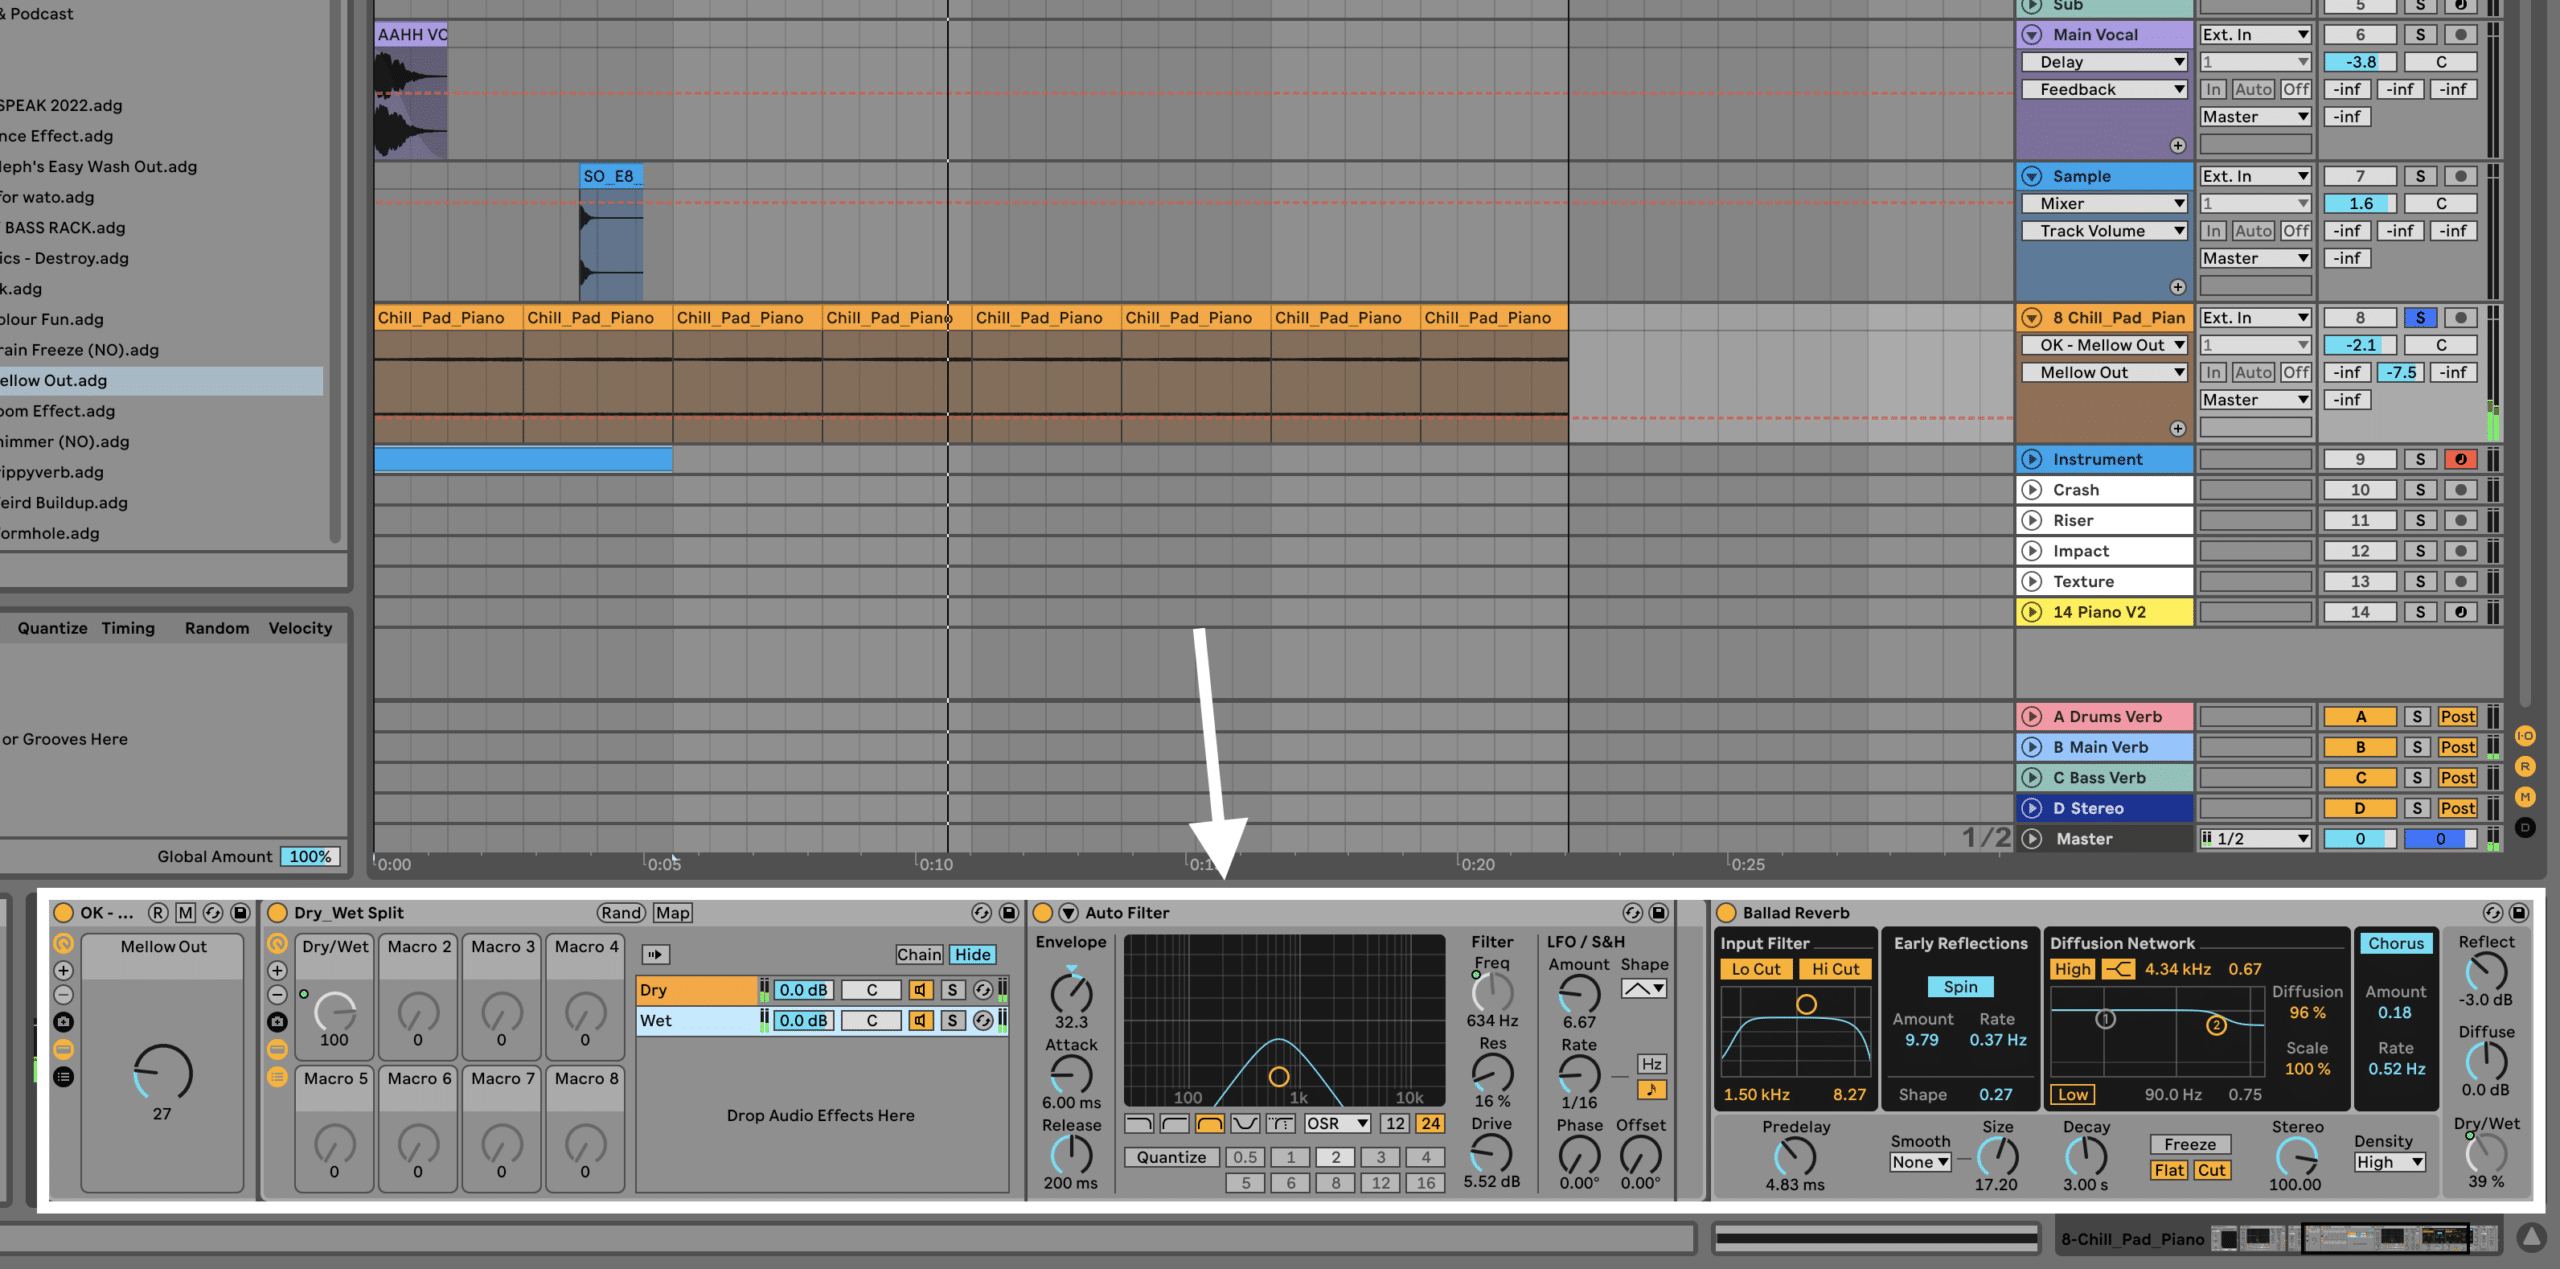
Here I’m using a moving filter as well as reverb to give this piano sound a unique texture.
Having these on hand can inspire you at any time!
Tip 32: Layer up your FX
A standard crash or white noise riser does its job, but they’re a bit boring…
Instead, try this Liquid DNB tip. Layer up these ‘boring’ FX samples with others that have a bit more flavour.
For example, I like to use dubbed-out laser sounds, chimes, field recordings, and more to spice up my tracks.
Tip 33: Switch to a half-time drum pattern in the breakdown
A great way to bring down the energy while maintaining the vibe of a tune is to create a half-time drum pattern.
Half-time drums could entail using a hip-hop drum loop, reprogramming your main drums to fit a half-time meter, or whatever your creativity says to use.
A great example of this is Winslow’s ‘Breaking News (feat. TRAC)’:
Notice how the intro has you thinking this is a hip-hop track, but then the drums switch in the build to a double-time pattern?
Tip 34: Sample from obscure sources
While I love Splice and Loopcloud, sometimes the types of sounds you can find there all feel a bit ‘samey’…
This is where digging for more obscure sounds can help inject something different into your music. Here are a few places I go looking:
- Random videos on YouTube (watch out for copyright here)
- Freesound.org (great for finding ANY sound imaginable)
- Record things on your phone (great for unique sound design)
- Certain sample subreddits (r/hotsamples, r/drumkits etc.)
- Sampling old records or music recordings (again, watch out for copyright here)
So feel free to branch out and use some of these resources!
Tip 35: Collaborate with someone else
If you’re running dry on ideas, a collaboration can reinvigorate your creativity. And in Liquid DNB, collabs are super common.
Ideally, it’s nice to do an in-person collab so you can pick up a few tips and tricks from the other person, but if not, over the internet is great too (especially if you’re getting to see the project file).
If you want to know the best with to ask for a collaboration, I’ll have another resource on this soon. But for now, check out this article from my friend Simon (aka Millstreet) on the EDMProd blog.
Tip 36: Change the key of your track
Getting sick of your track? Feel like the bassline isn’t hitting right? Need to switch things up?
Simply changing the key of your track could be precisely what you need.
All you have to do is change the pitch of your MIDI/samples up or down a certain number of semitones, and voilá – your track is in a different key!
Note: you can leave your atonal instruments (drum and FX) in the original key.
And last…
Tip 37: Keep experimenting!
While a list of Liquid DNB tips like this can be a huge help, the best thing you can do is come up with your own techniques that define your unique take on the classic Liquid sound.
Experiment with distortion types on your bass. Resample your pads and chop them up. Combine multiple vocal samples to create a unique pattern.
Go bonkers and make something awesome!
New to music production? 🧑💻
Watch our Free Masterclass on how to learn electronic music production the smart way (without months of confusion & frustration) 👇
Want Even More Liquid DNB Tips?
If you loved these 37 liquid DNB tips, you’ll love my email newsletter even more! I send 1-3 emails each week with exclusive tips only for our subscribers. And you can sign up here!
Have any questions? Feel free to get in contact with me at [email protected] 😊

