Ableton tips can truly boost your workflow and creativity.
But how do you know where to find all the little shortcuts and hacks? Us producers often don’t know what we don’t know.
In these cases, sometimes you just need a big bunch of Ableton tips, and that’s why we wrote 100 of them, from beginner, to intermediate, and to advanced.
Let’s delve into them. 👇
Discover the tools that expert producers already know and use in our free Ableton Workflow Bible 🧑💻
Master Ableton Live and make music twice as fast. Avoid frustration when designing new sounds. Pick up creative techniques that will change the way you produce 👇
Beginner Ableton Live Tips
These Ableton Live tips are little features or hacks that newer producers can easily pick up. The key here is to follow along, and not just to read them. If you’re anything like me, you’ll forget the moment you close this window.
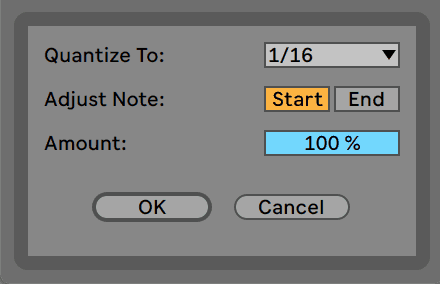
Tip 1: Quantize Settings
Whether you’re drawing or playing in notes, sometimes you need to tidy up the timing of certain notes, so that they play ‘on the grid.
Simply press Cmd + U on Mac or Ctrl + U on Windows to quantize your notes. If you need to get specific, press Shift + Cmd + U or Shift + Ctrl + U to bring up the settings, pictured above.
Here you can set the quantization size, the amount of quantization (having less than 100% can maintain a ‘human feel’) and whether you want the start and end of notes to snap or not.
Tip 2: Play Modes
You might have guessed that pressing Spacebar is the shortcut for Play and Stop. But you may also have noticed that it begins from the same spot every time you toggle between Play and Stop.
If you want to continue playback from the last stopped point, simply hold Shift + Spacebar instead.
On top of that, you can hold Option + Spacebar (Mac) or Alt + Spacebar (Windows) with a portion of the arrangement selected, allowing it to play only the highlighted area, stopping at the end. Neat.
Recommended: How To Use Ableton Live (for Beginners)
Tip 3: Computer MIDI Keyboard
If you don’t use an external MIDI keyboard controller, then you still have an option if you’re wanting to play notes in.
With this Ableton Live tip, Press M on your computer keyboard and suddenly, A to L on your keyboard become playable, with the same layout of keys.
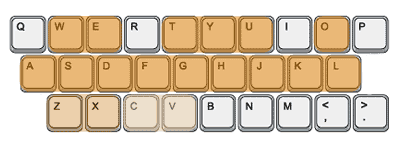
Credit: Sonicbloom
Tip 4: Fades
Fades have always been one of Live’s strong points, allowing an easy way to clean up the start and end of audio clips. It also happens to be my favorite Ableton Live tip 😁
Simply make sure Automation Mode isn’t enabled by pressing A and hover over the clip. You’ll see two handles on the left and right you can drag, as well as two curve adjustors:


Tip 5: MIDI Editor Note Preview
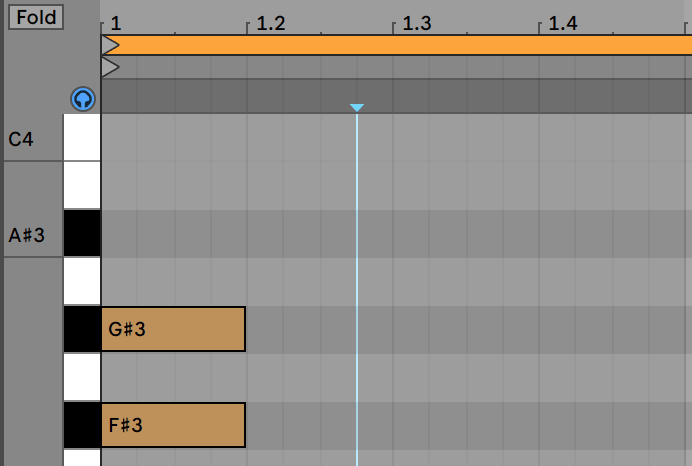
Ever wanted to hear the notes you’re drawing in, while you do it?
Just activate the MIDI Editor Preview by hitting the little blue headphone icon in the top left of the editor – you’ll be able to make sure your notes sound good before you hit play, and save a bunch of time.
Tip 6: Alt + U to minimize/maximize all tracks
This shortcut has changed a lot throughout the years of updates, but as of 10.1, the latest way to minimize and maximize all your audio tracks in the arrangement view is to press Alt + U. Great way to save precious screen real estate.
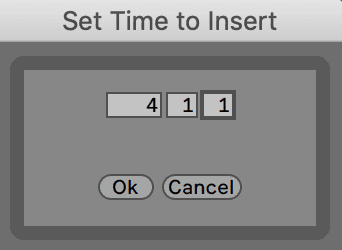
Tip 7: Insert Time
This Ableton Live tip blew my mind, and admittedly I learned of it way too late in my music production journey.
Press Cmd + I or Ctrl + I will allow you to insert a specified amount of bars, beats and 1/4 notes at the insert marker’s position.
Great for adding new sections into your tracks, or changing up the arrangement.
Recommended: Ableton Tutorials: The Best 21 YouTube Channels
Tip 8: Duplicate
This is another one of those Ableton Live tips which will make you think that Ableton is the best DAW.
Simply press Cmd + D (Mac) or Ctrl + D (Windows) with at least one clip selected. It will then automatically copy and paste the selection directly after the selected clip. This alone will shave off lots of time in your production sessions.
Tip 9: Split Clip
An underrated tool for chopping, mangling and arranging audio and MIDI in new and exciting ways.
You can split clips in two ways:
- Move the insert marker to a defined point in the middle of a clip, and press Cmd + E (Mac) or Ctrl + E (Windows) – the clip will become two
- Select part of a clip and press the same as above – the selection will become separate from the rest of the clip
Tip 10: Collections – Save Your Favourite Resources
When Ableton Live 10 was announced, I was over the moon about this feature-to-be – Collections.
In essence, you can save samples, racks, files and presets into different collections, even if they are all over the place on your hard drive.
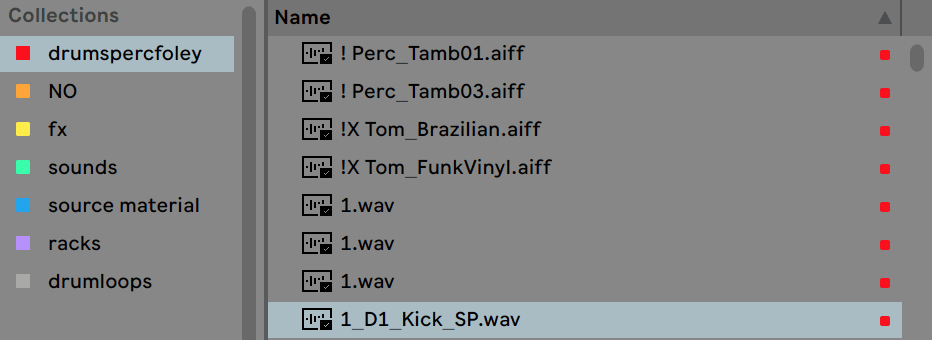
Bonus tip: Spend some good time going through your samples, presets and files, organizing them into collections so that when it comes to making music, your favourite sounds are at hand whenever you need them.
Tip 11: Consolidate
Cmd + J (Mac) or Ctrl + J (Windows) is your friend. This handy shortcut allows you to combine multiple MIDI or audio clips into one, and/or ‘bounce’ the fades so that they become part of the audio clip.
Tip 12: Effect and Instrument Racks
Fast workflow is what makes Ableton Live so great, and racks are a gamechanger in this department.
These devices group together with other devices and plugins into one ‘chain’ so that you can drag and drop on demand, loading everything up as is.
There are three types in Ableton, and each is self-explanatory:
- Instrument Racks
- Audio Effect Racks
- MIDI Effect Racks
Tip 13: Deactivate Clips
Sometimes you aren’t sure if a certain element or sound is going to work, but you don’t want to delete it.
To avoid this, us the following Ableton Live tip. Deactivate instead by pressing 0 with the audio clip, MIDI clip or MIDI note in question. You’ll see the following box come up, allowing you to resurrect it whenever you need by pressing the same shortcut.

Tip 14: Assign Track Color to Clips
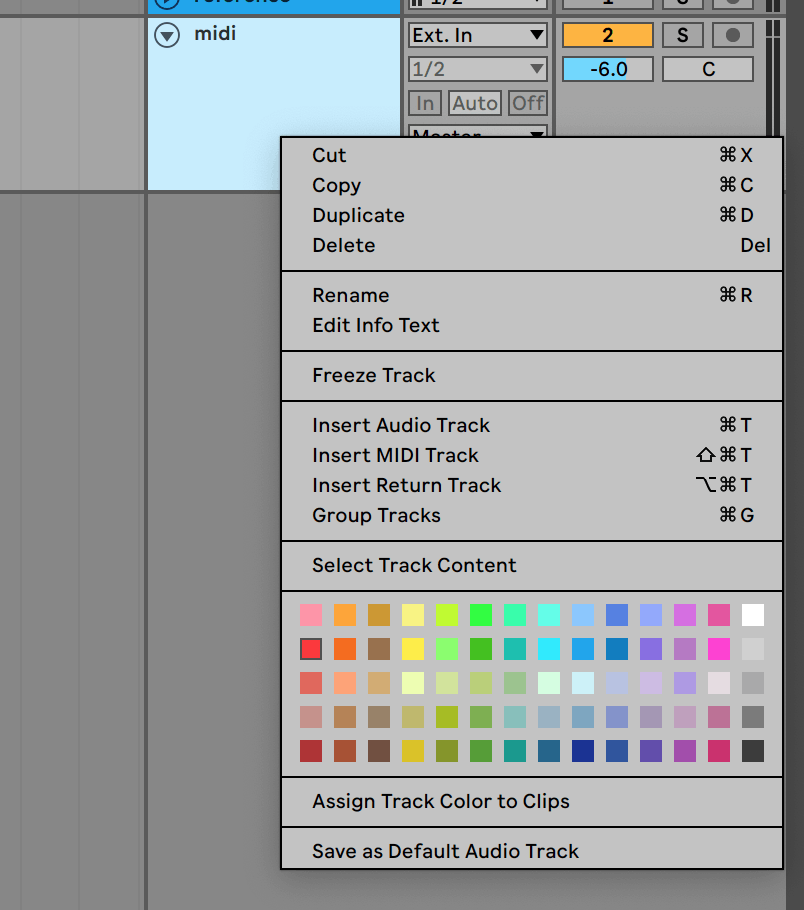
Color coding isn’t just for school students – it can be for producers too.
Right-clicking on any track will bring up a myriad of color options for you to select from. But extending that, you can apply that same color to all clips on that track, or in the case of groups, all tracks and their clips – simply select Assign Track Color to Clips in the same menu.
Although it’s something a lot of producers neglect, organising your project files in this way can inspire creativity when returning to the project at a later time.
Tip 15: Freeze/Flatten
Freezing and flattening is an Ableton Live staple. Instead of exporting or recording tracks, simply right-click and select Freeze to temporarily convert it to a new audio file.
This can help save CPU is you’re running hungry plugins like Serum with 16 voices on both oscillators.
Flatten the audio after the freezing process to make the change permanent, which is great for committing to an idea and creating a new ‘starting point’.
Tip 16: Groups
Most DAW’s have some sort of grouping function built into them, but Ableton makes it extremely straightforward.
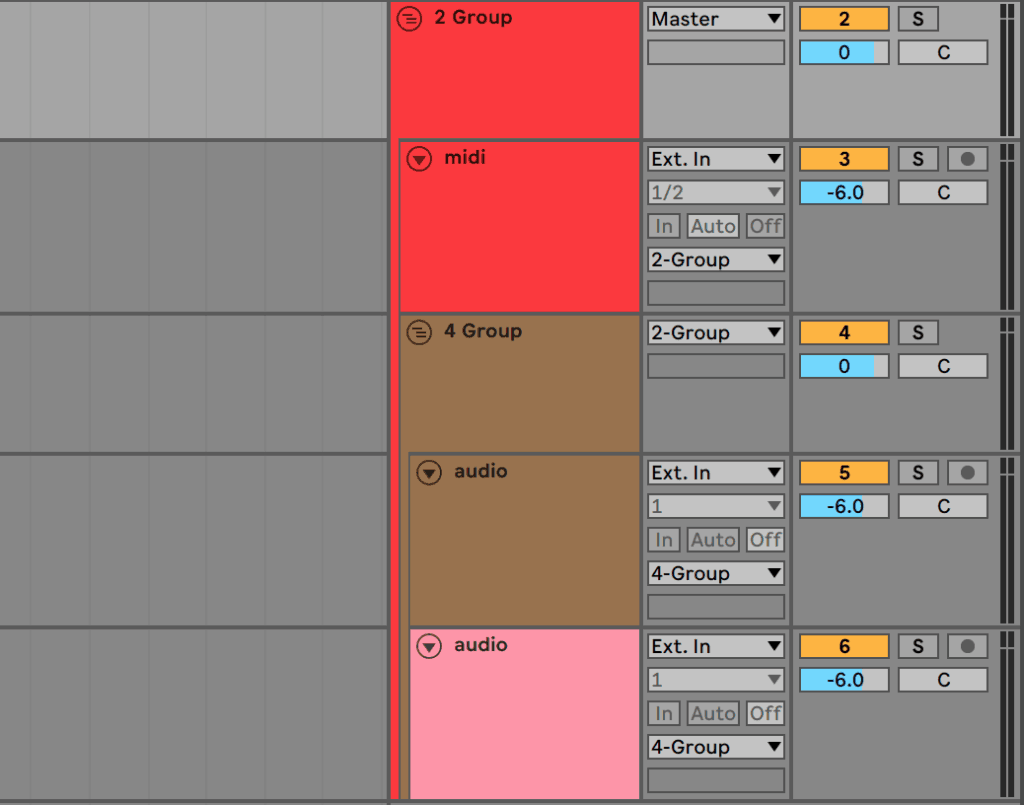
Select the tracks you want in a group, and press Cmd + G or Ctrl + G to combine them. Now you can add processing to all the sounds at once. The fun doesn’t stop there though.
As of Live 10, you can group groups into groups using the same process, allowing for creating hierarchy in your projects.
Tip 17: Slice to New MIDI Track
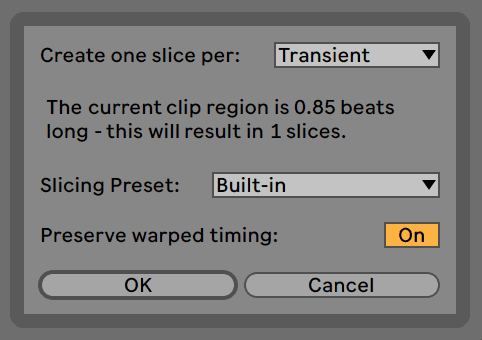
If you work with drum loops, or want to try an interesting creative exercise, then find a sound in the Browser and right-click, selecting Slice to New MIDI Track.
This process chops the audio up into a pre-defined set of cuts and puts them into a Drum Rack, making them playable.
Tip 18: Move Notes in Octaves
A quick hack – instead of pressing the Up key 12 times to move notes up or down an octave, press Shift + Up to automatically move selected notes in octave intervals. Another time-saver.
Tip 19: Reverse Audio
Reversing sounds always yields interesting results, and fortunately Ableton Live makes it so easy.
With this Ableton Live tip, not only can you navigate to an audio clip’s view and hit Rev, but you can also press R with the clip selected to reverse sounds on the fly.
Tip 20: Invert MIDI Notes
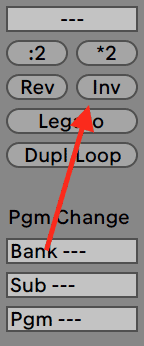
Our own workflow can sometimes be our own creative blocker. Inverting MIDI notes is one of my favourite ways to introduce some unexpected results into the process.
Select some notes in the MIDI editor and hit the Inv button to swap the note positions around, from the highest note to the lowest.
Often you may find that you have to edit the results, however it’s a great starting point for new creative ideas.
Tip 21: Half/Double Clip in MIDI Editor
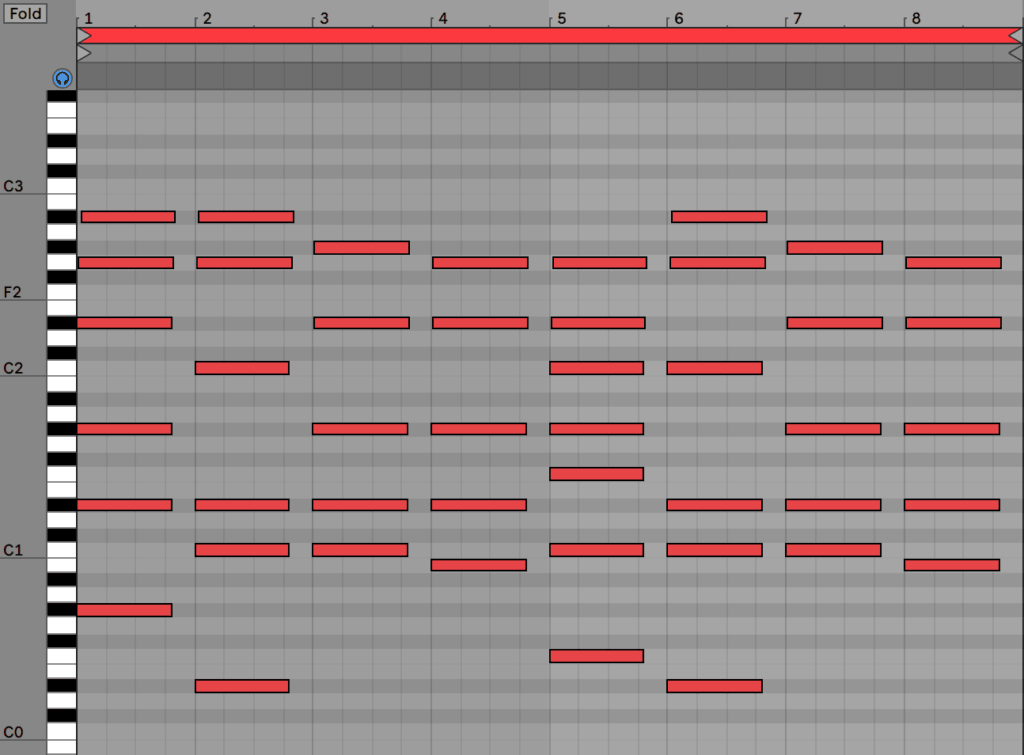
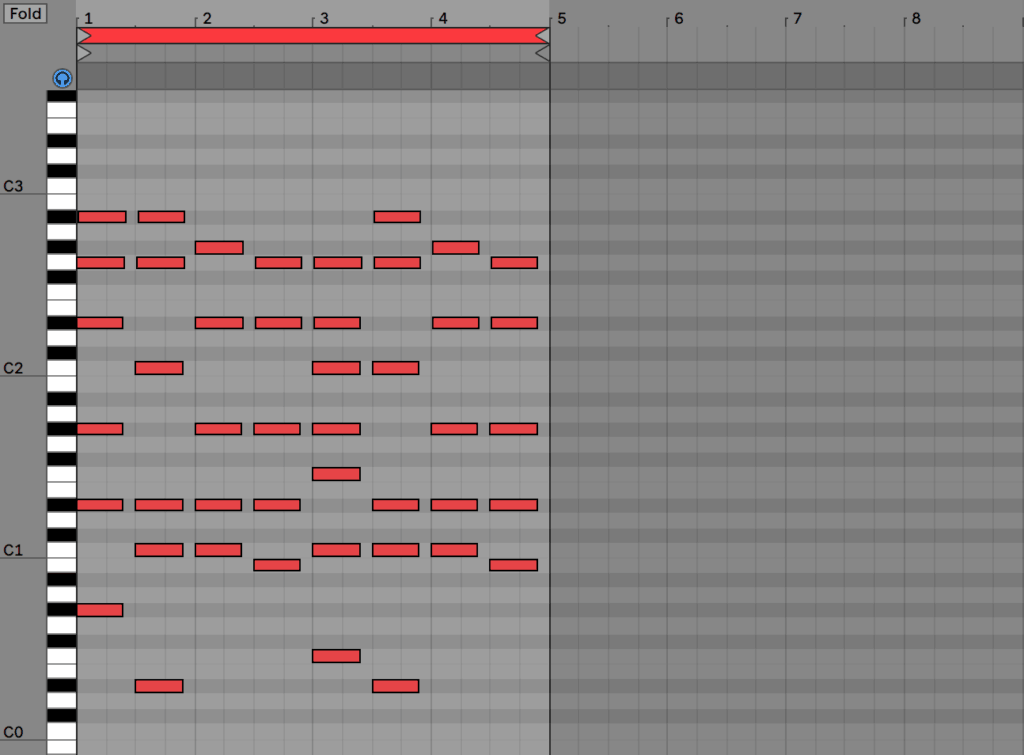
On the topic of cool MIDI tricks, you can also half or double the length of a MIDI phrase by pressing :2 or *2 in the same view. Sometimes things sound better slower (or faster).
Tip 22: Change Preview Output
There’s a little dark blue volume slider next to the master volume that you may have seen. This is the Preview/Cue Volume, and it has two functions:
- Alters the volume of sounds you preview in the browser
- Alters the volume of a second output set in the audio preferences, like headphones (usually for live performance)

I personally use this Ableton Live tip mostly for the former, allowing me to preview samples at a lower or higher volume, depending on my track.
Tip 23: Add Extra Folders
Ableton has great built-in sounds and tools, but you’ll definitely be wanting to use third-party samples. Simply click the Add folder… button on the bottom right of the browser to navigate to a folder you’d like to add.
Voila – it will appear under the Places segment.
Tip 24: Preview Samples with Arrow Keys
Another Ableton Live tip for the browser is to use the arrow keys to navigate between samples, rather than clicking with a mouse.
You can use the Right key to preview the sound over and over again, Up and Down to navigate through the list, and the Left key to move to the above folder.
Recommended: How To Sample Music
Tip 25: Global Quantization Menu
You have to remember that Ableton Live was originally predominantly a live performance tool, so the Global Quantization is set to 1 bar by default. That’s the little delay you’ll notice when moving the play marker to a new point while playing your track.

With this Ableton Live tip, you can customize this by adjusting the settings in the top left of the interface. I have mine set to ‘None’ so there is no lag when I move the marker.
Tip 26: Optimize Arrangement Width & Height
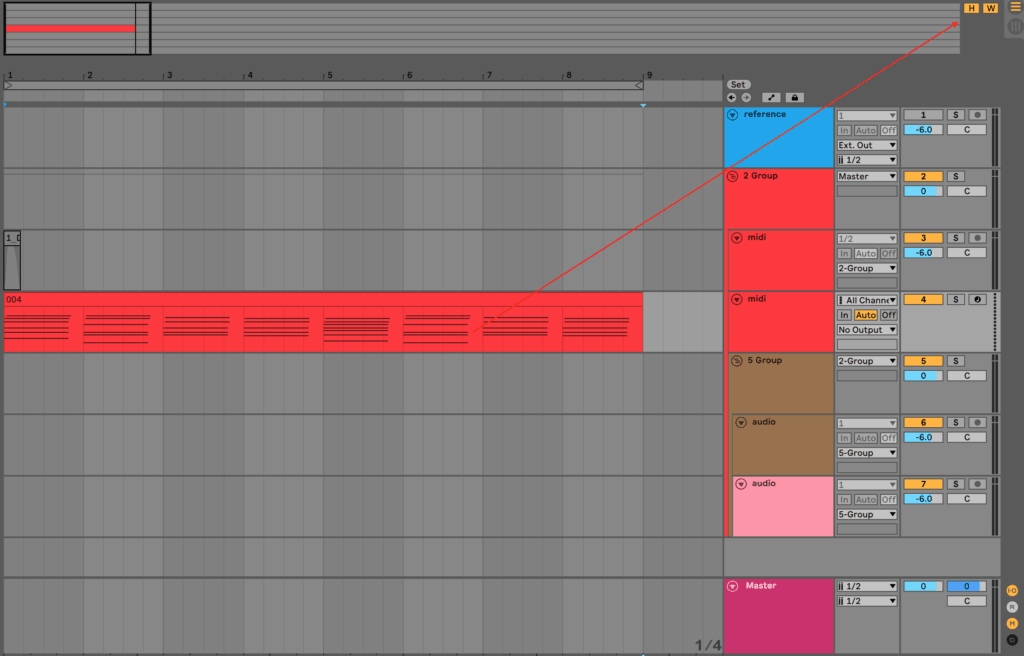
A new feature of Live 10 is the ability to adjust the width and height of tracks so they fit all content on the one screen. You can use these by clicking the ‘H’ and ‘W’ in the top right corner of the arrangement overview.
Tip 27: Show/Hide Track Features
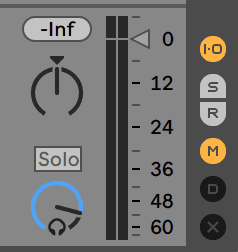

No matter if you use Session or Arrangement View, you can show and hide certain elements of the tracks depending on what you use.
The following can be shown/hidden:
- Input/Output
- Sends (Session)
- Returns
- Mixer Section
- Track Delay
- Crossfader (Session)
Recommended: Mixing EDM: The Complete Beginner’s Guide
Tip 28: Fold Devices
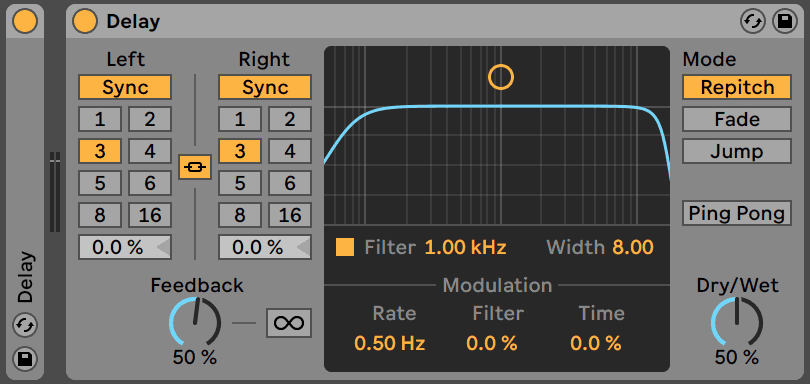
If you haven’t learned by now, Ableton is all about saving screen space as much as possible. The same goes for the devices you use.
Double click on the name of any device or plugin to turn it into a minimised version. This is great if you have an effect that you just throw on and don’t tweak much.
Tip 29: Fold Notes
On the topic of folding you can do the same with the MIDI editor, only showing the keys that currently have notes on them. This works great for Drum Racks, where typically only a certain range of notes are used.

Tip 30: Grooves
Grooves are at the heart of many different genres, and Ableton definitely built their software with those styles in mind.
The two wavy lines denote the groove pool to the bottom left of the screen – this is where any grooves you use in your project will be displayed.
You can then add grooves in a number of ways, however, the best way is to drag a .agr file from the Browser directly onto a MIDI clip or warped audio clip, applying a specified amount of swing. Note that this doesn’t move the MIDI notes unless you press ‘Commit’ afterwards.
You can find grooves in the Core Library in Ableton Live, under the Swing and Groove folder. Personally, the MPC 16 swing presets are my favourite for that old-school house feel.
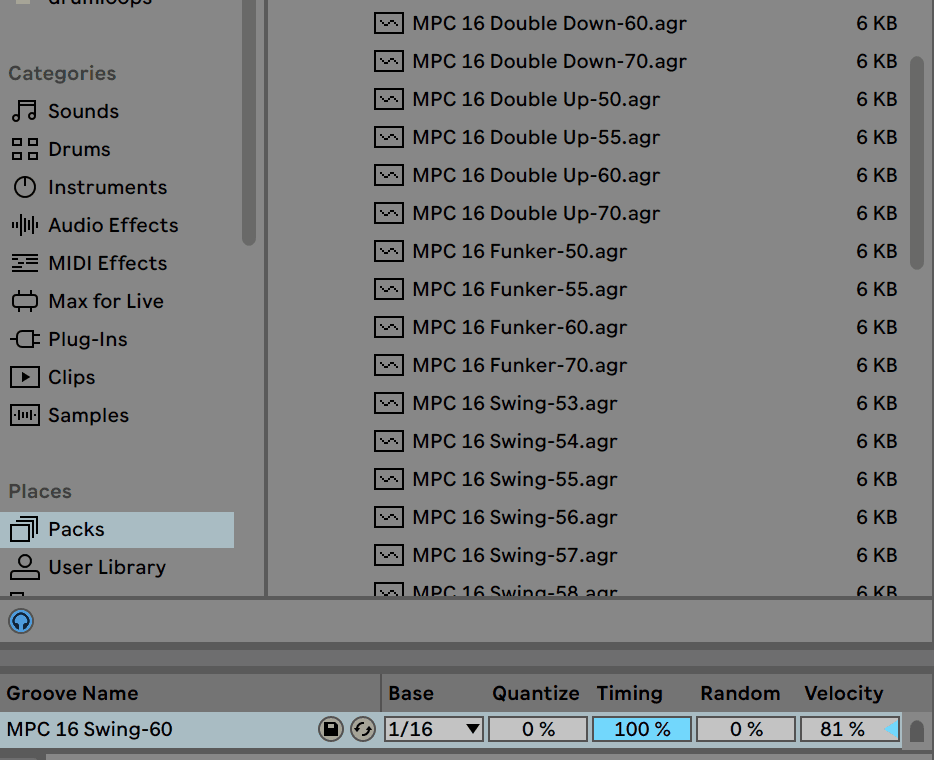
Bonus Tip: to add groove to all clips in the project, select a clip and press Cmd + A or Ctrl + A to select all clips in the arrangement, then select it from the dropdown on the left in the clip view.
Tip 31: Scenes
If you love to use the Session View for live performance or jamming, scenes are a godsend.
Why? They allow you to trigger all clips on a row at once. This is great if you want to work on an A and B section separately and see how they flow into each other.
If you name a scene to a BPM, it will also change the tempo upon triggering it.
Tip 32: Insert New Track
This might seem obvious to some, but you can insert a new track faster than most would think.
Simply press:
- Cmd + T or Ctrl + T for a new Audio Track
- Shift + Cmd + T or Shift + Ctrl + T for a new MIDI Track
- Opt + Cmd + T or Ctrl + Alt + T for a new Return Track
Tip 33: Buffer Size in Audio Preferences
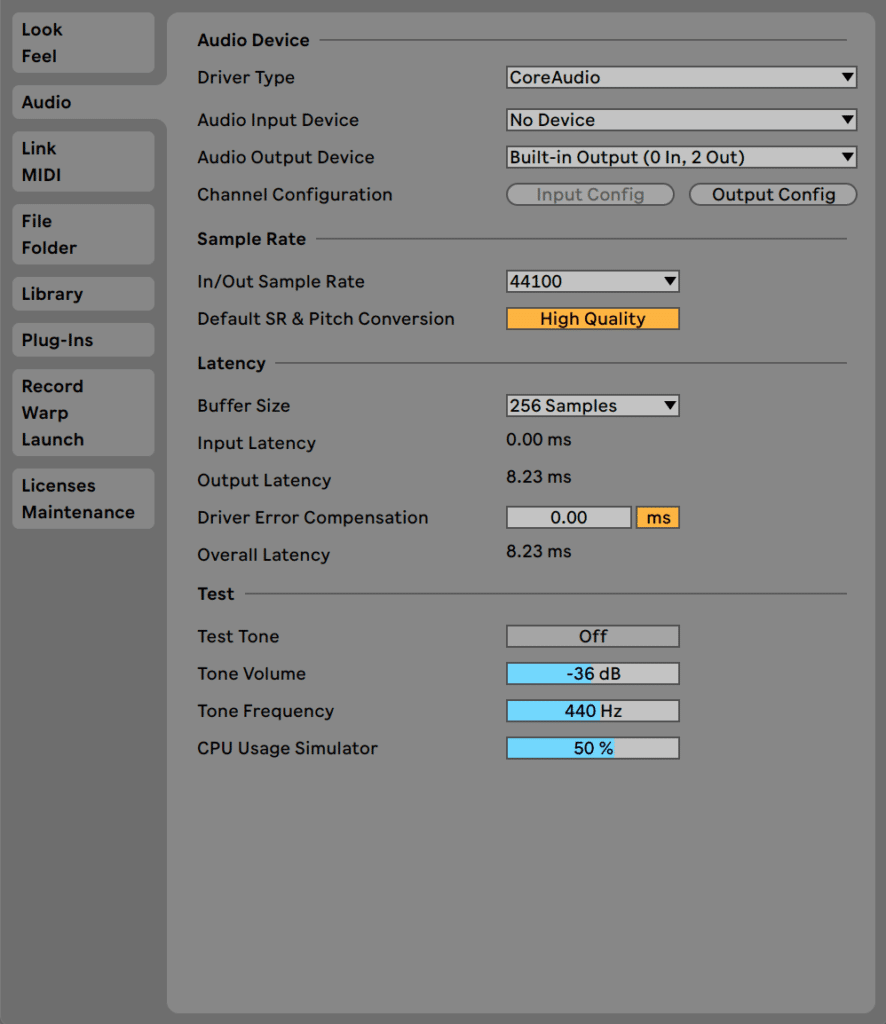
Dropouts are the bane of any producers existence, so this will likely be a frequent task for you.
Press Cmd + , on Mac or Ctrl + , on Windows to access the preferences, navigate to the Audio tab and select an appropriate buffer size.
Remember:
Lower Buffer Size = Lower Latency = More CPU Strain
Tip 34: Draw Mode
Double-clicking to add notes in the piano roll can seem cumbersome, but there’s a better way.
Activate the Draw Tool by pressing B or by clicking the pencil icon in the top right of the Ableton interface. Now note creation and deletion is just one simple click, and drawing automation in manually is simple!
Tip 35: Loop Section
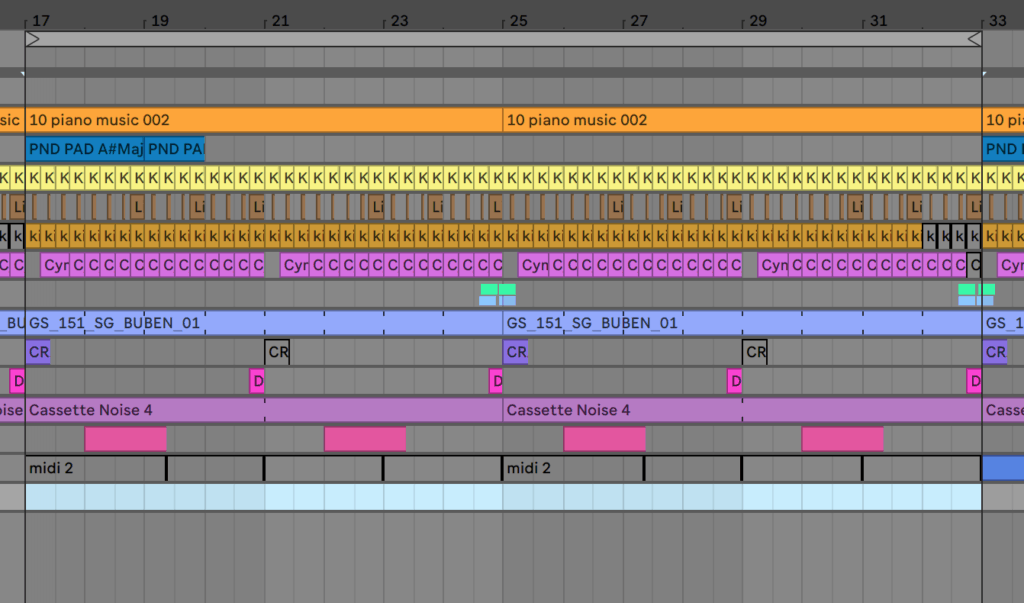
Music production often requires listening to the same section over and over again to get a good idea of what your track sounds like. This is where the Loop Switch comes in handy.
To use the Loop Switch, select a portion of the arrangement and press Cmd + L (Mac) or Ctrl + L (Windows). Now playback will loop in that section until you deactivate it by pressing it again.
Tip 36: Capture MIDI
Another feature included in Live’s incredible 10 update – ‘Capture MIDI’ allows you to ‘record’ what you played into your computer before you even pressed record.
That’s right, it remembers what you played, which is great news for lost ideas.
Tip 37: Follow
This one is relatively simple. Next to the play button is the ‘Follow’ feature, which means the arrangement view will follow the location of the marker as playback occurs.
It can be frustrating when you’re listening to your work, and you’re not sure where in the song you are. This fixes that problem.
Tip 38: Save Device Presets
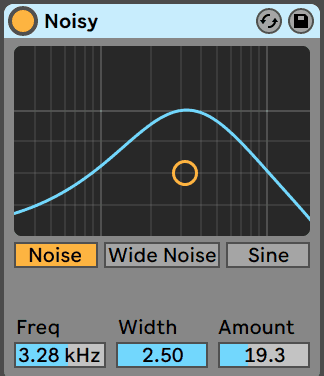
Following off the back of effect and instrument racks, you can easily save presets for your Ableton Live devices.
Simply tweak the device to the desired settings and hit the save icon on the top right, and you’ll save a preset in your user library.
You can also go back and access this preset from the ‘Audio Effects’ category by clicking on the dropdown next to the device.
Tip 39: Metronome Sound Customization
Sick of the same old metronome sound?
There are three different sounds to choose from:
- Classic – the default synthetic click
- Click – a short, plastic-y sound
- Wood – a hollow natural sound
A little adjustment like this can go a long way to change things up in the studio.
Discover the tools that expert producers already know and use in our free Ableton Workflow Bible 🧑💻
Master Ableton Live and make music twice as fast. Avoid frustration when designing new sounds. Pick up creative techniques that will change the way you produce 👇
Intermediate Ableton Live Tips
These Ableton Live tips require a little more know-how, and to some the may seem basic, while to others they may seem advanced.
Tip 40: Compare MIDI Clips
Producers love to layer sounds. It’s a great way to get fullness in a mix, and it helps achieve sounds that aren’t otherwise possible.
The issue is, having notes spread out between instruments and sounds can get pretty confusing. Luckily, Live has a great way of dealing with this.
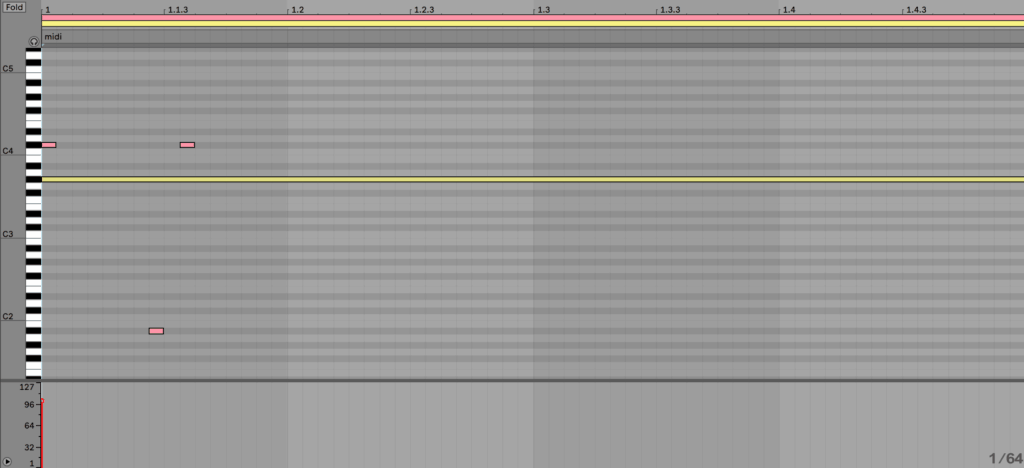
Simply select multiple MIDI clips by holding Shift + Left Click and the corresponding MIDI will appear in the editor, greyed out. To quickly switch between clips, there is a long bar at the top of the editor, which you can hover over and click to edit that clip.
Tip 41: Warp Marker Movement
When you’re a new producer, the warp modes available in Ableton can be overwhelming.
Once you get your head around them, you can get super creative with moving the warp markers by:
- Double-clicking to create new ones
- Moving them to stretch the audio
- Swap between warp modes to hear sonic differences
This is a creative hack that can yield awesome glitchy FX and the like.
Tip 42: Complex Follow Actions in Session View
If you’re a Session View fiend, then stay tuned for this one.
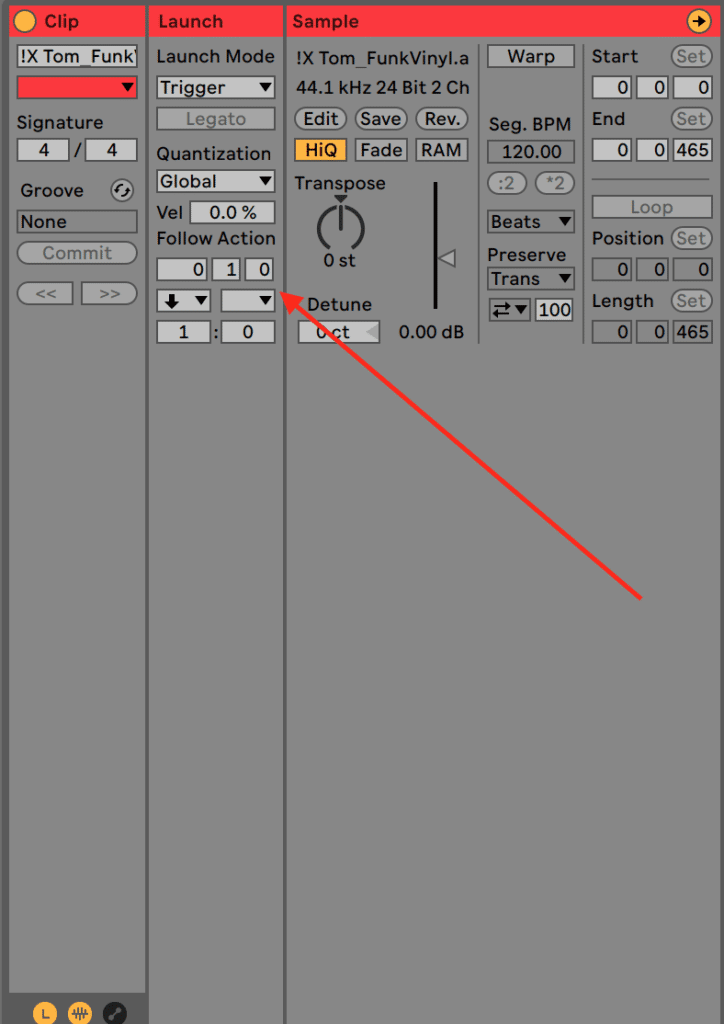
Follow Actions, if you aren’t familiar, relate to how consecutive clips are triggered on a track.
To customize them, hit the L in the bottom left corner with a clip selected – this brings up the launch options.
At the bottom, you’ll see the Follow Actions. You can change the length of time between triggers, the types of triggers and even have two options to choose between, depending on the ratio.
While this probably requires a whole article to explain in itself, it’s worth playing around with. Just make sure you load up loops and samples in some sort of order and start tweaking.
Tip 43: Save Current Set as Default
A bit of a lighter Ableton Live tip for you – templates.
If you always like to have a few things in place before you begin your sessions, then make sure to create a template.
Simply set everything up to the way you want it to be, and head to the Preferences and click the ‘File Folder’ tab. At the top, you’ll see the ‘Save Current Set as Default’ option. Hit ‘Save’, close Live and re-open it – you’ll have everything back the way you like it.

As of live 11, you can also save multiple templates in select them from the ‘Templates’ pane on the browser when starting a new session. Great if you have different starting points for different styles etc.
Tip 44: Ableton Live Packs
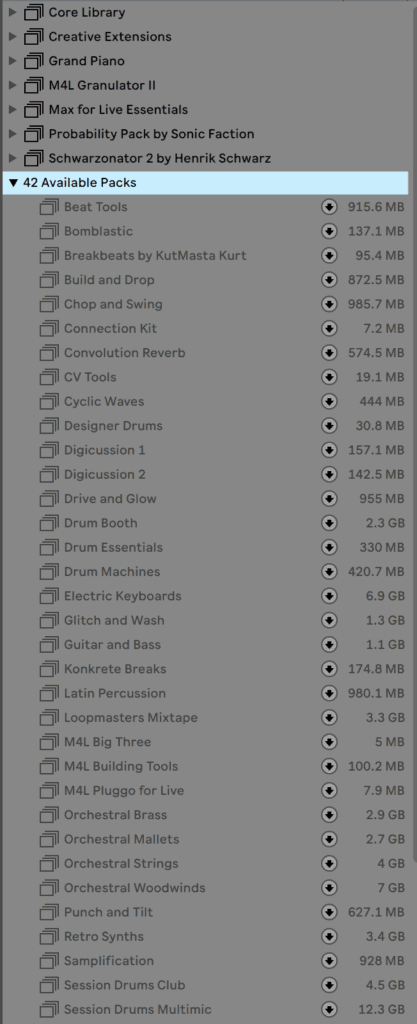
This one is especially cool for Suite users. Ableton has a bunch of packs you can download, many for free and some paid.
Head to the ‘Packs’ tab in the Browser and hit the download icon. There’s so many good sounds and tools to try out here that too many people neglect – from drum synthesizers to awesome modulation routing tools.
Tip 45: VST3 Plugins
Another recent addition to Ableton Live is VST3 plugin compatibility. It’s a newer version of VST with arguably better future compatibility.
The thing is, they won’t show up by default. So head into the preferences and click the ‘Plug-Ins’ tab. Simply switch the ‘Use VST3 Plug-In System Folder’ tab to On, and all your installed VST3’s will show up in the browser.
If you have a custom place for them, click the Custom Folder option and navigate to where you have them.
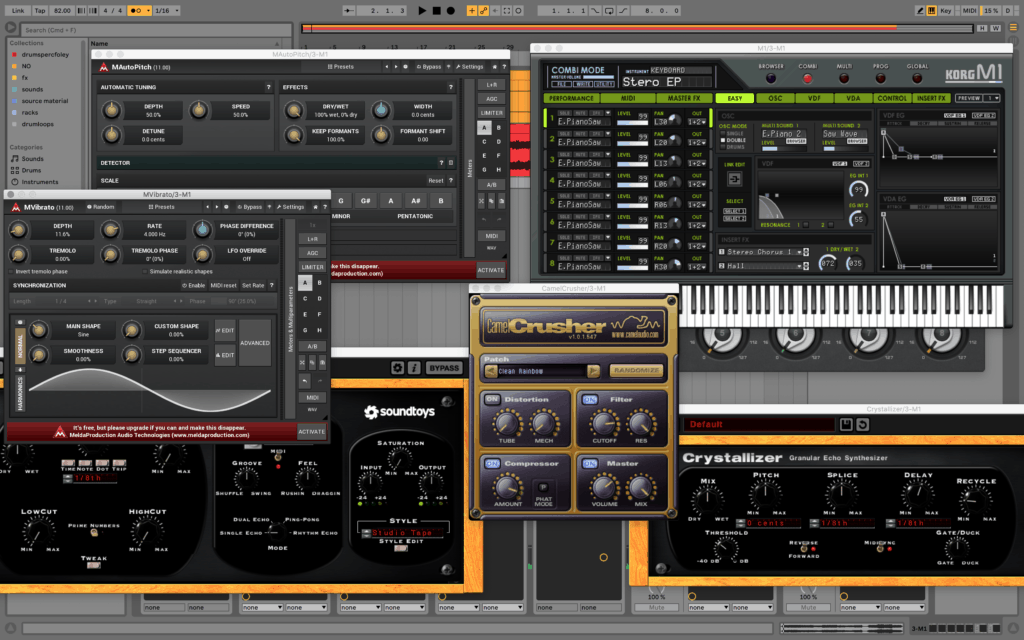
Tip 46: Multiple Plugin Windows
Live has some great built-in tools, but many of you are probably using third-party plugins. In which case, the default of having only one plugin window open at any time may frustrate you quite a bit.
Head back into the preferences and under the ‘Plug-Ins’ tab, enable the ‘Multiple Plug-In Windows’ option so that your screen can look something like mine does below.
Tip 47: Record Automation
When it comes to automation, most producers resort to drawing it in. But recording parameter movements in real-time can be a creative way to get organic movement in your tracks.
Simply hit record in the transport section up the top and move knobs, whether with your mouse or with a MIDI controller. Thankfully, Live 10 makes your automation curves nice and smooth.
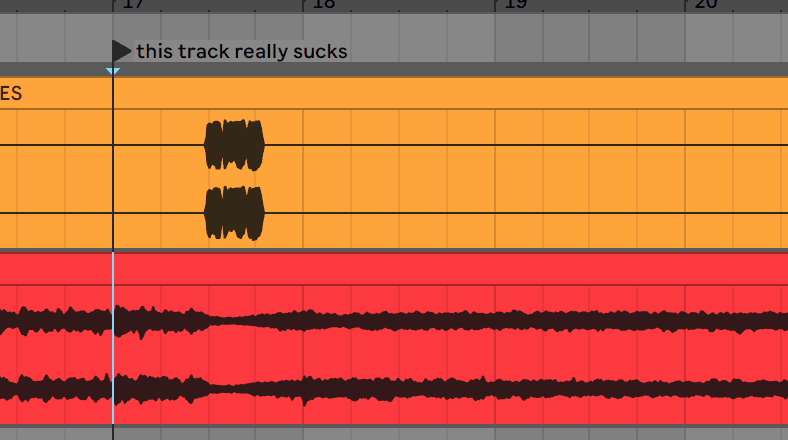
Tip 48: Locators and Move Between Locators
If you struggle with the arrangement, locators are a great way to map out a track structure.
Right-click on the Scrub Area at the top and select ‘Add Locator’. You can name it whatever you want, from ‘intro’ to ‘chorus’ to ‘add a nice pad here’ to ‘i hate this part’. Full-on freedom.
Tip 49: Arm Multiple Tracks
Sometimes you might want to play multiple MIDI tracks at once with your keyboard, but every time you click ‘Arm’, it disables the other one.
Get around that by holding Cmd or Ctrl while clicking ‘Arm’ – both tracks will light up red.
Tip 50: Monitoring
There are three options for incoming audio to a track (like a microphone or routed from another track). In, Auto or Off.
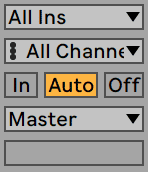
Off will not pass through any inputted audio.
Auto will pass through only when the track is armed.
In will always pass through any input.
Tip 51: Zooming
Ableton has so many options for zooming it’s not funny. The most practical ones I’ve found are the Z shortcut, which zooms into the current selection, and the X shortcut, which zooms back out to the full arrangement.
The other main one is zooming using the ‘Beat Time Ruler’ at the top, where you can click and drag up and down to move out and in.
Tip 52: Project Sample Rate
By default, Ableton’s Sample Rate is 44.1kHz, which is the standard for recorded music.
You can change this if you head to the Audio preferences and change the In/Out Sample Rate. 48kHz or higher is needed in certain applications and can help to reduce aliasing.
You can also do the same when exporting your audio – simply adjust the sample rate in the export settings dialogue.
Tip 53: Crop Clips
If you shorten a clip down to a specific point and want to commit to that length, right-click on it and select ‘Crop Clip(s)’.
Live will create a new audio file for the new version, and you can edit is as desired from there on in.
Tip 54: Show/Hide Browser, Overview, Info View & Detail View
Back on the topic of saving screen space – sometimes you don’t need certain features to be visible.
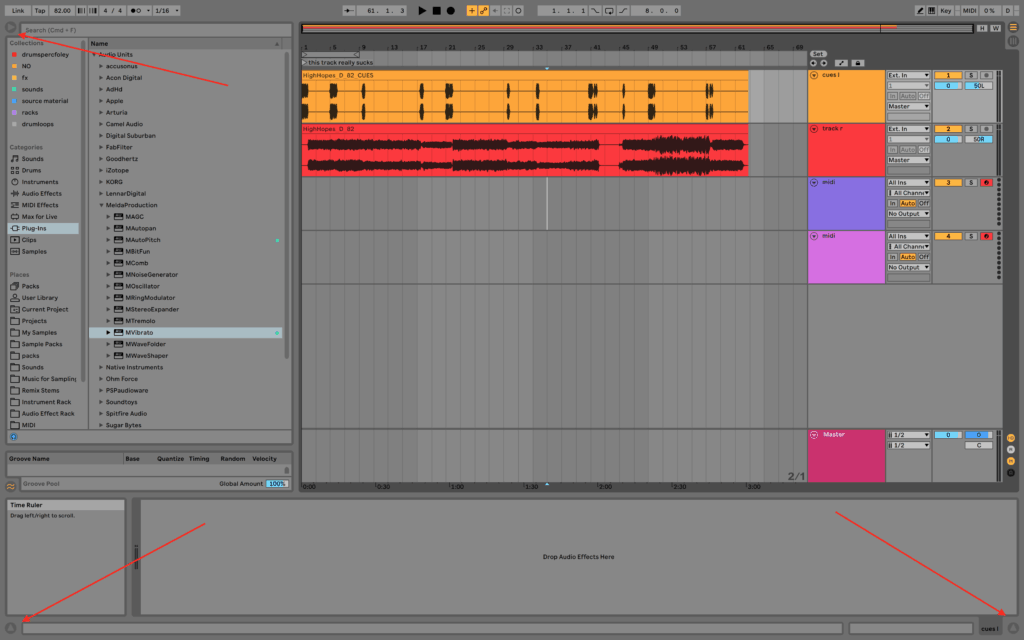
So, Ableton has made it so that you can hide the Browser on the left, the Overview at the top, as well as the Info & Detail Views down the bottom. To hide them, simply click on the arrow corresponding to the section, or use the following shortcuts:
- Browser – Cmd + Opt + B (or Ctrl + Alt + B)
- Overview – Cmd + Opt + O (or Ctrl + Alt + O)
- Info – ?
- Detail – Cmd + Opt + D (or Ctrl + Alt + L)
Tip 55: Export & Dither Settings
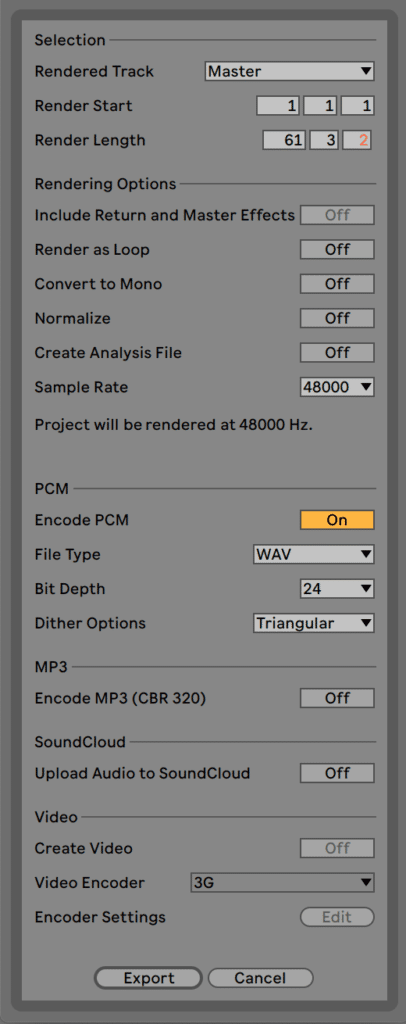
Once you’ve finished up your track, it can be daunting to know how to configure your output settings so that your track sound the best it can. Here’s a quick summary of the important parts:
- Selection – ‘Master’ refers to the whole track, and the start and length determine which part of the track will render (usually whatever is selected in the arrangement)
- Rendering Options – specific things you can do the output, pretty self-explanatory (Normalize makes the loudest peak at 0dB, analysis file is for re-use in Live)
- PCM – main output settings, file type, bit depth, and dither
- Dither Options – do some form of dithering, but usually sticking with just Triangular is fine
- MP3 – convert to 320kbps MP3 file
- Soundcloud upload option
- Video export options
Tip 56: Automate Volume with Utility
You can obviously right click on the track volume and create an automation clip, but if you’re using it to control the overall volume, you might want something else if you’re planning on changing dynamics throughout the track.
This is where Utility comes in handy. You can load one up and automate the gain, which goes down to -∞dB, allowing you to fade in from silence.
Remember if you pass 0dB gain, you’re adding volume.
Tip 57: Drum Buss
A newer audio effect in Live 10 – Drum Buss is extremely powerful for adding grit and energy to drums.
That being said, it’s also great beyond that application – you can use it on anything, from synths to vocals. The drive and crunch are a great way to texturize and color any sound.
Discover the tools that expert producers already know and use in our free Ableton Workflow Bible 🧑💻
Master Ableton Live and make music twice as fast. Avoid frustration when designing new sounds. Pick up creative techniques that will change the way you produce 👇
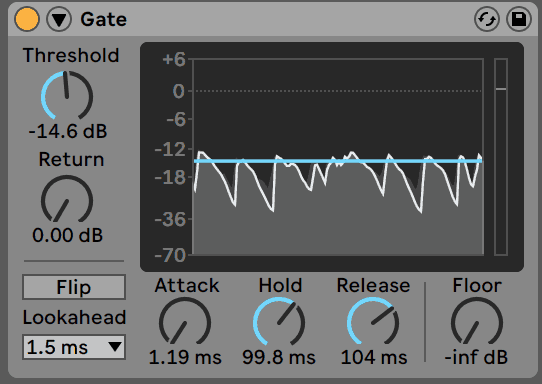
Tip 58: Tighten Up Sounds with Gate
Gate is an underrated tool, and producers need to make use of it more.
In a nutshell, Gate turns down quiet sounds under a certain threshold, allowing only a certain loudness of audio to pass through. This can get rid of unwanted background noise, or the long tail of an annoying kick drum.
Tip 59: Make Your Own Samples
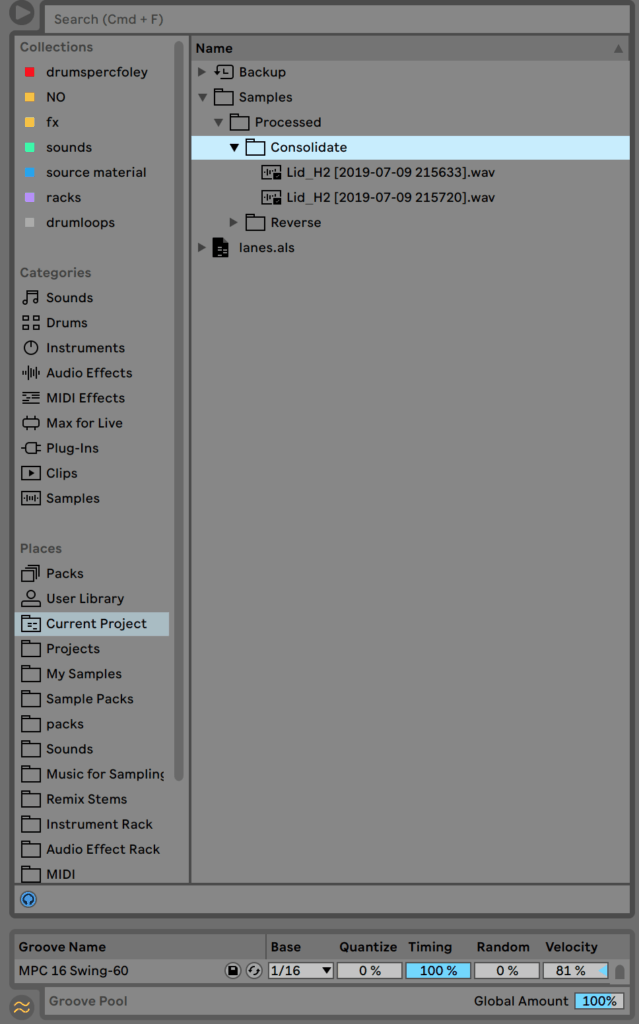
Although it’s not ‘straightforward’, you can export sounds from Ableton and create your own sample pack. How?
Well, the most obvious way is to export whatever sounds like you would a track. It’s not the fastest way, but it works and you can choose where you’d like to send it.
The other way is to freeze/flatten your audio and navigate to the current project files, moving and renaming the file to wherever and whatever you’d like. You can find the ‘current project’ folder in the Browser.
Tip 60: Saturator
I’ll admit, when I started producing I never really used saturation. I just didn’t think to do anything with it.
But oh man, when I started using it on drums and basses, it brought new life to my dull sounds. A life-changing Ableton Live tip 😉
Saturator works by applying controlled clipping to a sound, using a number of different algorithms.
The most basic way to use it is to increase the input gain and change the type and see what sounds good.
Bonus tip: Make sure to adjust the output gain, as the volume will change as you increase the input gain
Tip 61: Echo
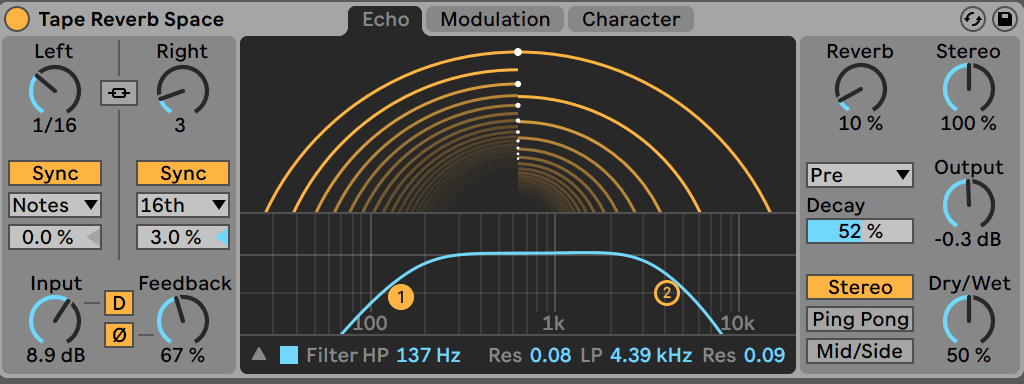
Another stellar device that Ableton threw into Live 10.
Echo emulates old-school tape delay machines with some extra features & flexibilities added in.
This isn’t a full-on Echo tutorial, but load it up on some sounds and tweak some of the presets – it simply sounds great.
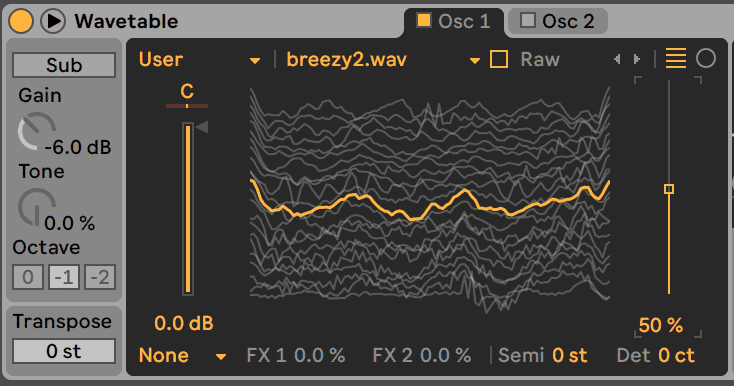
Tip 62: Turn Any Sound into a Wavetable
Wavetable is also a more recent addition to Ableton, and it’s extremely powerful.
Even more recently they added the ability to add in custom wavetables from audio samples. To do so, load up Wavetable and choose the ‘User’ option under the wavetable menu in the top left.
Then, find any audio sample and drag it onto the display! Moving the wavetable selector can yield some really interesting results.
Recommended: How To Make Drum & Bass: The Complete Guide
Tip 63: Import MIDI Clips
Sometimes inspiration runs dry, and melodies/chords just aren’t coming to you.
But using other MIDI clips from other songs, or even just random chord progressions can be a great tool for kickstarting a new track.
Simply locate one in your browser or in Finder/Explorer and drag it onto a MIDI track. It will ask if you want to import the tempo and time signature settings into the arrangement – that’s up to you but usually I say no.
Voila! You have some chords you can use. Feel free to adjust the notes, add some and take others away etc.
Tip 64: Slice in Simpler
Another killer way to get instant inspiration is to slice sounds in Simpler by using the ‘Slice’ mode.
Slice mode chops up the sample into automatic fragments, based on the transients in the audio. You can adjust the sensitivity to get longer chops, and also adjust the method of chopping to beat, section or manual options.
MusicRadar have a full tutorial on their website about using Simpler in this way.
Tip 65: Multi-sampled Instruments
Upgrading from the Simpler, we can use the Sampler instrument to play multi-sampled instruments.
If you’ve used the Ableton Live Grand Piano, this is exactly that.
There are a few great instruments included with Live that use this, but you can also create your own from other samples. It’s time-consuming, but if you’re recording real instruments, it can be lots of fun.
Check out our full video tutorial for Sampler.
Tip 66: Default Drum Racks
I know I mentioned presets earlier in the article, but cueing up sounds in a default drum rack can be a great way to jam from the get-go. I know it’s one of the Ableton live tips that speeds my workflow up.
Simply load your sounds up the way you want them, and right-click on it to choose ‘Save as Default Preset’.
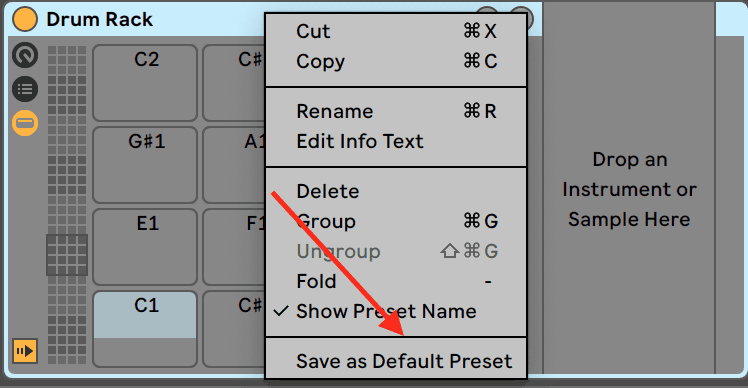
Now whenever you load it up, there will already be sounds waiting there for you.
Tip 67: Import Tracks from Other Projects
Did you know you can drag entire projects into one another?
That’s right, you can merge two projects’ worth of tracks into one project. One of my favorite Ableton Live tips 😉
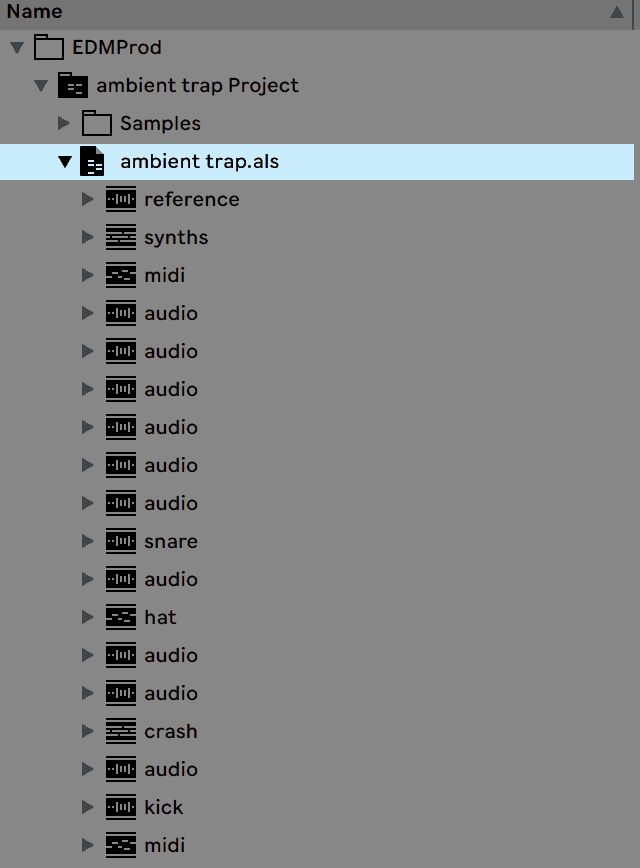
Now for some, this might be overkill. So instead, you can just drag individual tracks from another project into your current workspace.
In the browser, add your projects folder. Navigate to the desired project and find the right .als file. Clicking the dropdown will reveal all tracks in that project.
Simply click and drag the ones you want into your arrangement or session and you have those sounds ready to go.
This is a great way to keep your sound consistent between tracks and share elements.
Tip 68: Macro Controls
Do you know how we mentioned racks earlier? Well once you’ve created them, you can choose up to 8 controls throughout the entire chain to control on the front panel of the rack.

Click the ‘Map’ button pictured above and you can click on parameters throughout the rack, and set their minimum and maximum values for each control.
You can also map multiple controls to the same macro knob, allowing one knob to control a variety of FX.
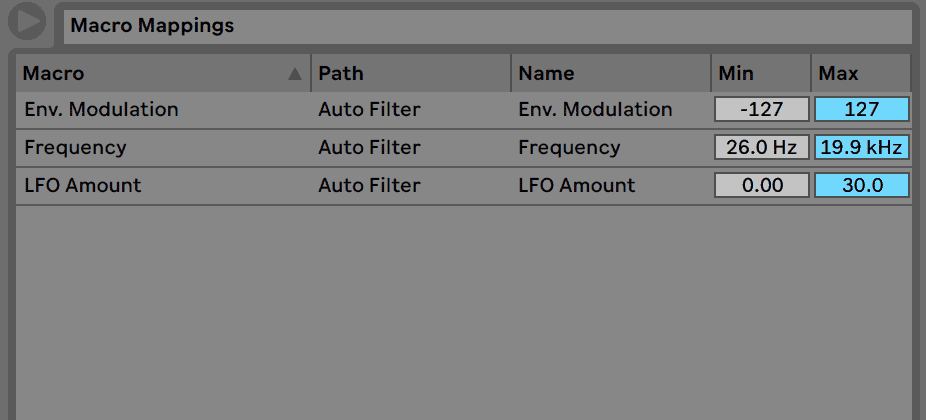
Every time you load it up, the main controls are at the front, meaning you don’t have to figure everything out whenever you want to use that rack. Just remember to save it!
Lastly, on Live 11, you can press + or – on the left of the rack to reduce the number of used macros. 8 can often be overkill, so only use the macro slots you need!
Tip 69: Zoom Display
No, I’m not talking about zooming in the arrangement. I’m talking about scaling the entire Ableton Live interface.
Sometimes your screen is just too small to fit everything well. So if you head to the ‘Look Feel’ preferences, you can adjust the ‘Zoom Display’ from 100% to whatever works best for your display.
Tip 70: Test Tone

This is a great feature for testing monitors and/or headphones in your studio, as well as testing CPU performance.
In the Audio preferences, you can turn on the test tone, giving it a pitch in Hertz as well as a volume. It can also simulate CPU usage amounts, so you can hear what it sounds like with dropouts.
Discover the tools that expert producers already know and use in our free Ableton Workflow Bible 🧑💻
Master Ableton Live and make music twice as fast. Avoid frustration when designing new sounds. Pick up creative techniques that will change the way you produce 👇
Tip 71: Decoding Cache
If you load a non-lossless audio file or something with incompatible bit depth or sample rate, Ableton Live has to convert this file to a usable format in the background so you can work with it.
Live stores these files in a decoding cache so you don’t have to decode it every time you load the sample up. But obviously, this uses more space.
To avoid eating up your hard drive, you can set a maximum file size for the cache in the ‘File Folder’ preferences, as well as set a minimum required free space amount so that it’s not saving files if there’s not much room left on the computer.

If you ever need to empty it, just press ‘Cleanup’.
Tip 72: Play in Key with Scale
One thing I haven’t delved into much in this article is sleuth MIDI effects, which are an amazing creative feature of Live.
Of these effects, one is ‘Scale’, which allows you to only ever play in a specific key.
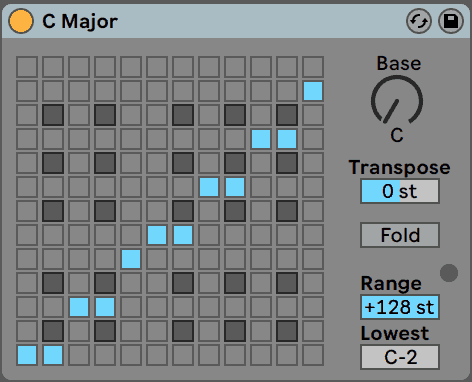
The Note Matrix determines input notes vs output notes, allowing you to strictly stick to one key if desired.
Give this Ableton Live tip a try. Drag the ‘C Major’ preset onto an instrument and play some notes. You can’t play a wrong note.
Tip 73: Instant Arpeggiation
On the theme of MIDI Effects, another favourite among producers is the Arpeggiator – one of the best in the game. Personally my favorite Ableton Live tip on this list 😍
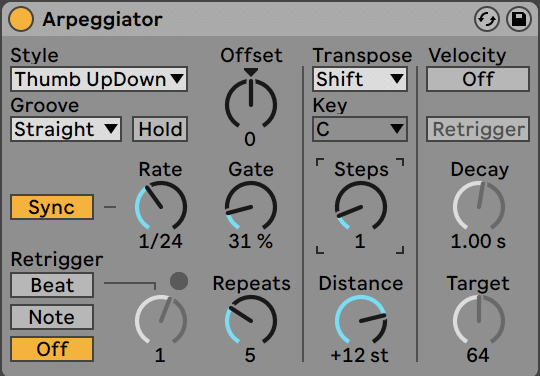
Once again, just load it up here and play with the different arpeggiator modes. Lots of fun.
Tip 74: Auto Pan for Tremolo
Auto Pan can achieve some cool stereo movement, but if you change the phase to 0, you can make some awesome tremolo effects.
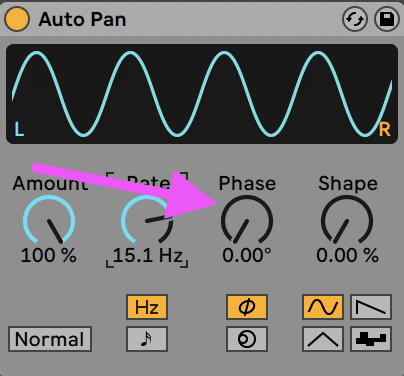
Play around with the rate and shape to vary this up, and sync it to the host BPM to get unique rhythmic sounds.
Bonus tip: you can also do this with the Frequency Shifter on ‘Ring’ mode, except it goes way faster than Auto Pan.
Tip 75: Time Signature Changes
Fancy some obscure time signatures?
Back up the top of the scrub area, you can right-click to add a new time signature. Add in the new time signature with text, or you’ll notice a red dot on the time signature up to the top right.
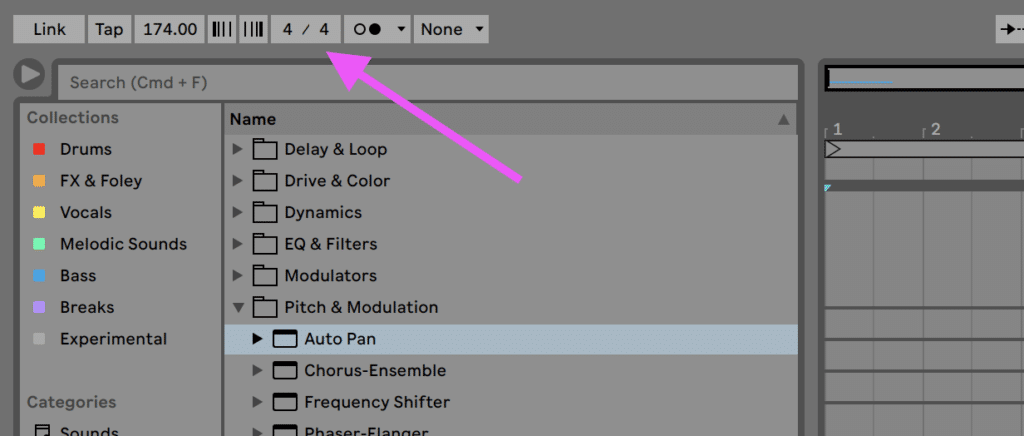
Adjust this and the rest of the track will now be in the new time signature from that point.
Tip 76: Return Tracks
AKA the biggest CPU saver ever.
Return tracks allow you to process multiple tracks with the same FX, using only one instance.
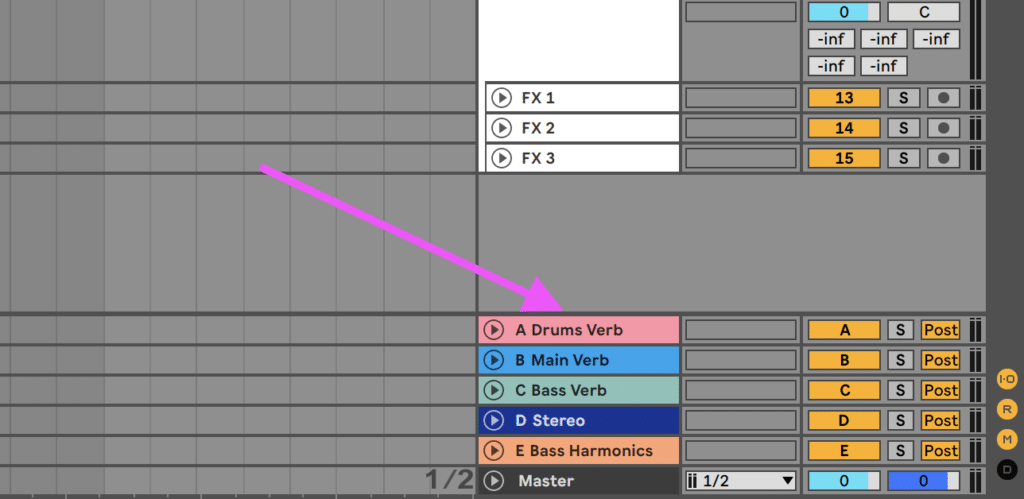
Simply add one and route different tracks their by turning the send knobs – each return track has a corresponding letter from A onwards.
Tip 77: Hide Categories
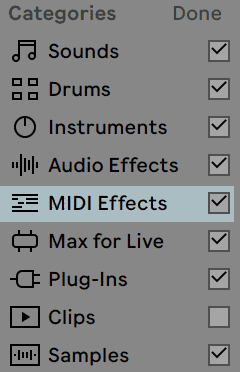
The Browser is a place that you’ll visit a lot as a music producer on Live.
So why not get rid of the things that you’re not using?
You can hover over ‘Categories’ and you’ll see the ‘Edit’ option. Simply click it and you’ll see you can uncheck certain categories that you don’t use.
Boom, now you have a cleaner browser thanks to this Ableton Live tip.
Tip 78: Sorting Options
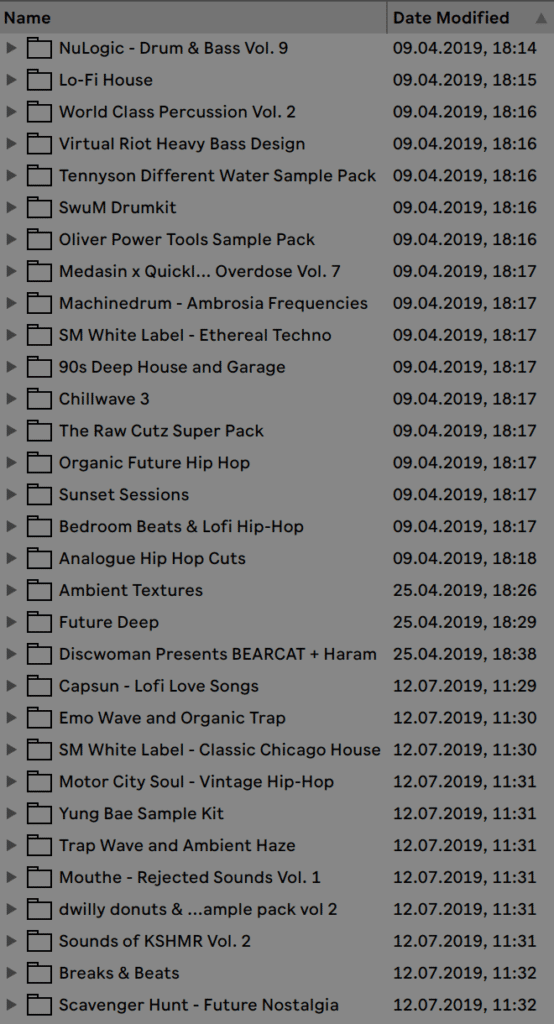
By default, Live sorts all of the samples, files, clips and everything by name. But you can add in extra sorting options to mix this up.
Right-click on the content pane and it will bring up a range of options: Date Modified, Size, Type, Rank and Place. Simply add one and then click on the name – it will now sort the samples differently.
This Ableton Live tip can be helpful if you tend to gravitate to samples at the top of a certain list or to find something specific that you’re looking for.
Tip 79: Duplicate, Copy, Cut and Paste Time
We mentioned duplicating way earlier in this article, but if you’re working with an arranged track, sometimes copy-pasting or duplicating elements can override other sections, which is less than ideal.
Thankfully, we have the following Ableton Live tip 🔥
Now, when you hold Shift with any of the duplicates, copy, cut or paste commands, it will also take the time into account. This means if you duplicate an 8-bar phrase, then it will also insert 8 bars as you do it. If you have any content in front, then it gets pushed forward and left intact.
If you forgot to add a breakdown in the middle of the track, it’s super easy to just duplicate a section and adjust the elements.
Tip 80: Draw from MIDI Keyboard
Not going to lie, I lost my mind when I learned this Ableton Live tip.
If you are using any sort of MIDI keyboard (yes, even your computer keys), then this Ableton Live tip will be insane for you.
If you open a MIDI clip and play some notes (don’t be recording, though), then you see the keys on the piano roll light up. If you start to move your right arrow key, then the notes will draw from what you are playing at the marker position! No clicking necessary!
This can be a really fast way to bang out chord progressions and melodies, once you practice the workflow a few times.
Discover the tools that expert producers already know and use in our free Ableton Workflow Bible 🧑💻
Master Ableton Live and make music twice as fast. Avoid frustration when designing new sounds. Pick up creative techniques that will change the way you produce 👇
Advanced Ableton Live Tips
Now we get to the rare stuff.
To be honest, there are probably 1000’s of advanced Ableton Live tips out there, depending on each producer’s unique experience. So here are 21 advanced tips that I use frequently.
Note: these tips are taken from my YouTube tutorial of the same name, so feel free to watch that as well, as these tips can be hard to follow along with.
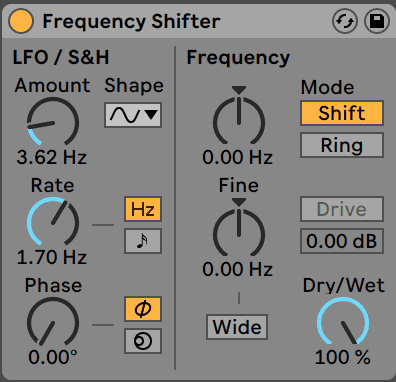
Tip 80: Frequency Shifter Vibrato
Frequency Shifter can help to create some really weird sounds, but you can use it very subtly to create a vibrato effect on any sound.
To set it up:
- Set the phase to 0 degrees
- Adjust the LFO amount and rate to whatever sounds good (a lower amount usually sounds better)
Tip 81: Max for Live LFO
Max for Live is severely underrated. There are an ever-expanding number of tools out there that all work natively in Ableton.
One of these devices is the Max for Live LFO, which an LFO that can be mapped to any parameter in live, anywhere.
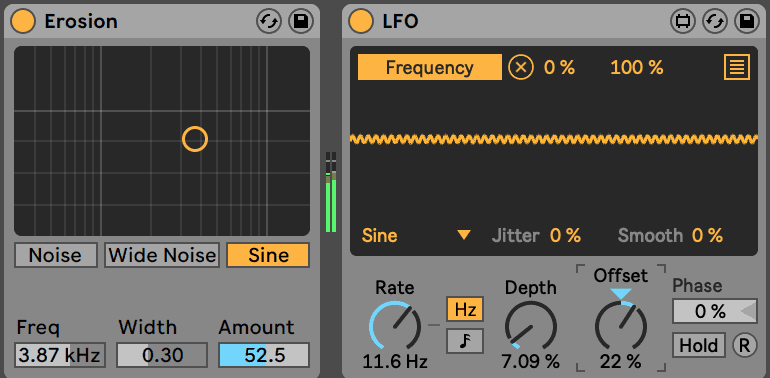
Here we have an example of the Erosion device’s ‘Frequency’ being controlled by LFO. I’ve adjusted the Rate and Depth so it’s a subtle, fast effect. The Offset controls the “original value” so you can move the centre of the LFO.
Endless possibilities.
Tip 82: Sidechain Apart from Compressor
Lots of producers are familiar with the sidechain function on Compressor but aren’t aware that other devices have it too.
In fact, you can sidechain on:
- Auto Filter
- Glue Compressor
- Gate
- Multiband Dynamics
- Corpus
Next time you want to try something a little different, use these devices to the sidechain. Particularly Corpus, which has an interesting enharmonic texture to it.
Tip 83: Resonators for Harmonic Interest
Speaking of interesting harmonics, Resonators is also a great way to create interesting tones in any sound.
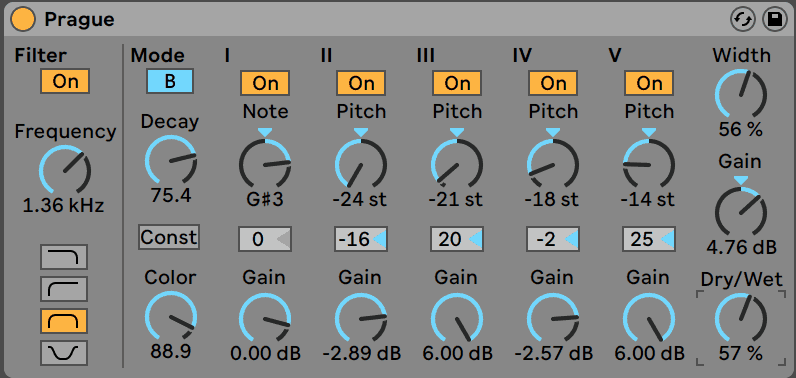
There are 5 resonators, all based around the pitch of resonator I. You can essentially create chords of resonance through this process, especially if you’re familiar with how to make chords.
To get an idea, play around with the various presets included with Live, some of them can sound awesome in the right context.
Beyond that, experiment with the decay to lengthen the tones, switch the modes from A to B and see what sounds better, and play with the input filter to color the sound.
Tip 84: Resampling
Sometimes you’ve made part of a track, or you’ve got a few cool sounds layered together, but you want to convert them all to audio in one sound.
The obvious way to do this is to export, but it’s annoying if you’re wanting to use it in the same project. This is where Resampling comes in.
Create a new Audio Track and set the input to ‘Resampling’. Simply arm the track and press the record button (or F9). You’ll see the output audio being recorded.

Note: this will also record any master effects into the signal, so make sure to disable any devices or plugins you don’t want to affect the resample.
Tip 85: Show Modulation
Automation is a powerful tool in Live, as you can adjust something like a filter over the course of a whole track.
Modulation is similar, except it’s drawn in at the clip level instead. This is great if you want to ‘build in’ automation to a certain sound, progression or loop.
Just right click on a parameter and select ‘Show Modulation’ instead of ‘Show Automation’ and it will allow you to adjust the most recently selected clips’ modulation. Make sure warping is turned on at this stage too.
The other benefit is that you can use both in conjunction with each other, having micro and macro movements.
Tip 86: Creative Vocoder Usage
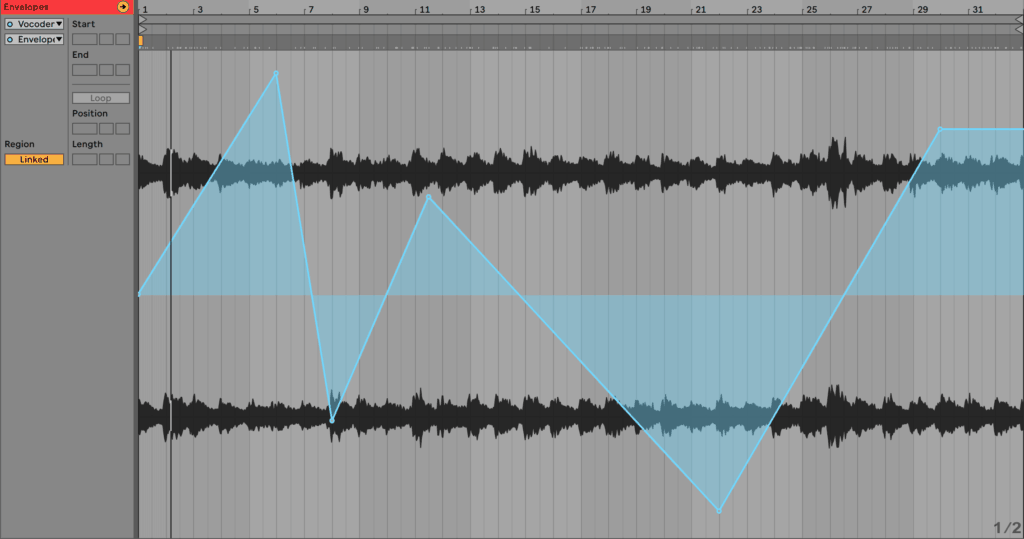
The Vocoder is typically for processing vocals with a carrier of some sorts – using your voice to modulate some saw chords, for example.
But the Vocoder has so many creative uses. For example, even setting the Carrier to the Modulator and playing around with the bands, formants and gates can be enough to get really unique results.
Check the video I linked above to hear what I mean.
Tip 87: Re-record MIDI Notes
I’ve gone a bit nuts with the MIDI Effects here, but one cool trick is that you can record any MIDI effect variations to a new MIDI track, meaning you don’t have to keep the devices on.
In essence, this is the MIDI equivalent of ‘freezing and flattening’.
Just set up a new MIDI track to record to input from another MIDI track, arm it and press record. You’ll see the resulting MIDI come out.
Tip 88: Layering in Instrument Racks
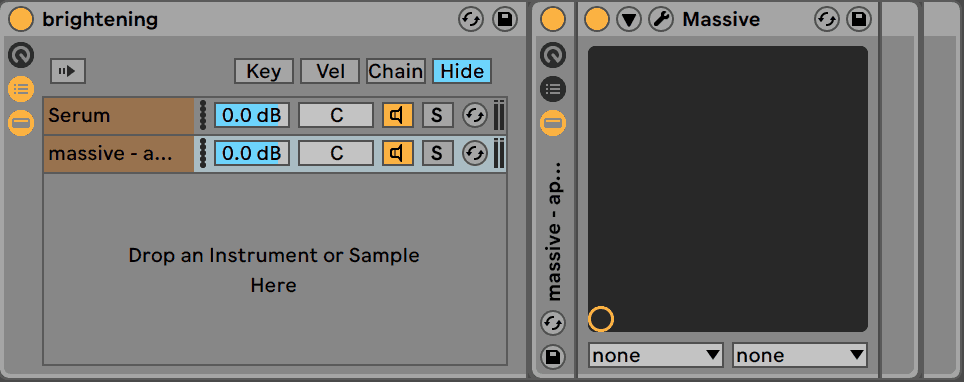
We’ve talked a lot about racks in this article.
This time, we have a specific tip for instrument racks. If you show the chain list (pictured below), you can right-click and create a new chain, or drag in another instrument. Now you can have two or more instruments in the same rack, being triggered by the same notes.
Bonus tip: use different MIDI effects for each layer, that way you can get really unique layered sounds.
Tip 89: Stacking Filters
This isn’t specific to Live necessarily, but it’s dope nonetheless.
Use multiple instances of Auto Filter (2 or more), and set each one to a different filter type with different LFO movements. This can add life to pads, textures or any sound, as the resonances sweep through each other.

Tip 90: Over-compressing for Texture
Compression is normally used to ‘massage’ the sound so it’s more even over time. Often, overdoing it can sound bad and kill the dynamic range. But sometimes, that’s the exact effect you want.
Try using a ratio of 10:1 or more, with a fairly generous threshold and fast attack and release. This kind of sound bordered on distortion, but for certain sounds (especially those with a lot of movement), it works perfectly.
Remember to use makeup gain so you can actually hear the sound.
Tip 91: Mono Artefacts
Often we use Utility to check if a mix or track sounds good in mono. Normally if the sound is weaker and has artefacts, the sound is too wide to work in a club context, where the system may run in mono.
Sometimes, these mono artefacts can sound really nice, especially if you are trying to achieve a lo-fi effect.
Simply load up a Utility and set the width to 0%.
Tip 92: Utility Effect Racks
If there are certain tasks I repeat over and over again, I like to set up ‘utility’ effect racks (no, they don’t necessarily use the Utility Audio Effect).
These are things like Multiband Splits, Mid/Side splits, Left/Right splits and Dry/Wet racks – I don’t want to have to do that every time.
Tip 93: Mid/Side EQ
EQ Eight is a killer tool, not just because of its simplicity and effectiveness, but also it’s extra features that you wouldn’t expect from a stock standard EQ device.
One of these features is the Mid/Side mode, allowing you to have 8 bands for the mid-channel and 8 for the side.
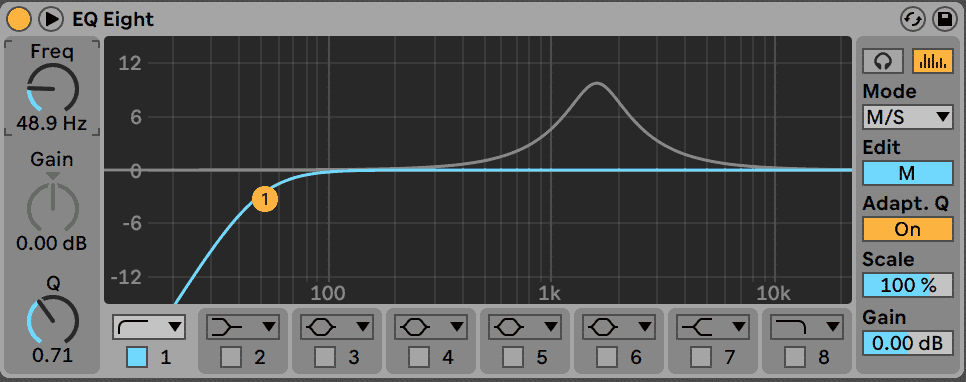
Activate it by changing the Mode to ‘M/S’, and then you’ll have an option below to edit either the Mid (M) channel or the Side (S) channel.
For example, if you have some unwanted low frequencies in the stereo field, you can eliminate them with a high-pass on the side.
Tip 94: Looping in Simpler/Sampler
Whether it’s a drum loop, a pad or a one-shot – you can loop a specific section of it in both the Simpler and Sampler instruments.

In Simpler, activate the ‘Loop’ button underneath the sample display. You have four main controls: Start, Loop, Length, and Fade.
- Start controls where the loop will start from. This can be the sample start point, or later.
- Loop and length together control the area to be looped.
- Fade determines the crossfade from the end of the loop to the beginning.
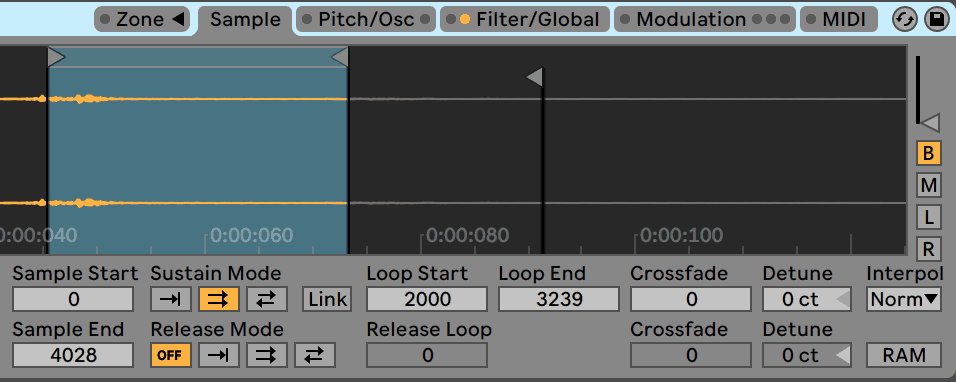
If these options aren’t enough, you can use Sampler. Here you can fine-tune the loop start and end in exact samples, adjust the fade, but you also get a variety of loop sustain and release modes. The sustain mode determines how the sample loops while a note is being held down, and the release mode refers to the behaviour when the note is let go.
You can switch from On (no looping), to Loop (loop from start) or Loop Back (loop back and forth). These are the same for the release modes, with the addition of an off mode if you want no release behaviour.
The key here is to open up Live and test them yourself – you’ll really get a feel for them.
Tip 95: Key/MIDI Mapping
Want to map your unused keyboard keys to certain parameters? Cmd + K or Ctrl + K will bring up the key mapping menu.
Want to map your controller to certain parameters? Cmd + M or Ctrl + M is your friend.
Tip 96: Track + Device Defaults
If you don’t like the way Live’s default settings are on some plugins, then you can change that, as we mentioned with the Drum Rack earlier.
Set it the way you like it, right-click on the device name and select ‘Save as Default Preset’.
This can be done for Audio Effects, MIDI Effects and Instruments (not Max for Live devices).
Tip 97: Options.txt
Ableton has allowed access to what they call ‘experimental features’ through the usage of the Options.txt document.
There is a list of features on their website and a guide on where to place the text file to activate the features.
You’ll find things like how many parameters to populate on a third-party plugin, ReWire settings and mouse mode adjustments.
Tip 98: Custom Third-Party Themes
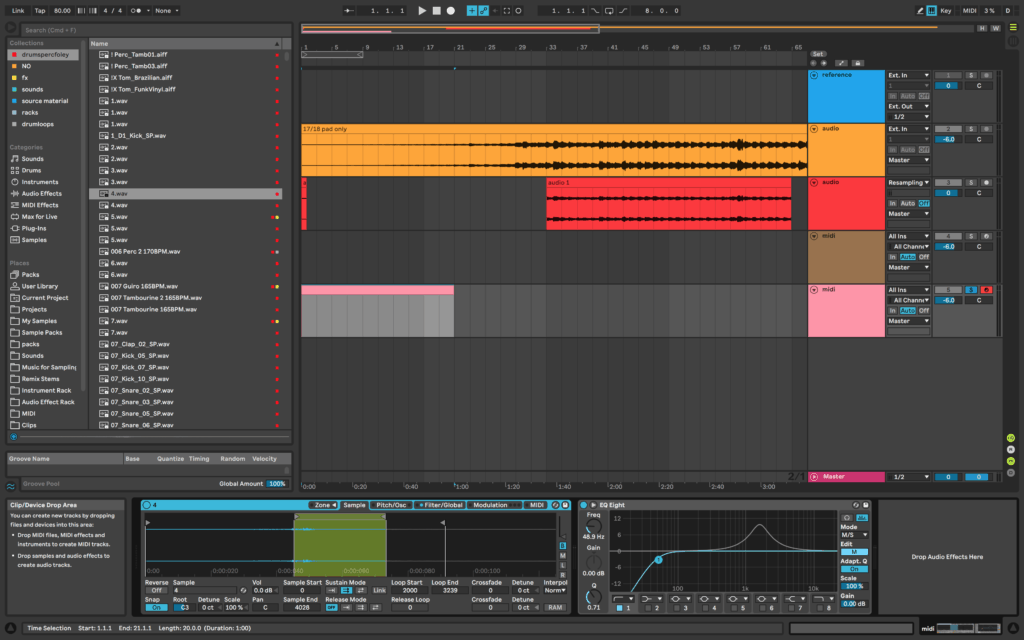
Live 10 comes with some great colored themes to suit your working and creative environment best. But sometimes you want other options.
A quick Google search will bring up some options. Here are some great ones from Sonic Bloom.
On Windows, navigate to C:\ProgramData\Ableton\Live x\Resources\Themes and paste them there.
On Mac, go to Applications and right-click on Live to select ‘Show Package Contents’. Open Contents\App-Resources\Themes and paste them there.
Tip 99: Edit Info Text
It’s crazy how many people don’t know about this feature.
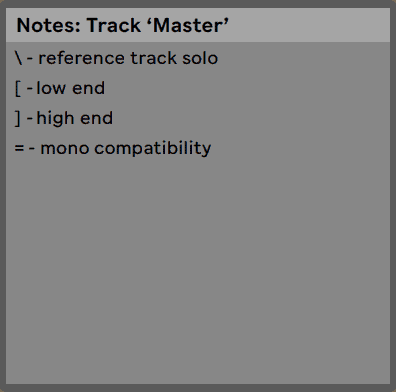
Whether it’s a clip, a track or a device, if you look at the Info Box, you can edit the text shown.
Simply right-click and select ‘Edit Info Text, writing it whatever you want, from reminders to explanations.
Here’s what I have on my master – some keyboard shortcut reminders.
Tip 100: Ext. Out Routing
If you use reference tracks, this one is a game-changer.
For a long time, whenever I used reference tracks, I’d have to disable master effects so they wouldn’t process whichever tracks I was using. Until I realized you can route it directly to the output.
Just change the output of your reference track to ‘Ext. Out’, and now you won’t have that issue anymore.

So, What Now?
Man, that was a lot of Ableton Live tips, right? Still processing a lot of them? Not getting some of them?
Download our free PDF here for future reference 🔥
Discover the tools that expert producers already know and use in our free Ableton Workflow Bible 🧑💻
Master Ableton Live and make music twice as fast. Avoid frustration when designing new sounds. Pick up creative techniques that will change the way you produce 👇
Did I miss anything? Made a mistake? Let me know at [email protected].

