Ableton Drift is Ableton Live’s brand-new analog-modeled synth.
It’s capable of producing incredibly warm, comforting sounds. This makes it perfect for genres such as LoFi Hip Hop or Organic House.
So what makes Ableton Drift unique? And why should you check it out? That’s what we’ll cover in this guide! Together, we are going to look at:
- Ableton Drift’s interface
- Creating your first sounds
- Adding movement to your patch
- My secret tip to get the most out of Ableton Drift 👀
So without further ado, let’s jump straight in 👇
Supercharge your Ableton creativity with these presets for Drift 🔊
Download our Drift Preset Pack containing 7 hand-crafted presets – ranging from buttery leads to warm basses:
✅ Compatible with the latest version of Ableton Live 11
✅ Fully customizable to your preferences
✅ Perfect for that analog vibe in your track
Table of contents
Ableton Drift Interface 🖥️
Ableton Live’s new Drift synth has just come out. It’s available for users of Lite, Intro, Standard, or Suite once you update to version 11.3.
Drift is based on experimentation and unpredictability:

If you’re looking for a specific sound, you’re better off with Vital or Serum. This synth is more geared towards experimenting and “happy accidents”.
At its core, Ableton Drift is modeled after classic analog synths. You get two oscillators with a select number of waveforms (more on those later). Each oscillator can then be morphed and detuned to create unexpected results.
But I’m getting ahead of myself. First, let’s dissect Ableton Drift’s interface:

In order, we have:
- The Oscillator section. This section features 2 oscillators with their own controls. You also get a noise generator, a visualizer, and a Pitch modulation control.
- The Filter section. This section features both a low-pass and high-pass filter. Confusingly, these show up on the Envelopes visualizer when you adjust them.
- The Envelopes section. Here, you get two basic ADSR envelopes. The first Envelope controls the Master Output by default (but can also be assigned to other parameters).
- The LFO and Mod section. Ableton Drift features one single LFO. However, it can be assigned to any number of parameters. You also get a modulation table where 3 additional modulations can be mapped.
- The Voicing and Global Controls section. Finally, this section features common controls such as Poly vs. Mono, Glide, Legato, Output Volume, and more.
Now that we have the basics covered, let’s dive deeper! Let’s go 👇
Ableton Drift’s Oscillator Section ♒
Let’s kick things off with the Oscillator section. This is where your sound is generated:
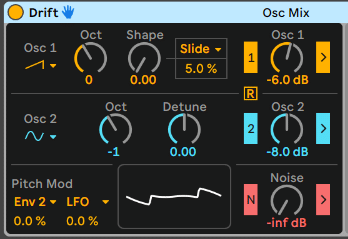
Drift features 2 main oscillators (colored orange and blue) and one noise generator (in red).
Let’s explore the two main oscillators.
OSC 1 lets you choose from 7 basic waveforms including sine, triangle, square, sawtooth, and more. Next, you have the “Octave” and “Shape” controls:
- Octave lets you pitch down 2 octaves or up 3 octaves
- Shape morphs the waveform, giving it an FM aesthetic
In this example, I am increasing the “Shape” on a sine wave:
Next, we have our first modulation source. This modulation is linked to the Shape of OSC 1:

In this example, I’ve selected Envelope 2 to modulate the shape of OSC 1. This is what it sounds like:
You can choose other modulation sources. For example, selecting “Velocity” will react to how hard you press the keys.
If you’re new to modulations, check out our extensive guide on LFOs 😉
Finally, the “1” button lets you turn OSC 1 on or off. You also have an oscillator output level and an arrow to send/unsend to Filter.
Oscillator 2 functions in much of the same way, with some key differences:

The two main differences with OSC 1 include:
- Only 5 waveforms
- A “Detune” knob instead of a “Shape” knob
The octave range has also been switched. With OSC 2, you can go up 2 octaves or down 3 octaves.
The “Detune” knob lets you get that classic chorus-y effect:
The range goes all the way up to 7, which is a perfect fifth:
Supercharge your Ableton creativity with these presets for Drift 🔊
Download our Drift Preset Pack containing 7 hand-crafted presets – ranging from buttery leads to warm basses:
✅ Compatible with the latest version of Ableton Live 11
✅ Fully customizable to your preferences
✅ Perfect for that analog vibe in your track
Noise Generator and Pitch Modulation
On top of our two main oscillators, we also have a noise generator:

However, you only get a volume control, which might feel limiting to some. I do feel like most synths allow you to import your own samples, which would have been nice here. Alternatively, the ability to shape the noise generator with a separate filter would have been cool
Finally, you get two Pitch modulations of the left-hand side.
Setting the source to Envelope 2 with a very short Attack and no Sustain will add some “pluck” to your sound:

Here’s what it sounds like:
You can also choose a second modulation source for the Pitch. For example:
- Setting the first modulation to ENV 2 to add some attack
- Setting the second modulation to a fast LFO to add some pitch wobble
Nice 😍
Wanna check out this guide in video format? Aden has you covered 👇
Ableton Drift’s Filter Section 〽️
Next, let’s move on to Ableton Drift’s Filter section:
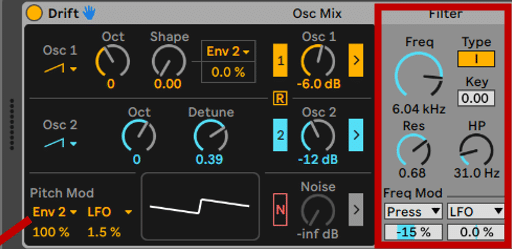
This section is rather basic and includes:
- A low-pass filter with resonance control. The “Type” (I or II) controls the slope of the filter.
- A high-pass filter with no control besides frequency cutoff
If you’re new to filters, we cover everything you need to know here 🔥
Both filters can be controlled directly on the visualizer:
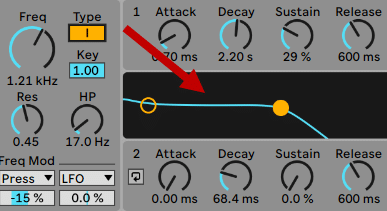
Confusingly, this window also serves to display the 2 envelopes (more on those later).
One useful feature to highlight here is the “Key” control:
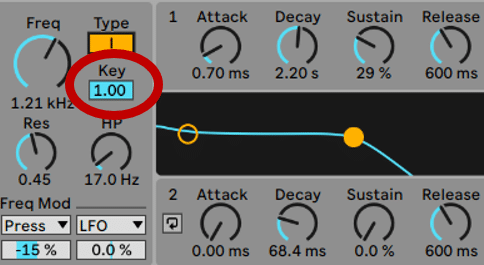
Setting “Key tracking” basically allows the filter to follow the MIDI notes. For example, play a high note and:
- set the low-pass to around 400 Hz and “Key” to 0. You won’t hear anything.
- However, switch “Key” to 1.00, and the filter will adapt so that you still hear your notes.
Finally, you also get two Modulation sources to control the low-pass filter cutoff. In this example, I’ve set the cutoff to 200 Hz, and set the modulation to ENV 2:
A quick tip: dry pushing the gain into the filter with the OSC 1 and OSC 2 Mix knobs. You will hear some really pleasing distortion, especially with the resonance turned up.
Supercharge your Ableton creativity with these presets for Drift 🔊
Download our Drift Preset Pack containing 7 hand-crafted presets – ranging from buttery leads to warm basses:
✅ Compatible with the latest version of Ableton Live 11
✅ Fully customizable to your preferences
✅ Perfect for that analog vibe in your track
Ableton Drift’s 2 Envelopes 📩
We’ve touched a bit already on Ableton Drift’s envelopes, but let’s dig a little deeper:
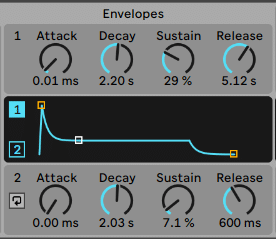
Drift features 2 envelopes. By default, ENV 1 controls the overall output of the synth. For example, you can lengthen the attack and release to create pads. Or you can shorten them to create plucky sounds.
However, both ENV 1 and ENV 2 can be assigned to any number of parameters within Drift.
Just remember that when you are adjusting ENV 1, you are also changing the synth’s output ADSR.
If this sounds a bit confusing to you, make sure to check out our guide on ADSR envelopes here 🔥
One cool feature of ENV 2 is the “cycling” mode. This pretty much turns it into an LFO:
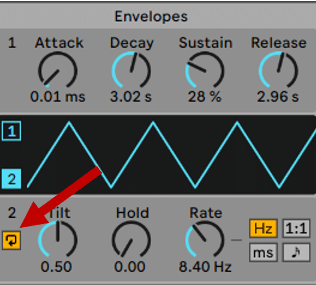
Once you do this, a bunch of other controls appear. These allow you to shape the modulation in different ways:
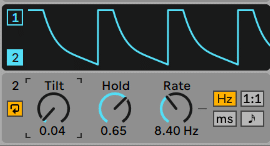
Once you switch to “cycling” mode, you can also control the “Rate” in Hz, ms, beats, or ratio. Ratio gives particularly gritty results:
Ableton Drift’s LFO and Mod Table 🔄
Next, the LFO and Mod Table allow you to add even more movement to your sounds:

Under LFO, you have 1 LFO envelope with a few controls. Let’s go over them.
Firstly, the speed of the LFO can be set to Hz, ms, beat, or a ratio. “Ratio” will actually take the pitch of the Oscillator into account, and create an FM sound.
Next are the LFO shapes. These include Sine, Triangle, Saw Up and Down, and a bunch of others:
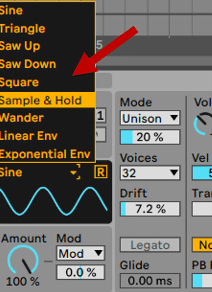
I usually make sure that the LFO Retrigger is set to “On”. This means each time a note is triggered, the LFO starts at the same position.
Finally, the “Amount” knob lets you dial in a more subtle effect:
You also get a modulation source for the LFO amount. This means you can increase and decrease the amount to create rhythmic patterns.
In the following example:
- The LFO is controlling the low-pass frequency cutoff
- ENV 2 (in “cycling” mode) is then controlling the amount of LFO modulation
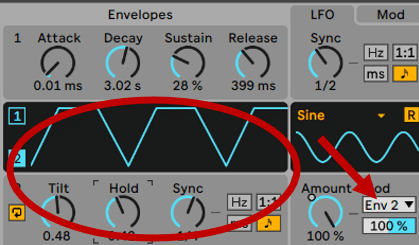
This is what it sounds like:
Ableton Drift’s Voicing and Global Controls 🎹
Finally, let’s look at the last section of Ableton Drift:
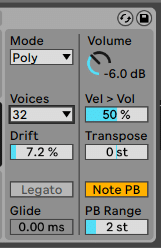
This section includes classic Voicing parameters and some other global controls.
“Mode” for example lets you switch between Poly, Mono, Unison, and Stereo.
Unison and Stereo are particularly interesting to achieve more width:
- Unison will add voices and detune them slightly, creating a chorus effect
- Stereo spreads the voices across the stereo spectrum
Here’s an example of how they affect the sound:
You also get a “Drift” control. To my ears, this mimics the way an actual analog synth would go in and out of pitch depending on heat and humidity.
Wanna create some really thick sounds?
Set “Mode” to Mono and set “Drift” to 100%. Then, start increasing the Mono percentage. Listen to how it affects the sound:
Finally, you have an overall output level, global transpose, pitch bend range MIDI velocity control.
My Secret Tip to Get the Most Out Of Drift 👀
Hopefully, you now know your way around Ableton Drift. But before I let you go, let me share with you my super-secret (not really) Ableton Drift tip with you 🙏
Map To Keyboard and Experiment
One of my favorite ways of using Ableton Drift is with my MIDI keyboard. More specifically, by linking as many parameters as possible to the knobs:
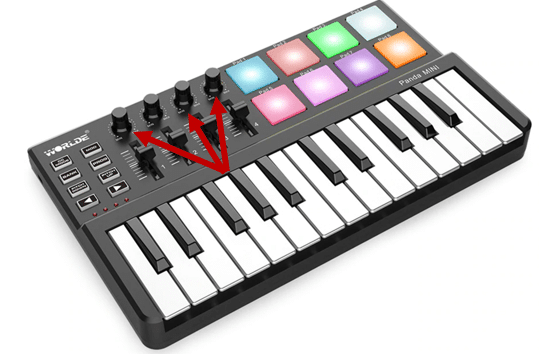
As we touched on in the intro, Ableton Drift is based upon unpredictability. So what better to get unpredictable results than by tweaking knobs randomly?
Here’s my process. First, I link my 8 knobs to various parameters of Ableton Drift. To do this, simply right-click a parameter and select “Edit MIDI Map”. Then, tweak a knob. Press ESC, and your knob should now be controlling that parameter:
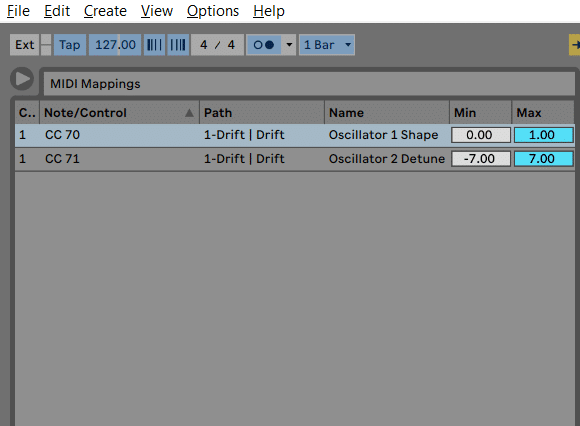
Here, my first knob (CC 70) controls the Shape of OSC 1. A second knob (CC 71) controls the Detune of OSC 2.
Note that for each link you can create, you can set a Min-Max range.
Link as many parameters as you can! You can even link multiple parameters to the same knob. Once that’s done, lay down some chords or an arpeggio loop. My preferred way however is to use the “Latch” function on my MIDI keyboard. This lets me create arpeggios in real time.
Here’s what it sounds like:
Here’s another example with some more extreme results:
This is one of my favorite ways to generate new song ideas and overcome writer’s block 🔥
Supercharge your Ableton creativity with these presets for Drift 🔊
Download our Drift Preset Pack containing 7 hand-crafted presets – ranging from buttery leads to warm basses:
✅ Compatible with the latest version of Ableton Live 11
✅ Fully customizable to your preferences
✅ Perfect for that analog vibe in your track
That’s It For This Guide on Ableton Drift! 🙏
This pretty much wraps up our guide on Ableton Drift! Hopefully, you were inspired to try out this new toy and create unique songs with it 🔥
Did I miss out on anything? Got any questions? Shoot them over at [email protected]

