

Layering samples is a great way to create a powerful, punchy kick drum.
If you frequently struggle to find the right kick samples for your song, then learning how to layer is an excellent technique to master.
In this article (and video), I’ll show you exactly how to layer your kicks.
You’ll learn:
- How to find good source material for layering
- Project file setup
- Envelope shaping
- EQ
- Using white noise (bonus step)
Let’s dive in!
Source Material
If you want to follow along with this tutorial exactly, then you may want to download the same samples I’m using. For this post you’ll need:
Of course, feel free to use your own kicks; it’ll just be easier to follow along if you use the same ones.
Project File Setup + Explanation
So the process of kick layering involves a bit of work which we’re going to go through in detail. Here’s an overview of what we’ll be doing:
- Renaming and organization (quite important when layering kicks in order to know what’s what)
- Envelope shaping
- EQ
- Balance
- [Optional] White noise
Don’t worry if you’re not sure of all those terms, we’ll be going more in-depth.
Renaming and Organization
So after downloading Kick 1 and 2, drag them each into a sampler.
Note: If you’re using your own samples, choose a kick with a nice high end, and another with a nice low end.
We’re going to be using Kick 1 as our ‘high kick’, or the high-end in our layered kick. Rename this to Kick High or something else that’s logical. After doing so, open up your mixer and type ctrl + L to assign it to a new mixer track.
Repeat this with Kick 2, but instead rename it to Kick Low. Make sure you assign it to a mixer track.
Finally, fill each four steps on both channels. If you play the pattern at the moment it won’t sound amazing and if you were to leave it as it is now – you’d probably experience some bad low-end issues in the mix.
Note: I’ve also changed the tempo to 128.
Envelope Shaping
A kick typically has 3 parts to it:
- The transient, or initial sound (normally quite high frequency)
- The body, or ‘punch’
- The rumble, or low-end
You can achieve all three of these with two kicks, despite what some people say. The body is created in combination of both kicks, but let’s not make it too complicated.
Kick Low Enevelope
If we solo our Kick Low, you’ll notice that it’s got a lot less transient than our high kick. This is great, but we want to get rid of that transient completely.
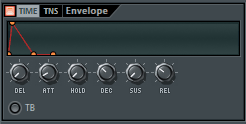
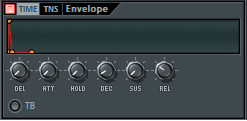
Open up the kick’s sampler and go to the INS tab. Make sure VOL is selected, drag the attack knob (ATT) all the way down so it sounds normal again, and then move it up ever so slightly until the transient disappears.
Note: If the attack time is too long, there’ll be a gap between our high-end kick and the low-end one. This is undesirable and we want to avoid it.
I also turned the hold and sustain all the way down, and finally pulled the decay down a bit to make the sample a little shorter.
Notice that this sounds quite ugly by itself. It’s supposed to, it’s only half of the recipe 😉
Kick High Envelope
We’ve pulled most of the transient out of our low kick, so it makes sense to use our high kick as the initial transient and a little of the body. Instead of taking the attack away from this kick, we’re going to remove the decay and sustain.
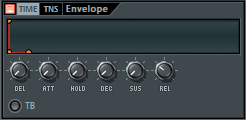
Open up the channel settings for the high kick, navigate to the INS > VOL tab and pull attack all the way down.
It should sound the same. Now pull the Hold, Decay, and Sustain parameters all the way down. There should be no sound at all.
Next we want to play this alongside the low kick while adjusting the Decay. I moved mine up very slightly, in fact you can hardly see it.
Basically you want to move it until you get the initial transient, and that’s it. If you wanted you could give it a little more body, but it’s likely to clash with the lower kick.
EQ
Our layered kick is sounding a little better now. Certainly not the worst, but it could be a lot better.
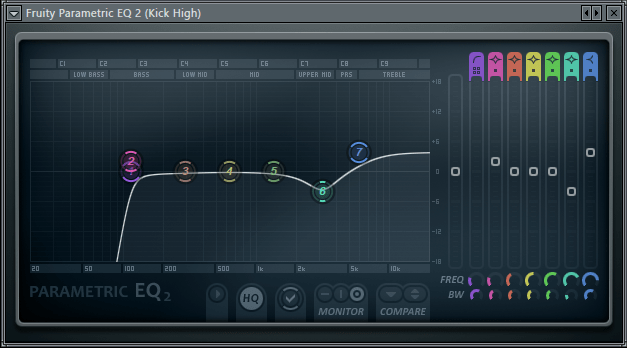
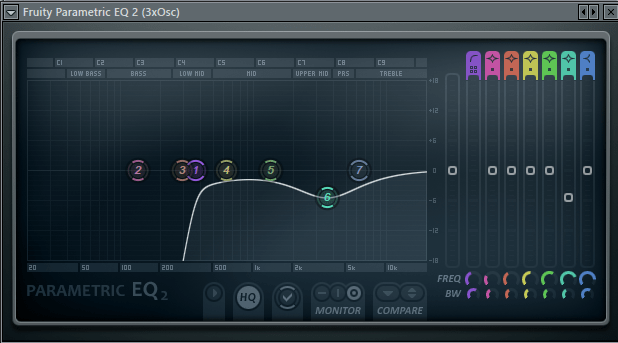
Even though our high kick is basically just a transient, it still has a little bit of body and therefore it still has some low end. We want to filter out the lows from our high kick in order to make room for the low kick in our layer. Go to the Kick High mixer track and insert a Fruity Parametric EQ 2 or an EQ of your choice.
I’ve only filtered out the sub-100Hz frequencies as I still want some good mids from the high kick, you’ll notice that if you filter it up too high then it loses its punch. I also make a small dip around 4kHz, and a generous boost at 5kHz +.
We don’t really need to EQ our low kick as it has very little high end. If you want to be a perfectionist though, just remove some of the high end above 500Hz.
If you want to dive deeper into EQing kicks, check out this newer guide from Simon.
Balance
This is where you have to do some of the work. You want to get a nice volume balance between the high and the low.
If the high kick is too loud, it’ll draw away from the low-end and make the kick too harsh. If the high-end is too quiet then the kick will sound very ‘subby’ and lose its punch.
I left my low kick at 0dB, and took the kick high down to -2.0dB. You may prefer something different as this part comes down to preference.
Optional Step – White Noise
One trick I like to use in order to increase the punch of my kick, or give it a nice characteristic is add a slice of white noise just before the initial transient.
This is fairly easy to do and just involves a little bit of envelope shaping and EQ.
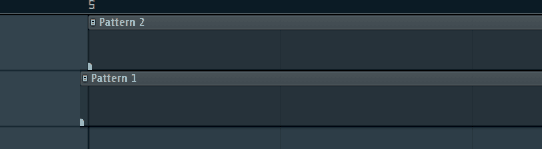
Switch to the Playlist
In order to implement this technique, you’ll need to create a new pattern for the noise and move to the playlist. Also, if you’re having your full kick coming in straight away, you might want to start your song a little later in the playlist as the noise needs to come BEFORE the kick.
Noise Shaping in 3xOSC
Insert a 3xOSC and assign to a new mixer track. Turn it WAY down.
Turn down all the other oscillators except for OSC 1, which you’ll want to change to a noise wave.
Just like we did with the kick, insert 4 steps on the step sequencer. At the moment it’s just constant white noise and sounds horrible.
Next, turn the attack, sustain, and hold all the way down. Finally, adjust the decay so there’s a tiny little stab of noise.
EQ and Volume
We only want the high-end of the white noise. I placed a low-cut around 300Hz and also a dip at 5kHz.
You want the volume to be extremely low. You shouldn’t be able to hear the white noise, but you should notice a difference when it’s muted.
Placement
And finally, place it right before your kick. As close as you can, just so you get a little lead in.
Conclusion
Now that you’ve learnt the basics of layering kicks, go and PRACTICE!
Seriously though, it’s going to take a while to get. Often you’ll have to try sample after sample until you get a good combination, so don’t think you can just pick two random kicks and make them sound great together!
It’s important to note that layering kicks is not essential for good sounding tracks, it can just help sometimes. Also if you’re someone who’s afraid of getting mocked for using common kick samples then it might be beneficial for that also, but ignore the haters yeah?
Have fun producing!
