


For all the talk about compressors and limiters, noise gates are a lesser-discussed topic in electronic music.
But a noise gate could actually be the key to unlocking a cleaner mix.
Although they are mostly used during live recordings, they can also help remove noise and muddiness in your productions.
In this guide, we will cover:
- What a noise gate actually is
- How noise gates differ from compressors
- 5 ways to use a noise gate in your tracks
- 5 plugins (free and paid) to get you started
Let’s go! 👇
Table of contents
What Is a Noise Gate?
A noise gate (or simply gate) is a device or software which controls the volume of a signal. If the signal is below a certain threshold, then the signal will be attenuated by a fixed amount (called range).
In effect, this range will often reduce the output to 0dB if the signal is below the threshold.
However, if the signal is above the threshold, the signal will pass through. The gate is then open.
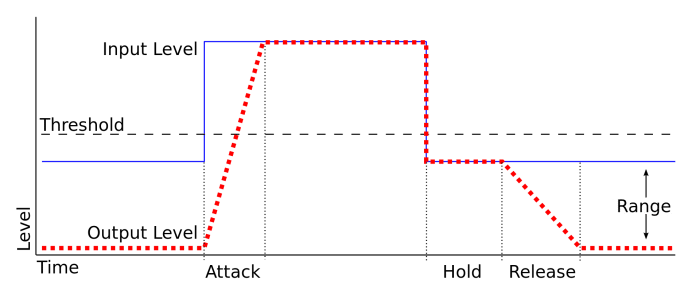
In this graph, the signal’s level is represented in blue. The output level post-noise gate is in red.
You can see that as the signal is below the threshold, the output is reduced to 0dB. But as the signal increases above the threshold, the gate opens up. The output level then matches the input level.
If you are more of a visual person, imagine a roller-coaster ride.

Most rides will have a height restriction. If you are above a specific height (threshold), you can pass and climb on the ride. If you’re below the threshold, you’re out of luck.
(I know this example isn’t perfect – it doesn’t capture concepts like attack and release. But hopefully, it helps paint a picture.)
In practice, noise gates are used to remove small unwanted noises. This could for example be during a recording (breathing noise, a click track, etc). It could also be unwanted hums and hisses due to saturation units.
However, you can use them in many other creative situations, as we’ll explore.
How Does It Differ From a Compressor?
If you are familiar with compressors and limiters, then a noise gate should be intuitive.
A compressor will attenuate a signal by a certain ratio once it exceeds a threshold. A limiter (which is an extreme case of compression) will simply block the signal from going any higher than the threshold.
With makeup gain, you can then increase the perceived loudness of the quieter parts of the signal.
By contrast, a noise gate acts as the opposite of a limiter. Instead of limiting the signal above a threshold, it will keep the signal at 0 if it doesn’t cross that threshold.
Parameters of a Noise Gate
Although each noise gate plugin will have its own settings, most parameters are the same. Let’s go over them:

There are 4 main parameters that every good gate plugin should have:
- Attack. As with most plugins, attack determines how long the plugin takes to come into action. In our case, the attack is the time it take the gate to open to let the audio through
- Release is the time the gate takes to close after the signal drops below the threshold
- Threshold sets the level under which the signal’s gain should be reduced
- Hold is the amount of time the gate must remain fully open after the signal has dropped below the threshold. This is a useful setting to avoid the gate opening and closing in quick succession
Other settings such as ratio and knee might be available in your gate plugin. Ratio will often be set to “∞ : 1” or -100dB. This is because we want to completely cut out the signal if it doesn’t cross the threshold.
You can adjust the ratio according to taste, avoiding your signal cutting out sharply.
Now that we’re familiar with the basics, let’s explore some use cases.
If you’re in need of some samples to follow along, make sure to check out our free resources here!
When To Use a Noise Gate?
As mentioned, noise gates are traditionally used in mixing. But you can also use them in sound design too.
So here are 5 ways you can use them!
Suppress Noise in Recordings
As mentioned in the intro, noise gates are often used in live recordings. Breathing noises, a lyric page being turned, a knock on the microphone…
Getting the perfect recording without noise is practically impossible.
Let’s look at some examples of how noise gates can help.
Here we have a vocal take where the metronome bleeds from the headphones into the microphone:
Let’s set a noise gate:
I’ve set the threshold at about -26dB to make sure it doesn’t interfere with the vocal. You can see the metronome hit in dark blue. Its level is below the threshold, so it gets suppressed.
Let’s have a listen:
With vocals, spend some time setting the right attack, release, and threshold settings. You don’t want to cut out the end of a sentence too abruptly!
Let’s look at another example.
Here we have a guitar recording with a lot of static:
Let’s use a noise gate to clean this up:
Notice the static noise doesn’t cross the threshold. Let’s listen to the result:
It’s important to note here that a noise gate will not suppress background noise entirely.
In this example, I exaggerated the static to show how the noise gate operates. But the static is still noticeable when the guitar plays.
If you find that there is too much noise overall, then a noise remover might be a better option.
Reduce Room Reverb
Room reverb occurs naturally in poorly-treated rooms. It can also be the case that a sample you want to use has too much reverb.
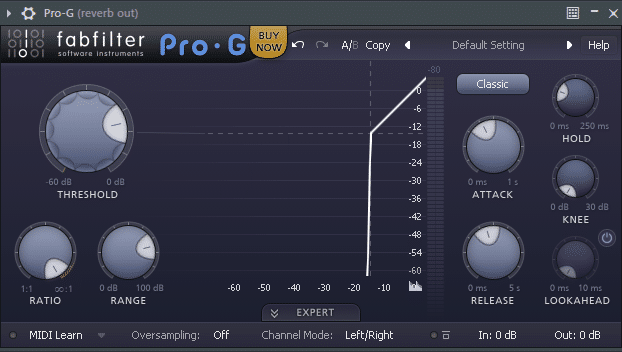
Let’s see how a noise gate can remove some of that reverb.
This is the original sample:
You can hear quite a lot of reverb between sentences. Let’s set a noise gate to block it out:
Granted it isn’t perfect – but you can hear how the vocal already sounds closer. In the context of a full mix, the little artifacts will be barely noticeable.
Pro-tip: with vocals, try setting the attack quite high (>40ms), and work your way down. This will help get a smooth removal of unwanted noise.
Shorten Long Tails
Let’s face it: we all love a bit of reverb. Especially when starting out. Reverb can quickly turn a boring sound into something that sounds professional.
But too much reverb on too many sounds has a cost.
Long tails happen when you add reverb carelessly. When the decay time is too long, reverb adds up, creating muddiness.
They also have the drawback of removing head-room for mastering.
Let’s listen to an example:

Even if you don’t hear it, the reverb is still playing after 30 seconds!
One option could be to automate the volume. That will become cumbersome over an entire track.
Let’s try to shorten that tail with a noise gate:
Because of the nature of the pad, I am setting a quite slow attack and release. This will avoid triggering the gate too quickly because of the little peaks in volume.
Let’s listen to the result:
You can hear that after a while, the reverb drops below the threshold. The audio then becomes muted.
Isolate Drum Hits to Create New Grooves
Ever come across a drum loop that you want to use, but don’t know how exactly?
Chopping and re-arranging drum hits is great. But sometimes you just don’t know what you’re after. So one of my favorite tricks is to use a noise gate to isolate drum hits.
Gating allows you to simply experiment, and come up with amazing results.
Let’s try it out. I have this drum groove that I really like:
However, there’s too much happening in this loop for me to use it. Because of the reverb, it will probably be hard to cut out any hits cleanly.
Let’s throw a noise gate on it and experiment:
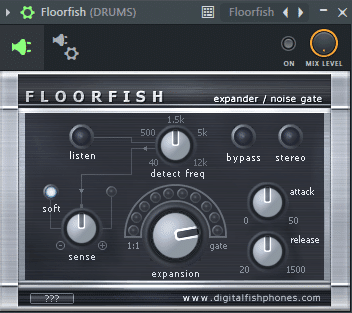
I am using Floorfish, a free noise gate plugin. Let’s set the expansion to “gate”, and play with the “sense” and “detect freq”.
Here are some cool results I came up with:
By setting the attack and release very low, the gate is acting as a transient shaper. This creates a cool percussion layer that I can easily add over some drums.
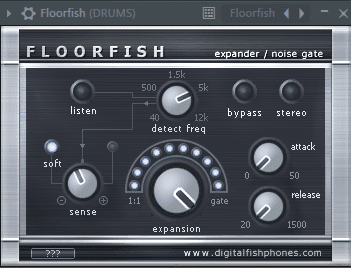
Let’s check out a second example:
Here I am adjusting the frequency higher. This way I exclude the kick drum and the low rumbling. I’ve also added a tiny bit of reverb after the noise gate. This helps fill out the space.
Sometimes, chopping up drum breaks doesn’t quite cut it. Noise gates are a great alternative.
Combine With Sidechaining to Create Tension
Many noise gate plugins will have a sidechaining option. This is great if you want to control your sound based on some other input.
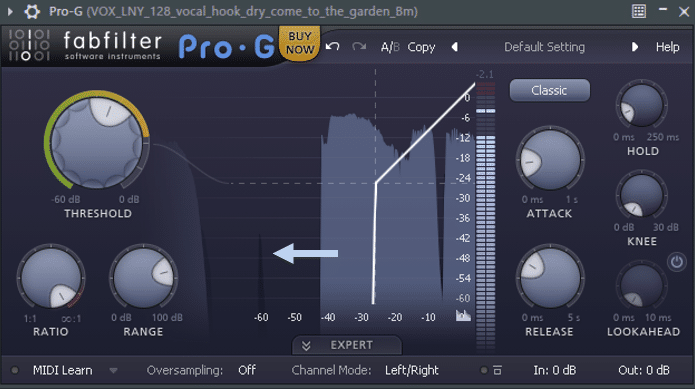
Let’s see how we can utilize this with FabFilter Pro-G:
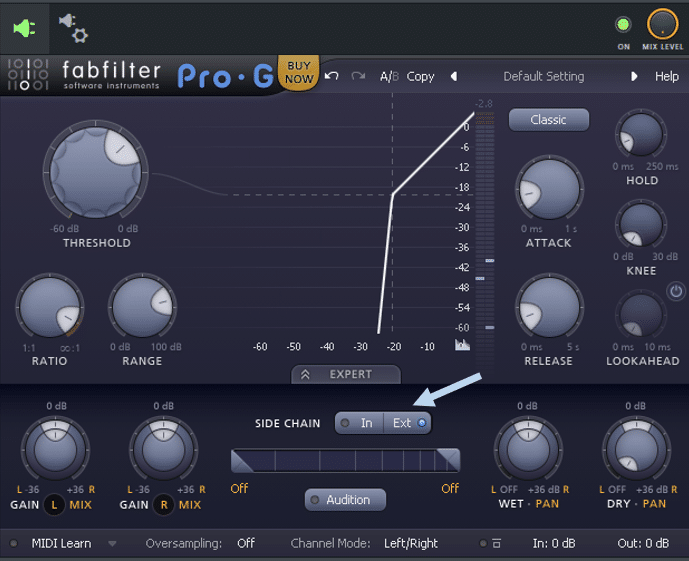
Open up the Expert section, and under Side Chain, select Ext. This will allow you to control the gate with an external sound source. This could be a kick, a snare, or any MIDI pattern.
Now, we can play with the Release knob to create a sense of anticipation. When you increase the release time, the gate won’t have time to close back. This will effectively let more sound through.
You can hear in this example how the main synth is ducking behind the drums. As the build progresses, I am increasing the amount of reverb coming through. Combined with a change in drums, this makes for a great transition.
5 Plugins to Get You Started
Most (although not all) DAW will have some version of a noise gate. Let’s explore some of them, as well as some third-party plugins.
FL Studio Fruity Limiter (Free)
Although not a dedicated noise gate, FL’s Fruity Limiter has a Noise Gate section:

Unfortunately, this noise gate is quite limited. And it is the only stock noise gate in FL Studio.
You’ve got your basic controls: release, gain, and threshold. So… no attack knob.
As you increase the threshold knob, the section lights up. Set the threshold to the desired level, then reduce the level by turning down the Gain knob.
There are plenty of free alternatives on the market, so I wouldn’t spend too much here. It can act as a quick fix if you don’t want to open another plugin. But most of the time you will be better off using a free alternative.
Note: for live recordings, there is a way to set up a gate within Edison. It is a bit convoluted, so we will skip it for this guide.
Ableton Live Gate (Free)
Ableton Live’s Gate on the other is a fully-fledged plugin:
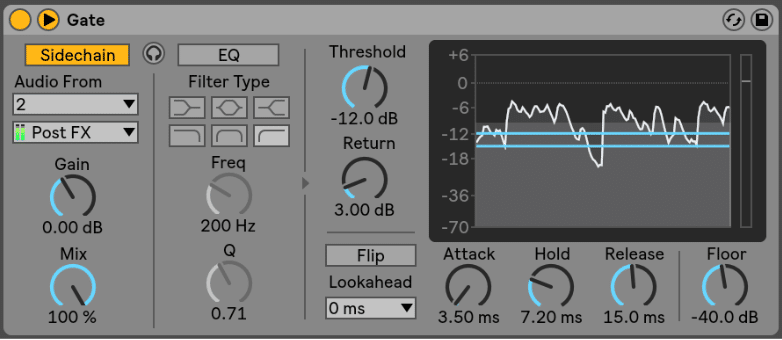
You have your standard Attack, Release, Threshold and Hold knobs. You also get a range of custom settings that are worth going over:
- Return sets the value at which the noise gate will close. Say your threshold is set at -12dB. By setting your Return at 3dB, you get will close when the audio drops below -15dB. Setting your Return at 1-3dB will help avoid the gate opening and closing. This can occur when the signal level is oscillating around the threshold value.
- Flip essentially flips the gate, so that the noise will only pass when it is below the threshold.
- Lookahead will help preserve the transients. For acoustic drums for example, make sure to pick a higher lookahead time to preserve the punch.
- Floor functions like the Gain setting in the Fruity Limiter. It determines how much the signal is attenuated when the gate is closed.
- Finally, the EQ section allows the gate to be triggered by a specific frequency band. This can be used in tandem with the Sidechain secion, which allows you to trigger the gate with an external source.
Logic Pro Noise Gate (Free)
Similarly, Logic also has its own fully-formed noise gate plugin:
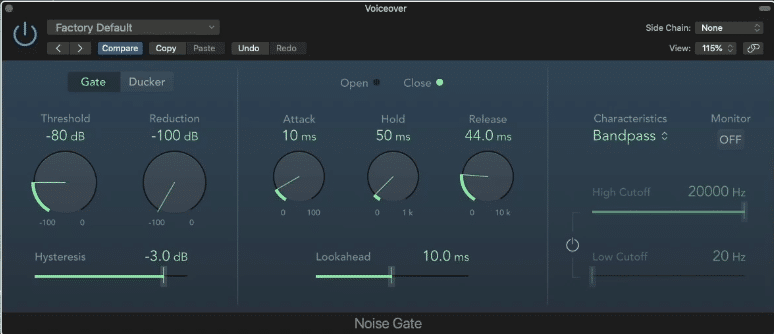
It does however lack of a visual representation of the signal. In place, we get an Open / Close light indicating when the gate is active. Besides that, Logic’s Noise Gate comes with classic bells and whistles.
Similarly to Ableton, Logic provides a Hysteresis (aka Return) and a Lookahead option
We also have a Side Chain option, as well as frequency cutoffs. Finally, the Ducker option works a bit like the Flip function of Ableton. When enabled, the audio will only come through when the volume drops below a certain threshold.
A common application would be with delayed vocals. By setting the mode to Ducker, the delays are suppressed when the singer is singing. But as soon as (s)he finishes a phrase, the delays will appear.
FabFilter Pro-G (Paid)
I used the Pro-G quite extensively in this guide, and for good reason. Like many of FabFilter’s plugins, it doesn’t get much better than this.
As with most FabFilter plugins, you get a range of presets to choose from. Some are designed for vocals, drums, or even an FX section for creative purposes.
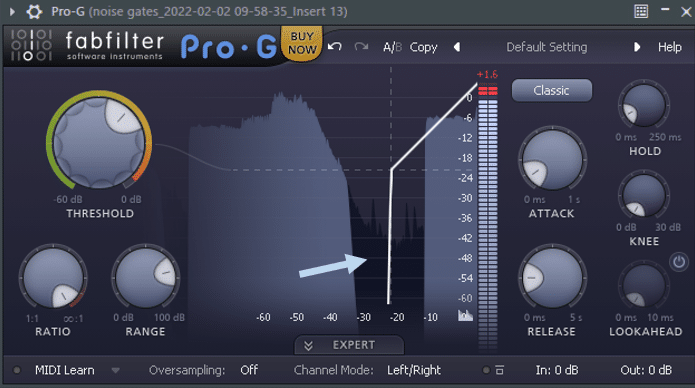
As touched on earlier, the Expert section lets you trigger the noise gate with an external source:
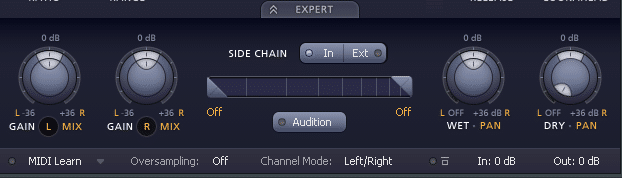
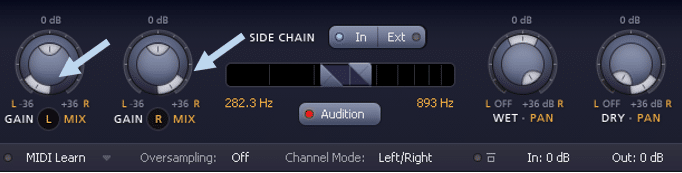
It also lets you determine a specific frequency range between which the gate will open.
Pro-tip: you can set a fixed frequency range, and then sweep across the spectrum by holding ALT/Option.
Best of all, you can control the Left and Right channels independently. To the left, adjust L and R Gain/Mix knobs to decouple the left and right channels. By setting the left outer ring 100% L, and the right outer ring 100% R, left and right channels are now fully unlinked:

A1 Triggergate (Free)
Although not technically a noise gate, A1 Triggergate can achieve impressive results. And it’s free!
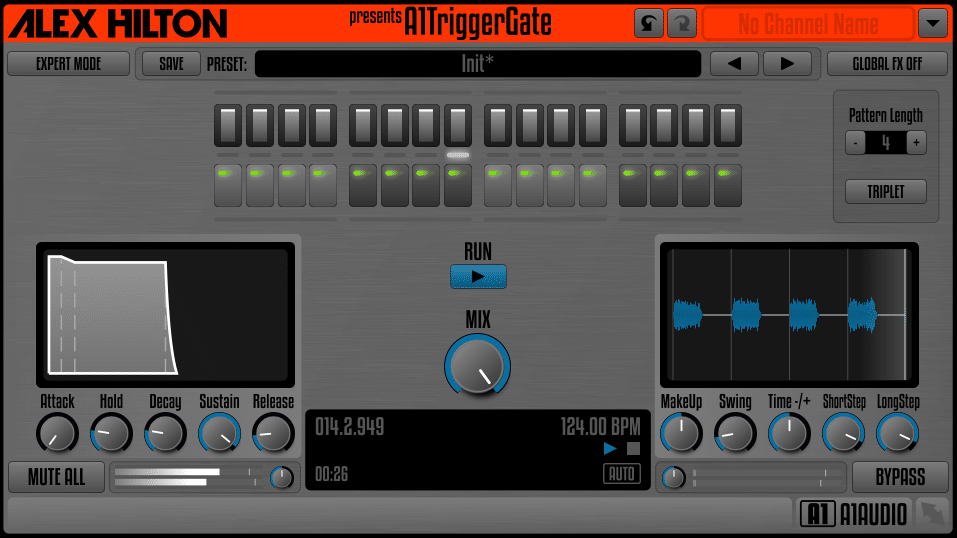
A1 Triggergate is an amazing tool to create the Gate Effect. This effect essentially turns a prolonged sound into a rhythmic sequence. And it does so by gating the volume.
Let’s look at an example using A1 Triggergate. This is the sound we’ll work with:
Let’s set A1 Triggergate to “TranceGate 01 + Echo”:
All with the touch of one button!
Essentially what A1 Triggergate allows you to do is control the level of each step within a 16-step sequence. It allows you to:
- customize the envelope of the gate with ADSR controls
- low-pass the entire signal
- add some drive
- add echo / delay to fill out the blanks left out by the gate
For a free plugin, the level of options you have is quite stunning. Let’s listen to one last example of what A1 Triggergate can do:
In this example, I am:
- increasing the Mix knob so that the gate effect increasingly comes through
- increasing the delay Level and Feed
- low-passing as the drop approaches
All with just one plugin! Do yourself a favor and grab A1 Triggergate, I can’t say enough good things about it.
Final Thoughts on Noise Gates
I hope you enjoyed this guide and learned something new! Although noise gates are mostly used for live recordings, you can use them in a ton of ways for electronic music.
Be creative, break rules and come up with amazing sounds!
Want to improve your sound design techniques? Check out our Breakthrough Sound Design course!
