


“Collab Bro“? Hang around music producers long enough, and you’ll get a few of those in your DMs.
However, “Collab bro?” is much more than just a meme.
Collaborations can help you learn faster, grow your audience and finish more tunes. But it has to be done right.
In this article, we’ll explore:
- the benefits of collabs
- how and who to reach out to for collaborations
- how to collab with people that use a different DAW
- and much more!
Let’s get started! 👇
Table of contents
Why Should You Collab With People?
Collabs can be tricky to pull off. Not everyone will enjoy the collaborative process, but the benefits are definitely worth trying. Let’s look at a (non-exhaustive) list of some of those benefits:
- Finish tracks faster: This is a no-brainer really. Collaborating means sharing the workload 50-50 (hopefully). This means you should be able to finish twice as many tracks in the same amount of time.
- Get unstuck: We all know that awful feeling of not knowing where to bring a track. You have a 32-bar loop, maybe your first drop, but don’t know what to do next. Instead of turning to yet another YouTube tutorial, a fresh pair of ears through a collab can unlock that.
- Networking: “It’s not what you know, it’s who you know”. This couldn’t be truer than in the music industry. As a newcomer, expanding your network is crucial. On top of meeting people and making new friends, opportunities might arise in the future through connections you made.

- Complement your skills: It’s hard being an expert at everything. Nailing your arrangements but struggling with mixdowns? Collaborating can be a great way to combine your expertise with someone else’s.
- Learn new techniques: Linked to the previous point, collabs are a great way to discover another person’s workflow. As you go over the project together, you are bound to learn new techniques and tricks that the other person uses.
- Grow your audience: Collaborations are a great way to cross-pollinate your respective audiences. Don’t take it from me, just have a look at some of these collabs in pop music. How many Gen Z’ers got introduced to the Beatles through the Kanye West x Paul McCartney collab?

Choosing Who To Collab With
Let’s now dive into some practical tips for a productive collaboration. Starting off with choosing who to collab with.
Tip #1: Collab with People You Get Along with
Probably one of the most overlooked aspects of collaborations. Put the odds on your side by collaborating with people you enjoy spending time with. Even if this is online, you should get a pretty quick feel if the vibe is right or not.

If this will be your first collab together, ask yourself: “Would I go out for a drink with this person”?
If this answer is “definitely not”, that should be a red flag. Collaborating with people you know will increase the chances of an enjoyable process.
Tip #2: Collab with People Above You
I know the word “above” is not the best one. But hopefully, you’ll get what I mean.
The idea here is to collaborate with people who have a slightly larger audience than you. This can be measured through Spotify monthly listeners or Instagram / Facebook followers.

Obviously, this is not a must, and it’s also good to “give back” by collaborating with “smaller” artists. But don’t be scared to reach out to people who might be “out of your league” – you will be surprised by the answers you get!
Additionally, you can also look at the person’s social accounts. Is their fan base very engaged with their content? This will also increase the likelihood people check out your project when it comes out.
Looking to boost your streams on Spotify? Check out our 13 free tips in our latest guide here 🔥
Reaching Out To People
So you’ve decided on who to collab with. What now?

Tip #3: Direct Message People
Don’t be that guy who drops a comment on their latest profile picture. Make it personal and show that you truly want to create a project together.
Ideally, you will already have built rapport together over time. This will make it a lot more natural when you eventually ask to collaborate.
If it’s your first time reaching out, make sure to introduce yourself in a professional manner. This means no “ezz broo fancy a collab??!”
Lay out why you think that person should collab with you, and follow up with some initial ideas (see next point).
Or better, yet, just introduce yourself first, and chat about collaborating later.
Tip #4: Offer an Idea / Sketch to Start With
There is an implicit rule in collab-world that the person who reaches out also sends a sketch. This is just common etiquette really. You are the one seeking to collab, so it’s only right to provide a starting point for the project.
Plus, it also makes it easier for them to say yes if you’ve already got something!
Have a few sketches ready to send in case the person agrees to collab. These should be fleshed out enough to give a general direction to the track – not just a few bars of atmospheres and foley!
Generally, a proper intro and a solid drop is a good place to start.
Collabs Using the Same DAW?
Hurrah! You’ve reached out to some people, and one of them has agreed! Time to truly get to work and send them your sketches.
In the following sections, we’ll look at different ways to share projects. Let’s first look at the case when you are both working in the same DAW.
Tip #5: Exporting a Project File in FL Studio
If you are both using FL Studio, you can share the .flp project file. Go to File > Export > Zipped Loop Package:
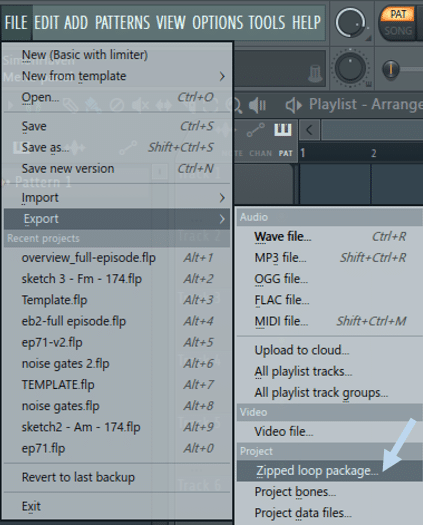
This will create a zipped folder containing the .flp project file. Any audio clips that you used will be rendered to audio. All patterns with their respective MIDI sequences will be preserved.
A few (major) caveats to this technique:
- you both need to run the same version of FL Studio
- you both need to have the same plugins (both instruments and effects), updated to the same version
These are quite significant limitations. This is why working with stems (see tip #7) is often preferred.
Tip #6: Exporting a Project File in Ableton Live
If you are both using Ableton Live, select File > Collect All And Save:
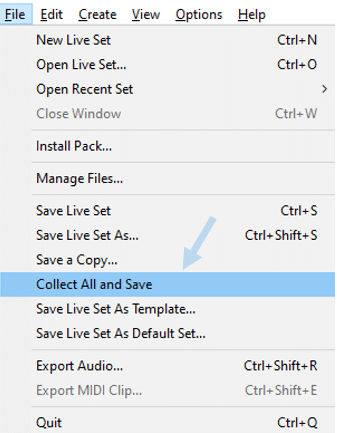
This will create a Samples folder in your project folder, where all the media files from your project are copied. This basically ensures that your collaborator has access to the media files you used.
However, the same caveats as for FL Studio exist. Both of you need to be running the same versions of all plugins that were used in the project.
One way to get around this limitation is by Freezing tracks with instruments:

This will create an additional path in your project folder called Processed > Freeze:

This way, your collaborator has access to a rendered version of what your instrument was playing.
One benefit of this technique is that if he also has the instrument plugin, he can simply Unfreeze the track:
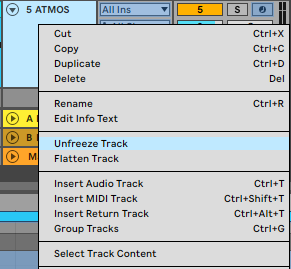
This will allow him to regain access to the MIDI and make any adjustments to the plugin itself.
Collabs Using Different DAWs?
Working with stems is probably the most common way to collaborate. I even know some duos that work with stems, even though they use the same DAW!
(By the way, “stem” is just a fancy word for an audio file.)
The major benefit of working this way is that it doesn’t matter what plugins you each use. Every sound, track, or instrument is rendered to audio. You can then easily share those files with Dropbox, WeTransfer, or Google Drive.
Let’s look at the optimal way to export stems in FL Studio and Ableton Live.
Tip #7: Exporting Stems in Fl Studio
Before anything, make sure each track is properly named:
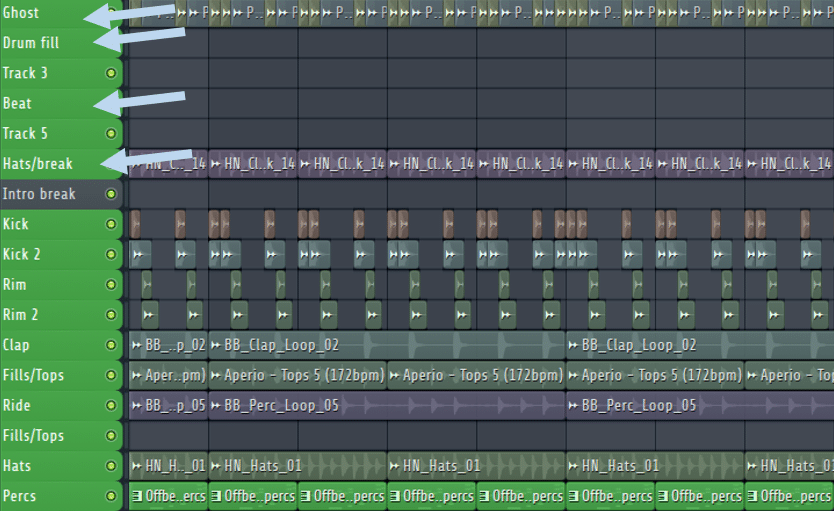
These will be the name of your stems, so make it easy for your collaborator to sort everything out!
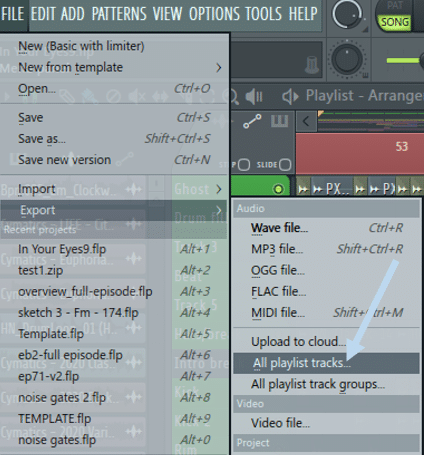
Once everything is named, make sure all your effect slots are enabled in the mixer. Double-check also that every mixer track is unmuted! Then, navigate to File > Export > All Playlist Tracks:
Under the rendering options, select WAV format:
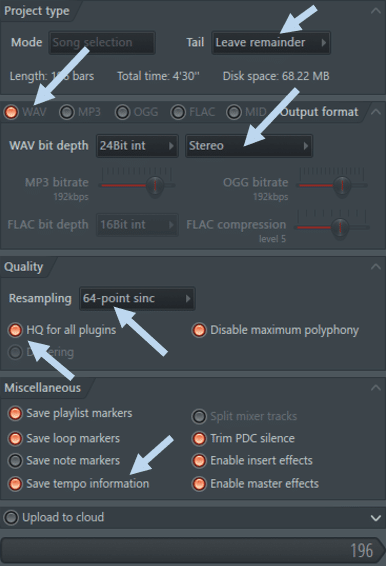
Make sure Leave remainder and Stereo are selected. In terms of quality, anything above 64-point sinc will do the job. Make sure to also enable “HQ for all plugins” and “Save tempo information”.
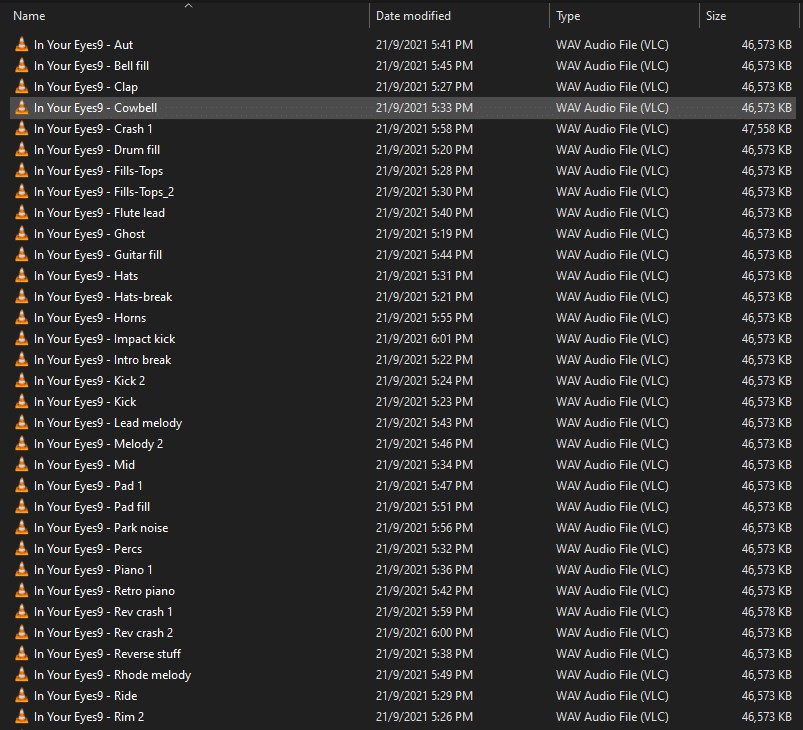
Click Start, and voila! You should have a folder full of stems:
Note: you can also export mixer tracks instead of playlist tracks. However, I prefer working with playlist tracks as I often route multiple sounds/instruments to the same mixer track.
Tip #8: Exporting Stems in Ableton Live
In Ableton Live, select the entire arrangement, and select File > Export Audio. Under Rendered Track, select All Individual Tracks:
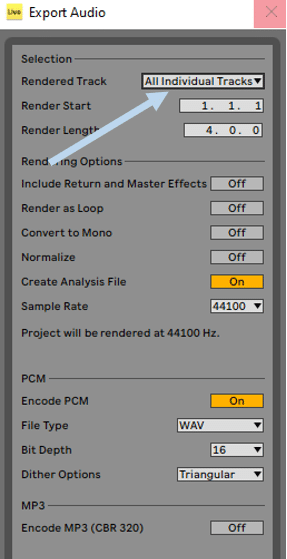
Make sure that Render as Loop, Convert to Mono, and Normalize are turned off.
If you have any return effects or effects on the Master bus, make sure “Include Return and Master Effects” is turned on.
Click Export, select your folder, and it’s done!
To actually share stems, I like to use Google Drive. It provides you with 15Gb of free storage and makes it easy to share links to specific folders with people.
Tip #9: Collab Through Third-Party Apps
Finally, let’s quickly look at a few ways to collaborate with third-party plugins.
Splice Studio
Most people know Splice as a sample platform. But it can also allow you to collaborate with others!
In the Splice Desktop app, go under Projects in the Library menu:
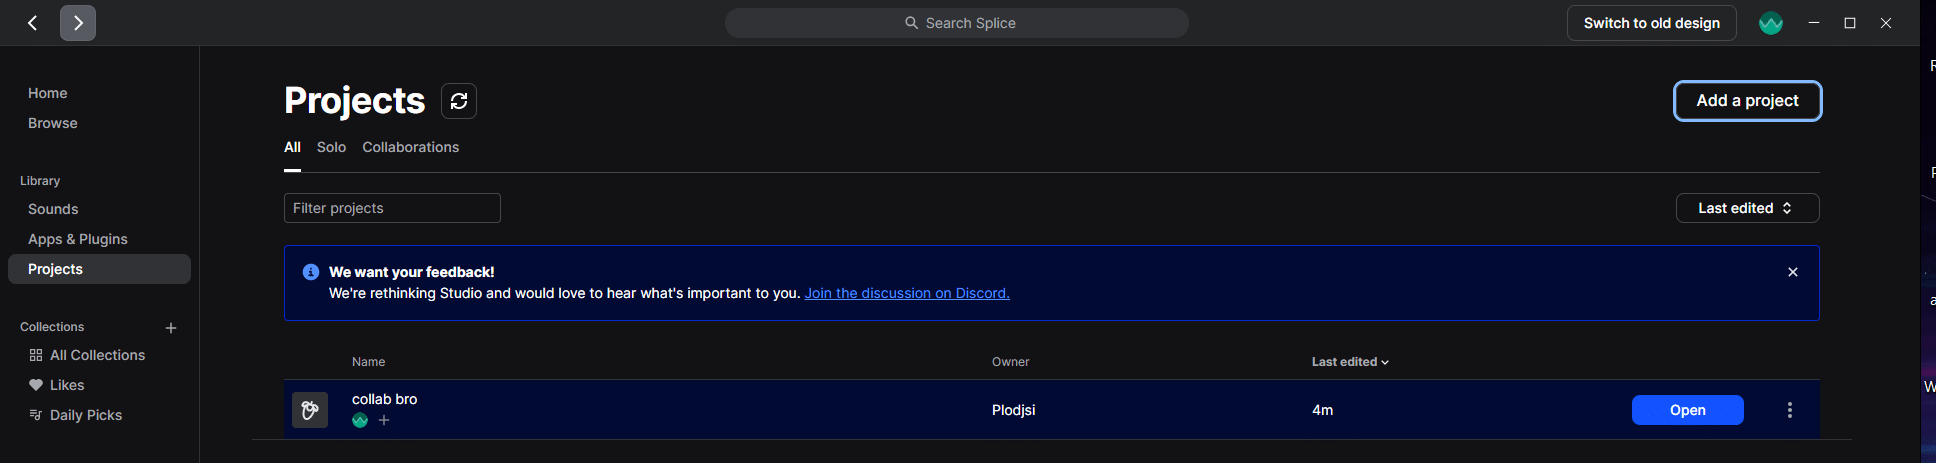
Here you can upload your DAW project directly. To collaborate with someone on a project, simply click the +Invite icon, and enter their username:

Note however that you need the same DAW for this to work. Splice in this case acts as a cloud server, and you are sharing the same DAW session.
When saving a project, you will still need to render everything to audio. That way all the samples are made available through the Splice app.
Satellite Plugins 2.0
Introduced in 2021, Satellite Plugins is a really cool way to collaborate with someone in real-time. And it’s free!
Essentially, it allows you to record, listen and share stems seamlessly. Satellite works as an effect plugin within your DAW. It records whatever you feed it, and shares it on a common interface with your collaborator:
Once the sound is recorded, it will appear on the person’s interface. He can then drag it directly into his own DAW.
Although I haven’t personally used it yet, it’s definitely something I’m going to look into. In my opinion, this is a great alternative to the traditional export-and-share-stems method.
Final Thoughts
Hopefully, you will now have a better idea of how to collaborate with others!
As you do more collabs, there are a ton of other best practices and things you pick up on the way. The best way to learn is to get started!
Did I miss out on anything? Any other collab tips to include? Feel free to get in touch with me at [email protected].
