

Us music producers tend to argue about a lot of things.
Whether it be the topic of sound design versus presets, which DAW is the best, or that everyone should produce drum and bass because it’s the most difficult genre.
We’ve heard it all.
But there’s one thing most music producers will agree on, and that’s the fact that workflow is a key element of production – not only in terms of actually being able to finish tracks, but also in regards to creativity, speed, and enjoyment.
Yes, I said enjoyment. Having a great workflow makes music production a lot more enjoyable.
So, I’ve decided to make this month’s mega post about workflow. Leading on from past tradition (the 50 Mixing Tips post), I’ve included 50 rut-busting tips that I and others use to improve workflow, be more productive in the studio, and ultimately get things finished.
The post is laid out as follows:
- General productivity tips
- Creativity
- Workflow Inside the DAW
- Ableton Live
- FL Studio
Note: If you’re after a more comprehensive guide to workflow and creativity, check out The Producer’s Guide to Workflow & Creativity here.
General Productivity Tips
1. Set aside time for production
Are you chasing a career in music? Or is it a mere hobby?
For this tip, it doesn’t matter. Because the truth is that if you want to get the most out of it, then setting aside some time is important.
Working in 5-minute gaps throughout the day isn’t highly enjoyable and doesn’t really help you get into that state of flow that we all know about. It rarely produces tangible results, and we usually end up more frustrated than happy.
Setting aside time for production also helps to get better rapidly, which in turn means a faster workflow.
Using a calendar application, or a real one (do people still use real calendars?) set aside a block of time for production and commit to it. I’d recommend at least 60 minutes worth of distraction-free time.
2. Create an ideal studio environment
This doesn’t apply to everyone. I know some people who actually feel more creative when in a messy workspace, and if that’s you – then awesome.
But the truth is, most of us prefer a clean workspace. So make sure your studio is clean (or at least organised)! It’s easy for us to look around after designing that synth patch and realizing that there are 6 coffee mugs on your desk. That’s where the endless pit of procrastination starts.
In short, a clean and organized environment is somewhere you’ll enjoy being and likely benefit in terms of productivity and creativity from fewer distractions.
3. Disable your internet connection
But.. but – what about Facebook?! I have to tell everyone I’m producing, don’t I?
Nope.
Applications these days have too many notifications that can ruin your flow instantly. This ties back into the first tip: when you’re producing – it’s YOUR time. Skype doesn’t need to be up, neither does Facebook. Just turn on flight mode or unplug the modem.
Note: if you struggle with this, feel free to work in 25-minute blasts and then check your social media during 5-minute breaks between them.
4. Drink coffee
One of my readers, Gabe Alari recommended this one.
I don’t personally drink coffee (I think it’s disgusting, I’m weird, right?) but from what I’ve heard it can be a good pick-up. Update: I fricken LOVE coffee.
Give it a go!
5. Try using a task-based workflow
If you really struggle with finishing tracks, or find yourself stuck in those situations where you’re going around in circles production-wise – then you may want to try out a task-based workflow.
What is it?
It’s a way of working that I find immensely helpful and logical. You basically set common tasks in a to-do list or application, and then do them.
Read my article on task-based music production here.
6. Use dual screens
I realize it isn’t possible for everyone to use two screens due to the desk space they require, but if you can afford to use dual screens – why the hell aren’t you?
It’s a much quicker way to work. You could, for example, have the mixer on one screen and your playlist/arrangement view on the other. Or maybe have the current VSTs being used on a track in the second screen for easier tweaking.
With that all said, some people do work faster with one screen, mainly due to practice. Personally, I find working with two screens a lot quicker.
7. Take regular breaks
Sam… you’re just spouting out the same old crap that you always do.
Yes, yes I am. Taking breaks is important, and it helps a lot with productivity and getting things done. If you plan to spend upwards of an hour in the studio then you should strongly consider taking scheduled breaks, not only for creativity and productivity purposes but also for your ears (especially when mixing).
I personally like to produce 45 minutes, take a 10-minute break, and repeat.
8. Record yourself producing
There’s something about recording your production session regardless of whether your planning on showing anyone or not. It helps you move fast and be decisive.
I know this may sound a bit weird, but why not try it out? Grab some screen recording software, or if that isn’t enough – record yourself with a video camera.
You’ll put in more effort, trust me.
9. Organize your sample library
Haha, you didn’t think I was going to include it, did you?
Well, I did. And I know you’ve been putting it off!
This tip provides a huge boost in your workflow as you won’t find yourself having to sift through randomly named folders such as “asf34gnb kicks” or “smooth grainy festival claps” and the likes.
This leads in nicely to my next tip…
10. Create a ‘favorites’ sample folder
Sometimes you’ve got an idea and the best way to go about it is to get it down FAST.
What happens? You spend 30 minutes looking for the perfect kick sample, and by that time, your awesome idea has vanished from existence.
Create a folder with your favorite samples: kicks, claps, hats, rides – you name it. You can use these at the start of your song to get things going. They can always be replaced later.
11. Use a notebook
Often when deep into a production session I’ll come up with a cool idea that I don’t want to implement right at the moment, so I write it down.
This happens at the worst of times and it’s easy to just tell yourself that you’ll ‘do it later’, but often we forget. Have a notebook handy when you’re producing so you can write down those little things such as, “turn down ride cymbal”, or “add atmosphere to synth track.”
12. Enter the state of flow
Not sure what the state of flow is?
It’s that moment when you’re in touch with what you’re doing. Unstoppable, powering forward like a train. Super focused.
We’ve all experienced it before, but it seems to come around once in every blue moon.
How do we enter it? I wrote a post over at Productivityist about the whole idea.
13. Separate each section of production
The most unproductive way to work, in my opinion, is to try and do everything at once. Synthesising a patch whilst flicking back and forth between bus compression, writing a melody while fixing up the arrangement…
It’s an absolute nightmare!
The way I like to work is: creation > mixing > mastering
Creation involves everything from writing music (melodies, harmonies), to sample selection and sound design; arrangement. You get the idea
Mixing is, well, mixing. EQ, compression, balance and the rest.
Mastering if I’m doing it myself then mastering comes last, and it generally always will.
A more in comprehensive way to separate the production steps is to use the Production Pyramid.
Creativity
14. Brainstorm before starting a track
While there’s nothing wrong with opening up your DAW and getting straight to work, I find that brainstorming beforehand can be helpful for coming up with ideas and producing a nice track.
For example I recently started working on a 2-track EP. After some brainstorming, and a lot of writing down random words! I came up with a ‘theme’ for each track, which I’ve generated ideas around.
What should I brainstorm?
It doesn’t matter! The best way to brainstorm is when no rules are imposed and you’re not being critical about anything. Write down everything and anything, the goal when doing this is quantity, not quality.
15. Be creative, then critical
In the early stages of production, when writing music and adding different sounds – you want to be as creative as possible. Try not to think twice about what you’re doing, just do it.
Being critical of yourself puts you in a focused/close state whereas mucking around and trying out new things puts you in an open state. Here’s a great video of John Cleese which explains it in further detail:
https://www.youtube.com/watch?v=DMpdPrm6Ul4
14. Work backwards
Normally start with an intro? Start with the drop.
Working backwards, I find, makes working with tension and energy a hell of a lot easier and it’s also a lot more fun.
15. Minimize resources
We’re living in a digital age with a plethora of different plugins at our fingertips. The downside? It can become overwhelming.
Try producing a track with just one synth, or using just 5 tracks.
Create boundaries and you’ll innovate in one way or another.
Note: Also, if you find yourself with 100’s of plugins that you never use. Why not just get rid of them?
16. Enjoy it
This isn’t some feel-good, cliché BS – it’s the most important tip in this article.
If you don’t enjoy it, then your workflow will suck, you won’t work fast, and the production probably won’t be great.
That’s not to say production is always a joyride. It’s not. It can be very difficult at times, but you’re supposed to enjoy it! Stop being so hard on yourself and enjoy the process of creating music.
17. Cultivate a creative mentality and ‘zone’
Had a tough day at work? Too much on your mind?
When you get in the studio, you’re there to make music. Not worry about life’s problems.
Create a mindset that you can easily trigger when you walk into the studio. It might be the process of opening your DAW, as soon as it’s open – you’re in the zone.
18. Change things up
It’s easy to fall into the routine trap, and sometimes switching things up helps a little.
If you’re using Ableton, why not switch up the color scheme?
How about trying out a new synth?
You never know what might come out of it.
Workflow Inside the DAW
Time for some more tangible, practical tips!
19. Use a piano
“When struggling with melodies, switch everything back to piano and start from there as to easily ignore sound design and technical details” – Fife.fm
A tip suggested by a reader of the site, and one that I fully stand behind. Half the time when making melodies, it sounds bad because we’re using a bad sound. Using a piano can help you tap into the ‘writing’ process without worrying too much about how it’s sounding sonically.
20. Constantly save your work
A tip from a reader of the site, Jordan Adams.
Have you ever been slaving away on a project, and then all of a sudden, the dreaded error message pops up?
It’s the worst. Especially when you realize you haven’t saved in 2 hours.
Get into the habit of saving constantly. Knowing your DAW’s save keyboard shortcut helps.
21. Learn your keyboard shortcuts!
Knowing your keyboard shortcuts is one of the easiest and simplest ways of improving your workflow. It involves a bit of memory, which all of us have, and a little bit of practice.
Using a mouse is far from ideal and also slow. Spend some time learning your DAW’s keyboard shortcuts, it’ll pay off.
Lists of keyboard shortcuts:
Also, here’s a cool little website that sells custom keyboards for various DAWs!
22. Color and name tracks
I’m going to propose a slightly different approach to coloring and naming tracks – do it before you take a break.
If you’re coloring and naming tracks while creating an 8-bar loop, it can slow you down. I find it much more efficient to color and name before I go and grab a drink or something to eat and have a break from production. That, or coloring and naming before moving on to the next big thing such as arrangement.
23. Choose and create great sounds from the get-go
If you do this, your song will practically mix itself.
Take time when choosing your drum samples, or synthesising your plucks. Yes, you can try to ‘fix it in the mix’, but that’s lazy.
But Sam, doesn’t this contradict tip #15 – Be creative, then critical?
To some extent, yes it does. Both are helpful tips, but one might work better for person A whereas person B finds the other to work better for them.
24. Use subtractive music production
Read my last post? I wrote about subtractive music production, why it’s so awesome, and how it can help you finish tracks.
Check out this post for more details along with two videos.
25. If it doesn’t work, delete it
You can’t polish a turd, and there’s certainly no point in trying.
If you’re having a good time producing, and something catches your ear, in a bad way – then delete it or fix it! That clap sample? Yeah, it’s really not working, and no, EQ will not fix it. Pick another one.
Note that this can be difficult sometimes, especially if you’ve worked for 4 hours on a chord progression to find out that it just doesn’t fit. But, it’s the life of a music producer. Forward and upwards.
26. Get the arrangement down ASAP
For some reason, once the arrangement’s done it feels like the track is close to completion. Even though in reality it isn’t.
With that said, it’s good to get arrangement done earlier rather than later (in most cases), because it allows you to start adding detail, whether it be tension, extra elements, automation, etc. The stuff that generally happens after arranging a track.
So don’t put it off.
27. Save presets
This kind of goes back to the ‘favorites’ sample folder idea.
Having an array of synth patches that you’ve made is extremely useful when it comes to making new tracks. Not only does it help with style development, but it’s also a quick way to work. There’s nothing easier than popping out your favorite pluck sound and plugging in a progression.
28. Constantly tweaking things for no reason? Bounce to audio
“Since I’m in Pro Tools, the majority of my mangling comes from using AudioSuite, which automatically renders files down. Working this way forces you to commit to choices, and it’s not killing your CPU by running any number of plugins in a row. Plus once stuff is rendered it’s so much fun to keep reprocessing and resampling it.” – Matt Lange
If you find yourself getting stuck in the tweaking trap (I hope you didn’t read that as ‘twerking to trap’), then it might be a wise idea to bounce down to audio. As Matt said, it helps you to commit to choices – meaning you can move ahead and get things done.
29. Own a MIDI keyboard? Record yourself playing
They aren’t just for looks!
If you own a MIDI keyboard, why not record ideas into the DAW? It sure beats inputting notes with a mouse.
But I’m no good at playing it!
Only one way to get better, right? 😉 But seriously, most DAWs have a quantization feature, so if there are a few notes out then you can automatically snap them into place.
30. Use send/return channels for FX
That synth patch your making, it sounds great right? But it does need a touch of reverb.
Here’s a challenge for you. What’s the easier option?
- Add a new reverb plugin to synth channel
- Route synth channel to reverb send
The second is the easier option, and while it may not sound great. It helps with speed and workflow. If you do need a different reverb later on, you can add one.
I normally set my send channels up as follows:
- Long reverb
- Short/room reverb
- 1/2 delay
- 1/4 delay
- Bit-reduction
31. Use groups/busses
Back in the day, I used to create 10 automation clips on 10 different instruments all doing the same thing. Low-passing when transitioning into a breakdown.
Then I realized that you can actually make tracks pass through groups, and use just one automation clip instead of 10!
So be smart about it. If you need to effect mass amounts of tracks at once, then group them. There’s no quicker way to make your CPU cry than add unnecessary plugins and automation.
32. Create a default template
Having a default template is the oldest trick in the book when it comes to improving workflow. Creating a blank project file with standard tracks, groups, and busses set-up can be a great way to get straight into production without having to worry about the preparation work.
Note: I tend to aim for minimal templates rather than making them too extensive. Otherwise, I’m tempted to fill all the channels, even though I may not need to.
33. Cut up loops
If you struggle with drums, more specifically – making them flow, then try cutting up some loops!
Pick the hi-hat groove from one loop, claps from another, and toms from yet another loop. You’ll often find that it sounds a lot more interesting than if you were to use individual samples. This is normally due to groove and processing already applied to the loop.
Here’s a quick video showing how I do it in FL Studio:
34. Sample where possible
I’m not a huge fan of people using construction kits and the likes to build songs. A part of me sees it as cheating, but there’s absolutely nothing wrong with using a bass shot from a vengeance pack, or a nice synth progression sample that you found in a random pack. If it sounds good, it sounds good.
Sampling is generally a lot quicker than designing sounds from scratch (for workflow purposes), so if you’re looking for a quick way to spice up your tracks – use more samples. Only if they fit, though!
35. RTFM
Read the ***king manual.
The best way to learn more about your DAW, whether it be keyboard shortcuts, certain functions, or hidden features that you’ll never find out about otherwise – is to read the manual!
Yes, I get it. Reading manuals can be boring, but they’re helpful for workflow, so you should.
So, have you read your manual yet? If not, get to it!
36. Record automation
Automation can be pesky and frustrating. If you’ve got a MIDI keyboard or controller that has knobs/faders, then you should consider recording automation in. Not only is it more natural, but it’s generally a lot faster.
Ableton Live Workflow Tips
36. CTRL/CMD + D is your friend
It’s probably the most important keyboard shortcut for Ableton users. Ctrl/Cmd + D allows you to duplicate something, whether it be an audio track with a sample on it, a few notes in the piano roll, or a crash cymbal in arrangement view.
A few ways to use it in order to save time:
- Duplicate synth tracks when layering (you’ve already got all the same plugins on the duplicated track which can easily be deactivated or edited/adjusted accordingly)
- Adding a ride cymbal on every beat? Duplicate the kick track and replace the sample
- Want to extend your melody and vary it a little? Duplicate the existing piece and make edits from there
Get into the habit of using the duplicate command over copy and paste.
37. Instrument and Audio Effect Racks
Create, save, and re-use instrument and audio effect racks wherever possible, you’ll save a load of time.
Examples of audio effect racks I use:
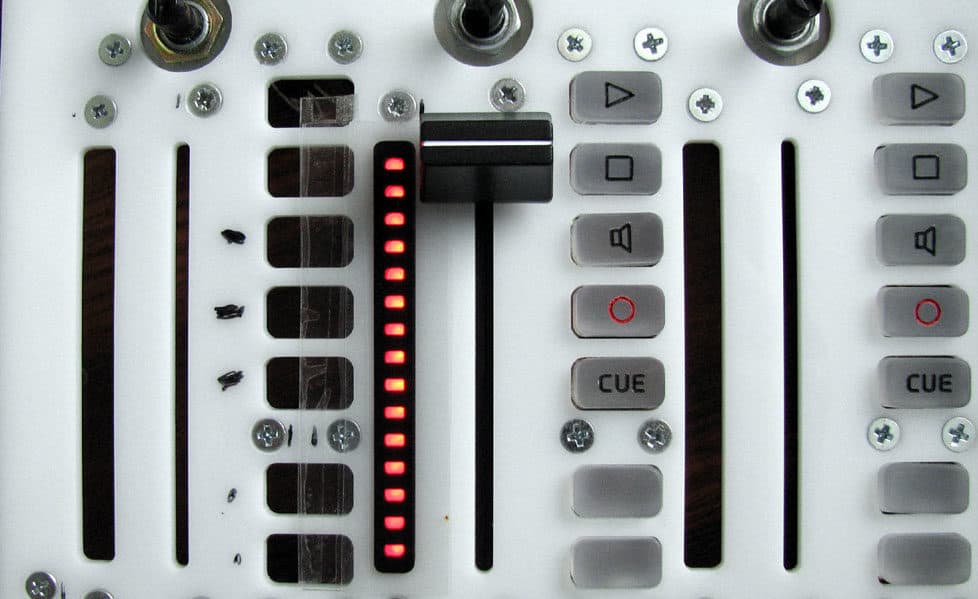
- Transient clipper: One knob macro that adds saturation whilst reducing gain to act as a transient clipper, reducing peaks
- Build-up: One knob macro for reverb, delay, and high-pass filtering
- Radio: Overdrive and bandpass EQ, used for quick transitions
38. Use locators
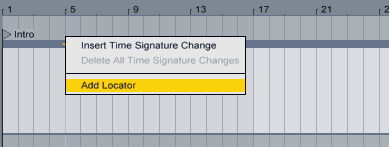
Live allows you to use locators in arrangement view. Locators are great for when focusing on particular sections of your track, you can set a locator to be the start time of the song, or simply double-click it to play from that point.
Try using locators for each significant section of your arrangement: intro, first drop, breakdown, build, second drop, build, outro.
39. Use macros
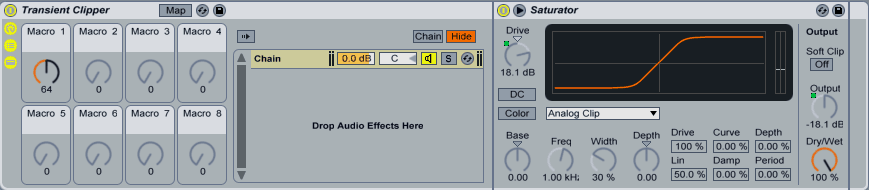
Need to automate the dry/wet on your reverb, delay, and auto-filter? Just use a macro.
Simply add the effects to an audio effects rack, and assign each parameter to the same macro. Done and dusted.
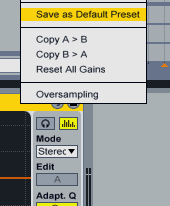
40. Set defaults
 Live allows you to set default settings for each of its native plugins. This saves a load of time especially if you find yourself having to change something right from the get go when putting something on a channel.
Simply right-click on the effect or instrument > Save as default.
A few ideas for defaults:
- A completely open auto-filter instead of it cutting off at 12.5khz by default
- Default 100Hz high-pass on EQ 8
- More mix friendly default reverb
- Default Redux with soft instead of hard setting
Here are a bunch more suggested defaults from the guys at pATCHES.
Take some time to go through your most used effects and set defaults. You’ll love yourself for it.
41. Draw mode
Holding down the “B” key when inside the piano roll automatically engages draw mode, meaning you only have to click once to place a note.
If you’re trying to create melodies and chord progressions quick, then it’s a lot easier doing it this way!
42. Search
Ableton has a search mode. Who would’ve thought?!
If your VES2028 kick is stuck under a load of folders somewhere, why not just search for it instead of having to navigate through a jungle of audio samples and folders.
Make using the search function a habit.
43. Start in session view
This is something I swear by and encourage others to do.
Starting in session view allows you to get ideas down quickly, and it’s also a lot more fun (especially if you have a MIDI keyboard to jam away on). It’s easy to transfer everything over to arrangement view when you feel the time is right.
FL Studio Workflow Tips
Note: if you’re new to FL Studio, check out or beginners guide.
44. Clone patterns and instruments
Does your supersaw need some layering? Maybe your hi-hat groove just can’t hold itself and you need some extra.
Whatever the case, clone.
Cloning is the FL equivalent of duplicating in Ableton, it allows you to keep the same sample or instrument you’re using, and process it differently. MIDI clips won’t be cloned over though, so you’ll need to copy them.
45. Make Unique

Unlike Ableton, if you edit a clip in FL’s arrangement view, the edit will affect all clips UNLESS you make it unique.
Click on the top-left corner of an audio or MIDI clip > Make unique. This will allow you to edit the clip without having to worry about changing all the rest. It’s great for making subtle variations to an already existing clip.
46. Browser snapshots
Browser snapshots offer a more efficient way of finding your favorite samples, presets, or whatever else you’ve got lying in FL browser.
Simply go to the section you want, click on the down arrow (top left), then select current snapshot. From here you can choose which number key on your keyboard you want to assign it to.
47. Link to controller
Sick of automation clips cluttering up your playlist?
Similar to Ableton’s macro function, FL allows you to link more than one thing to an automation clip. You could link the dry/wet on your reverb to the same automation clip as your high-pass filter.
Simply right-click on the parameter you want to automate > link to controller, choose automation clip under internal controller, then click accept.
Note: You can also use different mapping formulas. For example, you might want the dry/wet to only go up by 50% of the total clip, so you’d type in Input*0.5
48. Use the piano roll chord function
If your music theory isn’t up to scratch, or you just prefer to take the easy way out – then use FL’s chord function.
The chord function allows you to insert a chord simply by clicking somewhere in the piano roll, and can be accessed by clicking the piano roll’s down arrow, then Chord.
49. Add time markers
Similar to Live’s locators, FL’s time markers allow you to start the song from a certain point, easily loop sections, and more.
To add a time marker, simply click on the playlist options menu (down arrow) > Time Markers > Add one.
And Finally…
50. Keep Focused on the Basics
Come on Sam, this isn’t really a tip, is it?
But seriously, tip #50 is to remember what’s important in music production.
Don’t waste time on over-processing your sounds if you can’t put together a full track. Focus on the essentials and you’ll be way more creative, productive and have killer workflow.
That being said, the basics are still hard to learn, right? That’s why we put out The Producer’s Guide to Workflow & Creativity.
