


Hey everyone, welcome to the second installment of our newest tutorial series, Track Breakdown.
In this series, we’ll take a look at a wide variety of popular tracks, dissect them, and discover why they work.
Ultimately, we aim to teach you the techniques used in each track so that you can apply them to your own productions.
In this track breakdown, we’ll take a look at Cashmere Cat’s “Mirror Maru”.
First, we’re going to transcribe the main melodic content in the track.
Then, we’ll take a look at the MIDI and listen to the main instruments.
Finally, we’ll dig deeper into the track, analyzing the structure, melodic content, and arrangement.
For those of you that read the previous track breakdown, you may recall the key theme: simple, but interesting. As you’ll find out, Mirror Maru follows a similar pattern.
The Sauce:
Mirror Maru is in the key of F Minor.

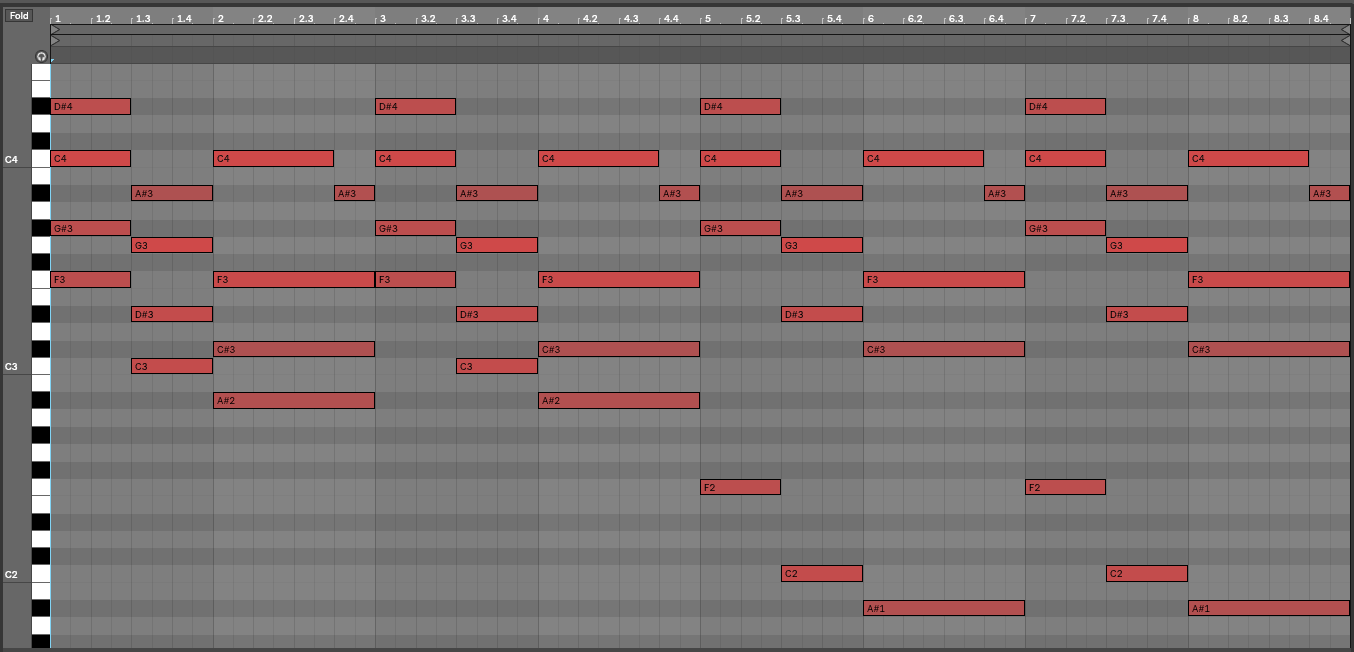
Below is a transcription of the opening piano progression:
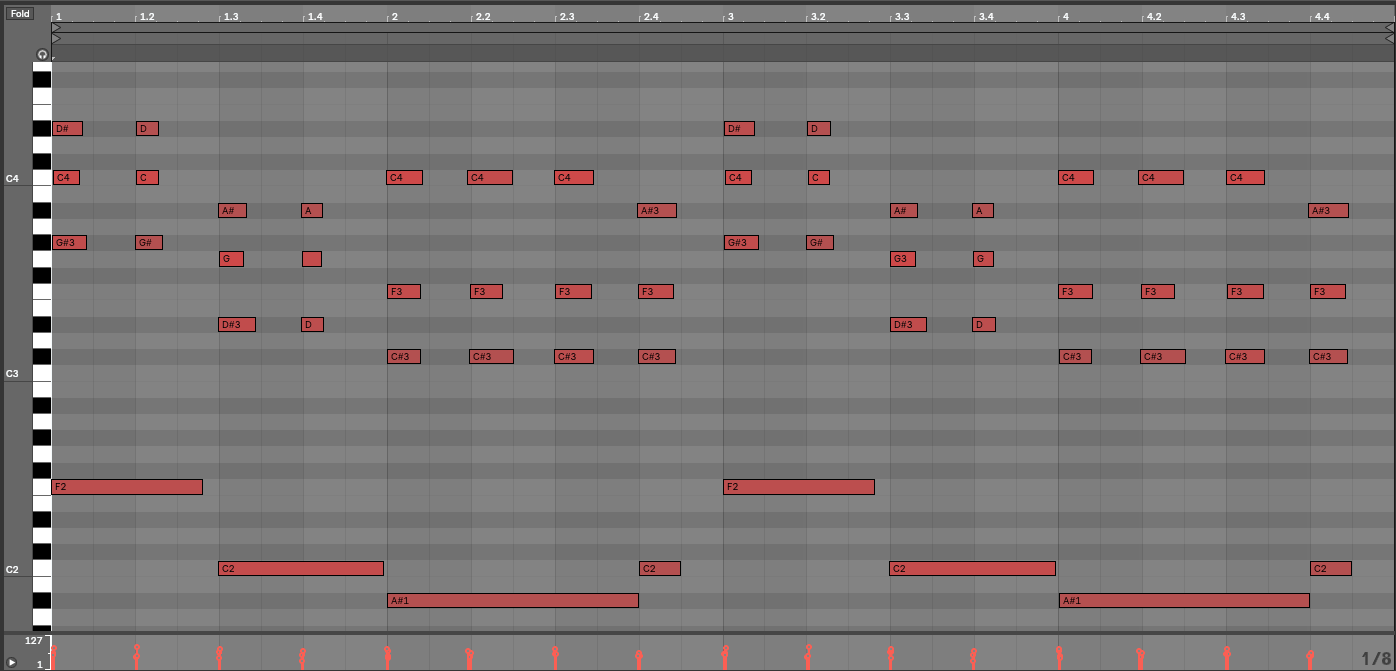
Listen here:
If we strip the chord progression of it’s rhythm, we’re left with sustained chords. Let’s look and listen to what that sounds like:
Listen here:
What are we working with?
The chord progression is a fairly simple three chord progression: Fm7 – Cm7 – Bbm9.
Fm7: F – Ab – C – Eb
Cm7: C – Db – G – Bb
Bbm9: Bb – Db – F – C
In the key of F minor, numerically the progression is i – v – iv (or rather, i7 – v7 – iv9).
This chord progression sets the foundation for the track; everything else builds off of it.
Now, let’s take a look at how Cashmere Cat is able to expand on this seemingly simple chord progression to make a compelling and memorable song.
(Note: It’s more technically correct to say the last chord is a Bbm9(omit 7) or Bbm(add9), since there isn’t a 7th playing. For simplicities sake, I’ll refer to it as Bbm9 since the song changes between using the 7th and 9th on top, essentially spelling out a true Bbm9. Don’t worry if this doesn’t make any sense, it’s not too important to this article)
Grab the MIDI Vault below to grab the MIDI used in this article:
Key Takeaways:
- Voicing: How to make chord progressions that actually sound good
- Same idea, different presentation
- Extending loops with subtle changes
- Using Syncopation to Lead the Listener
- Building and breaking tension
- Chords implying melody
- Counter Melodies
1. Voicing: How to make chord progressions that actually sound good
Many producers struggle to make their music sound human and realistic. Things like timing and velocity are important, but in my opinion, the number one most overlooked element is voicing.
Chord Voicing: The vertical spacing of notes in a chord.
There are a handful of ways we can arrange the notes in a chord. For example, let’s look at a C minor chord, which contains the notes C, Eb, and G.
In root (standard) position, it’s played with a C on the bottom, an Eb in the middle, and a G on top. However, we don’t have to play the notes in this particular order.
We can transpose the notes up or down, and we’ll still have an Cm chord. In the example below, all four chords are Cm. The first one is played in root position, while the other 3 are played with different voicings.
Listen here:
To me, it sounds as if they’re 4 different chords. In a way, they are. Yes, each chord is playing the same notes, but every chord has a distinct character and tone. No one voicing is better than the other; each serves a unique purpose.
How can we use this information?
When building a chord progression, know that there are dozens of ways we to spell each chord. Odds are, one voicing will sound better than the rest. Additionally, if you have a simple and basic chord progression, you can experiment with chord voicing to get different textures out of the chords and the progression as a whole.
Now that I’ve tricked you into learning about music theory, what does this have to do with Mirror Maru?
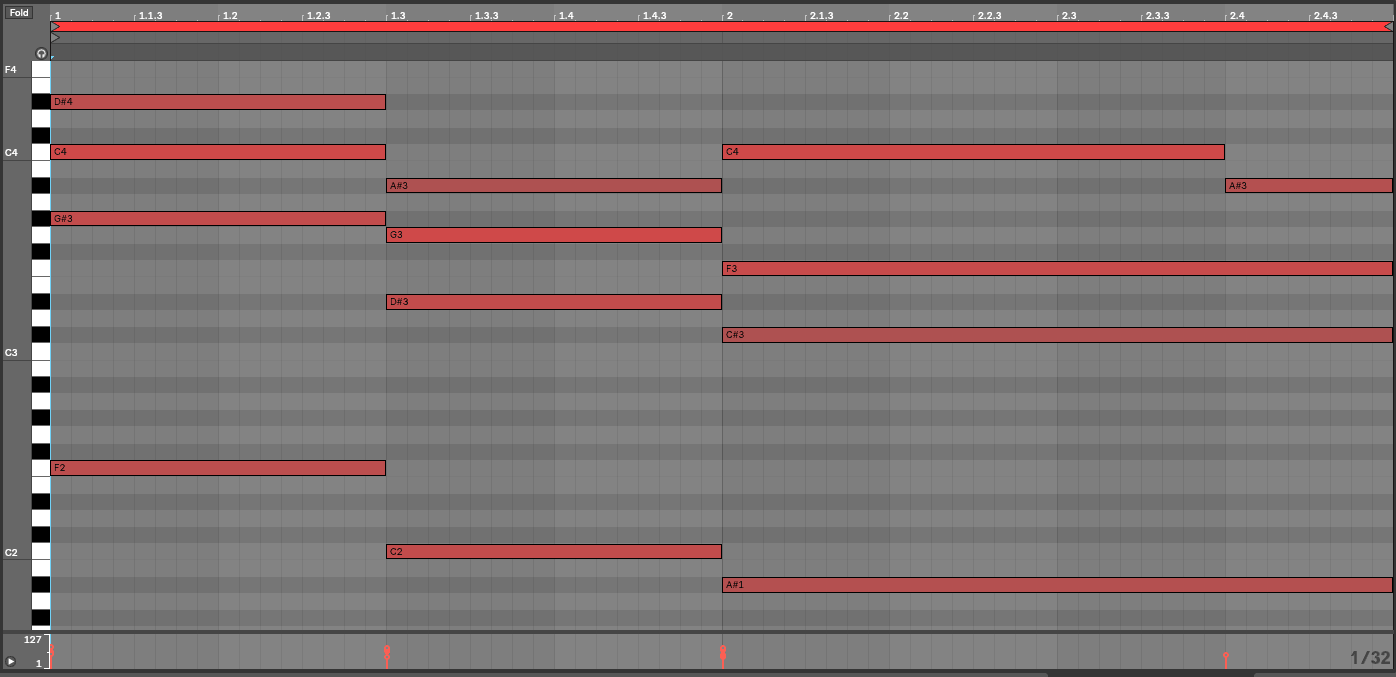
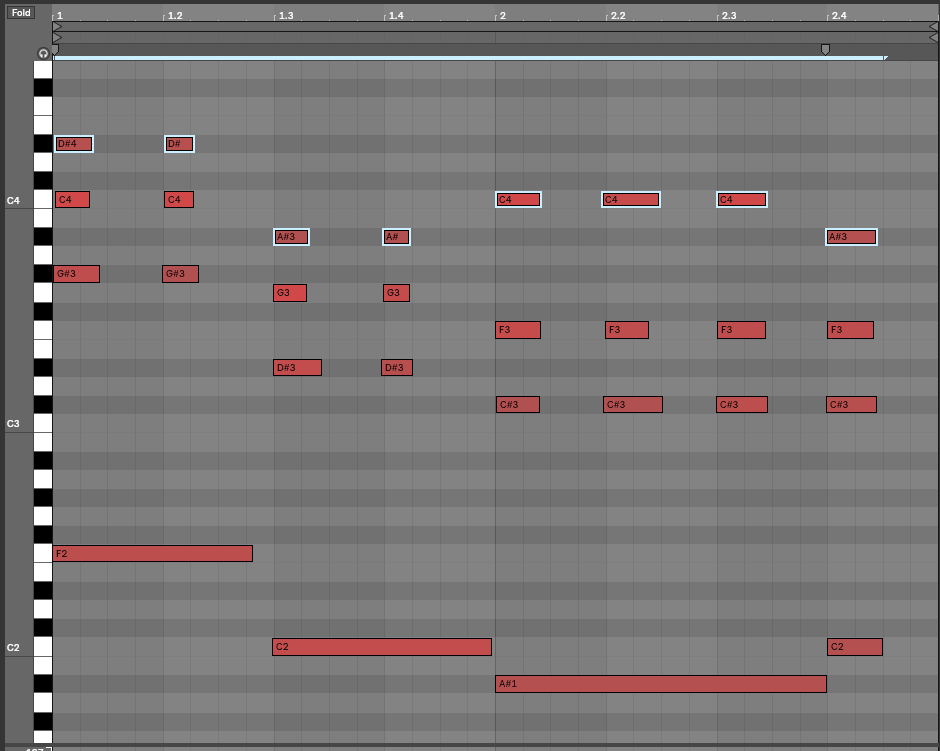
Part of what gives the intro chord progression its character is the way the chords are voiced. Let’s look back at the initial chord progression. As a reminder, the chords are Fm7, Cm7, and Bbm9.
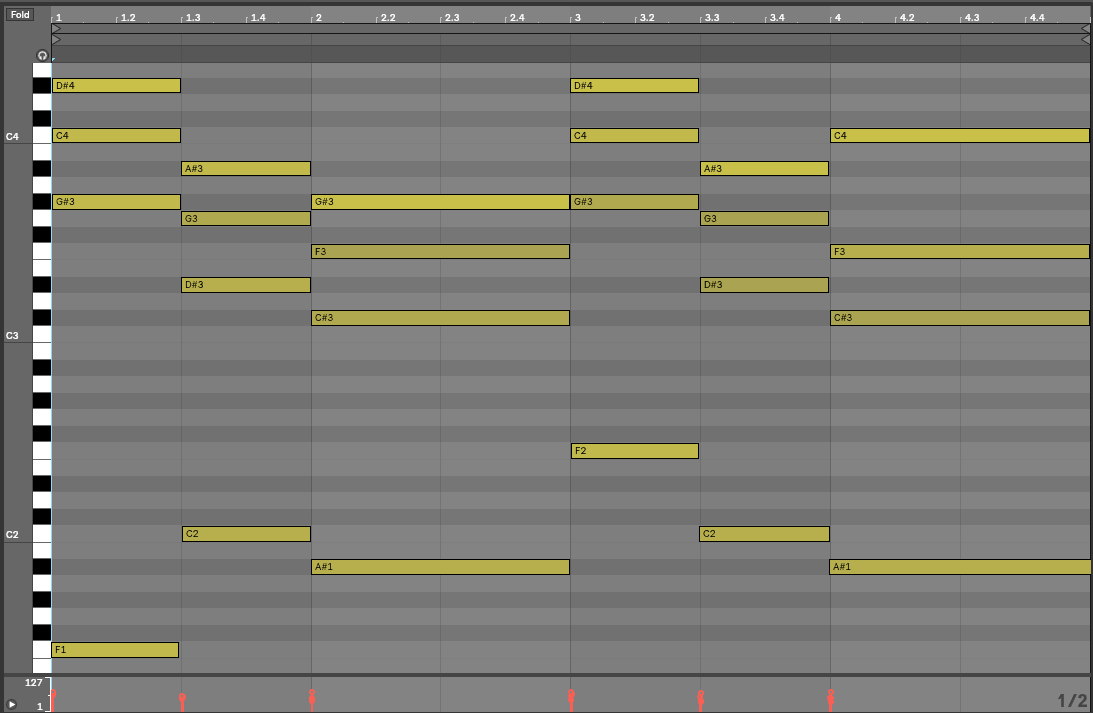
Instead of playing this progression in root position, what Cashmere Cat does is spread the notes out. The top three notes in each chord are all played an octave above root position. Another way to describe this is the chords use an open voicing.
Closed Voicing – the notes are all within an one octave range (alternatively, the notes are as close together as possible)
Open Voicing – the notes of the chord span larger than an octave
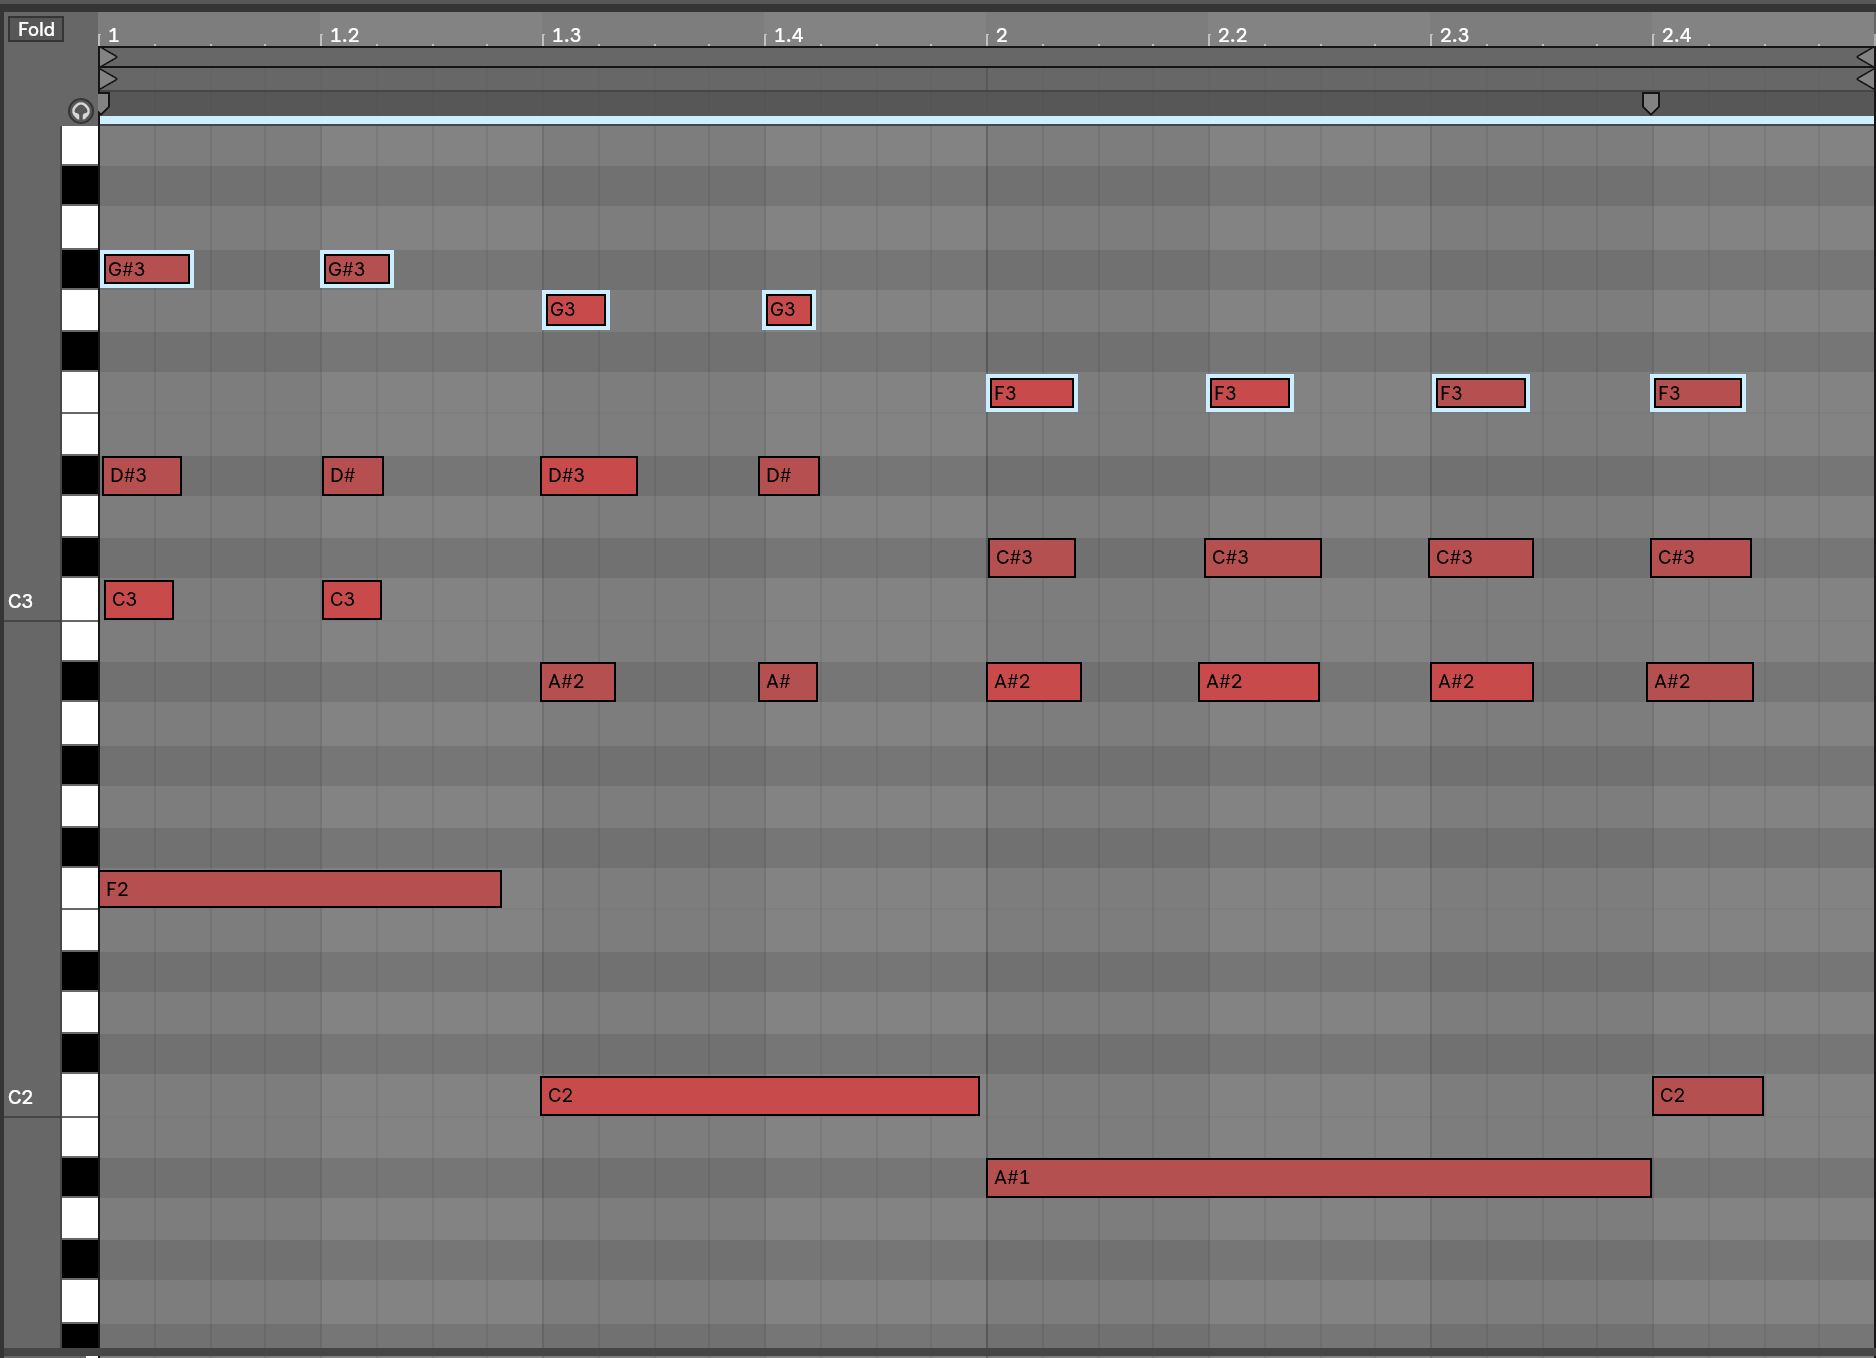
In root position (i.e. closed voicing), this is what this chord progression looks like:
Now, let’s listen to these progressions played one after the other. First, you’ll the hear the progression with closed voicing, followed by the progression with open voicing (i.e. the one in the track)
This is how I would describe it: the latter progression is moodier, fuller, and less cluttered. We can nearly visualize this by looking at the competing midi clips:
The later covers a larger sonic range (fuller), with less notes played closely together (making it less cluttered).
Obviously we should always voice our chords like this, right? Well, not exactly.
The reason it works here is there is nothing else happening in the track. There’s nothing for this piano to compete with. However, let’s say there’s a vocal, guitar, dummer, and baseline. In this instance, it may not it doesn’t make sense to have the piano take up the full sonic spectrum, so you’d opt for a closed voicing.
To summarize: How you voice your chords has a dramatic effect on the tone and texture of your chord progression. Experiment with open/closed voicings, playing around with the arrangement of the notes in the chord.
2. Same Idea, Different Presentation
This chord progression loops for the first 8 bars, until the song moves into the verse.
The main melodic elements in the verse are a harp pluck and a bass pluck (presumably a timpani or bass drum).
(The verse starts at 0:15)
While no elements are held over from the intro to the verse, why is this transition oh so smooth?
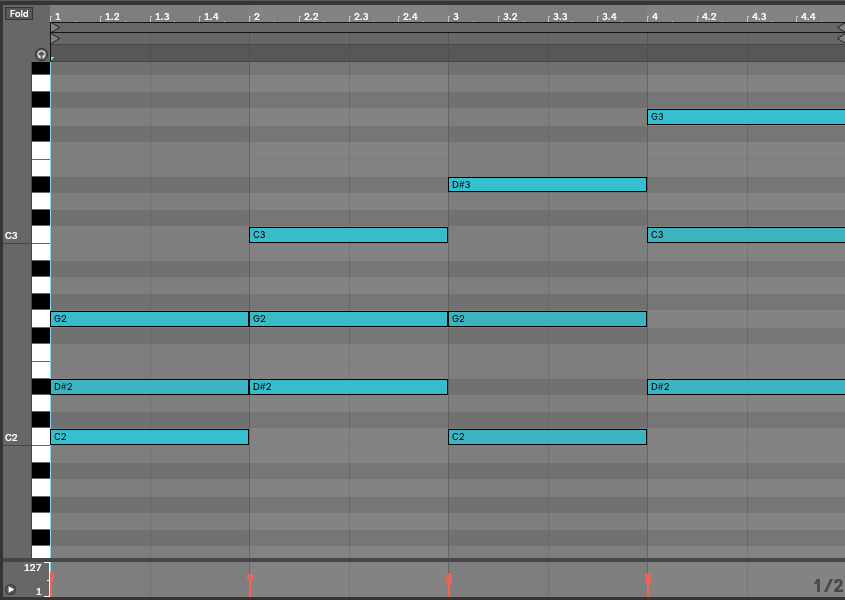
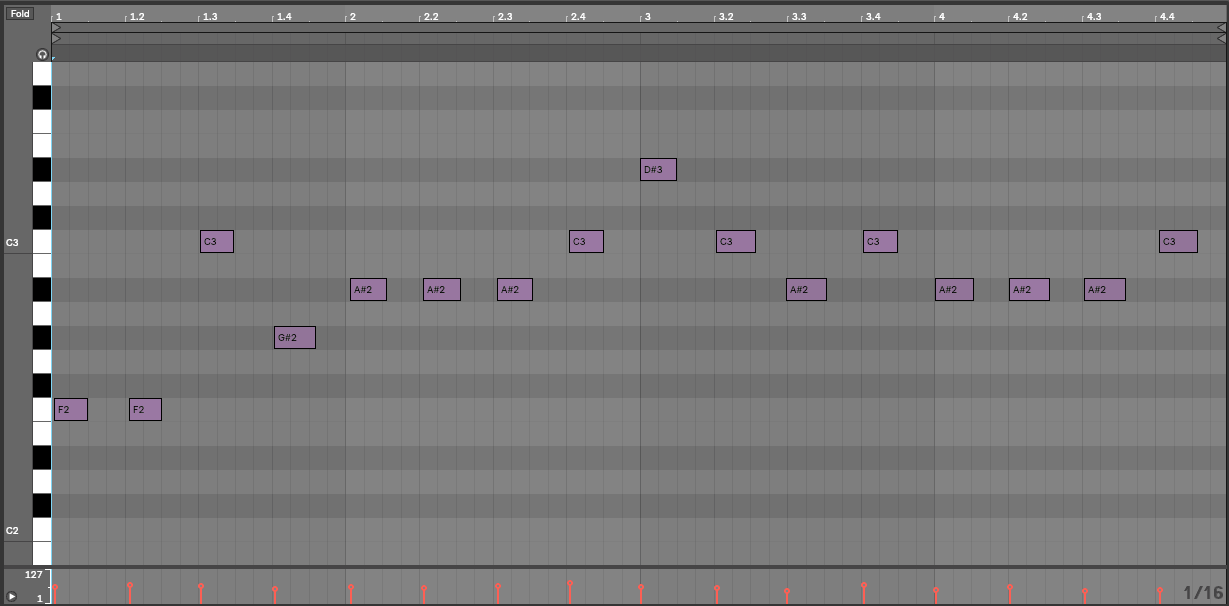
The harp/bass melody is “rephrasing” the initial chord progression. It’s playing the same chords with a different pattern.
Here is the MIDI for the harp/bass plucks. The harp pluck is highlighted.
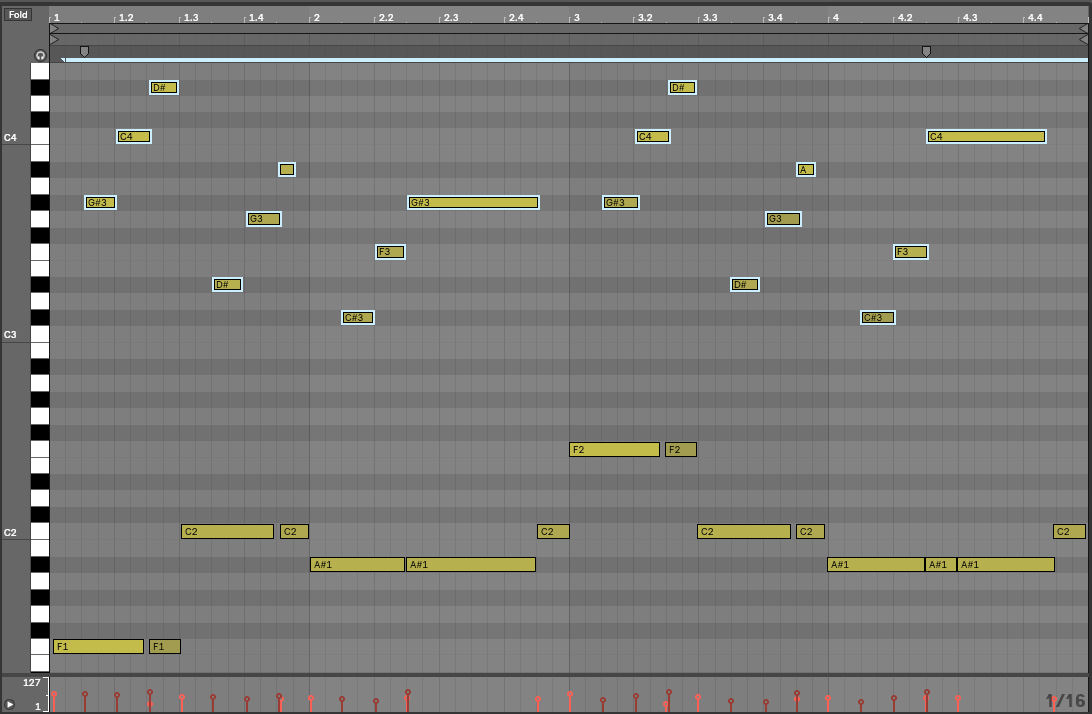
Listen here:
Like before, let’s strip this down to the root chords.
Listen here:
So while the verse section might seem removed from the intro, it’s (more or less) spelling out the same 3 chords established in the introduction, i.e. Fm7, Cm7, and Bbm9. This achieves the effect of making the verse sound new, yet familiar. This is the same thing that happens in Mura Masa’s track “Lovesick”.
I like to call this technique reframing. Reframing is when you copy the initial melodic idea and make small but meaningful changes to the way it’s played. This includes the voicing of the chords, the timing of the notes, the rhythm of the notes, the instruments used, and much more.
So how does Cashmere Cat “reframe” the intro progression. He turns the chords into an arpeggio, and plays the notes across two different instruments. In the end, it all relates back to the initial melodic idea.
(Note: During the verse, in Bar 2 a Bbm7 is played, while in Bar 4 a Bbm9 is played)
3. Extending loops with Subtle Changes
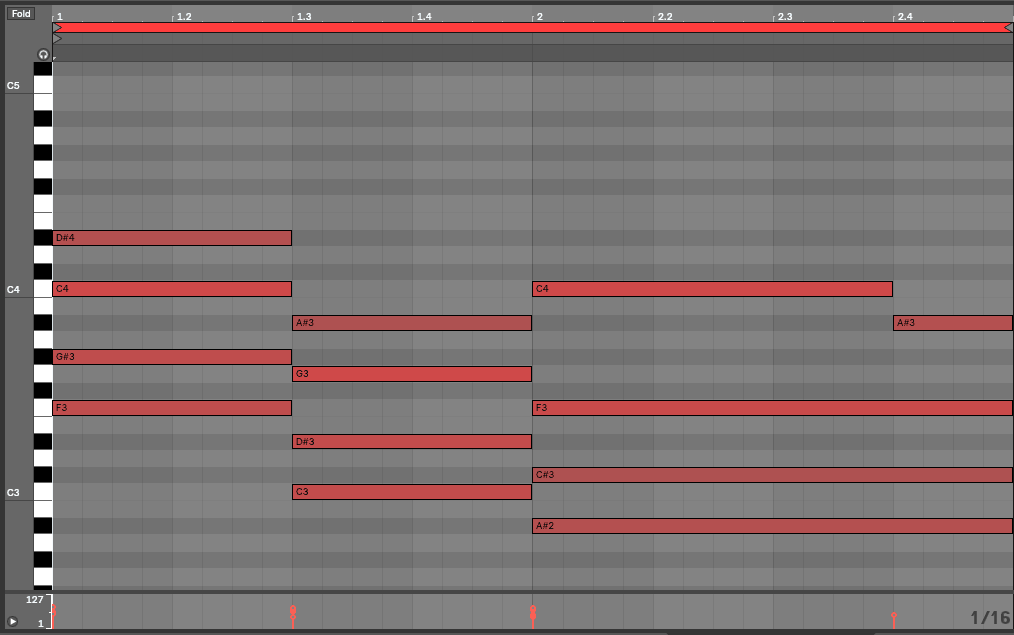
You may have noticed I transcribed the intro progression as a 2 bar loop, while transcribing the verse progression as 4 bars. Even though the progressions are quite similar, the verse progression has a subtle but meaningful change during the last 2 bars. Let’s look back at the verse melody:

Listen here:
Notice how during the last two bars the final melody note changes from a G# to a C (I’ve highlighted these notes in the image above). This may seem insignificant, but it effectively extends this progression from 2 bars to 4 bars. Adding to this, he plays the first bass note (F) an octave up during the second half of the progression.
Together, this creates a longer, more dynamic chord progression. By extending this chord progression from two bars to four, he’s able to cleanly and effectively push the track forward.
If you ever feel your chord progression is too stale or repetitive, you can utilize this technique to push the track forward. To do so, simply duplicate the progression and add subtle but meaningful changes to the second half of the loop.
Half the battle of songwriting is to keep the listener engaged the whole way through. Don’t put your listeners in a loop: add texture and interest to keep them engaged throughout the entire song.
Next, let’s take a first look at the chorus.
We can think of the chorus as a combination of the intro and the verse. The chords play through once, then the next three times they’re played as an arpeggio, like in the verse.
Here is the transcription of the chorus melody and bass:

Listen here:
4. Using Syncopation to Lead the Listener
We just discussed the idea of changing the notes in a progression to push the track forward. Another way Cashmere Cat keeps the listener engaged is through what is called syncopation.
Syncopation – Syncopation occurs when a rhythmic pattern that typically occurs on strong beats or strong parts of the beat occurs instead on weak beats or weak parts of the beat.
Cashmere Cat uses syncopation in the verse baseline of this track. Instead of just spelling out the bass note of the chords, the bass notes repeat just before a new chord is played. Let’s take a listen to this. Pay attention to the rhythm of baseline, in particular the notes I’ve highlighted below.
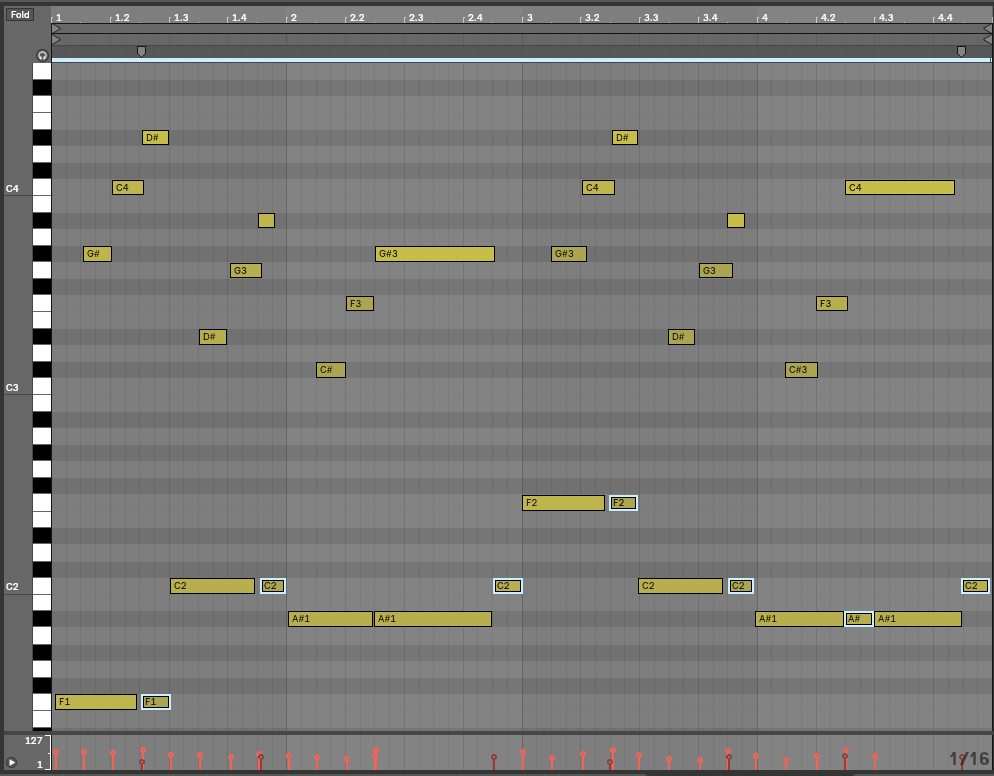
Listen here:
Notice how the highlighted notes lead you into the next chord? This creates a smooth transition between each of the chords, adding to the overall flow of the track.
Now, let’s take a listen to this progression, but with the bass stripped of it’s syncopation.

Listen here:
This progression doesn’t flow nearly as nice. We’re missing the syncopation of the bass, which helps push the progression (and thus the track) forward.
To summarize: syncopation is a great way to tell the listener a change is coming. It’s especially effective at the end of a chord progression to lead back to the start of the loop.
5. Building and Breaking Tension
In the original track, the initial progression gets cycled through in the intro and verse for about 45 seconds. Instead of going directly to the chorus, Mirror Maru completely breaks away from this progression during the pre-chorus.

For reference, listen to the transition at around 0:43, which leads into the chorus at 0:58.
Essentially, all that’s happening is a drum build and a trill on the fifth of the scale (which is C). This is a technique you’d more commonly see in a movie score, but it fits perfectly in this track. Why does it work so well?
The pre-chorus completely moves away from the melodic foundation, then jumps right back into it during the chorus. In other words, it effectively builds and breaks tension. Remember, tension and release are the defining foundation of a track: they create movement that keeps the listener engaged and focused.
Now, the lesson here isn’t to add a piano trill break to all of your songs. Rather, use builds and breaks to effectively shape the tension of your track. For an EDM producer, the idea of a big build/break isn’t brand new, but hopefully you can appreciate them a bit more after this section. Always be on the lookout for new ways to shape the story of your songs.
6. Chords Implying Melody
At the start of this article, we talked about how the voicing of your chords can shape the character and tone of your track. Adding to this, I want to go over an elementary but important characteristic of chord progressions:
Listeners perceive the top notes in a chord progression to be the melody.
For example, listen to the intro chord progression.
Now, can you sing the melody in this progression? Odds are, you’ll sing something like this:
That’s because this clip is playing just the top note of each chord. I’ve highlighted the top note in the intro progression:
How does this relate to relate to chord voicing?
When building a chord progression, treat the top note of each chord as itself a melody line. Play around with different voicings until you find a smooth and catchy progression.
Even if there is a melody playing alongside the chords, carefully choose the voicing of each chord (this is a technique called voice leading).
For example, I’ve taken this intro progression and played with the voicings of each chord.
Listen here:
Notice how this progression has a different emotional quality from the original? I wouldn’t say one is better (you might, however). What’s important is that you pay attention to the voicing of chords, in particular the movement of the top notes.
7. Counter Melody
The last topic that I’d like to discuss is counter melody.
Counter Melody – “is a sequence of notes, perceived as a melody, written to be played simultaneously with a more prominent lead melody; a secondary melody played in counterpoint with the primary melody” (via the WikiWiki)
What does this mean?
We can think of it of having two distinct and independent melody lines playing at the same time. They’re independent in that they have their own rhythm and shape, but they to some degree relate.
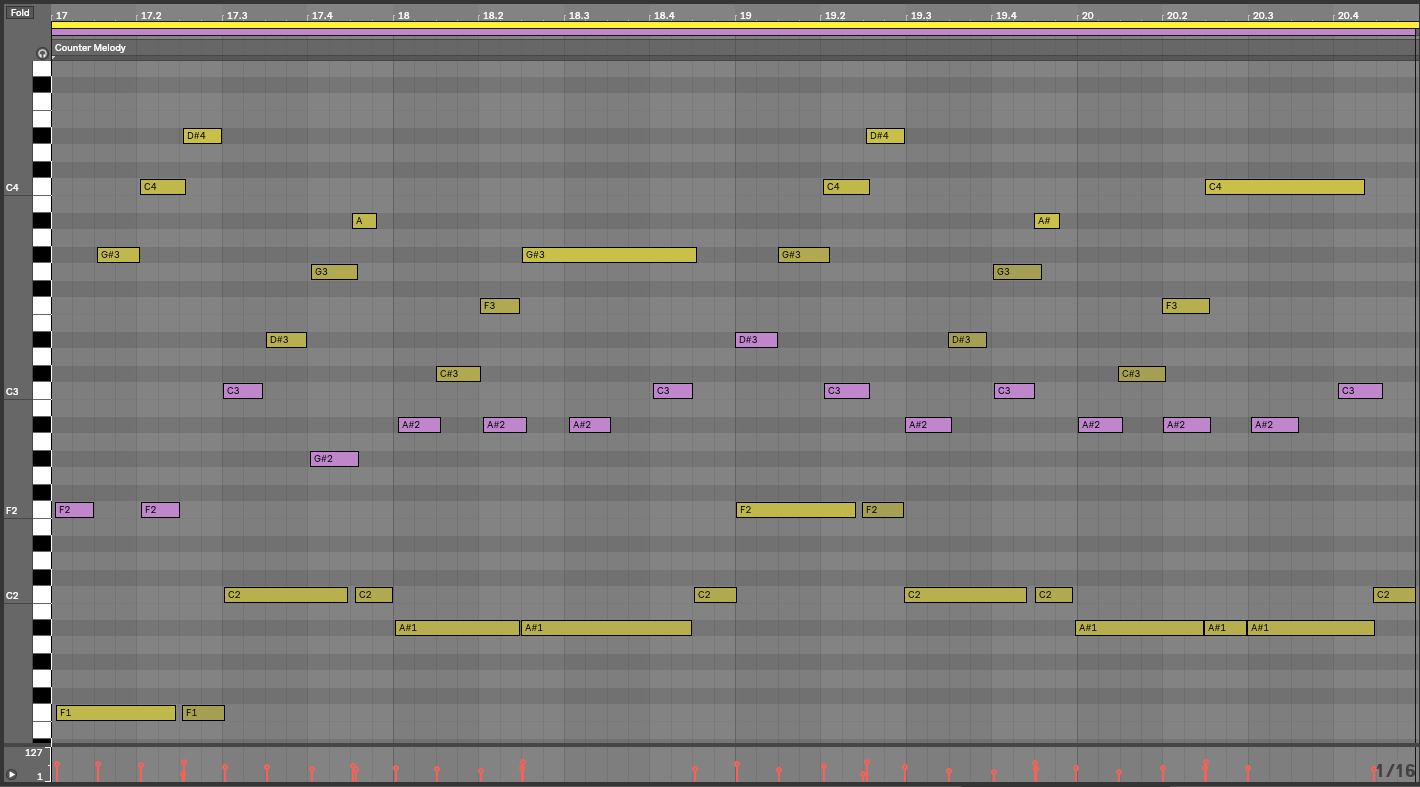
A counter melody is introduced in the second half of the verse. Listen for the reed stab that comes in around 0:28 (I’m not going to pretend like I know what instrument it is. Perhaps a clarinet? Tell me if you know)
I’ve transcribed this counter melody. You can look and listen to it below:
Listen:
In order for a counter melody to be effective, it must make sense when played with the original melody. Let’s look and listen to their relationship:
Listen:
The main function of this counter melody is to harmonically develop the track, helping push it forward.
So, how do you write a good counter melody?
The theory behind writing counter melodies (called counterpoint) is very dense, and far beyond the scope of this article. However, all the theory relates back to what sound good. Doing what sounds good will get you far enough.
Thus, I’m not going to give you a formal definition on how to write counter melodies. Rather, knowing that they exist, experiment writing second melody lines, ultimately trusting your ears.
Want free access to the Track Breakdown MIDI Vault? You can download the MIDI from all of our Track Breakdowns, as well as 25 hi-quality MIDI chord progressions you can use in your own productions.
Summary
I hope you were able to take away some useful tips from this article. Learning how to write and arrange is a difficult process, so I want to help make the journey as easy as possible for you.
I tried to pull out as much valuable information as I could from this song, helping you to better understand what makes a great song, well, great.
There’s a good amount of information to digest here, so I recommend re-reading it a few times to soak up all the different elements.
The point isn’t to memorize everything in this article, but to let this article guide your workflow, adding additional tools to your music-writing arsenal.
Lastly, if there are any songs you’d like covered, please let me know!
Want to read more breakdowns? Click here to visit the Track Breakdown Glossary.
Disclaimers:
- The transcriptions aren’t 100% exact, but they’re essentially there. The point of this article wasn’t to exactly copy the song; rather, I wanted to get the general idea of the melodies and chords, so as to further break them down. Also, there are certain subtleties I left out to make the teaching more direct and effective.
- Ableton doesn’t display flats, only sharps. During this article, I’ll refer to many notes as flat, even though Ableton will tell you they are sharps. For example, I’ll say Bb while Ableton will show A#. Know that these are the exact same notes, what are called enharmonic equivalents.
