


Welcome to the sixth installment of our article series, Track Breakdowns.
In this series, we break down the music theory and arrangement behind popular songs, ultimately showing you what makes each song work.
In this breakdown, we’ll be looking at Say It by Flume, the fifth track off his Grammy award winning album Skin.
Let’s get to it.
The Sauce
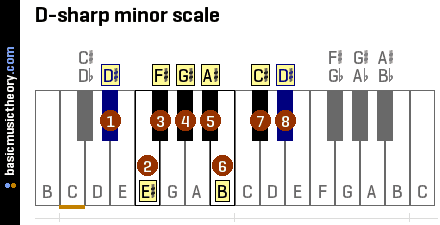
Say It is in the key of D# Minor.

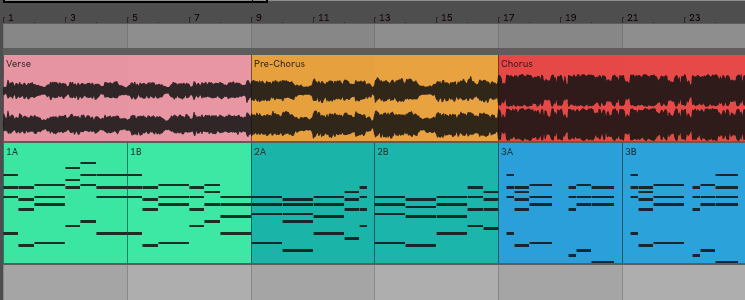
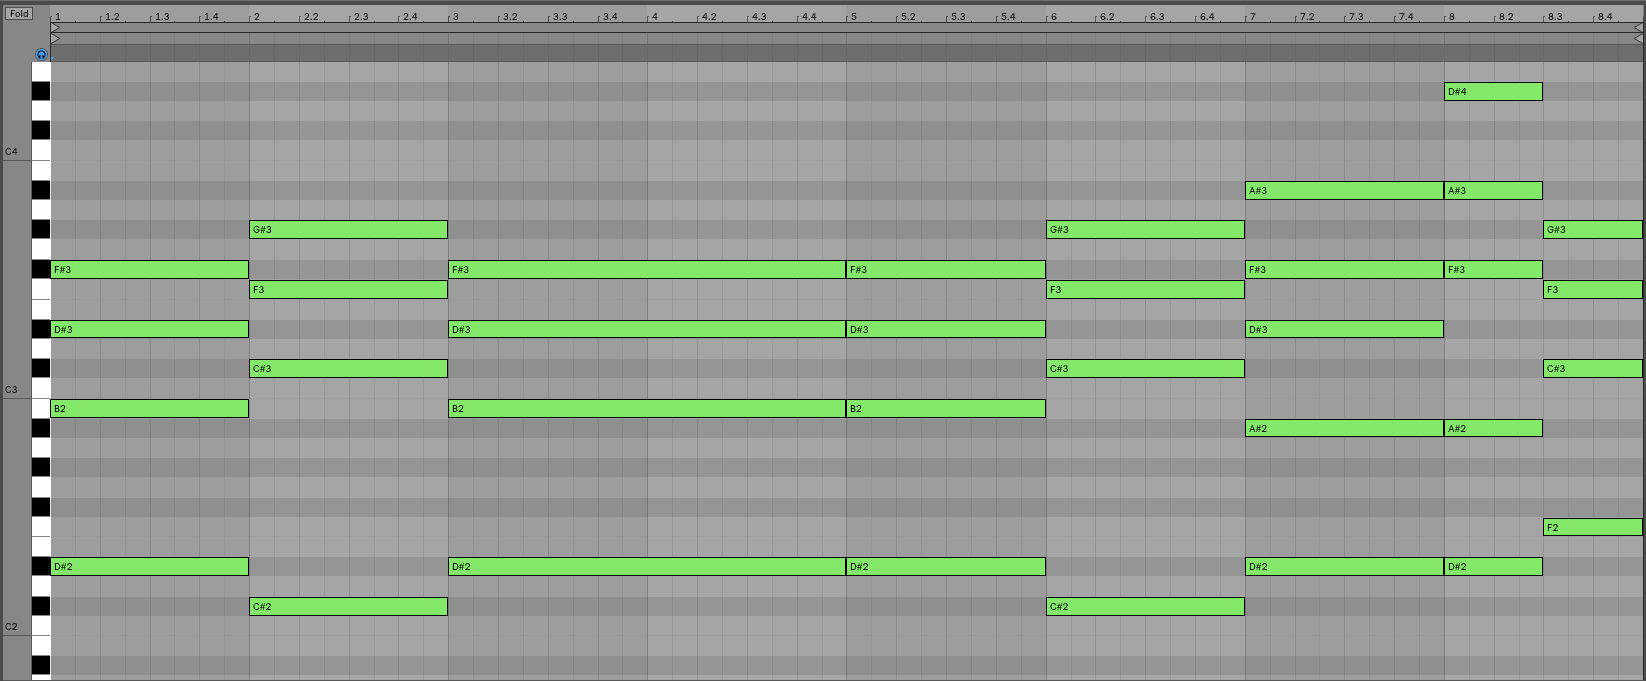
Below is the main verse chord progression (starts at 0:02).

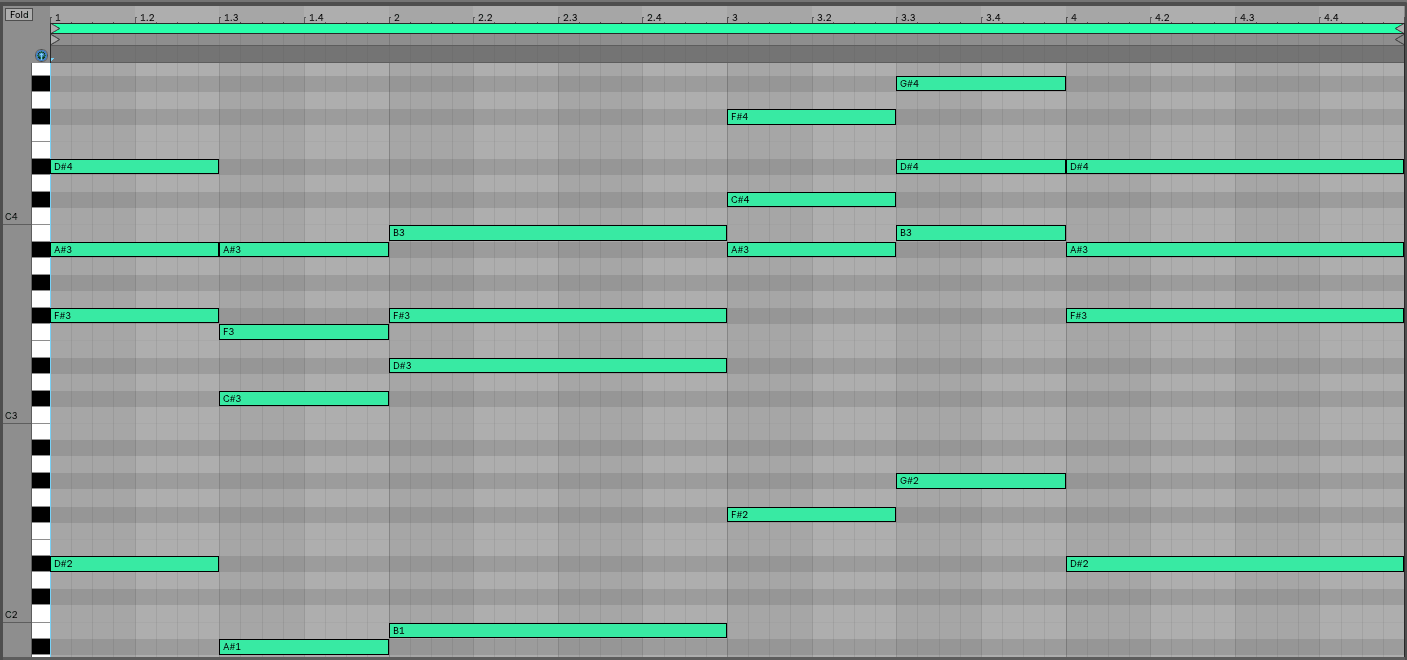
Listen:
What are we working with?
The progression is: D#m – A#m – B – F# – G#m – D#m
- D#m: D# – F# – A#
- A#m: A# – C# – F
- B: B – D# – F#
- F#: F# – A# – C#
- G#m: G# – B – D#
Numerically, this is: i – v – VI – III – iv – i
Now, let’s look at how Flume is able to take this chord progression and weave it through the rest of the track.
Want the MIDI from this breakdown? Download it below!
Topics Covered:
- Finding Home
- Voice Leading
- Transitioning from the Verse to the Pre-Chorus
- Transitioning from the Pre-Chorus to the Chorus
- Secondary Dominants
- If It Ain’t Broke…
- Writing a Bridge
1. Finding Home
Let’s begin by breaking down what makes this chord progression work.
This progression is relatively straightforward. All of the chords are diatonic to the key of D# minor, and they are all triads (three note chords).
Listen:
This progression starts and ends on the one chord.
Verse Progression: i – v – VI – III – iv – i
Why does this technique work?
Remember, the one chord is your home base. It sets both the melodic and emotional foundation of a track.
You can think of chord progressions as an elaborate way to get back to the one chord. How you choose to get there is what defines the emotional quality of your song.
It’s that one chord that provides resolution, resolution from the tension created by other chords in the song.
To show you how important the one chord is, let’s look at an example.
Which one of these two progressions makes you feel more comfortable?
Progression 1:
Progression 2:
..
Here’s what they are playing:
Progression 1: C – Am – F – G – C
Progression 2: C – Am – F – G
Progression 1 sounds better because it resolves. Progression 2 leaves you hanging, since you expect it to go somewhere else.
If I looped Progression 2, it would resolve every time it loops since it begins on C, which in this case is the “home” (i.e. one) chord.
This is fairly typical in popular music, where the resolution doesn’t occur until the chord progression plays again.
What’s interesting about the progression in Say It is that the resolution happens within the progression itself.

Listen:
By starting and ending on the one chord, we’re not left waiting for the progression to loop and resolve.
Instead, it resolves within the progression itself.
Now, what can you take away from this technique?
Don’t be afraid to go back to the one chord at the end of a progression.
What’s important to note about the verse progression in Say It is Flume strays away from the one chord for a “relatively” long amount of time. He starts with the one, then goes further and further away from it, eventually resolving back to it.
Verse Progression: i – v – VI – III – iv – i
By the time the iv chord hits, the listener wants nothing more then to go home.
On the other side, you don’t want to go back to the one chord too soon. You want to create just the right amount of tension before you resolve it.
2. Voice Leading
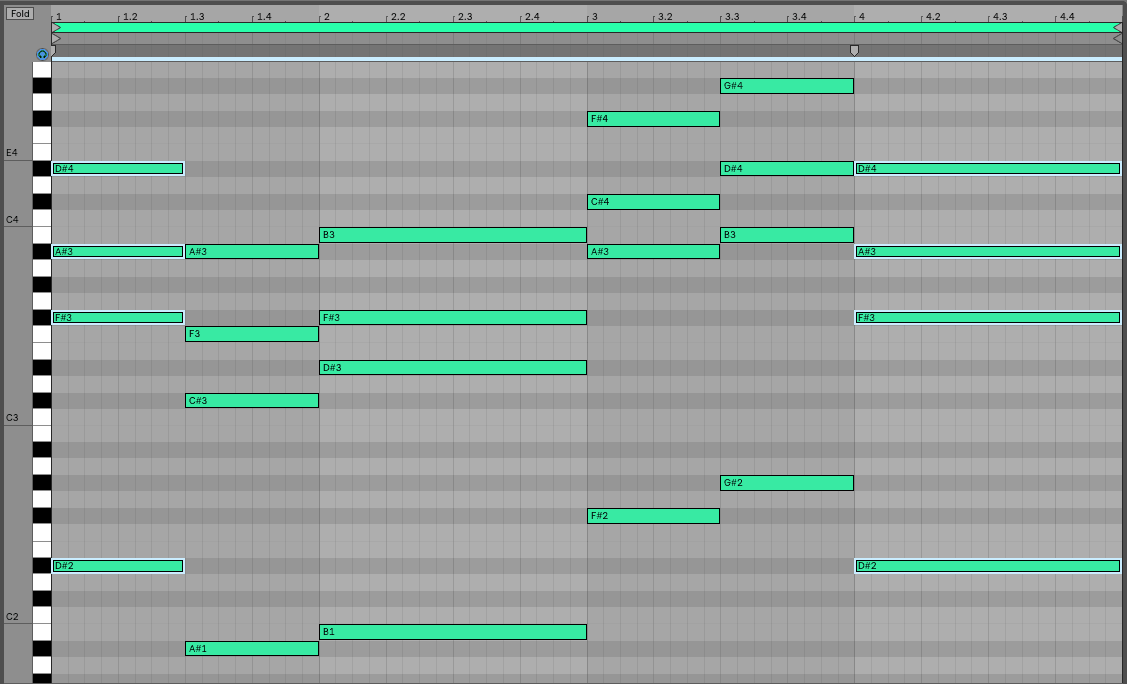
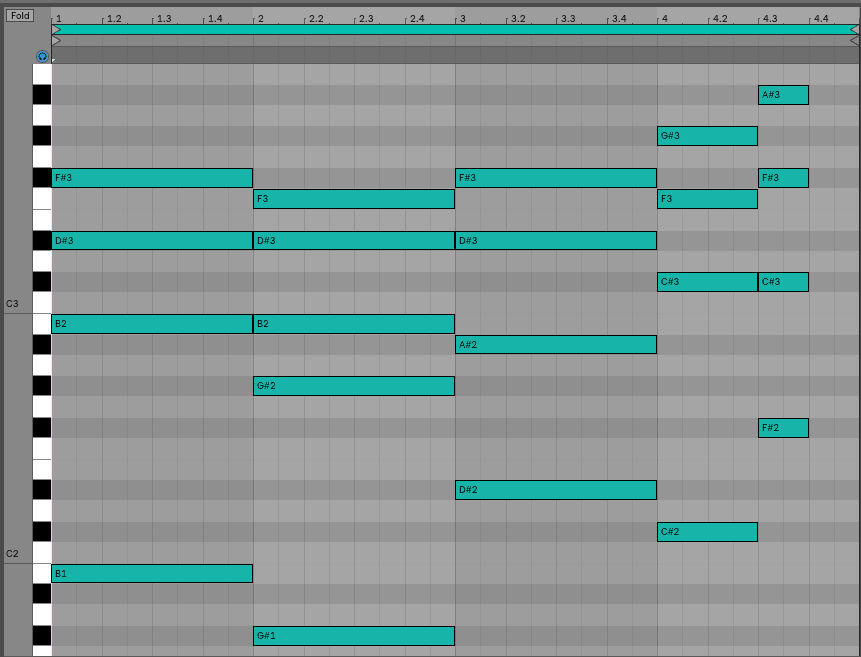
After the verse chord progression plays through once, Flume changes it slightly the second time around. Let’s listen to these played one after the other.

Listen:
There is a change in bars 7-8.
Even though the chords sound different, they’re actually the same exact chords. The only difference is how they are voiced.
As you can see above, bars 3-4 and 7-8 are playing the same exact chords, but the way the notes are played is different.
For example, the first time through the A#m chord is voiced A# – C# – F#. The second time through, it’s voiced C# – F# – A#.
So although these chords may sound different, they’re in reality the exact same.
This achieves the effect of making the second half of the progression sound new, but familiar.
All of this is a fancy way of saying Flume duplicated the progression and transposed some of the notes up/down. In reality that’s all that’s going on.
Again, the purpose behind this change is to add subtle interest and variation to keep the listener engaged.
(If you want to learn more about chord voicing, check out my Madeon breakdown)
3. Transitioning from the Verse to the Pre-Chorus
Lately, I’ve had a lot of producers asking me this question: How do you effectively change progressions in a song?
In other words, how do you transition between two chord progression in a way that actually makes sense?
To answer this question, let’s look at how Flume is able to do this in Say It.
—
The verse chord progression in Say It is different from the pre-chorus chord progression.

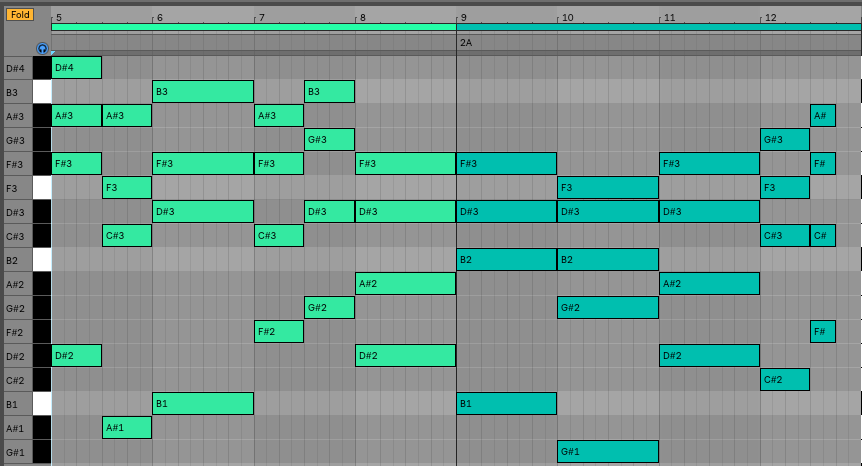
Below is the main pre-chorus progression (starts at 0:29):

Listen:
What are we working with?
The progression is: B – G#m6 – D#m – C# – F#
- B: B – D# – F#
- G#m6: G# – B – D# – F
- D#m: D# – F# – A#
- C#: C# – F – G#
- F#: F# – A# – C#
To focus in on this transition, let’s listen to the verse as it moves into the pre-chorus:

Listen:
Verse Progression: D#m – A#m – B – F# – G#m – D#m
Pre-Chorus Progression: B – G#m6 – D#m – C# – F#
Even though they are two distinct progressions, they work extremely well together.
Now back to the original question: How do you effectively change progressions in a song?
Beyond “switching things up”, you need to ask yourself what purpose the new progression serves, and how does the progression relate back to the initial idea.
Here are a few examples of this:
- The verse progression is sad and gloomy, so you write a chorus progression that is happy and uplifting.
- The verse progression resolves nicely, so you write a chorus progression that is pensive and anxious.
- You want to keep the verse and chorus the same, so you introduce a new progression in the pre-chorus (big hint: that’s what this song does).
Understanding this will make the writing process considerably easier.
—
Now this all sounds good in theory, but how does is look in action?
Let’s look back at the the verse/pre-chorus transition in Say It:
Listen:
Verse Progression: D#m – A#m – B – F# – G#m – D#m
Pre-Chorus Progression: B – G#m6 – D#m – C# – F#
Here is why this transition works:
- Both progressions sound good by themselves.
- The verse progression uses more minor chords while the pre-chorus progression uses more major chords. This creates a useful distinction between the two.
- The transition is smooth because the last chord in the verse (D#m) is a third away from the first chord in the pre-chorus (B). Moving by thirds tends to be smoother because the triads will share two of the same notes, making the transition less abrupt.
Let’s turn these around into practical strategies you can apply to your songwriting.
In order to effectively change chord progressions in a song, keep the following in mind:
- Both progressions should sound good by themselves.
- Make sure there is a purposeful distinction between the two. Consider both the quality of chords you are using, as well as the emotional tone of each progression.
- Starting up or down a third from the root is a great way to create a smooth transition between the two progressions.
4. Transitioning from the Pre-Chorus to the Chorus
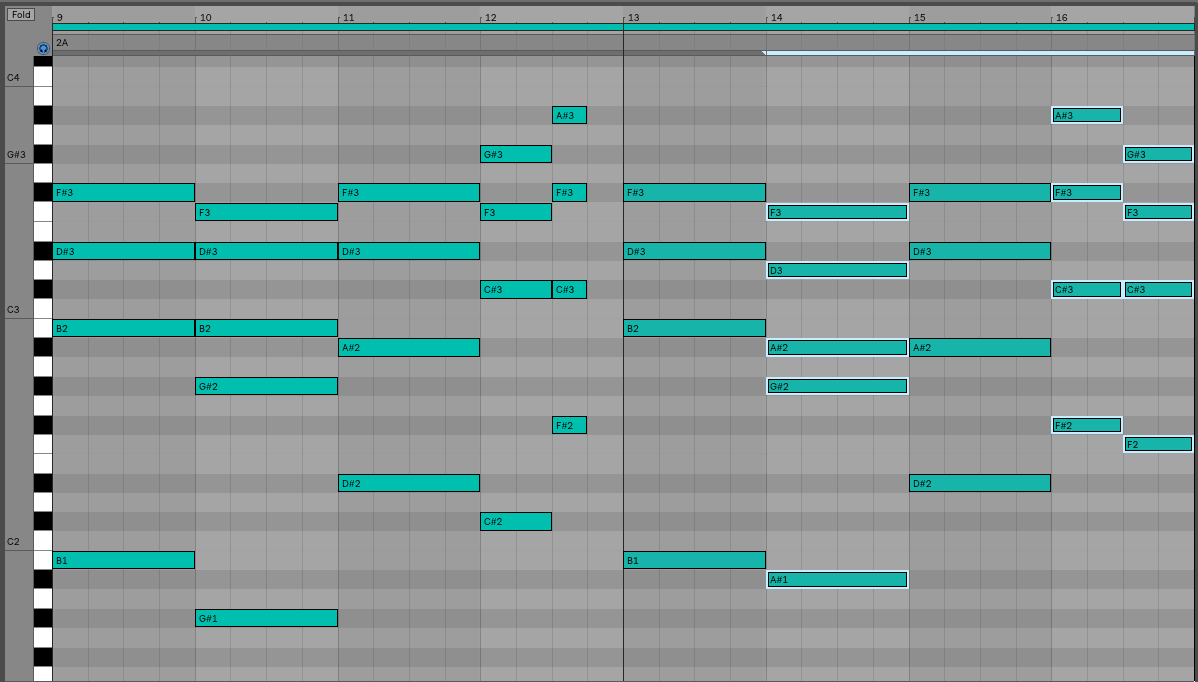
After the pre-chorus, Say It moves into the chorus.
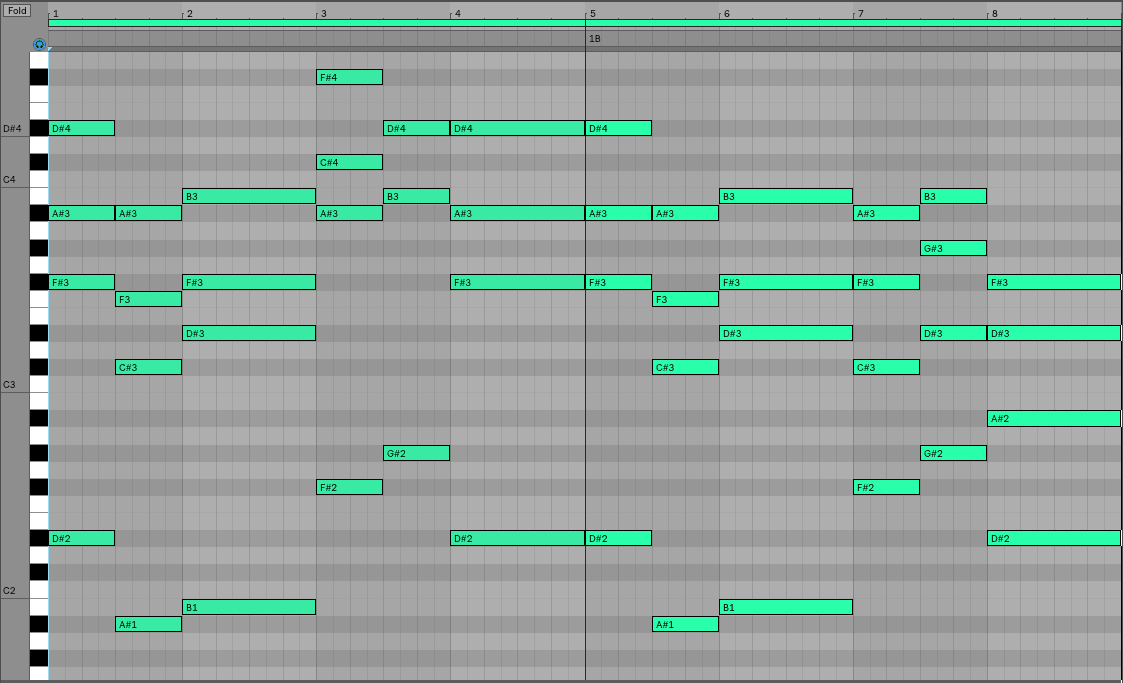
Below is the main chorus progression:

Listen here:
Sound familiar?
It’s nearly identical to the verse progression.

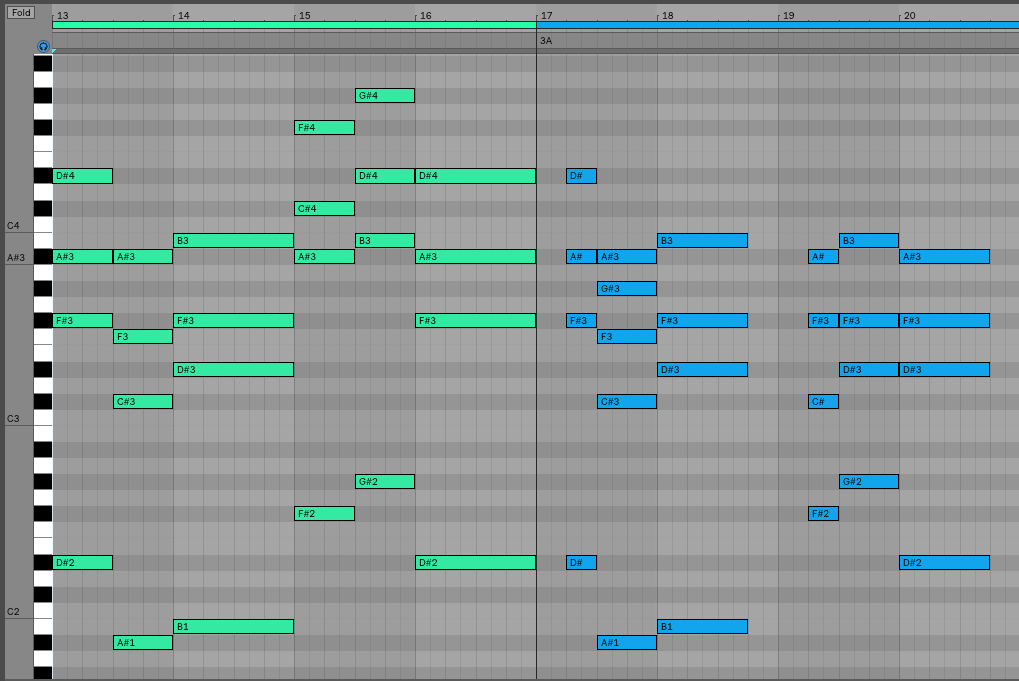
(Verse in is green, chorus is in blue)
The main difference is timing. The first (D#m) and fourth (F#) chords are both delayed by a quarter note.
Otherwise, there are small variations to the voicing of the chords. Nevertheless, the chords used are the exact same.
This makes it so when the chorus hits it feels new, yet familiar. It sounds like you’ve heard these chords before because you have, just in a slightly different form.
From a sonic perspective, the chords in the verse are heavily low-passed, as opposed to in the chorus where they are bright and open. So even though the listener “heard” the chords in the verse, they didn’t hear them in full force. This adds to the distinction between both sections, all the while further linking them together.
5. Secondary Dominants
Flume doesn’t initially repeat his pre-chorus progression. Instead, he makes adds a few changes the second time it plays through.
Let’s listen to the pre-chorus in its entirety. I’ve highlighted the chord changes below:

Listen here:
Pre-Chorus Progression A (Bars 9-13): B – G#m6 – D#m – C# – F#
Pre-Chorus Progression B (Bars 13-17): B – A#7 – D#m – F# – C#/F
There are three changes: the second, fourth, and fifth chords are all different.
Let’s focus in on the second chord.
The second time through, Flume substitutes the G#m6 with an A#7.
However, A#7 (A# – D – F – G#) isn’t diatonic to the key of D# Minor. Where does it come from?
This A#7 chord is what’s called a secondary dominant chord. It’s an extremely popular technique used in jazz, rock, folk, pop and more.
Here’s the tl;dr explanation of secondary dominants:
- The V7 – I resolution is very strong (i.e. moving from the dominant-seventh five chord to the one chord).
- This naturally occurs only once per key (since there is only one naturally occuring dominant seventh chord per key)
- However, we can recreate this movement by borrowing the dominant seventh chord a fifth above any chord. The borrowed chord called a secondary dominant chord.
- Example: The secondary dominant of G is D7, since D is a perfect fifth (7 semitones) above G.
- To use this in a progression, find the secondary dominant of a chord, then place it before that chord in a progression.
- Example. Let’s say we have a C Major progression that goes C – Am – G. I want a chord between Am and G, so I’ll use the secondary dominant of G, which is D7. The progression then becomes C – Am – D7 – G.
- Secondary dominants will always be borrowed from a different key, which is perfectly fine.
(For a more detailed explanation, click here)
Circling back, the A#7 chord mentioned above is a secondary dominant chord because it is a perfect fifth above the chord that follows it (D#m).
Listen here:
Pre-Chorus Progression A (Bars 9-13): B – G#m6 – D#m – C# – F#
Pre-Chorus Progression B (Bars 13-17): B – A#7 – D#m – F# – C#/F
—
There are two ways I utilize secondary dominants in my songwriting.
This first is when I know I want to land on a certain chord, but don’t know how to get there. Let’s say I want to go from a D to a Bb, but don’t know what chord to put in between. Since I want to land on the Bb, I’ll use the secondary dominant of Bb, which is F7 (making the progression D – F7 – Bb).
The second way is to use secondary dominants to substitute chords in a progression, the same way that Flume does in Say It. I’ll duplicate the progression, find a chord I want to replace, then use the secondary dominant of the chord that follows it.
6. If It Ain’t Broke
Not too long ago I was helping a student with a track of his.
He told me that he was struggling to make an interesting and unique second chorus (sound familiar?).
My response: What was wrong with the first chorus?
He said that there was nothing wrong with it, so I asked him why did he felt compelled to switch up the second chorus.
He didn’t have a good response to this. He said that’s what a lot of other songs do, so he thought he should too.
—
If a section of your song is really good, the listener will want to hear it again. Don’t switch up the verse or chorus just because you think you are supposed to.
If the chorus of your song is memorable and catchy, give it to the listener again. Similarly, if your opening chord progression is great, don’t be afraid to use it throughout the entire song.
The reason I’m pointing this out is that throughout this article I’ve discussed the importance of adding subtle but significant changes to a track. However, it’s essential to make these decisions in context.
Making decisions in context means you understand why you are making the creative decisions you are making.
Here are a few examples of what is meant by in context:
- Don’t add another layer to a sound just because. Think about what it adds to the existing layer (i.e. punch, low end).
- Don’t switch up a chord progression because you’re bored with it. You may have just heard it too many times. Ask a friend for their opinion before you make any changes.
It’s important to trust your creative instinct. However, it’s just as important to be able to step back and understand how your decisions affect the growth of a track.
7. Writing a Bridge
Lastly, let’s look at the bridge of Say It. First, have a listen to the original:
Below is a transcription of the bridge chord progression

Listen:
The progression is: (D#m – C# – D#m) (D#m – C# – D#m – D#m – C#/F)
What’s going on here?
Essentially, Flume is just bouncing back and forth between D#m and C#.
Towards the end, he starts playing with the voicing of D#m, then adds a C#/F to help signal that a change is coming.
Overall, this progression is fairly simple, but it works well to bring down the energy of the track.
To summarize: Alternating between chords can be used to build tension in an intro, pre-chorus, or bridge.
Want free access to the Track Breakdown MIDI Vault? You can download the MIDI from all of our Track Breakdowns, as well as 25 hi-quality MIDI chord progressions you can use in your own productions.
Conclusion
I hope you were able to take away some useful tips from this article. Learning proper songwriting is a difficult process, so I want to help make the journey as easy as possible for you.
I tried to pull out as much valuable information as I could from this song, helping you to better understand what makes a great song, well, great.
There’s a good amount of information to digest here, so I’d recommend re-reading it a few times to soak up all the different elements.
The point isn’t to memorize everything in this article, but to let this article guide your workflow, adding additional tools to your music-writing arsenal.
Lastly, if there are any songs you’d like covered, please let me know!
Want to read more breakdowns? Click here to visit the Track Breakdown Glossary.
Disclaimer: Technically, in the key of D# minor the second note is E#, not F. For simplicity’s sake I’ve left it as F in this article.
