


Welcome to the tenth installment of our article series, Track Breakdowns.
In this series, we look at the theory and arrangement behind popular songs, ultimately showing you what makes each song work.
In this breakdown, we’ll look at Ekali & Medasin’s song Forever featuring Elohim.
In a departure from my previous more theory heavy track breakdowns, this breakdown focuses much more on arrangement.
This reason is there aren’t that many advanced theory techniques used in this song.
Ekali and Medasin were able to make this track interesting and exciting while using more standard chord progressions.
Let’s look at how they did this, and how you can apply these techniques in your own productions.
The Sauce
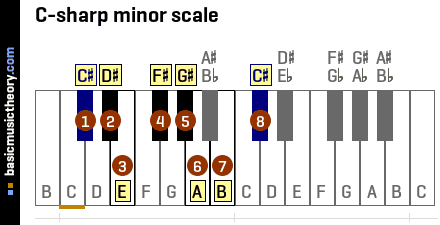
Forever is in the key of C# minor

Below is the progression used in the intro. This intro progression lays the foundation for the rest of the song (as the intro has for every track breakdown I’ve done).

What’s going on here?
The first 4 bars are pretty straightforward.
The progression is Amaj7 – F#m7 – C#m9. All of these are in root position, and the F#m7 has the F# doubled.
- Amaj7: A – C# – E – G#
- F#m7: F# – A – C# – E (with the f# doubled on top)
- C#m9: C# – E – G# – B – D#
The progression in bars 5-8 is similar to the first 4 bars, only with some slight, but meaningful, adjustments.
The first three chords are Amaj7, F#m7 and C#m9. They’re the same chords used in the first half of the progression, only voiced differently.
The other difference is instead of holding the C#m9 chord for 2 bars, they switch it up with an E major chord.
Don’t worry too much about the exact chords used in this song. In all honestly, someone with zero theory knowledge could still take away valuable techniques from this breakdwon.
My guess would be Ekali doesn’t know too much music theory, but rather uses his ear to find progressions and arrangements that work.
What I hope you take from away from this article are simple yet effective strategies to make your arrangements more interesting and exciting.
—
Here’s an overview of what we’ll look at in this article.
First, we’ll dive into the intro chord progression. We’ll look at why it works, pulling out 3 simple techniques you can use to create extended chord progressions.
Then, we’ll look at the arrangement. We’ll look at how the song progresses between sections, focusing on how to keep songs interesting without making them too complicated.
Lastly, we’ll look at the concept of chord voicing. I’ve talked about voicing in previous articles, and it’s about time we had a proper look at it.
Want the MIDI from this article? Grab it below:
Intro Progression
Let’s look back at the intro progression.
First, listen to the progression in the original track.
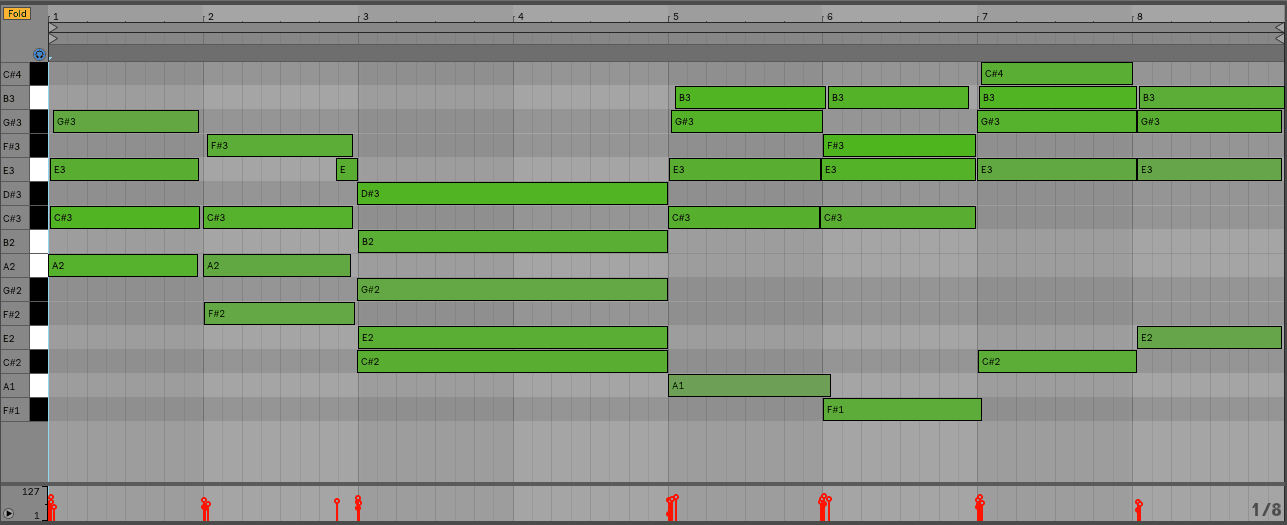
Below is my transcription of this chord progression.
As mentioned above, the first half of this progression is straightforward. It’s Amaj7 – F#m7 – C#m9, all in root position (with the F# doubled on the F#m7).
By itself, this progression works fine.
But would you want to use this progression for an entire song? Probably not.
While this progression sounds good, I don’t feel it’s interesting enough to carry a 3 minute song.
Instead of repeating this progression, Ekali and Medasin extended it out, making changes to the final four bars.
The most significant change they made was adding a new chord in the last bar. Instead of holding the C#m9 for 2 bars, they split it up with an E major chord. This makes the second half of the progression sound new, but altogether familiar, since they share 3 of the same chords.
It also feels natural because C#m9 and E major are closely related. In fact, E major is housed entirely within the C#m9 chord. So although it feels like they’ve moved to a new chord, they actually just shaved off a few notes of the C#m9 to get an E major.


C#m9 v E
This is the first takeaway from this article. If you want to switch up the chords in chord progression, but don’t want the change to be too jarring, use the chord that is a third away from the original (i.e. the chord that is two notes away in the scale).
For example, instead of going from C#m (C# – E – G#) to E (E – G# – B) , they could have went from C#m (C# – E – G#) to A#° (A# – C# – E). There are still two common tones (shared voices), which helps create a smooth transition.
The second way they created variation was with voicing.
Looking at the transcription below, it’s quite obvious the voicing of the progression differs between the first four and last four bars.
Thus, when the progression turns around, the transition feels new, because the chords sound different, but familiar, because the chords are same.
This is a really simple tip you can use in your productions. If you want to extend a chord progression, simply adjust the voicing the second time through.
We’ll look more at voicing in the last section.
This last technique is something I would imagine you’re already familiar with, although maybe not in this context.
Let’s look back at the intro progression.
Notice how the bass notes aren’t present in the first half, but are played during the second half.
This is a very common technique for pop/rock piano players. They’ll play the progression once through without the bass, then add the bass later on. This adds an element of tension and interest that keeps the progression moving.
This is something you can do with just about any instrument (piano or otherwise). Instead of adding new instruments that overwhelm the listener, play with the voicing of existing instruments to create the tension and movement you need.
It’s a great way to push the movement in a section without cluttering up your mix.
Arrangement
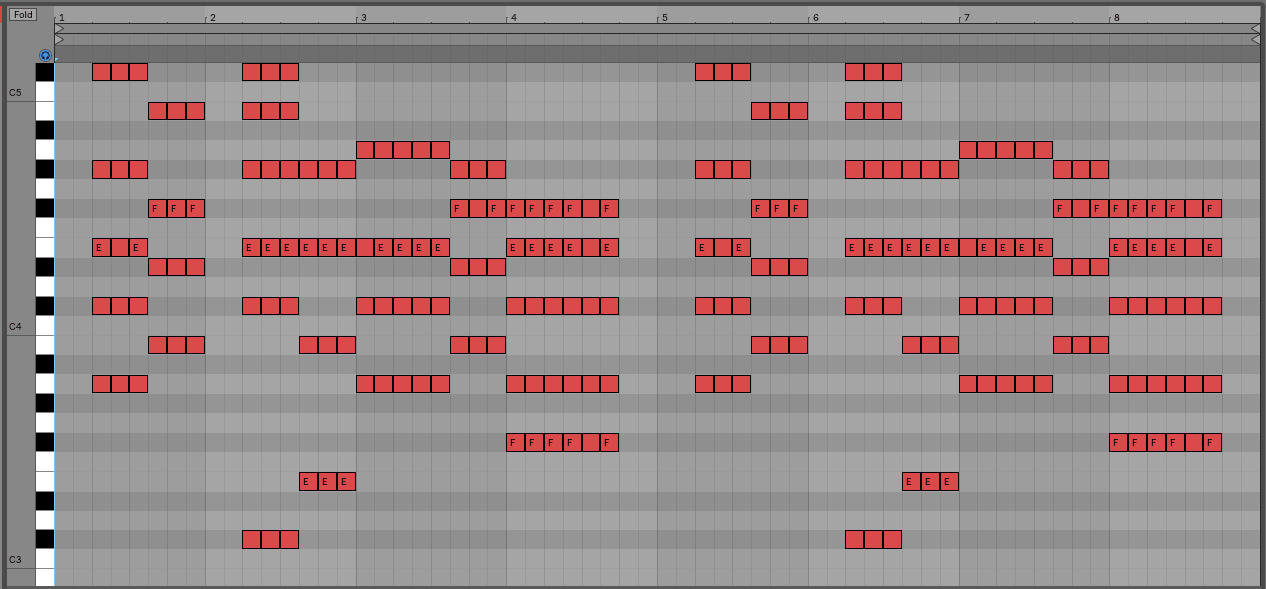
Below, I’ve mapped out the arrangement for this song. For each new chord progression, I created a new MIDI clip and gave it a new color.
Take a look, and notice if anything stands out.

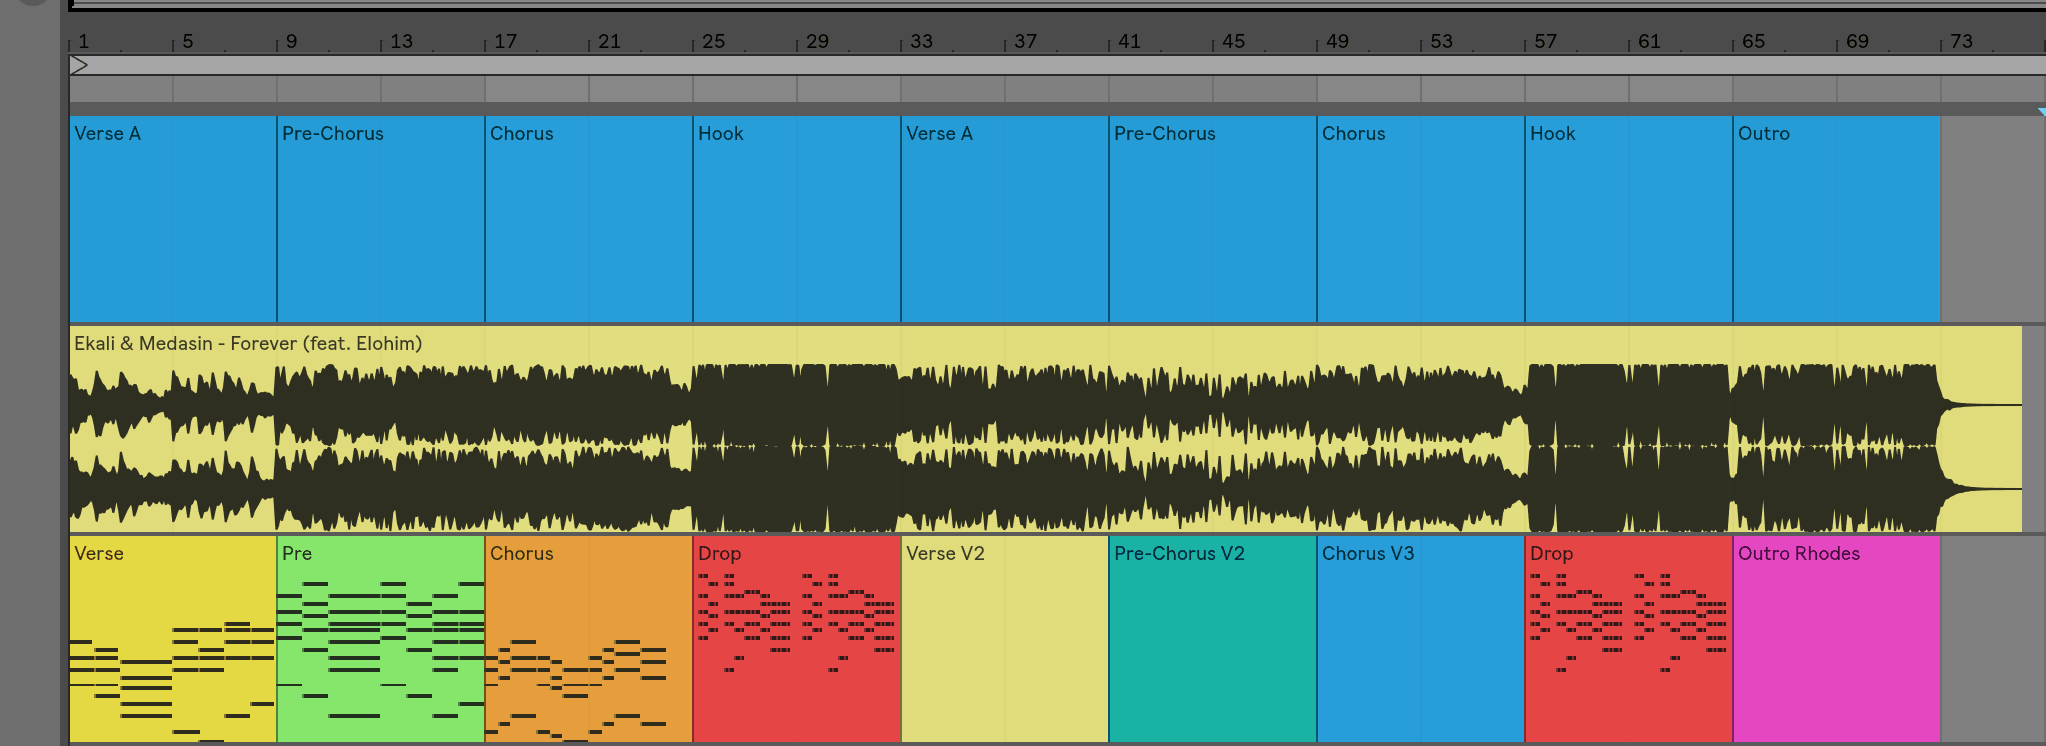
(I didn’t transcribe every single progression, as it wouldn’t add much to the value of this article. You can trust that those sections are different, or take a listen for yourselves).
Nearly every section uses a different chord progression, and only one chord progression is repeated in its entirety (the chorus).
Nothing feels out of place, nothing feels overwhelming. Each section flows logically into the next.
Odds are you have one of two questions in your head right now:
1) “Do I really need 9 chord progressions in a song?”
2) “I can barely write one chord progression, how do you expect me to write to write 9 in a song”?
Short answers: Probably not, and I promise it’s not as hard as you think.
Tackling this first question, 9 different progression is far more than you need for a great song.
The reason I’m telling you this is to show you what the some of the pro’s are doing to craft compelling and memorable tracks.
If you want to compete with the pros, it’s good to know what you’re up against.
If I could pull one lesson away from this, it wouldn’t be to put a ton of chord progressions in your tracks.
Rather, it would be to focus on creating movement and excitement throughout your entire song.
One of the biggest differences I hear between professional and amateur music is the latter’s doesn’t evolve nearly enough. It may be mixed well, and the sounds are cool, but it doesn’t develop and hold your attention.
It’s 2018, and songs are winning in the music industry.
Listen to any of our recent podcasts, and they’ll all tell you that songs are winning.
You’re not going to blow fans away with sound design anymore. That era is just about over.
If you want to craft a career as a producer, you need to start thinking like a songwriter. Songwriters use every trick they can to keep the listener wanting more.
Voicing
Last year, I decided to invest thousands of dollars into lessons with a jazz piano teacher.
I was already quite comfortable with the piano, but knew there was heaps I could learn from a far more experienced player. More than anything, I was excited to learn about music from a unique perspective.
Not only did he help me become a better performer, he taught me (indirectly) practical tips I could use while writing music in a DAW.
Of all the things he taught me, one technique stood out more then the rest.
Voicing.
I learned dozens of techniques about chord progression, melodies, rhythm and more, but my main takeaway was chord voicing.
Producers don’t pay nearly enough attention to voicing.
Essentially, chord voicing is the way you arrange the notes in a chord.
In the example below, there are four different versions of an A minor triad. They’re the exact same chords, only voiced differently.
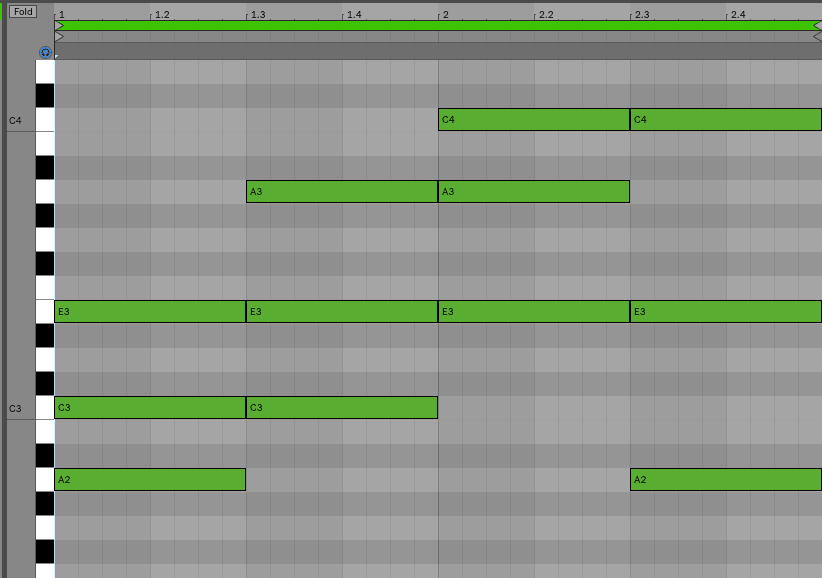

The way you voice the chords in a progression has a substantial effect on your song.
First and foremost, you can adjust the voicing of each chord to create smooth movement from chord to chord (this is called voice leading).
You can also use voicing as a tool for a cleaner mix, which I talk about in my Madeon Track Breakdown.
More than anything, voicing affects the tone of your chords (chords, those things a song is built on).
Thus, it would make sense to pay an enormous amount of attention to the voicing of your chords.
Ever since I focused more on my chord voicing, my songs have become much cleaner and much catchier. I’m not using more complicated chords, I’m just being more careful about the voicing of the ones I use.
That’s the reason I’m rambling on about voicing right now.
Using the music theory you know right now, you can easily start writing better chord progressions if you pay more attention to chord voicing.
A lot of the chord voicing tutorials on YouTube have clickbait-y titles like “How to sound like a piano pro in 10 minutes”. Although these titles make me cringe, there’s not necessarily wrong.
I promise if you invest more time into adjusting the voicing of your chords, your songs will sound cleaner, catchier, and fuller.
—
Cool, but how does voicing relate to this track?
Earlier, I mentioned how the voicing of the first half of the intro progression is different from that of the second half. You can check it out below.
The same thing happens in the verse:


And in the drop:

And in the second verse.
And in the outro.
You get the point.
Throughout this song, Ekali and Medasin played with chord voicing to change the character and development of their progressions.
As should you.
Chord voicing is a powerful tool to create smoother, catchier, cleaner, and fuller chord progressions.
SeamlessR has a great theory-light video explaining chord voicing in the DAW.
If you want to learn a bit more theory about chord voicing, you can check out the video below. The theory isn’t too complex and it’s very helpful.
Want free access to the Track Breakdown MIDI Vault? You can download the MIDI from all of our Track Breakdowns, as well as 25 hi-quality MIDI chord progressions you can use in your own productions.
Conclusion
I hope you were able to take away some useful tips and techniques from this article.
I tried to pull out as much valuable information as I could from this song, helping you to better understand what makes a great song, great.
Lastly, if there are any songs you’d like covered, please let me know!
Want to read more breakdowns? Click here to visit the Track Breakdown Glossary.
