


This is a guest post from Nicholas Di Lorenzo of Panorama Mastering and Cassandra Zko of ZKO Music.
From Sam: Some time ago, I asked the EDMProd Artist Community if they thought that too many producers focus on the technical aspects of a track (mixing, mastering, sonics, etc.) over composition and songwriting.
One answer that stood out in particular was from my good friend Nicholas Di Lorenzo, mixing and mastering engineer. He said that most people leave holes in their production workflow, and that producers should view the production process as a “pyramid” of sorts, starting with composition and ending with mastering.
A short while later, he came to me asking if he could write an article on it with Cassandra Zko, a well-studied music theorist, musician, and teacher. The three of us talked over coffee one evening and laid out a roadmap for the article you’re reading now.
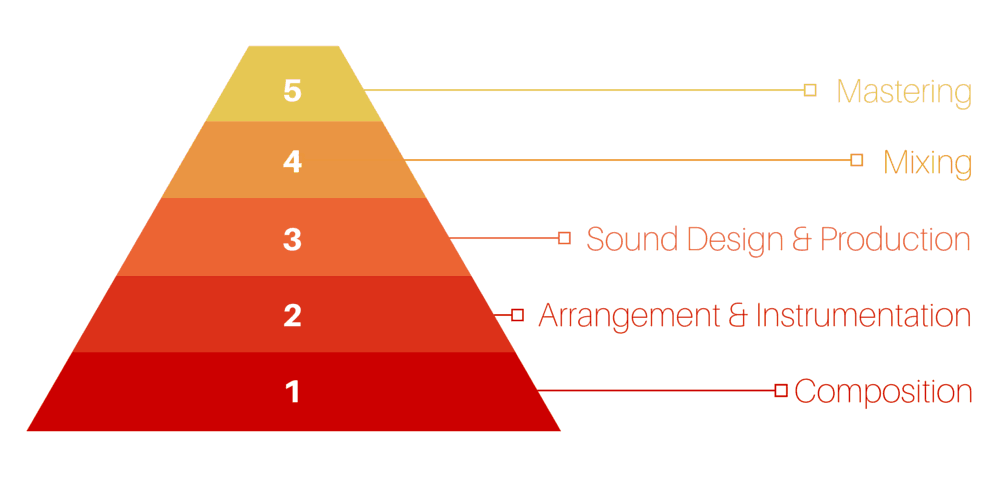
This post is comprehensive, as would be expected with such a topic. It covers the 5 stages in the production pyramid – composition, arrangement/instrumentation, production/sound design, mixing, and mastering – in great detail. It’s something you’ll likely refer back to time and time again when you’re struggling with a creative roadblock or workflow problem.
It’s also for everyone. If you get frustrated with production and find yourself stuck at certain stages, then you’ll get a lot of value from this post, but even if you already have a robust workflow and rarely encounter problems, you’ll most likely pick up a trick or two as well.
If you want to quickly skip between different parts of the production pyramid, you can do so by clicking these links:
- Part 1: Composition
- Part 2: Arrangement & Instrumentation
- Part 3: Sound Design & Production
- Part 4: Mixing
- Part 5: Mastering
What is the Production Pyramid?
The Production Pyramid breaks down the process of producing a track in a clear, easy-to-follow framework that consists of five steps.
Just as a building a house requires a solid foundation before the frame is added, a track needs to start with foundational elements. If making a dance track, it’s unwise to spend time thinking about the mixdown before a foundational groove is laid down. Likewise, if a melodic track is being made, focusing on sound design and complex production tasks is nothing more than a form of procrastination.
The 5 steps, as shown below, are not mutually exclusive. The point of this article is not that you must focus on composition first and ignore sound design while doing it, or that you must do all your EQ and compression – mixing – only after the first three steps, but rather that to focus as best you can on each step leads to a better end product, with less trouble along the way.
Despite what we’re often led to believe, multitasking isn’t beneficial for anyone, especially the electronic music producer. Jumping between creative tasks and logical tasks means that our brain is continually having to stop, switch and regain momentum, only to have to suddenly reconfigure and restart the process again.
Furthermore, viewing the production workflow through this 5-step framework works incredibly well with a task-based or task-managed workflow. That is, viewing the song creation process as a set of tasks rather than one large task. For example, one could split up the 5 parts of the framework into smaller subtasks…
- Composition
- Write basic chord progression
- Write melody
- Write counter melody
- Create underlying rhythm for track
- Write bridge chord progression
- Arrangement & Instrumentation
- Choose drum sounds
- Arrange intro
- Arrange chorus
- Finish basic arrangement
…and so forth.
If you want to learn more about task-based music production, I suggest reading this article.

What is composition and what is its importance?
Put simply, composition is the process of generating musical ideas. The composition process is often a fluid process; one where ideas are generated, then manipulated, variated, expanded upon or even simplified. The choices made in this stage often set the track on a particular path in terms of genre, vibe and style.
The key to a successful track is strong melodic, harmonic and rhythmic ideas. These ideas will sit best in the track if they’re established during the beginning of the production process. Why? Because once the main ideas are solidified and the track starts to take shape around them, it becomes very difficult to remove or change them without impacting heavily on other elements. The best technical production skills mean nothing without the presence of solid musical ideas.
What are the goals of the composition stage?
- To decide on a key, tempo, time-signature, chord progression, strong motif, melody, countermelodies, harmonic layers and any other accompanying lines that complement and support one another
- To develop ideas for the introduction, verse, bridge, chorus, breakdown and outro
- Select a basic set of patches and instruments to be used as placeholders before the sound design stage (where they will then be crafted further)
- Write ideas with a ‘forward-thinking’ focus (being creative whilst making strategic choices to reduce problems in the later stages)
- Focus on developing strong, straightforward lines (as opposed to many weaker lines which are difficult to arrange and mix later on)
- Create a bank of various motifs, lines and melodies that can be easily accessed if needed
Elements of composition
A piece of music must contain all three elements of music – melody, harmony and rhythm.
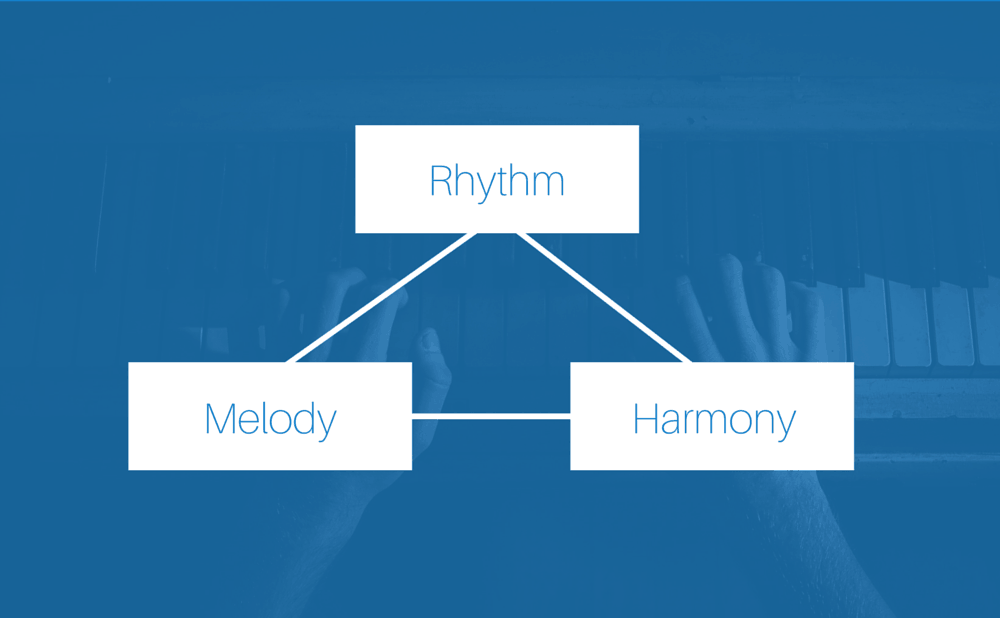
A dance track cannot exist without a pulse for the audience to dance to and listeners will be unable to sing along to lyrics if there is no melody in place. Each genre of music uses each element in varying amounts.
Melody
A melody is a succession of notes played one after the other that together form a phrase or idea. Catchy melodies are often the part of the track that the audience will remember.
Whilst there are twelve notes in an octave, a melody generally doesn’t use all twelve notes. It instead uses the notes from the scale it is in. If the key of the track is A minor, the melody will use notes from the A minor scale. Notes can be added from outside of the scale but they may introduce dissonance.
Harmony and chord progressions
Harmony complements the melody, providing support while adding texture and mood.
A chord progression is a series of chords. A progression often repeats over and over throughout the track and commonly consists of four chords (but not always). Chord progressions are important as the bass usually plays the first note of each chord. For example, an A minor – D minor – C major – F major chord progression will typically have the bassline playing the notes A – D – C – F as single notes.
Keep in mind that a chord progression in a minor key will usually include a mix of both major and minor chords. Minor chord progressions often use a combination of minor and major chords and vice versa.
Rhythm
Rhythm is a pattern of stressed and unstressed sounds over a period of time which are organised into bars. Most electronic dance music uses a 4/4 simple metre, that is 4 beats per bar. Syncopation is created when emphasis is put on the weaker beats, also known as offbeats, of the bar (typically beats 2 and 4 of the bar).
Breaking the mould and using other time signatures for dance music is unusual and may not be popular with DJs who will find it difficult to mix the track into their sets. Adding interesting rhythmic patterns or polyrhythms and cross-rhythms instead over the top of a 4/4 kick will create a point of difference while adding interest and groove.
Other elements & considerations
Key
A key gives a composition a sense of home, resolution and rest. A key may be major or minor, though most dance music is composed a minor key as it is regarded as darker and more emotive than the major key.
A key gives the listener context and acts as an anchor. If the track is written in A minor, the A minor chord gives a sense of home. If theory isn’t your forte, writing in A natural minor is the preferred key to write in as it consists of only white keys.
Tempo
Tempo is the speed of a piece of music and is indicated in Beats Per Minute (BPM). A track written at 128BPM means that 128 beats occur in the duration of one minute. BPM is often used to distinguish genres from one another – electro house is centered around 128BPM while trance often falls anywhere between 128 – 145 BPM. When starting a new track, tempo plays an important factor in determining which genre the track will fall into. Respecting the BPM range of the genre makes it more DJ friendly – tracks of similar BPMs will make beatmatching easier.
Motifs
A motif is a small fragment that is placed in a track at various points and is the thing that is stuck in the listener’s head afterwards. It doesn’t have to be complicated – just a few notes or a rhythmic fragment will do the trick.
Structure
Most dance music follows simple structure that’s predictable enough for the audience to gauge what’s coming next. Well thought-out structure takes the audience on a journey consisting of anticipation, tension and emotional release and also lets us know how far through the track we are. Structure and arrangement will be discussed further in the next stage of the Pyramid.
It is important in this stage that ideas are written for every section of the track. Avoiding writing the main lead idea and trying to come up with it later on makes things unnecessarily difficult.
Starting the composition process

Producers often become overwhelmed by the blank DAW screen, and the uncertainty of “beginning.” Keeping the three elements of music in mind (rhythm, melody and harmony) and ensuring that each of these elements are present when generating ideas will help. Having an existing track for inspiration and an idea of which genre to write will also help.
Restriction enhances creativity. Many producers have a wealth of instruments, plugins, and samples available to experiment with which can be suprisingly detrimental to creativity if the wrong mindset is assumed. One approach to composition is restrict everything to a single neutral instrument such as a piano, guitar, voice or synthesiser with an initialised patch and perhaps a simple 4/4 kick acting as a metronome. Using a neutral patch will ensure that the producer isn’t ‘pigeonholed’ into a particular genre or style.
A common way to start a composition is by writing a simple chord progression and then adding different melody lines on top of it. Alternatively a lyric, loop, or sample might trigger the creative flow. Writing a 4, 8, or 16 bar loop and then continually adding elements is another common approach.
Avoid focusing on sound design or spending time scrolling through patch banks. Starting the process by spending hours designing a ‘perfect’ patch can cull creativity. While sound design is indeed important in the production process, its inclusion at the beginning of the creative process can slow down things down and result in hours of unecessary work without a single note being written.
A patch can ‘pigeonhole’ a producer, forcing them to create a certain genre or style to suit the patch they’ve labored over. The key to the composition process is to write with an open mind in order to create an array of musical ideas that can then be variated, developed, or discarded at a later stage. Find ‘placeholder’ patches that sound similar to the sound you’re going for but don’t obsess over them.
Tips to ensure a successful composition session
- Brainstorm many ideas in one single sitting (writing many ideas, developing some and deleting others)
- PLAN: Start with mental themes or have an inspiration track. Having some direction before starting will help.
- Work as quickly as possible – perfectionism is time-consuming
- Keep the creative process as organic as possible (playing an instrument, tapping and clapping or using the human voice to create ideas)
- Use a neutral patch or piano to generate ideas
- Start with your ‘weakness’. If writing chord progressions come easy to you, start with rhythm instead.
- Learn basic music theory and the basics of playing an instrument
- Ensure that the track is working musically before worrying about sound design and production
- The composition process should be fluid – find an idea, play around with it and then choose to delete it, put it aside or develop it
- Pay attention to all three elements of music – rhythm, melody and harmony
- KISS (Keep It Super Simple) – keep in mind that the majority of your audience will have very little or no formal music training. Elements should be uncomplicated and straightforward.
The Composition stage is quite heavily tied into the Arrangement stage and one can view them almost as sitting side by side on the Production Pyramid as opposed to Composition first and Arrangement section.

What is Arrangement and what is its importance?
Arrangement is more than just assembling a verse, bridge and chorus in the right order. The aim of arrangement is to assemble musical ideas in a way that is digestible, easy to follow and flows from one section to the next resulting in a strong sense of beginning, development and completion. It also includes adding and subtracting different instruments throughout the duration of the track in order to build or reduce tension.
The arrangement must appeal to both the audience and DJs, and can make or break a track. The introduction of a lead at the wrong point or a track that isn’t easy to mix in or out of can severely reduce its appeal and impact.
What is Instrumentation and what is its importance?
Instrumentation refers to choosing different instruments to represent the different elements in a track. If you’ve written a chord progression and melody on the piano for example, the next step is choosing the best instruments and patches to convert it from a piano solo to an electronic piece of music.
The producer must make appropriate choices in order to create a track that fills out the available width and depth, using elements that complement and support each other while also appealing to the audience and portraying the elements in the best possible light.
Why is Arrangement and Instrumentation important to the Production Pyramid?
The musical ideas generated in the previous Composition section are simply ideas. They’re not finished products, and they need to be put into some sort of order. Proper arrangement ensures that the musical ideas are placed in such a way that they properly fulfil their roles.
Many musicians consider composition and arrangement to go hand in hand with each other. When arranging a track, the producer may notice a section that sounds bare or like it is lacking in energy. Being able to quickly compose an element to fill this space and then continue with the arrangement is a vital skill. Here, arrangement becomes a compositional tool which highlights ‘holes’ in the overall composition.
What are the goals of the Arrangement and Instrumentation stage?
- To create a sense of flow/pull/momentum and tension/release
- A well-arranged track should grasp the listener’s attention, keep their attention and make their emotions mimic what is happening in the track (excitement, tension, anticipation, relief)
- Follow the typical structure of tracks (for example, including a one minute introduction for DJs to mix into)
- Layer instruments to complement, support and harmonise with each other (not clash or compete for space in the mix )
- Ensuring instruments are spread out across the sonic spectrum and balanced evenly
- Choices are made with the audience’s behaviour in mind (where will they dance, sing, take a rest etc)
- To choose ‘placeholder’ patches that will then be developed in the next stage
Things to consider during instrumentation
Instruments must have a particular space and purpose in the mix. While in-depth sound design and tweaking should be reserved for the next section, choosing placeholder patches now is important in order to arrange the track. When considering instruments, the following should be considered:
Timbre
Pronounced ‘tam-bar’ or ‘tim-bar.’ Timbre, also known as tone colour or sound quality, is the quality of a musical sound. Take a distorted guitar and a sine wave for example; when both are at exactly the same note and the same loudness, we are still able to distinguish between them. We could say that the guitar is colourful, noisy and contains a lot of upper harmonics, while the sine wave is smooth. This is because of their distinctive timbre. Using a range of instruments with varying timbre creates interest, contrast and colour.
The role of the instrument
Will this instrument play a leading part or sit in the background? Will it be forward or back in the mix?
A bright pad, for instance, will be difficult to push back into the mix. Choosing a duller pad would be a better choice. Yes, you can filter out the highs or add reverb in a later stage to push back the pad but starting with a patch that is ‘almost there’ will save time and allow you to get a better vision of the overall track early on.
Instrument quantity and balance
It is unrealistic, for example, to have more than one piano or two guitars playing in a live band, so always aim to keep the quantity and balance of instruments as realistic as possible. Working in a digital workspace means that we can add and duplicate instruments instantly which can quickly overload a track. Study the balance of instruments in an orchestra and try to replicate this balance in your track.
Feasibility and convenience
Having access to musical instruments and the recording facilities to record such instruments live is a dream for many producers with most instead having to rely on virtual synths, samplers and instruments. Remember, a drummer only has two hands so overly complex drums patterns will sound like a drum machine or sample. Avoid going overboard with layering and duplicating these virtual synths (unless you’re purposely trying to make your music sound unrealistic and complex).
The frequency range of each instrument
It is important to have an idea of where each instrument sits in the mix for two reasons:
- The instruments will sound realistic. Having a cello play two octaves above will sound unrealistic and obviously electronic. Keeping each instrument within its range will make the mix sound logical.
- The mix will be clearer. Having a sense of each instrument’s frequency range will help you make better choices. Knowing that XYZ frequency is already occupied by XYZ instrument will make you think twice about piling three more instruments in that space.
Less is best
Keep in mind the more instruments you add, the more competition for space there is in the mix. Choose one strong instrument instead of doubling up two weaker patches. This will also reduce the chance of phasing and make life easier in the following stages.
Things to consider during arrangement
Arrangement and structure takes time to master and is often a result of hours of listening to other tracks in the same genre. The structure should flow from one section to the next and take the audience on a seamless journey of beginning, middle and end.
Include variation
Music should evolve as it progresses. Slight melodic or rhythmic variation can pull a track along or give the listener something to latch onto. Adding a new element every 8 or 16 bars can keep the audience locked into the track.
Control tension and energy
Dance music relies on careful manipulation of tension and energy. If your build-up has more energy than your drop, then listeners (especially those on the dancefloor) will be disappointed. Likewise, if your build-up doesn’t create enough tension, your drop will be perceived as lacking impact.
What’s the focus?
It’s often said that the listener can only focus on three elements at a time. The arrangement and structure of your track should reflect this. If the vocal is the main focus of a certain section, then make sure that there aren’t too many other unnecessary instruments playing that detract from it.
Also, make sure that each section of the track is clearly defined. In the intro, the focus should be on the rhythm, holding back the main melodic and harmonic elements so that the DJ can mix cleanly into it. In the breakdown, the rhythm won’t be as obvious and the energy will be brought down.
“Personally when I try to arrange music I think of what feeling I want each section to have and how they will flow into each other to build up, breakdown, bridge, or introduce the chorus ect. A lot of trial and error.
Often listen to some of my favorite songs, rock, pop or classic disco to help to try figure out how they flow or what makes them work so well.
I try to work on composing, arrangement and then production and find I’m usually arranging several broken ideas into one.” – David Pugliesi, LA Rocksteady
What is sound design and what is its importance to the Production Pyramid?
We often think of the special effects in movies at the mention of sound design. But sound design is more than just tapping taut steel cables (as in Star Wars) or recording the sounds of water with underwater microphones (as in many other sci-fi films) – sound design also encompasses the creation, or tweaking, of unique patches on synthesisers or VSTS.
Excelling at sound design can help to set a producer apart, giving their instruments an edge that presets and sample packs may not be able to provide. Often using an unaltered preset usually isn’t enough, particularly for prominent instruments like the bass. To make the preset shine, a degree of tweaking and the addition of an EQ and compressor at the very least is required.
Great patches and samples will ensure that the carefully chosen and arranged ideas from the previous sections shine through in the mix and gel together.
Some producers start building patches from scratch (or the ‘init’ patch) while others use a preset and tweak them from there. Building new patches from scratch takes practice and requires at least a basic knowledge of how a synthesiser works (or the patience for trial and error). Without this, the producer may find themselves changing parameters at random on the synth but not getting the result they want. It’s like playing notes on an instrument at random having never taken a music lesson – there’s a good chance that you won’t hit what you want at first.
Sound design is an area that producers can quickly become bogged down in, continually tweaking a patch or spending days in abandoned train tunnels capturing echoes with a field recorder.
Many producers prefer to perform the majority of their sound design outside of song projects. The reason being that sound design is time-consuming, and is a much more enjoyable and creative process when done outside the limitations of an already arranged track.
“The way I got my head around sound design was just spending a lot of time mimicking synths from producers like Deadmau5, Wolfgang Gartner, Eekkoo etc. I see all too often more novice producers saying “bro never copy someone’s track because you’ll never get creative!” and I couldn’t disagree more. Mimicking is a brilliant way to learn, sure don’t release something if you’ve ripped a huge part of a track but if you can eventually get to the point where you hear a track and can already build that sound in your head just from listening that power opens up a HUGE amount of creative possibilities.” – Lachlan Scott McDiarmid, Faure
What is production and what is its importance to the Production Pyramid?
The production stage is the final stage before focusing on the sonic credibility of your track. It may consist of a number of things, such as:
- Filling in the arrangement with sound FX and tension-builders
- Tweaking and cleaning up transitions
- Creatively using audio effects like EQ, delay, reverb, compression, and distortion
- Making key decisions and preparing for the mixing stage, i.e., deleting unnecessary tracks, making final arrangement tweaks
Tips for excelling at sound design and production
- Practice daily. Practicing for a small amount on a daily basis is going to help you improve far quicker than having one big session a couple of times a month.
- Don’t be afraid to start with a preset. As mentioned in the previous stages, start with a patch that sounds close to the sound you would like. Tweak and enhance it to suit your track.
- Don’t get bogged down. Work quickly. Get it as close as you can and move on. Spending hours tweaking your bass may cause frustration which then leads to boredom and procrastination.
- Watch tutorials and learn from others. There are millions of Youtube tutorials that take you step-by-step through the process of making a particular patch. A simple search like “Trance Bass Sylenth” should bring up more than enough results to help you out. Also, watch “In The Studio” videos to observe how other producers work.
- Repeat, repeat, repeat. Ever wonder how those producers can make that bass patch in just a few minutes? Usually it’s because they’ve repeated the process over and over until it’s become second nature. To get the most out of a tutorial video, initialise the patch after the video has finished and then try to repeat the steps. Repeat the process ten times. You’ll find that the sound you couldn’t make an hour ago is now a familiar process.
- Set time aside to experiment. You need to practice to get better. The same goes with sound design. Set time aside to concentrate just on experimenting with synths and plugins. The trick here is to do this when you have a spare half-an-hour, not during the actual production of a track (as you can go down the rabbit hole and not come back up for hours).
- Set a time limit. Again, don’t get lost in sound design. Set yourself an hour to experiment and save whatever patches or plugin chains you come up with during that time.
- Start with clean sounds for a clean mix. Don’t muddy up your mix with many sounds that have a lot of reverb, distortion, delay and multiple oscillators and voices. Remember that effects are cumulative – a small amount of an effect on one instrument won’t seem like a lot but is noticeable once you add everything together. Take the time to choose clean and strong sounds to carry your ideas across.
- Learn one synthesiser inside out. Choose one synthesiser and stick to it – it’s better to know one instrument inside out than to have a moderate knowledge of three. Avoid getting swept up into purchasing the newest synths as they’re released (the same goes for plugins) – too many tools, samples or plugins can often be more of a hindrance than an advantage. Limitation can enhance creativity.
Beware of overproducing
It is possible to go overboard with sound design and production by adding too many plugins or simply allocating too much time to an instrument that doesn’t require it. Don’t spend four hours on an atmospheric pad that sits in the background whilst using an unaltered patch for a driving lead that dominates the foreground. In a perfect world we’d have infinite time to allocate to each area but unfortunately we aren’t in one, which is why it’s better to work quickly and move on.
Ensure that you maintain each instrument’s character, particularly ‘traditional’ instruments like a piano or violin. Unless you’re going for an over processed sound, tweak orchestral instruments only to enhance them and keep plugins to a minimum – there’s nothing worse than an ‘acoustic’ piano patch playing in a trance breakdown that sounds fake.
Be wary of the costs of changing instruments and patches at this later stage, as making a change – particularly to the elements that hold the track together like the kick or bass – could throw the whole track out. The trick is to choose placeholder patches in the Composition stage that are close to the sound you’re going for. Aim to make wise instrument choices in the previous stage to minimise work in this stage. It’s all about fine tuning, not heavy processing.
What is the role of each plugin you’ve added to chain? Is it enhancing the sound? Can you describe its exact purpose or is it just there to fill up space? We often add plugins out of habit or because we’ve seen a tutorial and XYZ producer swears by this or that plug in. Ask yourself these questions as you reach for another plugin. If you can’t answer the questions, don’t add it! Remember, less is best.

What is mixing and why is it important?
Mixing is the stepping stone that facilitates the presentation of music with the artistic intent of the composition, arrangement and production.
When discussing mix engineering, we must first understand that what we’re trying to do is engineer a musical production.
Now in understanding that, there are two elements we address in mixing that we must always be conscious of and how they affect the presentation of the music:
- Creative elements
- Technical elements
Producers often keep the two separate, which can be detrimental to their end product. The key to remember, is that when engineering, we are problem solvers. The problems are most often creative, the solution is most often technical, and the equation we implement to achieve our creative goals is unique to every single one of us.
Good productions provide space for the mixing engineer to interpret, engage with and develop the presentation of the creative with their technical expertise.
Now, one might ask, how does mixing tie itself into the production pyramid? It’s simple. Without the foundations of a good composition, arrangement and production, the mixdown process can only present to a listener what information it is fed. If fed a poor production, the engineer will spend countless hours chasing their tail, trying to remedy or make compromises in order to keep the presentation of the creative information sounding desirable.
A mixdown won’t compensate for poor voicing choices between pads, lackluster percussion tracks and melodies. These are all elements which need to be addressed with strong concern earlier on. With this in mind, a well thought-out composition, arrangement and production can make way for endless possibilities to be achieved through the mixing process.
What are the fundamental building blocks of a mix?
The fundamental building blocks of a mix can be described through the simple physical locations in the sound stage such as left to right (Width), foreground & background (depth), and high & low (height). These three elements house a large deal of importance when trying to make elements sit in their own space within a mix.
Width
The delivery device more often than not for music consumption – especially with electronic music – is a stereo playback system. We utilize the characteristics of this system to position a listener and embellish the motifs in a production/arrangement. Appropriate the stereo field with the intentions of your production, arrangement and composition with some of general notes below.
Characteristics of the stereo image:
- Low frequencies carry a lot of energy in a mix. By keeping them centered the balance/focus of your mix will be weighted evenly.
- Generally, in electronic music a lot of emphasis is placed on the weight, thud and umph of the kick and bass line. By having both the left and right speakers reproducing the SAME information in unison will help share the weight needed to reproduce that strong, chest punching bass.
- Higher frequencies travel with greater direction and less dispersion making it easy for a listener to localize where the sound source is located in the stereo field.
- This directly relates to creating a sense of SPACE. Utilize your pan pot for elements such as hi-hats, backup synths, layered top heavy synths, auxilliary percussion, backup vocals and toms. By doing so you can create and position your listener in an engaging environment which embellishes the motifs of the production and composition.
- The center of the soundstage in a mix has the most utilizable space for PROMINENCE and FORWARD CLARITY
- Elements like lead synths, melodic lines, and lead vocal tracks can be made to feel forward and present with little effort when placed in the centre.
- Transients punch through with greater strength and prominence when centred.
- In electronic music the “Feel” and “Umph” of a driving rhythm is a key ingredient to a great song. By utilizing the centre soundstage for kicks and snares or rhythmic synth elements you can embellish the feel of a production’s rhythm to great effect.
Depth
The dimension of depth in a mix is one that directly frames what is and isn’t in focus to the listener. With a dynamic range of 96db in a 16-bit session and 116db in a 24-bit session, the great amount of dynamic depth that can be achieved purely with faders is an asset that shouldn’t be ignored.
Good depth in a mix can provide a sense of impressionable dynamics, distance and intimacy. By being sympathetic to the production, arrangement and composition’s intentions you can begin to develop a sense of depth with the following key points in mind.
- DYNAMICS: A sense of tasteful dynamics is the anchor point that divides good mix downs from great mix downs. The ability to discern which elements are needed in a production to be up front and in the listener’s face in contrast to elements which play a secondary role supporting the production in the background is a skill that is often overlooked.
- FADERS FIRST: get your levels sorted before flicking the switch on any of your EQs or Compressors.
- Listen intently to how the production is presenting the information to you has a listener.
- Want something sitting in the front? Ride the fader up. Hearing too much of something else? Bring it down.
- If elements appear to be whaling in and out of focus due to dynamic variance (Vocals and bass lines typically), employ the use of a compressor to help hold their dynamic range in check and remain seated where required in the mix.
- DISTANCE + INTIMACY: Creating an impression of space, distance and intimacy is the next stepping to stone to build on and further embellish the intentions of the dynamics in a production and mix. By using processing such as reverb and delay, you can generate a sense of environment in which you position the listener in.
- When adding some early reflections or mixing in a prominent wet reverberation effect it can help signal to the listener how close or far away a particular sound is.
- Utilizing longer reverbs and delays help keep background elements feeling distant in relationship to lead synths which you may leave dry and upfront in volume to help create focus within the mix.
- The overuse of reverberation and delays can leave a mix feely muddled, use sparingly with taste and with intent.
Height
The height of the mix is all about the tonal balance and harmony of the overall track. The way the height of a mix frames the production is important. Think of height from the bottom up, lowest frequency to the highest, respectively.
If it’s a bass driven production and the overall timbre of the mix is very bright and boxed up, it will detract from the key compositional and production features and lose the bottom-end drive that’s needed to present the mix most appropriately.
The most appropriate tool to pinch frequencies of elements in and out to adjust the height of them in a mix is an EQ. An equalizer is a tool that requires a whole article of its own to explain all its assets and applications throughout audio engineering. The one key thing to understand is that when using an equalizer there is always a relative “ying-yang” effect taking place. When attenuating low frequencies you are respectively boosting the high frequencies and when boosting low frequencies you’re attenuating the highs. By understanding the cause and effect of each of your moves with an equalizer and adapting the mentality to create a track with well balanced height, you can create a very full and impactful presentation of your production.

What is mastering?
“Mastering is the last creative step in the audio production process, the bridge between mixing and replication (or distribution)… …Regardless of the form in which product is sold, our job as mastering engineers remains: we help music to be presented in the best possible way” – Bob Katz, Mastering Audio – the art and the science 3rd ed. pg1.
Mastering is a process that has evolved significantly over the past 50 years as playback mediums have fallen in and out of favour, most notably between the shift from analogue to the digital technologies of recorded music.
The primary goal when mastering is to turn a fully arranged mix/set of mixes into a presentable musical product ready for distribution; that when broadcasted, downloaded, streamed on a hi-fi system, headphones, car system or on any playback system presents the listener with the most accurate intentions of the music from the first second to the last. In saying this, when mastering, we are not necessarily looking at each individual element in the mix, but rather looking at the whole song, EP, or album as a full start-to-end experience for the listener.
Before any mastering processes, session bookings, or ozone presets take place, it is always important to prepare your session. Set a brief and goals for what you are trying to achieve through the mastering process. Establish, with yourself or your mastering engineer, what your mix is trying to achieve and how you want it to connect with your listener, where it’s come from, and where it’s intending to go.
This preparation helps develop an understanding and appreciation for the work that has already been put into the mix, and also allows an empathetic approach to the finer details throughout the mastering process.
How does mastering fit into the production pyramid?
Your artwork is the composition and arrangement, your colors are the production, and the application of your colors is done through mixing. It’s the mastering stage that sizes it up, frames it and presents it to the public.
The framing of the mix is achieved through a process of; Quality control, ensures the mix has no artifacts or audible elements that will detract or impose themselves negatively during the mastering session. Surgical processing, addressing elements of the mix which may have been unheard/attended to during the mixing stage and push the listener away from the content of the mix. Creative processing, working with the tonal and dynamic qualities of the mix to present them in their best light to the listener. Last but not least – sequencing and rendering, the process of timing lead-in into the track, and the fade-out/gap at the end of one track to the next, as well as rendering the files for the medium they’re to be released on.
Quality control, surgical/creative processing as well as sequencing and rendering are all aspects that are addressed during mastering. However it does not accommodate for shortfalls in the mixing process without some level of compromise.
To learn more about the mastering process and how it relates to the Production Pyramid, read this article.
Conclusion
There you have it – a 5-step framework for taking a track from conceptual idea to finished product. Reading an article like this means nothing if you don’t apply the teachings, so, at the very least, try and experiment with this workflow and see how it goes.
Also, be sure to tweak the Production Pyramid to your liking. Music production is such a subjective art form, and we’re not claiming that you must absolutely work this way if you want to make good music, but it will most likely help.
Have any questions? Leave a comment below.
